
Indie game storeFree gamesFun gamesHorror games
Game developmentAssetsComics
SalesBundles
Jobs
TagsGame Engines

General Decker Question and Answer Thread Sticky

A topic by ahmwma created Aug 06, 2025 Views: 5,368 Replies: 196
Viewing posts 1 to 50
(+4)

Some users have mentioned having a question or two that were small enough that they didn't feel like they wanted to make a new thread.

So here's a place to ask and answer general questions about Decker.

No question too small or silly! It's always good to ask if you're feeling confused about something

-----

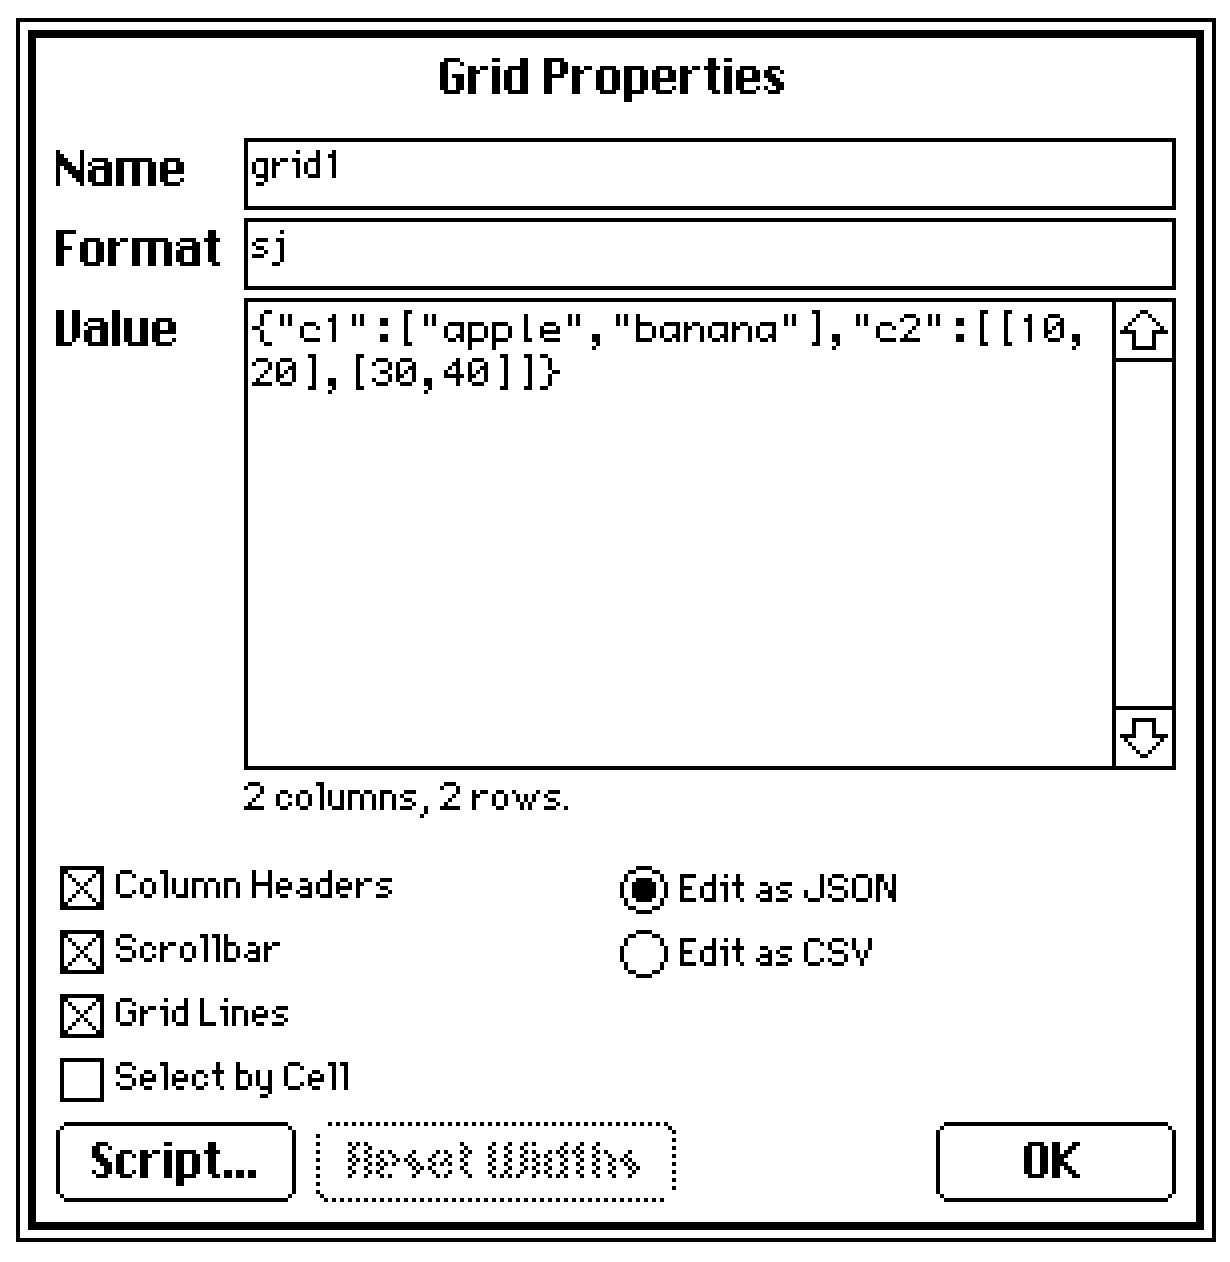
If your question is about Lil (the scripting language) specifically you could check out the Lil Programming Questions thread instead.

Hey! I'm  trying to build decker on linux and I'm getting an error. Mind you that I have close to 0 coding knowledge and its a miracle I'm able to even use linux so the problem  might be obvious.


$ make

In file included from ./c/decker.c:3:

./c/dom.h: In function ‘deck_write’:

./c/dom.h:2882:37: error: ‘js_decker_html’ undeclared (first use in this function)

 2882 |                 str_addz(&r,lmiutf8(js_decker_html,js_decker_html_len));

      |                                     ^~~~~~~~~~~~~~

./c/dom.h:2882:37: note: each undeclared identifier is reported only once for each function it appears in

./c/dom.h:2882:52: error: ‘js_decker_html_len’ undeclared (first use in this function)

 2882 |                 str_addz(&r,lmiutf8(js_decker_html,js_decker_html_len));

      |                                                    ^~~~~~~~~~~~~~~~~~

./c/dom.h:2891:37: error: ‘js_lil_js’ undeclared (first use in this function)

 2891 |                 str_addz(&r,lmiutf8(js_lil_js,js_lil_js_len));

      |                                     ^~~~~~~~~

./c/dom.h:2891:47: error: ‘js_lil_js_len’ undeclared (first use in this function)

 2891 |                 str_addz(&r,lmiutf8(js_lil_js,js_lil_js_len));

      |                                               ^~~~~~~~~~~~~

./c/dom.h:2892:37: error: ‘js_danger_js’ undeclared (first use in this function)

 2892 |                 str_addz(&r,lmiutf8(js_danger_js,js_danger_js_len));

      |                                     ^~~~~~~~~~~~

./c/dom.h:2892:50: error: ‘js_danger_js_len’ undeclared (first use in this function)

 2892 |                 str_addz(&r,lmiutf8(js_danger_js,js_danger_js_len));

      |                                                  ^~~~~~~~~~~~~~~~

./c/dom.h:2893:37: error: ‘js_decker_js’ undeclared (first use in this function)

 2893 |                 str_addz(&r,lmiutf8(js_decker_js,js_decker_js_len));

      |                                     ^~~~~~~~~~~~

./c/dom.h:2893:50: error: ‘js_decker_js_len’ undeclared (first use in this function)

 2893 |                 str_addz(&r,lmiutf8(js_decker_js,js_decker_js_len));

      |                                                  ^~~~~~~~~~~~~~~~

In file included from ./c/decker.c:9:

./c/io_sdl2.h: In function ‘base_path’:

./c/io_sdl2.h:75:87: warning: zero-length gnu_printf format string [-Wformat-zero-length]

   75 |         if(t){snprintf(path,PATH_MAX,"%s",t);SDL_free(t);}else{snprintf(path,PATH_MAX,"");}

      |                                                                                       ^~

./c/decker.c: In function ‘main’:

./c/decker.c:4314:57: error: ‘examples_decks_tour_deck’ undeclared (first use in this function)

 4314 |         if(!deck){str doc=str_new();str_add(&doc,(char*)examples_decks_tour_deck,examples_decks_tour_deck_len);load_deck(deck_get(lmstr(doc)));}

      |                                                         ^~~~~~~~~~~~~~~~~~~~~~~~

./c/decker.c:4314:82: error: ‘examples_decks_tour_deck_len’ undeclared (first use in this function)

 4314 |        if(!deck){str doc=str_new();str_add(&doc,(char*)examples_decks_tour_deck,examples_decks_tour_deck_len);load_deck(deck_get(lmstr(doc)));}

      |                                                                                 ^~~~~~~~~~~~~~~~~~~~~~~~~~~~

make: *** [Makefile:66: c/build/decker] Error 1

(+1)

The js_decker_html variable should be defined in c/resources.h which should be automatically built when it needs to be.

If you rm c/resources.h and then make V=1 c/resources.h do you get any error message?

(1 edit) (+2)

Doing that solved the issue! Thanks!:-) You're getting a special thanks in my first decker project lol

I'm slightly surprised/confused by the behavior of the new pattern/color support in text fields.

It seems as if the pattern doesn't persist past whatever text you initially marked with that pattern. If I write out some text and make it green, if I continue to then write further text past that, it will revert back to the default black, and my new added text will be black. I also can't set the whole field to a specific pattern, so as to change that black default, at least not from what I can see from the GUI.

This is in contrast to the behavior when changing fonts, where the behavior is such that any text I write past the point where I changed the font will continue to be in that font. This does have some wrinkles that aren't always intuitive when mixing fonts, but it does mean I continue to write into a text field in that font as expected without any special interaction, and I can save myself even those headaches by just setting the font property of the field itself, thus insuring that it defaults back to that font.

I bring all this up because it sort of negatively effects my workflow to how I've been working with text fields for the current project. When I'm writing a long card of text, usually my method is just to make one large field on the card, set the default font of that, and then I take advantage of interact mode's ability to just write directly into the field. Makes it easier to write long texts rather than doing it in the field properties. 

But this kinda doesn't work with the color support, because I can't set the field to be all one color and just write away. Plus, on my current project, the text is over a mostly black background, so it's unreadable until I change the color. It's a minor detail, and I can work around it, it's just unexpected I guess.

(+3)

So this might help a bit, but basically there's two ways of setting the colour/pattern of text in a field. It sounds like what you're doing is using the "select a bunch of text and change it with the text menu" option, which yeah does seem to not affect newly added text. But you can also select the field in widget mode, go into the properties (double-click or widget -> properties) and then there's a "pattern" button. If you set the pattern or colour there, that becomes the default for that field, so when you're writing into it in interact mode it'll come up as the colour you want. Hopefully this helps / makes sense.

(+1)

oh! all those words and yet so there is a button for that. that should make this much easier but also begs the question how I missed it. 😜

I have some cards with a bunch of fields in them, and I want them to line up nicely, so I used the “snap to grid” function. Eventually I decided that the default 16x16px grid was a bit too chunky, and dropped down to an 8x8px grid so I could have spaces smaller than a field, as well as larger.

But now when I need to adjust a field, I have to go in and change the grid spacing back to 8x8px every time - it defaults to 16x16px every time I start Decker.

Is there a way to have the default grid size stored in the deck?

Developer(+2)

Currently grid settings aren't persisted anywhere, but I'll give it some thought; possibly it could be stored in deck files, or perhaps it might make sense to expose scripted control via the app interface.

How do I insert/drag and drop an image and have it be full width? I just starting using Decker and regardless of image size my images are being resized, even 512 × 342 GIFs are resized when dragged+dropped. What am I missing? Thanks!

Developer(+2)

With the selection still active, you can choose "Edit -> Resize to Original" or "Edit -> Resize to Card" from the menu to preserve the original dimensions of the image or snap it to the dimensions of the card, respectively.

(+1)

Amazing! Thank you and great project really. I am a Haskell and Lua novice and am enjoying Lil

Deleted post
(+3)

Hi! I'll do my best to answer your questions, but please let me know if anything doesn't make sense to you, and I will try to explain more clearly.

1:

When you're doing the style settings in Dialogizer, there's two key attributes to get it to animate with sound. The first is "tsound" which specifies a sound to play for each word, and the second is "speed" which specifies how fast or slow the text will appear.

For example, if you have a script in a field and a sound:

o:()
o.tsound:"sound1"
o.speed:3
dd.open[deck o]
dd.say[field1.value]
dd.close[]


2:

When you play a sound using the "play" command you can specify that you want it to loop. When you do this then it will loop continuously including over other cards, until a command is used to stop it.

To start a sound:

play["sound1" "loop"]

and to stop it:

play[0 "loop"]

3:

One way to make it easier to keep animation frames consistent and lined up is to use the grid functionality. When you're in drawing mode, in the View menu there is an option to "Show Grid Overlay" which will add a grid to the screen that you can use to line everything up. And if you click "Grid and Scale..." then you can change the size of the grid if you need to.

4:

Yes! As part of the setup for Puppeteer, you will have added an "on animate do" function - this is what Dialogizer uses to work at the same time as Puppeteer and other scripts. So if you add the zazz commands here then they will run as well.

For example, in a current project I have this in a card-level script to make the zazz animations work.

on view do
 zazzanimations[]
 go[card]
end
on zazzanimations do
 zazz.flipbook[coffee coffeeframes 0.0015]
end
on animate do
 zazzanimations[]
 pt.animate[deck]
end

I've put the zazz command in its own function so that I only have to change it in one place.


5:

So basically you will need to create a separate card with checkboxes on it, to store the values. E.g. make a card called "flags". Then you add a checkbox on this card named "gotkey"

You can in your code refer to the value of this card like so:

#to get the value
flags.widgets.gotkey.value
#or to set the value
flags.widgets.gotkey.value:1

You can reset it by having some code that runs at the start to reset the value to 0, or if you set the checkbox as "volatile" then it will automatically reset when the deck opens.


I hope this all makes sense. If you have more questions I'm sure people here would be happy to help out.

And I think it is absolutely OK to share projects that aren't in English. I know there have been a few Decker projects that are in languages other than English. People may not be able to understand it but you shouldn't let that stop you!

Deleted post

Hey! I've got 2 questions right now. One's more general, and one's a problem I've got with my code right now lol.

1. I wanted to make a canvas that does something on both the up and down click of a mouse  (Similar to how a button widget changes color when its clicked down on, but doesn't count as "clicked" until the mouse button unclicked over it.) and was wondering if there was any code to do something like that. Preferably, I want it so that the canvas counts as "Unclicked" when the mouse is also taken off of the canvas while clicked.

2.For some reason, the If Statement I'm using here isn't activating when I want it to, and I can't figure out why. My guesses is that either it's having trouble because it's reading from a text field, or because mult.text  routinely has 2 decimal points (Numbers like 1.35 and that kinda stuff) so the score.text also has 2 decimal points and that is messing it up somehow.  Either way, I kinda have no idea what I'm doing admittedly.

(Also, if someone has a better way to store number variables so they automatically round up/down from a decimal point, tell me and my life is yours.)

(1 edit) (+5)

For your first question, a canvas gets the click event on mouse-down, and the release event on mouse-up, so you can make the canvas change colour while the button is held down:

on click pos do
 me.pattern:colors.red
 me.rect[0,0 me.lsize]
end

on release pos do
 me.pattern:colors.white
 me.rect[0,0 me.lsize]
end

(obviously you can do fancier painting than that if you want)

The release event also gives you the position of the pointer at the time the button was released, relative to the top-left corner of the canvas. If the position is below and to the right of the top-left corner, and above and to the left of the bottom-right corner, then it’s within the canvas, and you can do whatever the canvas-button is supposed to do:

if min (pos>0,0),(pos<me.lsize)
 alert["whatever I'm supposed to do"]
end

For your second question, I can’t easily spot an error (though I’m pretty sure you don’t need set); in this situation I’d wrap show[] around different parts of the code to double-check that the values being calculated were the ones I expected. show[] takes a sequence of expressions, logs them to the Listener, and returns the first one, so you can wrap it around expressions without changing how your code runs. So, this code will run exactly the same as the example above:

if min show[(pos>0,0) "<-- to the bottom right"],show[(pos<me.lsize) "<-- to the top left"]
 alert["whatever I'm supposed to do"]
end

…but produces this output in the Listener:

(1,1) "<-- to the bottom right"
(0,1) "<-- to the top left"

For your third question, the floor operator drops the fractional part of a number:

 floor 1.0,1.4,1.5,1.6,2.0
(1,1,1,1,2)

If you want round-to-nearest rather than always-round-down, you can add 0.5 before hand:

 floor 0.5+(1.0,1.4,1.5,1.6,2.0)
(1,1,2,2,2)
(+1)

Alrighty, I'm back! I've started putting all of your of the advice you've given to work, but I still haven't been able to get the If Statement to work. 

I used the show code to make sure that that score.text is receiving numbers properly, and I also used the floor function to make sure that there were no decimal points in the score, but that didn't seem to work either. I also tried switching the field to both Plain Text and Code, but that didn't seem to fix anything either.

One thing I have come to realize is that when i make it so that the score.text is supposed to be Less Than the given number, it will always activate regardless of the number larger or smaller. And it seems to work the opposite with Greater Than, with it never activating instead. (I also tried to set the number it's compared to to a negative one,  and the results were the same) If anyone has any ideas as to what is going on, please tell me cuz I'm getting a little desperate.

Anyways, thank you Screwtapello for the help. Even if I can't get that one system working, seeing my scores finally not have a bunch of little decimal numbers hanging off of the end has eased a sense of peace upon my soul, one which I cannot describe accurately with words alone. Your help is appreciated.

Developer(+2)

The .text attribute of a field is a string. Comparing numbers to strings in Lil can have surprising results, because in this case Lil makes the comparison lexicographically:

3>"12"  # 1
3>12    # 0

To avoid this problem, you can use an arithmetic identity operation to coerce the string into a number before performing a comparison:

  myField.text  # "12"
0+myField.text  # 12

Alternatively, use the .data attribute of the field instead: this will ask Decker to interpret the contents of the field as LOVE (a superset of JSON):

myField.text     # "12"
myField.data     # 12
otherField.text  # "[11,22,33]"
otherField.data  # (11,22,33)

Yet another option would be to store numbers in Slider Widgets instead of fields; a slider's .value attribute is always a number. Does that help?

(+1)

I'll have to do some more research on what all this means, but I have gotten it working now. Thank you!I Like Your Funny Words, Magic Man - Meming Wiki

I HAD A QUESTION!
is it possible to have the widgets outside of Decker, like just chilling on my desktop or smthn or is that not possible?

(+2)

Unfortunately, No. Though that sounds fun. :) Decker Widgets share a name with phone Widgets but they do different things.

If you wanted to use Decker's Widgets for your own personal use on your computer you could definitely make a small nice looking deck that holds Widgets that do small helpful things that you'd like to have access to on your desktop... (I'm imagining things like a clock, a to-do list, a pomodoro timer, a place for writing notes, etc.) but the widgets would still have to be entirely inside Decker.

Quick question - with grids, is there any way to have a hidden column, aside from the few built-in always hidden columns?

Basically I'm trying to build a file list where I show the user "friendly" names but when they select one I then have the actual path to the file hidden behind the scenes and I can load that. Is there a way I can have that as a column in the same table, hidden but accessible through scripting, or would I need a separate invisible grid elsewhere with the "real" values?

Developer(+2)

You can set the .widths property of a grid widget to a list of column widths in pixels. Any columns thus set to 0px wide will be completely hidden from view and skipped over when navigating by cell. Grids will also automatically hide any rightmost columns that don't fit within the width of the widget, so making leftward columns a bit wider can scrunch the secret columns out of view. (Columns have resize handles in between column labels while in Interact mode!)

(+3)

Aha, that should work! Thank you!

(+1)

Another question! For some reason when I try and download the latest version of Public Transit, it doesn't have any of the transitions, and doesn't seem to add them to my Decks when I import in the PublicTransit resource either.


This has occurred in both the downloaded sample decks that come with Decker, and downloading straight from the web version of Public Transit. I want that Melt transition soooooooo bad man, it reminds me of Balatro.

(1 edit) (+3)

I might be wrong but I think you're using an older version of Decker. Possibly 1.54 or earlier. 

The reason I think that is because Decker 1.55 introduced some changes to Lil. The description box under the preview is showing a "0" which suggests that your version of Decker is from before "nil" was introduced.

Could you update to a more recent version and let us know if that fixed it?

(+2)

Yep, you were exactly right! I did have the newest version downloaded, but I didn't realize that It was still opening every deck with the old version I had sitting around. Thank you!

i don't know why i can't figure it out, but i can't use any colours with the animated patterns no matter what i do. i just want red and black instead of white and black lmao. any idea what i'm doing wrong?

(+2)

The “Patterns Interface” section of the Decker docs describes the animated patterns as:

A list of up to 256 pattern indices for animated patterns.

You can include solid “red” and “black” in the animated sequence because they have pattern indices (35 and 1). But if you want a pattern pattern, those are described as:

An 8x8 image interface comprised of patterns 0 and 1.

So actual patterns can’t have red in them, only patterns 0 and 1, which are (by default) white and black. You could set palette 32 to be red instead of white to get red-and-black animations, but that would make every white pixel red, which probably isn’t what you want.

Developer(+2)

As a concrete example, assuming the default palette, if you wanted to set animated pattern 28 to red and black alternating as fast as possible you could use The Listener to issue the following Lil snippet:

patterns[28]:35,47

To halve the speed you could double up each pattern index, e.g.:

patterns[28]:35,35,47,47

There are more examples of this sort of thing in All About Color.

Is that clear?

it's still confusing to me because i have a smooth brain BUT it is adding some colour to the thing so i'm gonna keep playing with it. thank you!

I'm having some troubles working out how to iterate through every row in a grid

If I use like "each x in grid.value" I get each column separately. And I can do it if I refer to each row with the index like "each x in count y" and then "grid.value[x]" that seems to be an option but I can't seem to find a way of getting the total size so that I know how far to go.

Is there something I'm missing? Is there a cleverer way of doing this?

Developer

The "rows" primitive turns a table into a list of dictionary, with each dictionary representing a row.

You can thus iterate over the rows of the table stored in a grid something like:

each row in rows mygrid.value
 # ...
end

More broadly, though, what are you trying to do? There might be better alternatives depending on the application.

I'm working on the launcher for my Deck Kiosk - so I'm starting with the sample code you sent me with the directory listing but I want to have it go through and  open up each deck and pull out the name (and maybe the author) for each deck so that things look a bit friendlier than just a filename. I tried doing it as part of the select statement but it didn't seen to work, I guess because the function I was using didn't work nicely over a vector?

(+2)

Hi, I've just started using Decker and it's great. Really fantastic environment to play in. Congratulations!

My question is probably obvious to someone versed in Lua or Lil, but if I want to stock a grid with items from a column in another grid, how could i do that? For example, to display a list of items being carried in an inventory.

At present I have 'invlist' which is a grid containing all the possible items, with names and other date (such as a parameter number for their effects. But I want to have the ability to select from a list of held items which would be displayed on the cards. So I need to draw in data from the names column of 'invlist' to populate a grid based on a numerical list of what the player is holding  However, everything I try seems to hit a brick wall Any newbie advice for populating grids and/or adding items to them?

Developer(+1)

Grid widgets, like this example named "items":


contain tables. You can read or write the table of a grid widget via the .value attribute of the grid. Tables can be indexed numerically (looking up rows) or by strings (looking up columns):

items.value
# +--------------+-------+--------+
# | fruit        | price | amount |
# +--------------+-------+--------+
# | "apple"      | 1     | 1      |
# | "cherry"     | 0.35  | 15     |
# | "banana"     | 0.75  | 2      |
# | "durian"     | 2.99  | 5      |
# | "elderberry" | 0.92  | 1      |
# +--------------+-------+--------+
items.value[3]
# {"fruit":"durian","price":2.99,"amount":5}
items.value.fruit
# ("apple","cherry","banana","durian","elderberry")

In the simplest case of populating another grid with a specific column of a source grid, assigning a list to the destination grid's .value attribute will implicitly cast it to a table:

dest.value:items.value.fruit


For more complex transformations of data, there's Lil's query language:

select fruit price where amount>2 from items.value
# +----------+-------+
# | fruit    | price |
# +----------+-------+
# | "cherry" | 0.35  |
# | "durian" | 2.99  |
# +----------+-------+

A query never modifies tables in-place; it returns a new table. Just like before, we can take the source grid's .value, query it, and assign the result to another grid's .value attribute:

dest.value:select fruit amount where fruit in "cherry","banana" from items.value


There are many examples of using queries on tables in the Lil reference manual section Lil, The Query Language. If you aren't using it already, Decker's Listeneris very helpful for trying queries interactively or generally testing out snippets of code.

Does any of that point you in a useful direction? I can try to furnish more specific examples of how to formulate queries for your project if you provide additional detail about how your data is organized.

Thank you - this has got me very close.

I came up with something like

 invdisplay.value:select Name where Item in 0, 1 from invlist.value

This allows me to fill invdisplay with the names of items 0 and 1 from invlist, which is great!

But I also have  a grid for tracking the inventory, so it is a table containing a single column of values such as 0, 2, 5, for example.

I just can't figure out how to turn that column into something usable in this select query, since something like the following does not work:

invdisplay.value:select Name where Item in carrying.value from invlist.value

Any clues?!

All the best,

Phil

Developer(+1)

You have several approaches available.

The @ operator can be used to index a list, dictionary, or table by a list of indices or keys. For example:

items.value
# +--------------+-------+--------+
# | fruit        | price | amount |
# +--------------+-------+--------+
# | "apple"      | 1     | 1      |
# | "cherry"     | 0.35  | 15     |
# | "banana"     | 0.75  | 2      |
# | "durian"     | 2.99  | 5      |
# | "elderberry" | 0.92  | 1      |
# +--------------+-------+--------+
items.value.fruit @ 0,2,3
# ("apple","banana","durian")

Indexing a table in this way gives us a list of rows (each a dictionary), but we can glue those back together with the "table" operator:

items.value @ 0,2,3
# ({"fruit":"apple","price":1,"amount":1},{"fruit":"banana","price":0.75,"amount":2},{"fruit":"durian","price":2.99,"amount":5})
table items.value @ 0,2,3
# +----------+-------+--------+
# | fruit    | price | amount |
# +----------+-------+--------+
# | "apple"  | 1     | 1      |
# | "banana" | 0.75  | 2      |
# | "durian" | 2.99  | 5      |
# +----------+-------+--------+

To clarify my earlier examples, in most applications the "in" operator attempts to check whether an item on the left (or each item in a list on the left) appears within a list on the right:

3 in 2,4,5        # 0
5 in 2,4,5        # 1
(3,5) in 2,4,5    # (0,1)

Within a query, you could do something roughly equivalent to our first example by referencing the implicit "magic column" named "index":

select where index in 0,2,3 from items.value
# +----------+-------+--------+
# | fruit    | price | amount |
# +----------+-------+--------+
# | "apple"  | 1     | 1      |
# | "banana" | 0.75  | 2      |
# | "durian" | 2.99  | 5      |
# +----------+-------+--------+

If your desired indices are stored in a table, you'll need to pluck out a column of that table before you can compare it to another column with "in" or index with "@":

invgrid.value
# +-----------+
# | itemIndex |
# +-----------+
# | 0         |
# | 2         |
# | 3         |
# +-----------+
invgrid.value.itemIndex
# (0,2,3)
table items.value @ invgrid.value.itemIndex
# +----------+-------+--------+
# | fruit    | price | amount |
# +----------+-------+--------+
# | "apple"  | 1     | 1      |
# | "banana" | 0.75  | 2      |
# | "durian" | 2.99  | 5      |
# +----------+-------+--------+
select where index in invgrid.value.itemIndex from items.value
# +----------+-------+--------+
# | fruit    | price | amount |
# +----------+-------+--------+
# | "apple"  | 1     | 1      |
# | "banana" | 0.75  | 2      |
# | "durian" | 2.99  | 5      |
# +----------+-------+--------+

You might consider keeping track of inventory items based on their names, or some other semantically meaningful "id" or key column, rather than by index; it could be more human-readable, and if you make any mistakes writing your queries it may be more obvious where something has gone wrong.

I would also like to note that grids aren't the only way to store collections of data within Decker, and may not always be the simplest choice. For example, you could also store a list of indices in a field widget via its .data attribute. Say we have a field named "myList":

myList.data:11,22,33

The field will visually show the data as "[11,22,33]". If we read myList.data we can reconstitute the list:

myList.data   # (11,22,33)

Does that help?

(+1)

Thank you again! I am away from my machine RN, but I will give these a try tomorrow!

(+1)
invgrid.value.itemIndex 
# (0,2,3)

Thanks! This was what i was missing! :) Thank you so much for all the wonderful examples.

i edited the march script to get a "vibrate" effect; i was aiming for a screenshake but i need to figure out how to make widgets bigger than the canvas (otherwise it just leaves the background in view when shaking) but that's not what i'm doing today.

today i used this script:

on view do
 zazz.march[p1,p2 canvas1 0.05]
 go[card]
end
successfully on one deck:

the big image is the canvas, with the two lil guys being the points it moves between. worked pretty well for a total newbie like me.

hoooooooooowever................... no matter what i do, i cannot seem to recreate it in my other deck. not when i copy the whole card, and not when i do it step by step.

but it just. won't move. at all.

even when i paste the card into this deck it doesn't work and i'm a little at a loss about how i fumbled this LOL. when i paste THIS card back into the vibrate deck that works, it works?? sorry. it's probably something super basic.

(+3)

Possibly a silly question, but did you make sure to add the "zazz" module to your other deck?

(1 edit)

hahahahahaha nope....... that must be it. but if i'm being honest, i have absolutely no idea how to add a module at all. anyway....

i pulled it over from resources but nothing has changed, which was my only guess as to how to import a module. i must have missed the tutorial on this part specifically somewhere, my bad.

(+3)

Basically you open the deck you need to have the module in, and then drag the deck that has the module into the window. That'll pop up the Font/DA mover and you can move the module across. It looks like you've done that but with still no luck?

Any chance you can upload the deck somewhere so we can have a look?

(+3)

ahhh. i had used import resources, and imported zazz from there. i had to delete that zazz and then drag it in like you said, but now it works? not sure why but. hey. it's working now LOL.

thanks for your help.

(+3)

Hello! I've discovered decker a few days ago and I've been experimenting and messing around on it, recently I discovered the bazaar of contraptions, they are so cool, but I'm not sure where I have to insert the code to put it on my deck.

I've been reading the documentation, tough I haven't finished yet (discovered decker right around finals week, whoops) I'm not sure if the answer is in the documentation, but if it is could someone point to me where to look? (I didn't what to clutter the contraption bazaar with my silly question but lmk if I should ask directly in there) 

(2 edits) (+3)

Not a silly question!

The short answer is you can use ctrl+v (or Edit > Paste Widget in the menu) while you're looking at a card.

The slightly longer answer is this:

Decker's image data, widgets (including contraptions) and even whole cards can be copied and pasted between decks very easily.

As an example: if you copy a plain button widget and then paste it somewhere else... you get a matching button.
But if you paste it into a text editor like notepad you get something that looks a little bit like the code blocks in the contraption bazaar:

%%WGT0{"w":[{"name":"button1","type":"button","size":[60,20],"pos":[230,164]}],"d":{}}

That's because this is what widgets look like when they're stored in your system's clipboard. They start with %%WGT and contain all the information about their size and scripts and data, etc.

So Decker will know that if there's a  %%WGT at the start of a string that you're pasting (that you copied from the bazaar) that means you're pasting a widget!

Just like it would recognize %%IMG as image data or %%CRD as being a whole card.

We're using the forums as a place to pass this easy kind of copy-and-paste clipboard data to each other in order to share our inventions and tools. Because it just works. :)

So, yeah, when you copy a contraption from the bazaar you can just paste it directly onto a card!

Have fun, and good luck with your finals!

(+2)

OMG thanks!! tbh i was literally reverse engineering by reading the code and copying the script parts but doing my own widgets, it was so time consuming, haha. This way is def more easy!! And thanks for the good wishes! have a lovely day.

(+1)

How do I delete cards?

(+1)

The easiest way is to cut them. Use [ Card > Cut Card ] from the menu bar, and then just don't ever paste them back in.

(This gives you a small window to get your card back before it's gone for good.)

(+1)

Thank you!

Is there ANY way to resize an internal canvas(es) on a contraption resize? I cannot figure out how to do it for the life of me. I’ve put it in “on view” for the contraption card, I’ve put it on some internal widgets that have an animate property and are firing every 60Hz.

The ONLY way that it seems to work is in the prototype view, then yes, my canvases are resized to the size of the prototype when interact is turned on. But, as soon as I plop that contraption instance in a card, nope! My canvases refuse to resize. It’s like the size of the canvases are now static and refuse to take a resize parameter.

Is this some sort of limitation of decker or… what am I missing? I feel like I’ve tried everything and whatever it is going to be is probably not intuitive.

Alternatively, I suppose I could put them on an internal state image, which is what I am really using them for, for double buffering and compositing (though, I do need a draw line from a canvas). But, then that raises another question, I am uncertain where to initialize long term state on a card or contraption. I feel like if I put it in the card’s/contraption’s/prototype’s main script, it will get overridden when that script fires again. Does it go in an “on view” with an “initialized sentinel value”?

Also, is there a working example of get_ and set_ for prototypes? The examples don’t help me and everything I’ve tried doesn’t work either.

(+1)

Is there ANY way to resize an internal canvas(es) on a contraption resize?

If you make your prototype “resizable” (when you’re editing a prototype, from the “Prototype” menu make sure the last item “Resizable” is ticked), then you should be able to resize the contraption when you add it to a card. If you also tick “Show Margins” in the Prototype menu, you’ll also get four little handles you can use to mark the left, right, top and bottom margins of the prototype: any part of a widget that is between the edge of the prototype and the margins will stay at that fixed distance from the edge, any part of a widget that is in the middle will be proportionally resized as the contraption is resized.

%%WGT0{"w":[{"name":"prototype11","type":"contraption","size":[98,91],"pos":[86,66],"def":"prototype1","widgets":{"canvas1":{"size":[81,41]}}}],"d":{"prototype1":{"name":"prototype1","size":[100,100],"resizable":1,"margin":[0,25,0,0],"widgets":{"canvas1":{"type":"canvas","size":[83,46],"pos":[8,9]}}}}}

If you paste the above widget definition into a card, you’ll get a contraption with a canvas in the top half of it. The top edge of the canvas is between the top edge of the prototype and the top margin, so it stays at a fixed distance from the top of the contraption as it is resized. The bottom edge of the canvas is between the top and bottom margins, so it moves proportionally as the contraption is resized.

If you are trying to write code to reposition widgets in a deck, that should work, but it may be overidden by the “built in” resizing behaviour described above? I’m not sure, I haven’t tried it.

But, then that raises another question, I am uncertain where to initialize long term state on a card or contraption.

The best place to put long-term state on a card or contraption is in a widget. Widgets don’t have to be in the centre “white” part of a prototype, you can stash them in the dark-grey border area - but make sure they’re locked so the user can’t accidentally interact with them. For most data types (numbers, strings, lists, dicts, tables) you can just use a regular field, and read and write its .data property. If you want to store a bunch of images (such as sprites), the best way is to use a rich-text field; you can paste the images in, and access them from code by reading the .images property.

Also, is there a working example of get_ and set_ for prototypes?

If you edit a prototype and choose “Script…” from the Prototype menu, you can enter a handler like this:

on get_foo do
 "here's a foo"
end

Then, let’s say you make a contraption from this prototype, called mycontraption. If you say mycontraption.foo, that will evaluate to the string "here's a foo". Here’s a pasteable example of that in action:

%%WGT0{"w":[{"name":"mycontraption","type":"contraption","size":[100,100],"pos":[86,66],"def":"prototype1","widgets":{}},{"name":"button1","type":"button","size":[84,20],"pos":[93,40],"script":"on click do\n alert[mycontraption.foo]\nend","text":"Gimme a foo"}],"d":{"prototype1":{"name":"prototype1","size":[100,100],"margin":[0,0,0,0],"script":"on get_foo do\n \"here's a foo\"\nend","widgets":{}}}}

Setting works the same way: define on set_foo val do ... end and it will be called when code does mycontraption.foo:somevalue.

If you want to be able to get and set values interactively, rather than just through code, you can also use “attributes”, but that’s an optional, additional layer on top of get_foo and set_foo that you don’t have to worry about otherwise.

(1 edit)

Thanks, I’ll try these.

As for the resizing widgets and what you’ve said, my gut is that it might be being overridden by the internal resizing logic, I’m not sure really.

What I have experienced is that I have them offscreen, since they are acting as compositing buffers. The “resize event” works fine, as it is triggered by some code that is being run in an animated widget - ONLY when it’s in the prototype view. As soon as an instance of the prototype becomes a contraption instance, all of that code stops working. The canvases will not resize anymore.

Also, thanks for the confirmation on the state. I kind of figured it was like Pd (Pure Data) and it would go in a widget, like how Pd does it.

(+1)

If you can provide an example contraption that exhibits the behaviour you describe, that would help. If you can set it up in a new deck, you can select the contraption, do Edit → Copy Widgets, and then paste the result into a reply here. That’s what I did to create the examples in my reply - if you copy a contraption, Decker even includes its prototype.

(+1)

Thanks for the offer, but I’ve decided on another route.

I’m doing what I wanted through modules, deck.add, etc. That does work for me and it’s clearer to me what’s happening.

It’s more work for me to avoid the prototype/contraption interface, but that’s how it goes.

(+2)

I figured out what the problem was. I didn’t realize you needed to call card.update[] when changing subordinate widget sizes.

Actually, no - that wasn’t it.

Anyways, I’ll have the contraption done soon, but I think I am running into a corner case where it doesn’t like resizing when a canvas is beyond the boundaries or something. The clipping gets to be incorrect and things start wrapping even though I explicitly set the sizes of the canvas and clip.

(1 edit)

I figured it out. I don’t know if it’s a bug or a limitation, but it’s easy to reproduce:

A prototype/contraption background image will not resize itself. It is fixed, no matter what. For instance, if I make a prototype at (200,200) and then resize it, the image is fixed. It also causes strange compositing errors near the edge of the contraption if I am actively drawing into it.

To get around it, I will have to use another canvas as the background image, rather than the contraption’s image - because they should be resizing themselves, obeying the margins. The prototype’s/contraption’s card does not, and is permanently fixed size.

Also, maybe I am abusing the use of the prototype/contraption base image and it is not supposed to be drawn into during interaction.

(+1)

Ah, yeah. The “margins” of a prototype also divide up the prototype background into a 3x3 grid. When a contraption is resized: the top-left tile of the prototype is drawn at the top-left corner of the contraption; the top-centre tile of the prototype is tiled horizontally across the top of the contraption; the top-right tile of the prototype is drawn at the top-right corner of the contraption, and so forth.

The default introduction/tutorial deck you get when you launch Decker has a page on “contraptions”, and one of the examples is a “resizable decorative border” contraption that demonstrates the behaviour nicely.

If you want to draw the background with code, you’ll need a canvas widget if only because the Image protocol you get from card.image doesn’t provide a lot of drawing primitives. You can use a “hidden” canvas widget, draw the background you want, then do card.image:canvas.copy[0,0 canvas.lsize] to paste it onto the contraption background, or (much easier) just make the canvas widget cover the area of your prototype, and Decker’s default resize behaviour (with the margins and such) will make sure it stays in place as the contraption is resized.

(2 edits) (+1)

That’s exactly what I do, except the problem is the base image of the prototype/contraption will be fixed. If I resize the contraption, and the image started at (200,200) after instantiation, it remains at (200,200). It cannot be changed. I’ve tried on view or a subordinate widget that tries to resize it - it stays fixed.

Then, when I composite the subordinate canvases into it, and the contraption is resized, the image will wrap. The image will not resize itself and I can’t force it to resize.

The only way I have gotten around this is by maximizing the card on the prototype page so it starts with a very large image buffer, and then shrink it on view, when it’s actually instantiated. Except, that has problems, too.

So, I figure the only real fix is to not draw on the prototype’s/contraption’s base image, but on a canvas, and show the canvas.

Yep - it works now. It’s either a bug or limitation.

  • If the final target of the composite is the prototype/contraption card image, there are compositing errors and it (the image attached to the prototype/contraption card) will never resize.
  • If I use a “visible” canvas as the target, it does resize and all compositing errors go away.

Hello, I found a Sokoban-like decker game called "sokoban" in the "examples" folder. I would really like to know a simple tutorial on how to use and make the "mover" widget. I want to incorporate it into my decker to enhance interactivity

I have another question. How can I limit the number of action steps for followers in Path? To align with and advance the plot development, I don't want players to run around on the map. At the same time, I want followers to trigger events when their steps are exhausted or at specific locations. Sorry for asking so many questions, but I really want to make this game well.

I've really encountered many problems because I don't know how to use quotation marks, so I always end up with nested plain text boxes and code text boxes, which looks like a mess of code. But there's nothing I can do about it. Now, I really want to know how to directly quote and execute code text boxes in a visual novel with one-time options

I'm going to come back to all of your questions when I have time to reply more thoroughly, but could you explain a little more about what's going on with your quotation marks? Is it because they're used in your story's dialog and also in code?

Thank you for taking the time to answer my question, and I'm sorry that my translation software didn't convey the meaning accurately. What I actually meant to say is that I don't know how to "quote". For example, in the "dd.chat" function, using "at:,bt:" to directly reference the answer to a question, and later I found that writing "at:XX.value" can also reference the content of a field named XX. But now I want to know how to execute the code inside the field like "eval[XX.text()1]"

(+3)

Hello!  

Some of the questions you've asked are difficult for me because I'm not very familiar with how these examples work or I'm not sure what the correct answer would be for your project. I've learned a little bit but I have more questions for you. 

I really want to make sure I understand what you need so I can either figure it out or look up the answer.

Asking specific questions helps me give you more specific answers. 

Regarding Sokoban and "Mover":

From what I understand about the sokoban example... "Mover" was made specifically to move boxes inside of a Sokoban-like game and most of the code in the example relates to that. 

What do you like about "Mover"? 

  • Being able to move a character on a grid with the arrow keys? 
  • Sokoban gameplay? 
  • Something else?
  • What kind of gameplay would you like in your game from something like "Mover"?

Regarding path:

From what I understand, this is what you need:

  1. A way to limit the number of steps taken when the follower moves
  2. A way to make an event happen when the follower runs out of their limited steps
  3. A way to make an event happen when the follower arrives at a specific location

Have you coded a way to make events happen when your follower arrives at a location yet? 
Is there anything else that you're trying to understand how to do with path?

Regarding "quotes": 

From what I understand you'd like to allow the player to choose a dialog option and then have the game run some code depending on what they chose? Is the code in the other text field more dialog (dd / visual novel format) or something else?

Do you want the player to be able to return to the original choice and pick another dialog option?
Or
Is this a one-time event where they can only choose one answer?

I'm sorry if I didn't understand something! Thank you for being patient.

(+1)

I'm sorry for taking so long to reply, as I'm also taking some time to try and solve some problems. Thank you very much for your serious reply.

That's right, I actually want to add a map similar to an RPG game in visual novels, using directional keys to move on the map. When the "Mover" stops at a special location, an event is triggered, and there is no need to push boxes, but obstacles need to be blocked on the map.

If Mover can achieve the effect I want, that would be great.

If Mover cannot be implemented, I plan to use Path and Follower. In order to prevent players from running around on the map, I need to limit the number of steps the follwer can take. When the number of steps is exhausted and the guide point is not reached, it will be considered a failure. I currently only add events for the end of the movement regarding the follwer, and cannot limit the number of steps at specific locations.

Regarding quotes, I hope that the first option selected for the "r: dd. chat" function can reference the code text box to trigger the second "chat", which means that the code for the second chat is included in the first chat, like a collection or a tree branch. When the second chat ends and returns to the first chat, there is only one other option left for the first chat.

This is my ideal result, but currently based on my attempts, only the "dd. ask" function can achieve this. If the player does not choose the first option as I expected and chooses the second option first, my backstage performance will crash.

I am using a translator and I try my best to make my expression easier to understand, but I cannot see any errors in the translated result. I am sorry that it may still be misunderstood.

Thank you for patiently reviewing my questions and helping me solve them. Wishing you a Merry Christmas and Happy New Year!

❄️🎄🎁

How do I make audio loop in decker when exported as  .html? The audio seems to pause after the first 10 seconds even when i use play["sound" "loop"]. It does not pause in the .deck version.

How long does it pause for?

Permanently, it does not play again after the first 10 seconds. 

Does looping work for you in the official All About Sound deck? In my browser (Firefox on Linux) I can click “Start Loop” and it runs for at least 11 loops (that’s when I got bored).

What browser are you using, on what platform?

How long is the sound that you’re looping?

Thank you for your reply!

Strangely, yes, it works in the All About Sound deck. I'm using Safari on Mac, and the sound runs the full 10 second limit that Decker has. I believe I'm using Decker version 1.54. 

If you wish to check it out, you can find my project on https://puter-and-tunep-games.itch.io/inspiration-strikes. It might be the case that it's working for other browsers, and I have some weird local issue going on. 

(+1)

Ah, here’s what I see:

  • when I start the game, no sound
  • when I click on the background, the background loop plays once
  • when I click on the “next” button, there’s still no background music
  • if I press the left-arrow key on the keyboard to go back to the first card, the background loop begins playing, and loops properly

From the documentation, under Web-Decker and Native-Decker:

Most web browsers do not allow programs to play audio until the user has interacted with a page, so any play[] commands issued before a user has clicked, tapped, or pressed a keyboard key will have no effect.

I think this is what you’re bumping into, since your deck tries to play audio when the first card appears. The simplest workaround would be to also start looping the sound on the second card, so that whether somebody’s using Web Decker or Native Decker, they get the background loop eventually. A more complex solution would be to add a pre-title card that the user has to click through to get to the title card.

(+1)

Thank you so, so much!! This solved my problem and it works perfectly now - I added it on the second card :D

Developer

For the record, I'd strongly recommend updating Decker.

v1.54 is over 8 months old; we're up to v1.61.

(+1)

Thanks! I’ll make sure to update as soon as I get the chance. 

Does Decker support drawing pads? Im trying to make sure im not doing something wrong on my end. i just wanna use the drawing tools with my drawing pad

(+1)

Yeah! If I'm doing art stuff I usually have Decker fullscreen on my display tablet. 

What OS are you using? And can you describe any problems you're having currently?

(1 edit)

Sure I'm on windows 11! and no worries on replying take your time (there are alot of comments in this thread.) basically I have a drawing pad, it's called One by Wacom. I just kinda plug it in and i can draw with it, I can't really do that with Decker tho. I've tired updating drivers messing with some settings for the actual tablet but can't seem to get it to smoothly draw in the program. It either draws random uncontrolled lines or nothing at all. Even selecting tools is pretty rough.
I tried messing around with Decker but I've kinda hit a wall lol.

Should i check out some of the code? Maybe look through how to use Decker with a tutorial ?? Anything you have to offer helps, i really wanna make a deck but using the mouse all the time sucks( not complaining about the program just frustrated)

Thanks for getting back to me!!


(1 edit) (+1)

As much as I support looking at the documentation and learning more about Decker (:D) I don't think there's anything in there that would help with the tablet issue. Decker should be as easy to use when you plug in your tablet as other art programs are... but computers can be weird and sometimes we need to poke at them to make them work.

If you don't mind... I have two things I'm curious about:

Are you having the same tablet trouble in both Web Decker and in Native Decker?
If you don't know what I mean by that, Web Decker is the version that runs in your web browser (like this copy of the official tour or wigglypaint) and Native Decker is the standalone program that you download and run on your computer.

The other thing I'm wondering is whether or not there are some settings inside of Wacom's driver software (Wacom Center?) that could be adjusted. My tablet has a different driver software so I'm not sure.... but from what I know about Wacom it's possible to create program-specific settings (like shortcuts, etc) and maybe there's some way to modify how your tablet interacts with Decker in there? (Maybe?)

(+1)

lol heard heard.

Thanks for explaining Web and Native to me! I'm using native on my Asus VivoBook, it's running Windows 11. I have not tried the web version yet but can give it a whirl.
I did try messing around with Wacom's tablet settings mostly with the pen and clicking, but I may need to look at some more options after checking out the documentation for the tablet itself. I could be missing and not seeing I'll update with areply either tonight (10:30pm right now) or tomorrow morning before work!!

so it seems like the web version works much perfectly with the drawing pad. does this means i need to redownload the native version?? im not opposed to using the web version but hoping i can fix the problem with the native version so i can use that instead.
****side question**** 

I want to understand more of the way the tools work for Decker where can I find documentation again

Developer

An offline copy of Decker's documentation is included with the Native-Decker download inside the "Docs" folder.

You can also access the latest docs through the links in the Help menu, or the links on the main decker website.

(1 edit) (+1)

Hi how would i make it so a piece of text follows me throughout the whole deck. Like if i wanted a score to be tracked across the entire deck so it can get updated and is seen in all cards how would i do that? Like the score would be in the top right corner! thank you!

Developer(+1)

State in a deck, like a score counter, needs to live in a widget, on some card.

The straightforward way to have a global score counter would be to make a field (or slider) widget somewhere on a specific card; let's call the card "inventory" and the field "score". Scripts on another card can then refer to that field by one of its "fully-qualified" names:

deck.cards.inventory.widgets.score
inventory.widgets.score

For example, to add 100 points to the score, a button script might be

on click do
 inventory.widgets.score.data:100+inventory.widgets.score.data
end

Or, using a local variable to reduce repetition,

on click do
 s:inventory.widgets.score
 s.data:100+s.data
end

In fact, if you're referring to this widget constantly throughout your deck, you might consider setting up an alias in the deck-level script:

scoreCounter:deck.cards.inventory.widgets.score

After which point you could just use the name "scoreCounter" in any script, on any card.

Each card could have their own "score" field (perhaps volatile) that is drawn from the central source-of-truth score counter and updated when the card gets a view[] event:

on view do
 score.data:scoreCounter.data
end

(Note that when you change the score counter you will generally also want to call view[] to perform this update.)

Does that make sense?

If you're interested in making this even tidier- at the cost of some additional up-front complexity- I could describe how to use a contraption to build a "game HUD" that behaves like a single object shared across many cards.

Hi! I am looping two pieces of audio, however it ONLY loops the second piece, rather than first -> second -> first -> second. How can I fix this? Does it have to be about my duration of audio? (cc1 is 10 seconds and cc2 is around 7 seconds)

(+3)

Your audio duration should be fine! 

After experimenting with a deck where I have a similar audio looping setup I think my best guess is that the script is expecting to find a Field that has the name "loopcounter" on the same card you're on and it's not finding it so it can't correctly loop through your clips. 
(Because nothing is loopcount-ing, y'know?)

It could be that it doesn't exist, or it has a typo in the name or it does exist by that name but it's on another card... something like that. 

(+2)

That was exactly the case, had the field in another card 😭 Thank you so much!

Is there a way to have a button pressed on another card, then have it checked by another button on a different card?

For instance, if I have a card/room called Pieces, and two other cards that are Puzzle Rooms, I want a button in each puzzle room to be pressed in order for the button in Pieces to do something. To make it sound simpler, I want the player to steal treasures from both rooms, before going into final room to leave.

This is what I have, however it keeps believing  that the buttons are not being pressed.

on click do
if puzzleroom.button1.pressed and puzzpleroom2.button2.pressed
 dd.open[deck]
 dd.say["You successfully stolen all treasures!"]
 dd.close[]
 go["end"]
else
  alert["You must collect all treasures to leave!."]
end
end

And then for my puzzle rooms buttons, I have the same thing:

on click do
pressed:true 
end

Am I doing it right? Forgive me if this is silly, I am still trying to wrap my around this...

(+1)

You’re almost there, but unfortunately Decker doesn’t allow you to add a pressed attribute to a button like that. If you want to keep track of a flag like “treasure taken”, the easiest thing would be to make a button in the puzzle-room called treasuretaken, configure it to be a checkbox, and “Show None”. Then the button that takes the treasure can do:

on click do
 treasuretaken.value:1
end

(note that you have to say 1, not true: Decker’s scripting language Lil does not recognise true and false specially, and treats them both as undefined variables)

…and the button that checks for taken treasures can do:

on click do
if puzzleroom1.treasuretaken.value & puzzleroom2.treasuretaken.value
 dd.open[deck]
 dd.say["You successfully stolen all treasures!"]
 dd.close[]
 go["end"]
else
 alert["You must collect all treasures to leave!"]
end
end

(note that the way to say “both these things must be true” is & not and - Lil does not recognise and either)

Thank you so much, this helped a ton! But weirdly, I don't know if it's just me, but when I make it checkbox + show none, I am unable to press it.

(+3)

Yes, if a checkbox is set to "show none" you can't interact with it. I think in the example given the idea is you have a hidden checkbox that stores whether the button is pressed, and then you have your normal visible button with code in it to set the value in the checkbox. I hope this makes sense?

I see! Thank you so much, was feeling kind of stupid LOL I will mess around with this!

(+2)

Hopping in too (Hello!)

There is a fun thing about buttons which is often overlooked -- All buttons can store a value, not just checkboxes.

So you don't need a second button to be a checkbox at all.

We often talk about checkboxes because the mark is visible and easier to understand but if you don't want to have a separate hidden checkbox you can change your button back to what it was originally and use this script in it:

on click do  
me.value:1 
end

When you use "me" like this in a script it refers to the widget the script is attached to... so the button (of any style you like and any name) will set it's own value to "1" when this script is inside of it and the button is clicked.

One more small correction, in the beginning of your progress checking script:

on click do  
if puzzleroom.widgets.button1.value & puzzleroom2.widgets.button2.value

Putting .widgets. between the card name and the widget name is an important part of telling Decker where to find your widget. 

Of course, use the correct names for your particular buttons and cards at this moment!

A side note about setting the value in a hidden or non-checkbox button:

Doing it this way has a side effect of being a little harder to uncheck the buttons when you want to reset the game while testing it.... but you could set these two particular buttons as 'Volatile' if you wanted to. 

That makes it so you can clear their .value anytime using [ File > Purge Volatiles ] in the menu. 

This would also remove their .value when the project is saved.

Volatile is dangerous to use on anything precious and irreplaceable -- but it's fine for temporary things like progress checkmarks.

If you feel comfortable using it you can select the widget you're using to store this progress .value and use [Widgets > Volatile] to make it Volatile.

(Again, this is not for anything precious like your art assets! Disposable .values only here!)

This whole project sounds lovely :D We're all rooting for you.

(+2)

You don't understand how much I appreciate the help! The .widgets helped a lot-- I was not understanding why it wasn't working until I realized. I cannot wait to show everyone what I was able to make during the last few weeks! It is very scuffed though!

(+2)

I tried to use unless operator with side-effects, and I was surprised that it doesn't short circuit.

potato_card: deck.add["card" "potato"] unless deck.cards["potato"]

The above creates a new card regardless of whether a "potato" card exists. I was hoping that the left term would not be evaluated  (a.k.a short-circuits) if the right term was not nil.

Is there a better (more idomatic) way to get this short circuit behavior? This is what I'm currently doing:

potato_card: if deck.cards["potato"] deck.cards["potato"] else deck.add["card" "potato"] end

Thank you!

Developer(+3)

"unless" does not short-circuit; No operators in Lil do.

In this specific case I would probably write

if !deck.cards.potato deck.add["card" "potato"] end

and then subsequently use "deck.cards.potato". Even if you then also assign it to a variable, the end result is slightly shorter.

(+2)

I'm working on a game in decker that includes a few doll-maker/dress up games. For the clothes I've pasted images into draggable canvases (i'm basing it on the layouts of games like dollzmania), and I was just wondering if there's an easy way to be able to have a button for players to reset the card so that the clothes are in their original spots. i saw in another thread someone asked a similar question and it was suggested that they use the listener to get the canvas position and set it so that the canvas returns to that spot when they go to the next card. however, that'd mean scripting in the position of each separate object, and for my project it would be really fiddly to do if there's like 15 items of clothing on the card. Any advice? I'm new to Decker so I'm still getting the hang of things, but i'm loving it so far! 

Developer(+1)

You could write a script to record the position of all the canvases automatically (rather than recording every coordinate by hand), stash those positions in a field somewhere, and then have another script re-apply them when appropriate.

Let's say you have widgets something like this:

The "remember" script looks like:

on click do
 p:select key value..pos where value..type="canvas" from card.widgets
 positions.data:raze p
end

And the "restore" script looks like:

on click do
 each pos name in positions.data
  card.widgets[name].pos:pos
 end
end

In practice, this field and buttons will probably be hidden (set to "show none"). If you ever want to record the current state of the canvases without un-hiding the buttons you can simulate a click via the listener:

remember.event.click

Does that make sense?

(+2)

this works perfectly, thanks!

(+1)

Is there any hotkey for swapping between widget and interact mode, and if not could add one? I'm aware of the option to click between in the toolbar, but would prefer to have bound key. Currently, it requires a lot of cursor travel for something need to do quite often when testing out a project. Thanks!

(1 edit) (+1)

The keyboard shortcuts that I know (In native Decker) for swapping between modes are F1 for Interact Mode, F2 for Widget Mode (And F3 - F12 are for the drawing tools). I hope this helps!

(+2)

Ah, that works with function modifier on mac, thanks! 

(+1)

Hi! I am a total newbie on Decker and English is not my native language so sorry for the mistakes :).
I am trying to make invisible cliking buttons or an « object button » , like when i click on a fish it takes me to another card. I am currently using the button widget and make it invisible but when i click on it it show the rectangle shape in white :( .  I was trying to use the canvas widget but i really don’t understand how it work…  I am begging for help 🙏

Developer(+3)

If you want a button to be clickable but have absolutely no visual effect when clicked, set the style to "Invisible" and then additionally apply "Show Transparent" (found in the Widgets menu).

I'm making a prototype, where I set a button's text based off a string attribute.

This works until I open the button's prototype, whereupon that attribute gets reset and the button's text resets to the prototype's default is. I don't observe this behavior for example when using field.text as the string persists between opening's of the prototype. 

I'm reading through the documentation but missing what the determining factor in whether a property gets reset between prototype openings. 

I can use a hidden field, but that complicates things as the button will still get reset when opening the prototype so needs a restore call etc.

Deck with an example of the behavior: https://munro.itch.io/decker-question

Developer(+1)

From the reference manual's description of the Prototype Interface,

when a definition is updated, the nameposshowlockedanimatedvolatilefontpattern, and script attributes of Contraptions will be preserved, as well the valuescrollrowcol, and image content of the widgets they contain (as applicable) if they have been modified from their original values in the prototype, but everything else will be regenerated from the definition. The state of contraptions is kept, and the behavior and appearance is changed.

Any other state that you wish to survive prototype modification should be stashed in internal widgets; I recommend refreshing these settings (alongside applying settings from the enclosing contraption instance like .font and .locked, where appropriate) in the view[] event handler in the prototype script.

(+1)

Ah, so because button's text is not the value it doesn't get kept, however a field's text is a value so field text does get kept? Thanks for clarification and the snippet!

Developer (1 edit) (+1)

Just to be clear, a field's .value attribute, which is represented as a rich text table, is the complete, underlying contents stored in the field. Fields have .text, .images, and .data attributes which can be read and written, but all three are alternate views/subsets of the same contents (as a plain-text string, as a list of inline images, and as encoded/decoded LOVE data, respectively), as scripting conveniences.

Buttons have a .value attribute as well, but it represents the boolean (1/0) value of checkboxes, and has no relationship to the .text attribute of the button, which controls the button's label.

Sliders have a .value attribute which corresponds to their numerical value, and Grids have a .value attribute which corresponds to the table data they contain.

Hellooo complete and utter noob here. I've used Macromedia Director back in the day which in tunr was very inspired by HyperCard so i was delighted to find this project :) However i have a small question: is there any way to get more colors working in a project? Again, i will admit i know next to nothing about the tool (yet) apart from a bit of tinkering but i think if we were able to at least use graphics with 256 colors the possibilities for retro adventure games would be endless :)


Thanks so much for creating it!

(+2)

Currently, no. 16 colors is the cap. Though the troublemaker in me might mention that it's 16 colors at a time, not per project.

The way I look at it is that 16 colors is definitely a creative constraint... but you can do a surprising amount with a well crafted palette.

Having fun tinkering! :D

(1 edit)

Is there a way to enable microphone recording in the downloaded version on mac? I get the prompt to allow microphone permissions in the browser version, but the desktop version I haven't gotten the prompt. I don't see it as an option in Privacy & Security settings. Tried reseting microphone permissions but no luck.

(1 edit)

any way to only have "on loop" fire when background loop completes but NOT when a card is navigated to?

I'm trying to loop two songs (play sound 1 then play 2 then 1 then 2 etc) using a deck-level script for the "loop" event that updates a counter on one of the cards

it works perfectly EXCEPT this event is fired (and so the music immediately switches from whatever is playing to the other sound) every time a new card is navigated to

(i also just don't know why "loop" event is essentially a "on loop OR on view" sort of thing)

I think on loop is checked when you visit a new card, so that the new card has a chance to stop the loop, or start a new one. For example, if one card represents the player standing beside a waterfall, it would be more atmospheric if a loop of waterfall noise played whenever that card was visible. When the player visits that card, the loop should start immediately (even if some other loop was already part-way through playing) and when the player leaves that card, the loop should stop immediately (even if the waterfall noise was part-way through). Calling on loop on card transitions makes that kind of effect possible.

If your two songs are less than 10 seconds in total, you could combine them into one sound and loop that quite easily.

If your two songs are more than 10 seconds long in total, you might add a “last loop started at” field on the same card as the counter that switches between them. When you start playing a sound, update the counter, and set the “last loop started at” field to sys.ms (the current time in milliseconds). When on loop is called, it passes in the old sound - if the “last loop started at” time, plus the duration of the old sound in milliseconds (old.duration*1000, since the duration is in seconds), is nearly equal to sys.ms, then we’re probably looping because we got to the end of the sound. If the start time + the duration is greater than sys.ms, then the loop has been called early, probably because of a card change. If you return the original sound, it will continue playing it, rather than restarting it.

I have returned!I have two questions!

My first question has to do with Button Shortcuts. As of right now, I have a puppet that does something when it is clicked, and another when it is released. I wanted to see if I could activate the puppet using a keyboard button, like spacebar. The only issue is that as far as I know, the button widget is the only way to create a shortcut like this, and whenever I use it to send a click event to my puppet, it treats the puppet like it is being perpetually being clicked down after the button press, and doesn't seem to respond to being released either. I tried making the button animated and making sure it wasn't on toggle, but so far it does not look like there is any way to make a button widget that responds to being released. (My guess is because buttons dont typically count as "clicked" until they are released, making releasing them kind of impossible.) My main goal is to just interact with the puppet using the spacebar though, so if there is another way of both clicking and releasing the puppet using keyboard, that should work too.

My second question is about Puppeteer itself. I was just wondering if you could make puppeteer code refer to variables somehow. Something along the lines of "!show [variable] smile", to make it possible to basically just costume change a puppet without having to make an all new one to sit around on the same card. (Clearing puppets won't work for what I'm doing since I need them to retain the scripts that I gave them.) 

(+4)

The Canvas is the only widget that has both click and release events, and the Button is the only widget that responds to keyboard presses, so you can’t make something that starts when you hold a key and stops when you release.

However, you can make the button send a click, then wait a while, then send a release, which is probably as close as you’re going to get:

on click do
 canvas1.event["click" 0,0]
 sleep[15] # in 60ths of a second
 canvas1.event["release" 0,0]
end

That can look a little weird, since Decker disables all interactive widgets (drawing them greyed out) until the sleep time is complete, but it prevents the player from doing more things while the previous things are still going on.

If you don’t want to freeze things like that, you can build something a little more complex that lets Decker keep doing things while you wait. Create a field to hold the timer countdown, and change the button click handler to:

on click do
 canvas1.event["click"]
 field1.data:15
 field1.animated:1
end

So when the button is clicked, it sends the click event to the Canvas, it loads 15 into the field, and sets the field to be animated (so Decker sends it view events 60 times a second). The field’s view handler looks like this:

on view do
 me.data:me.data - 1
 if me.data = 0
  canvas1.event["release" 0,0]
  me.animated:0
 end
end

So every time view is called (that is, 60 times a second), it subtracts 1 from the value it stores. When it reaches 0, it sends the release event to the canvas, and turns off animation again. As a result, when the button is clicked, the canvas is “clicked”, then things keep happening as usual while the timer ticks down, and when it does the canvas is “released”.

The field can be made “Show None” if you don’t want the player to see it; if you make the button “Show None” then it won’t react to the keyboard. However, you can make the button use the “Invisible” style to hide it, and “Show Transparent” to make it invisible even when clicked. You can also just move it off-screen.

I've actually been messing around with animated timers for a bit now, but I never realized you could actually toggle widgets being animated like that. It actually made me pretty anxious from adding too many so I wouldn't lag out the program. I'll definitely be using that second solution you gave, thank you so much for your help!

In the “Events” section of the Decker documentation, one of the listed events is view for any widget, described as “The surrounding card is active, repeatedly at 60hz.” I expected this to be something like “The surrounding card is active and the widget’s animated property is true, repeatedly at 60hz.”

Have I missed something? Is there some way to get a 60hz event without setting the animated property?

Developer (1 edit) (+2)

I've made some clarifications to that table to be more precise.

Primitive widgets will ONLY be sent automatic view[] events when they are set to be "animated" AND the card upon which they appear is the active card.

Before the .animated property existed, a cruder way of obtaining a 60hz event pump was to go[] to the current card without any transition effects, indirectly scheduling the view[] event for the card to be re-triggered. One advantage of this old approach- which still works fine- is that by making the "dispatch plumbing" within  a card explicit, it's very easy for blocking scripts to send their own "synthetic"view[] events to the current card and keep everything ticking along in the background. Dialogizer provides a synthetic animate[] event while its blocking dialogs are open that can be forwarded to view[] if desired.

(+1)

Hello! I'm having trouble getting the built-in Audio Editor to record sound. I click record, but it's not picking up my microphone. I've tried on two different MacBooks with the same result. Any ideas what might be going on?

(+2)

I realise it's not exactly a solution, but have you tried recording sound separately (in like Audacity for example) and then importing into Decker? I've found even when the audio editor is working I get better results this way since I can adjust the levels and such in Audacity before converting down into Decker's format

(+2)

Thank you, Millie! This is a good suggestion. I'm still wondering if anyone else has had this recording issue though... I like the convenience of being able to record directly in if possible...

I think I really need some help. I tried making a pop-up following the content in dd:visual-novel modals, but I didn't expect that even if I copied it exactly as it was into my software, I still couldn't get a visual novel-style pop-up to show up using the button. I later ruled out potential issues with the button (I used alert and confirmed the content in the text box was normal), so I think the problem lies with the dd function. But I copied it exactly—could it be that my Decker software can't use it?

(+1)

Decker and Dialogizer should always work with each other, unless there's of a very old copy of one of them and a very new copy of the other. So let's check that. The current version of Dialogizer is 1.7 and the current version of Decker is 1.63, for reference.

You can see the current version of your module (and update to a newer one if needed) in the same popup where you transferred it into your project from the Dialogizer example deck [File > Resources]

You can see the current version of Decker by using the menu [Decker > About].

If the version numbers seem fine then the other thing to check is whether you have dd.open[deck] before you dd.say[] anything. Like this:

on click do
 dd.open[deck]
 dd.say["hi"]
 dd.close[]
end

Hopefully one of these two things will be the answer, but if not please let me know.

You really helped me a lot! After following the steps, the pop-up I set up actually appeared! It works perfectly! But I still have two questions. First, I noticed that when I import a black-and-white image, the Add Outline function works, which creates a particle-like animation for the image (I use this as a shortcut to make dynamic effects). However, if I check the color option, Add Outline stops working (I also want to create similar particle animations for colored images...).

Second, I wonder if there’s a code that makes the next page button I set up only appear after the user clicks on certain elements. I’ve looked through plenty of related tutorials, but I’m still a bit confused—definitely looking like a total newbie lol....

(+2)

If you just want the “next page” button to appear after you click some other button, you can make the “next page” button be “Show None” (in Widget mode, select the button, then from the Widget menu, pick “Show None”), and have the other button make the “next page” button solid:

on click do
 nextpage.show:"solid"
end

Of course, once you test that button, you’ll have to go back and hide the “next page” button again. It might be worth having your deck begin with a “start game” button that specifically goes through and resets all these things before the game begins, so you don’t personally have to remember to do it each time you save the deck.

(+2)

谢谢你的提示!

(+2)

I see that Screwtapello explained about showing and hiding widgets so I'll try to take the outline question.

I'm going throw a couple little pieces of information out there, hopefully it will all make sense.

The first is since you're doing art stuff I recommend turning the toolbars on if you haven't yet with [Decker > Toolbars]. They're really useful.

----

The second thing is that there are two kinds of white in Decker. One is a solid opaque white, which is always treated as solid white in every circumstance

The other one is a sometimes-transparent white that you can tell Decker to treat that white as 'clear' by turning on transparency in the Style menu or setting a widget to 'show: transparent'.

You can see the difference between them with a setting called Transparency Mask which makes that transparent white appear to be a different color (if you haven't modified the default Decker palette it'll become a neutral gray, if you have modified your colors then it'll be whatever happens to be in pattern slot 45). You can make this difference visible (only to you, it doesn't change anything in the project)  with [View > Transparency Mask] or 'R' on your keyboard.

Here's an example of both transparency and transparency mask.

So there are two kinds of white:

When you import an image in black and white it will always import that image into black and transparent white.

When you import an image in color and it has any areas of solid opaque white Decker will use opaque white for that area. That includes any big white background area! If the image has transparent areas, those areas will remain transparent in Decker.

----

Because [ Add Outline ] only looks at the 'empty'/transparent white pixels around an image to know where to draw the outline... if there's a big rectangle of opaque white pixels around the image it can't see any 'empty' spaces to draw the outline.

You can fix this inside Decker though! We can just remove the extra white area.

Turn on Transparency Mask with and then select the flood bucket tool. Right click on the opaque white to 'erase' it all back in transparent, clear white. Clean up the edges if you need to and then you should be able to use [Add Outline] around your image like normal.

----

I think you were using either a 1-bit logical pattern or an animated pattern for the special outline effect? (Very cool!)

And I think the opaque white issue was why it wasn't working but I also want to talk about another option for a special outline effect if you didn't want to use the black and white 1-bit patterns for the outline effect on your color images.

Because the 1-bit patterns can only use whatever colors are in pattern slots 32 and 47 (which are black and white by default) and neither color can be replaced by another color in the palette.

But you can get a different kind of shifting color effect out of the Animated Patterns! 

The way those work is that they cycle through a sequence of other patterns and colors that exist. The default versions only use the 1-bit patterns (for example 1,1,1,1,0,0,0,0 is an animated pattern that blinks between black and white) but absolutely nothing is stopping you from putting things from the 16-color palette in that sequence instead! Maybe blinking between colors or shifting around between them slowly. I dunno!

If this seems interesting to play with here's an editing tool for changing the animated patterns: https://itch.io/post/14641530

Click 'Read' to get the current lists of numbers, change the lists however you want and the click 'Write' to set them and see what you think.

You can copy this canvas into your project to have an easy reference for the numbers for each pattern:

%%WGT0{"w":[{"name":"patternpreview","type":"canvas","size":[103,140],"pos":[138,187],"locked":1,"show":"transparent","border":0,"image":"%%IMG2AGcAjAFoAGUBAgAbAQEABQEBAB0BAQANAQEAFwECABsBAQAFAQEAKwEBABcBAgANAQQAAwEEAAIBBAACAQQAAgEDAAIBAQABAQIAAgEBAAEBAgAKAQEAAwEBAAEBAgADAQQAAgEDAAIBAQADAQEACwECAA0BAQADAQEAAQEBAAMBAQADAQEABQEBAAMBAQADAQEAAQECAAIBAQABAQIAAgEBAAkBAQADAQIAAgEBAAEBAQADAQEAAQEBAAMBAQACAQEAAQEBAAwBAgANAQEAAwEBAAEBAQADAQEAAwEBAAUBAQADAQUAAQEBAAUBAQADAQEACQEBAAMBAQADAQEAAQEBAAMBAQABAQUAAwEBAA0BAgANAQEAAwEBAAEBAQACAQIAAwEBAAUBAQADAQEABQEBAAUBAQADAQEACQEBAAMBAQADAQEAAQEBAAMBAQABAQEABgEBAAEBAQAMAQIADQEEAAMBAgABAQEABAECAAQBAgACAQQAAQEBAAUBAQADAQEACQEBAAMBAQADAQEAAgEEAAIBBAABAQEAAwEBAAsBAgANAQEAVwECAA0BAQBXAQIAZQFpAGUBAgAJAQMACwEBAAkBAwAJAQMACQEBAAEBAQAJAQMACQEDAAkBAwAFAQIACQEBAAEBAQAKAQIACwEBAAsBAQAJAQEAAQEBAAkBAQALAQEADQEBAAUBAgAJAQEAAQEBAAsBAQAJAQMACgECAAkBAwAJAQMACQEDAAoBAgAFAQIACQEBAAEBAQALAQEACQEBAA0BAQALAQEACwEBAAkBAQABAQEACgEBAAYBAgAJAQMACwEBAAkBAwAJAQMACwEBAAkBAwAJAQMACgEBAAYBAgBlAQIAAgFhAAIBAgACAQEACwENAgsBAQMLAQEICwEBBQsBAQYLAQEHCwEBAAIBAgACAQEACwENAgsBAQMLAQEICwEBBQsBAQYLAQEHCwEBAAIBAgACAQEACwENAgsBAQMLAQEICwEBBQsBAQYLAQEHCwEBAAIBAgACAQEACwENAgsBAQMLAQEICwEBBQsBAQYLAQEHCwEBAAIBAgACAQEACwENAgsBAQMLAQEICwEBBQsBAQYLAQEHCwEBAAIBAgACAQEACwENAgsBAQMLAQEICwEBBQsBAQYLAQEHCwEBAAIBAgACAQEACwENAgsBAQMLAQEICwEBBQsBAQYLAQEHCwEBAAIBAgACAQEACwENAgsBAQMLAQEICwEBBQsBAQYLAQEHCwEBAAIBAgACAQEACwENAgsBAQMLAQEICwEBBQsBAQYLAQEHCwEBAAIBAgACAQEACwENAgsBAQMLAQEICwEBBQsBAQYLAQEHCwEBAAIBAgACAQEACwENAgsBAQMLAQEICwEBBQsBAQYLAQEHCwEBAAIBAgACAWEAAgECAGUBAgAJAQMACQEDAAcBAQABAQMABwEBAAMBAQAIAQEAAQEDAAcBAQABAQMABwEBAAEBAQABAQEABwEBAAEBAwAEAQIACQEBAAEBAQAJAQEAAQEBAAYBAgABAQEAAQEBAAYBAgACAQIABwECAAMBAQAGAQIAAwEBAAYBAgABAQEAAQEBAAYBAgABAQEABgECAAkBAwAJAQMABwEBAAEBAQABAQEABwEBAAMBAQAIAQEAAQEDAAcBAQACAQIABwEBAAEBAwAHAQEAAQEDAAQBAgAJAQEAAQEBAAsBAQAHAQEAAQEBAAEBAQAHAQEAAwEBAAgBAQABAQEACQEBAAMBAQAHAQEAAwEBAAcBAQADAQEABAECAAkBAwAJAQMABwEBAAEBAwAHAQEAAwEBAAgBAQABAQMABwEBAAEBAwAHAQEAAwEBAAcBAQABAQMABAECAGUBAgACAWEAAgECAAIBAQgLAQEJCwEBCgsBAQsLAQEMCwEBDQsBAQ4LAQEPCwEBAAIBAgACAQEICwEBCQsBAQoLAQELCwEBDAsBAQ0LAQEOCwEBDwsBAQACAQIAAgEBCAsBAQkLAQEKCwEBCwsBAQwLAQENCwEBDgsBAQ8LAQEAAgECAAIBAQgLAQEJCwEBCgsBAQsLAQEMCwEBDQsBAQ4LAQEPCwEBAAIBAgACAQEICwEBCQsBAQoLAQELCwEBDAsBAQ0LAQEOCwEBDwsBAQACAQIAAgEBCAsBAQkLAQEKCwEBCwsBAQwLAQENCwEBDgsBAQ8LAQEAAgECAAIBAQgLAQEJCwEBCgsBAQsLAQEMCwEBDQsBAQ4LAQEPCwEBAAIBAgACAQEICwEBCQsBAQoLAQELCwEBDAsBAQ0LAQEOCwEBDwsBAQACAQIAAgEBCAsBAQkLAQEKCwEBCwsBAQwLAQENCwEBDgsBAQ8LAQEAAgECAAIBAQgLAQEJCwEBCgsBAQsLAQEMCwEBDQsBAQ4LAQEPCwEBAAIBAgACAQEICwEBCQsBAQoLAQELCwEBDAsBAQ0LAQEOCwEBDwsBAQACAQIAAgFhAAIBAgBlAQIAZQECAAgBAQABAQMABwEBAAEBAwAHAQEAAQEDAAcBAQABAQMABQEDAAEBAwAGAQMAAgEBAAYBAwABAQMABQEDAAEBAwADAQIABwECAAEBAQAIAQIAAwEBAAYBAgABAQEAAQEBAAYBAgABAQEAAQEBAAcBAQABAQEAAQEBAAgBAQABAQIACAEBAAMBAQAHAQEAAwEBAAMBAgAIAQEAAQEDAAcBAQACAQIABwEBAAEBAwAHAQEAAQEDAAUBAwABAQEAAQEBAAYBAwACAQEABgEDAAEBAwAFAQMAAgECAAMBAgAIAQEAAQEBAAEBAQAHAQEAAgEBAAgBAQABAQEAAQEBAAcBAQADAQEABQEBAAMBAQABAQEABgEBAAQBAQAGAQEAAwEBAAcBAQAFAQEAAwECAAgBAQABAQMABwEBAAIBAQAIAQEAAQEDAAcBAQABAQMABQEDAAEBAwAGAQMAAgEBAAYBAwABAQMABQEDAAEBAwADAQIAZQECAAIBYQACAQIAAgEBEAsBARELAQESCwEBEwsBARQLAQEVCwEBFgsBARcLAQEAAgECAAIBARALAQERCwEBEgsBARMLAQEUCwEBFQsBARYLAQEXCwEBAAIBAgACAQEQCwEBEQsBARILAQETCwEBFAsBARULAQEWCwEBFwsBAQACAQIAAgEBEAsBARELAQESCwEBEwsBARQLAQEVCwEBFgsBARcLAQEAAgECAAIBARALAQERCwEBEgsBARMLAQEUCwEBFQsBARYLAQEXCwEBAAIBAgACAQEQCwEBEQsBARILAQETCwEBFAsBARULAQEWCwEBFwsBAQACAQIAAgEBEAsBARELAQESCwEBEwsBARQLAQEVCwEBFgsBARcLAQEAAgECAAIBARALAQERCwEBEgsBARMLAQEUCwEBFQsBARYLAQEXCwEBAAIBAgACAQEQCwEBEQsBARILAQETCwEBFAsBARULAQEWCwEBFwsBAQACAQIAAgEBEAsBARELAQESCwEBEwsBARQLAQEVCwEBFgsBARcLAQEAAgECAAIBARALAQERCwEBEgsBARMLAQEUCwEBFQsBARYLAQEXCwEBAAIBAgACAWEAAgECAGUBAgBlAQIABgEDAAEBAQABAQEABQEDAAEBAwAFAQMAAQEDAAUBAwABAQMABQEDAAEBAwAFAQMAAQEDAAUBAwABAQMABgEDAAIBAQAEAQIACAEBAAEBAQABAQEABwEBAAEBAQAJAQEAAQEBAAkBAQADAQEABwEBAAEBAQABAQEABwEBAAEBAQABAQEABwEBAAEBAQABAQEACAEBAAEBAgAEAQIABgEDAAEBAwAFAQMAAQEDAAUBAwABAQMABQEDAAIBAgAFAQMAAQEDAAUBAwABAQMABQEDAAEBAQABAQEABgEDAAIBAQAEAQIABgEBAAUBAQAFAQEABQEBAAUBAQADAQEAAQEBAAUBAQAEAQEABgEBAAMBAQABAQEABQEBAAUBAQAHAQEAAQEBAAEBAQAIAQEAAgEBAAQBAgAGAQMAAwEBAAUBAwABAQMABQEDAAEBAwAFAQMAAgEBAAYBAwABAQMABQEDAAEBAwAFAQMAAQEDAAYBAwACAQEABAECAGUBAgACAWEAAgECAAIBARgLAQEZCwEBGgsBARsLAQEcCwEBHQsBAR4LAQEfCwEBAAIBAgACAQEYCwEBGQsBARoLAQEbCwEBHAsBAR0LAQEeCwEBHwsBAQACAQIAAgEBGAsBARkLAQEaCwEBGwsBARwLAQEdCwEBHgsBAR8LAQEAAgECAAIBARgLAQEZCwEBGgsBARsLAQEcCwEBHQsBAR4LAQEfCwEBAAIBAgACAQEYCwEBGQsBARoLAQEbCwEBHAsBAR0LAQEeCwEBHwsBAQACAQIAAgEBGAsBARkLAQEaCwEBGwsBARwLAQEdCwEBHgsBAR8LAQEAAgECAAIBARgLAQEZCwEBGgsBARsLAQEcCwEBHQsBAR4LAQEfCwEBAAIBAgACAQEYCwEBGQsBARoLAQEbCwEBHAsBAR0LAQEeCwEBHwsBAQACAQIAAgEBGAsBARkLAQEaCwEBGwsBARwLAQEdCwEBHgsBAR8LAQEAAgECAAIBARgLAQEZCwEBGgsBARsLAQEcCwEBHQsBAR4LAQEfCwEBAAIBAgACAQEYCwEBGQsBARoLAQEbCwEBHAsBAR0LAQEeCwEBHwsBAQACAQIAAgFhAAIBAgBlAQIAZQECAAYBAwABAQMABQEDAAEBAwAFAQMAAQEBAAEBAQAFAQMAAQEDAAUBAwABAQMABQEDAAEBAwAFAQMAAQEDAAUBAwABAQMABAECAAgBAQADAQEABwEBAAMBAQAHAQEAAQEBAAEBAQAHAQEAAQEBAAkBAQABAQEACQEBAAMBAQAHAQEAAQEBAAEBAQAHAQEAAQEBAAEBAQAEAQIABgEDAAEBAwAFAQMAAQEDAAUBAwABAQMABQEDAAEBAwAFAQMAAQEDAAUBAwACAQIABQEDAAEBAwAFAQMAAQEDAAQBAgAIAQEAAQEBAAkBAQADAQEABwEBAAMBAQAHAQEAAwEBAAcBAQABAQEAAQEBAAcBAQACAQEACAEBAAEBAQABAQEABwEBAAMBAQAEAQIABgEDAAEBAwAFAQMAAQEDAAUBAwADAQEABQEDAAEBAwAFAQMAAQEDAAUBAwACAQEABgEDAAEBAwAFAQMAAQEDAAQBAgBlAQIAAgFhAAIBAgACAQEgCwEBIQsBASILAQEjCwEBJAsBASULAQEmCwEBJwsBAQACAQIAAgEBIAsBASELAQEiCwEBIwsBASQLAQElCwEBJgsBAScLAQEAAgECAAIBASALAQEhCwEBIgsBASMLAQEkCwEBJQsBASYLAQEnCwEBAAIBAgACAQEgCwEBIQsBASILAQEjCwEBJAsBASULAQEmCwEBJwsBAQACAQIAAgEBIAsBASELAQEiCwEBIwsBASQLAQElCwEBJgsBAScLAQEAAgECAAIBASALAQEhCwEBIgsBASMLAQEkCwEBJQsBASYLAQEnCwEBAAIBAgACAQEgCwEBIQsBASILAQEjCwEBJAsBASULAQEmCwEBJwsBAQACAQIAAgEBIAsBASELAQEiCwEBIwsBASQLAQElCwEBJgsBAScLAQEAAgECAAIBASALAQEhCwEBIgsBASMLAQEkCwEBJQsBASYLAQEnCwEBAAIBAgACAQEgCwEBIQsBASILAQEjCwEBJAsBASULAQEmCwEBJwsBAQACAQIAAgEBIAsBASELAQEiCwEBIwsBASQLAQElCwEBJgsBAScLAQEAAgECAAIBYQACAQIAZQECAGUBAgAGAQEAAQEBAAEBAwAFAQEAAQEBAAIBAQAGAQEAAQEBAAEBAwAFAQEAAQEBAAEBAwAFAQEAAQEBAAEBAQABAQEABQEBAAEBAQABAQMABQEBAAEBAQABAQMABQEBAAEBAQABAQMABAECAAYBAQABAQEAAQEBAAEBAQAFAQEAAQEBAAEBAgAGAQEAAQEBAAMBAQAFAQEAAQEBAAMBAQAFAQEAAQEBAAEBAQABAQEABQEBAAEBAQABAQEABwEBAAEBAQABAQEABwEBAAEBAQADAQEABAECAAYBAwABAQEAAQEBAAUBAwACAQEABgEDAAEBAwAFAQMAAQEDAAUBAwABAQMABQEDAAEBAwAFAQMAAQEDAAUBAwACAQIABAECAAgBAQABAQEAAQEBAAcBAQACAQEACAEBAAEBAQAJAQEAAwEBAAcBAQADAQEABwEBAAMBAQAHAQEAAQEBAAEBAQAHAQEAAgEBAAUBAgAIAQEAAQEDAAcBAQACAQEACAEBAAEBAwAHAQEAAQEDAAcBAQADAQEABwEBAAEBAwAHAQEAAQEDAAcBAQACAQEABQECAGUBAgACAWEAAgECAAIBASgLAQEpCwEBKgsBASsLAQEsCwEBLQsBAS4LAQEvCwEBAAIBAgACAQEoCwEBKQsBASoLAQErCwEBLAsBAS0LAQEuCwEBLwsBAQACAQIAAgEBKAsBASkLAQEqCwEBKwsBASwLAQEtCwEBLgsBAS8LAQEAAgECAAIBASgLAQEpCwEBKgsBASsLAQEsCwEBLQsBAS4LAQEvCwEBAAIBAgACAQEoCwEBKQsBASoLAQErCwEBLAsBAS0LAQEuCwEBLwsBAQACAQIAAgEBKAsBASkLAQEqCwEBKwsBASwLAQEtCwEBLgsBAS8LAQEAAgECAAIBASgLAQEpCwEBKgsBASsLAQEsCwEBLQsBAS4LAQEvCwEBAAIBAgACAQEoCwEBKQsBASoLAQErCwEBLAsBAS0LAQEuCwEBLwsBAQACAQIAAgEBKAsBASkLAQEqCwEBKwsBASwLAQEtCwEBLgsBAS8LAQEAAgECAAIBASgLAQEpCwEBKgsBASsLAQEsCwEBLQsBAS4LAQEvCwEBAAIBAgACAQEoCwEBKQsBASoLAQErCwEBLAsBAS0LAQEuCwEBLwsBAQACAQIAAgFhAAIBAgBlAQIAZQFo","scale":1}],"d":{}}

Each animated pattern can have a list of up to 256 other patterns in it... which is mostly useful because you can slow down how quickly it cycles through colors by listing them more than once like 38,38,38,38 instead of just a single 38 which would only be visible for a short moment.

Hopefully something in this helped you! 

(+1)

I'll try it!

(+1)

It's me, I'm back again, and now I've encountered another strange issue...

I added an extra button to the card, intending to jump to the next interface after the dd mode finishes playing. However, after I edited it in the widget and switched to interactive playback, it played normally once. Then I clicked the button, but the dd popup on the next interface inexplicably played the content twice! And when I used the menu shortcut to jump back, the content still played twice! Oh my god, I really can't figure out why this is happening... Here is my card code:

on view do (I want it to jump to dd mode as soon as it appears)  

 play["xxx""loop"]  

 dd.open[deck]   

 dd.show[0]  

 sleep[80]  

 dd.show[1]  

 dd.style[().speed:6]  

 dd.say[""]  

 dd.say[""]  

 dd.close[]  

end  

```


The button is just a regular on click ... then go next.


Since I set the previous card to automatically jump to the next page after the dd playback finishes, it didn’t appear. But after it automatically jumped to the next page, the card content on that page played twice (I think this might not be due to switching between interactive or widget). When jumping to a similar popup again, it played twice again. I’m really about to cry... Please save me. Or perhaps I need a lock code so that it pauses after playing once?

Developer(+1)

See this thread.

(+2)

Thank you so much!:D

apologies if this was covered elsewhere, my search-fu is terrible and i'm rushing ahead of what might be a power outage

is there any way to change the font of the Decker menus themselves? i spent my formative years with hypercard but my old eyes can't take this interface, i'm afraid. (it's not a sizing issue bc i don't seem to have a problem with the small editing font) 

(+1)

The menus basically just use the "menu" font built into Decker. It is possible to edit this font or the other built-in fonts (using for example the editor in the example fonts.deck) and these changes will be saved along with the deck.

If you've got a separate Decker font and want to use it to replace the default fonts, I'd assume this is possible somehow but I'm not sure the best way to do it.

Although if it's eyestrain that's the issue, it could be worth looking into changing the palette instead?

(+1)

Yeah, there's a way to do it! We'll be using the font editor in examples/fonts.deck to modify the menu font.

The one slightly fussy element is that "menu" is not a font that can be transferred between decks through the DA/Font mover... but after making the change you can save the editor deck as a new file and empty it out to use it as a starting point for future projects.

(There might be other ways to move the font around, but I'm less sure about how....)

If that sounds okay to you then this is how I'd do it: We're going to copy the glyphs of an existing font and apply them to the menu font.

Step one would be to open examples/fonts.deck and hit the button for the Font Editor. Look through the list to find a font you like. A lot of them tend towards whimsical or deliberately handwritten but perhaps there's something in there that would work for you. 

There's also the option of using something from this font pack which has some very nice ones but you'd probably want to edit them to have less empty space above the glyphs. (I can explain more if you find one that you prefer in there)

I'm going to use 'ahmCasual' from fonts.deck for my example here. The existing 'menu' font is 16 by 13 pixels, and ahmCasual is 16 by 16. The difference in width might cause a letter to get cut of in some places where 'menu' is currently used but... it's probably okay? It's close enough.

At the top right of this card you'll find a couple of sliders labeled 'font properties' and a button labeled 'set grid overlay to font dimensions' -- the button may be grayed out if the grid overlay already matches the font dimensions listed.


We want to set the grid overlay to match the dimensions of the font we're taking our new glyphs from. So after you find a font you like you should click that button (if it isn't gray already).

Now click the Sheet button at the bottom of the card. 

Go into Widgets mode and use the View menu to turn on 'Snap to Grid'. (You can also turn on 'Show Grid Overlay' if you'd like to see what's going on.) 

With 'Snap to Grid' active the positions and sizes of widgets will snap to the dots on the grid overlay whenever we move or resize them.

And because we're in Widgets mode you'll also be see the hidden widget that marks the area where the glyphs are drawn on the card. (the widget is named 'workzone')

(an image of the workzone widget as I found it..... not at all aligned with my new grid overlay dimensions but that's fine)

Drag 'workzone' around once to make the top left corner snap to a point on the grid near the top left of the card. Then resize 'workzone' once so the widget  is moderately large on the card and the other dimensions will snap to the grid too. You don't need to be too specific about the size or position. 

If it's not big enough during the next step you can resize it and try again. It's also okay if there are still unrelated glyphs on the card -- they'll be erased automatically in a moment.

Go back to Interact mode on this same card and click the 'Load' button. The glyphs of the font you selected should now be shown on the card inside the space marked by the 'workzone' widget.

Click the Font button at the bottom of this card to go back to the card with the font list and select 'menu' towards the top of the list.

Use the arrows on the 'font properties' sliders to match the grid overlay dimensions of the other font we're using (in the case of my example, ahmCasual, that's 16 by 16). The 'set grid overlay to font dimensions' button (which we're not clicking now) should become gray/locked automatically when your selected dimensions in the sliders match the current grid overlay.

And now we go back to the Sheet editor card one last time and click the Apply button.

The glyphs that were on the card in the 'workzone' should be applied to the menu font. :) 

Save this deck as a new file and enjoy?

(+3)

Here’s a more automated way to clobber the menu font with a custom one.

  1. Copy this text to the clipboard:

    %%WGT0{"w":[{"name":"clobberfont","type":"button","size":[112,16],"pos":[208,64],"script":"on click do\n s:me.font\n t:deck.fonts.menu\n \n t.size:s.size\n t.space:s.space\n each i in range 256\n  t[i]:s[i]\n end\nend","font":"body","text":"Clobber menu font"}],"d":{}}
    
  2. Open a deck with a font you like

  3. Go into Widget-editing mode (Tool → Widgets)

  4. Paste the widget (Edit → Paste Widgets)

  5. This should give you a button like this:

    image.png

  6. Set the button’s font to be the font that you want to use as the menu font (Widgets → Font…)

  7. You now have a button that will clobber the menu font of the deck it’s in, with a font of your choosing

To set the font of a deck:

  1. Copy your customised button to the clipboard (Edit → Copy Widgets)
  2. Open the deck whose menu font you want to change
  3. Go into Widget-editing mode (Tool → Widgets)
  4. Paste your customised button into the deck (Edit → Paste Widgets)
  5. Go into Interact mode (Tool → Interact)
  6. Click the button
  7. You should see the font in Decker’s menu-bar change
  8. Now this deck has a custom menu font, you can delete the button and save the deck, and the change will persist

Warning: Unlike patterns and palettes, Decker does not have an easy way to reset a font to its default appearance. If you decide you want the old font back again, that’s going to be trickier.

Also note that Decker’s interface does not adapt well to fonts that are larger than the default. It does its best, but there are limits:

image.png

(+1)

Passing arguments with event calls from Contraptions?

Hi! I was going through the "Breakout Three Ways" tutorial, and decided I wanted to make my own game-like object. I have an array of tiles (Contraptions from a Prototype Tile) and when the user clicks one, I want it to pass the tile's label (kept in a hidden field) to the top level Card script. That top-level script looks like this:

on moving which do
 alert["Yes, this is the card top level."]
 alert[which]
end

So, the event should be "moving[]" which accepts an argument (`which`), right?

So, in my Prototype, I have this script attached to the invisible button that makes up the tile's face. The "which" field is hidden, keeping track of the label for the tile:

on click do
  card.parent.event.moving[which.text] 
end

This is based on the "Breakout" example, but none of the Card level event handlers take arguments, so I'm trying to supply the argument as I would with a regular function. I've also tried without the brackets and using literal strings or numbers instead of the text from the hidden "which" text field. And every time, all I get is zero, or null or empty (with event handler code above).

Can someone give me a hint on where I've gone wrong? This seems to be a reasonable way to call the event (other events seem to do it?). But if I can't get it to work, I'm going to have to do something stupid like set a flag on the Contraption and call the event and have the handler grovel through all the widgets to find out who's got the flag set.  I guess if it works, it's not stupid, but it seems inefficient since I know what tile is raising the event?

Thanks!

Developer (1 edit)

In Lil, dot-indexing with an identifier and bracket-indexing with a string are equivalent:

card.parent.event.moving
card.parent.event["moving"]
card.parent["event"]["moving"]
card["parent"]["event"]["moving"]

This is a very convenient shorthand when functions take a single string as their argument, but I can see how it might leave you puzzled about passing extra arguments to the "event" method of deck-parts. You're looking for something like:

card.parent.event["moving" which.text]

Make sense?

(1 edit) (+2)

Okay... So I guess this is the relevant bit in the manual:


I thought that ".event" was just a dictionary, not actually a function (method?) that was taking event names(and optional arguments) as its arguments. Obviously, I need to read more carefully... Thanks very much for pointing me in the right direction!


With that resolved, I think I'm getting very close to the endgame here!

(+1)

Hi! Thanks again for your help! I got it working: https://oofoe.itch.io/puz15
(password "puz15" -- I just don't want it showing up on my profile yet because not finished.)

Another question, if you're willing... I'm trying to use the array language capabilities to figure out if there's an opening to move a tile into by vector adding to get the orthogonal neighbours:

np:2 window (p,p,p,p)+(1,0,0,1,-1,0,0,-1)

Then I get the contents of my tracking map (canvas that I write the actual tile positions into) at those positions to determine if one of the neighbouring spaces is empty (=0):

0=map@np  # Yields something like (0,1,0,0)

I know that a lot of array languages have some kind of operator to filter one array by a boolean other, so I could apply the result of the 0=map@np to np and arrive at just the coordinates of the empty space (or nil, if no empty space in neighbours). Currently, I'm grovelling through with an each loop -- is there a way to one-shot the operation like that?

Thanks!

Developer

In K, you'd solve this kind of problem with the "where" (&) operator:

 &0 1 0 0 1
1 4
 *&0 1 0 0 1
1

Lil doesn't have an independent monadic primitive for this operation; it's folded into the query language:

first extract value where 0=map@value from np

This is a little bulky when you're doing something simple.

When you only need a single result, you could consider forming a dictionary:

((0=map@np)dict np)[1]

It's also possible to perform an equivalent "masking" operation just with arithmetic:

m:0,0,0,1,0     # "one-hot" boolean vector
m*keys m        # (0,0,0,3,0)
sum m*keys m    # 3

Hello everyone! I really truly appreciate all the help from everyone before; you guys solved so many problems! But now I have many new issues.

The good news is, my game is already half-finished, and I want to create a screen shake effect, similar to gunfire or vibrations. I tried using fixed-point screen movement, but it looks really strange... I feel like there might be a better way to achieve this kind of performance effect, I just haven't found it? 💥💥💥

Secondly, I originally wanted to add other language fonts to this game, but even though I copied all the fonts over, some other countries' languages still throw errors and can't be used, such as Chinese, Japanese, Korean, etc... It seems like these fonts just aren't here? But if I really did add these fonts, it would be a massive amount of work—I need hundreds of cards lol...

Also, I really hope someone could personally teach me, step by step, how to export this game and publish it on itch.io when it's done, so that everyone can download and play it. I currently understand that I need to add a little txt file to the software package to include the author's copyright notice? : ) I got it.

And also, after it's really exported, how do I hide the top work panel so that players can only click the cards to play? I found something similar in the Locked decks... but... oh, I feel like I just can't understand it. Does it need something else?

I'm without a doubt a complete computer beginner. If someone is really willing to answer these questions in detail, I'd be really touched. Thank you ❤️

Developer(+2)

Puppeteer includes a simple screenshake effect. If you're using that library already, you can just include the !shake command in your dialog scripts like in the example. Here's a simplified version of how that works internally that could be used elsewhere- adjusting "shake_mag" and the duration of the transition (here 15) can tune how the effect looks:

go[card on shake_trans c a b t do
  local shake_mag:30,30
  local m:shake_mag*1-t
  c.pattern:1
  c.rect[0,0 c.size]
  c.paste[a (random@2*m)-m]
end 15]

Unfortunately, supporting non-Latin-alphabet languages in Decker is not straightforward. Phinxel has a few suggestions for workarounds, but any way you slice it a great deal of work would be involved.

To hide Decker's main menu, you'll need to lock the deck. (The following page describes how you can save a "protected" copy of the current deck.) Whether you're exporting a protected copy of a deck or using the ordinary save menu, all you need to do to create a web-playable version of a deck is save with an ".html" extension.

When you create your project page on Itch.io, upload the .html file you saved, and mark it as "played in browser". It'll look something like this:

There are also additional settings to configure how your game will be embedded in the web page:

The defaults are mostly fine, but I recommend enabling the "fullscreen button" for most projects.

(+1)

Oh my god, this is amazing! I used the code and the result is absolutely perfect!

Thank you so much for your help—I’m going to work hard on creating my game with Decker ✨🔆

(+2)

i am way more used to making things in flash (rip) - so maybe i'm erring in thinking of canvases as adobe flash movie clips? not being able to "enter" a canvas like you can with a flash movie clip is making it hard for me to understand how anything inside a canvas can be changed or even accessed once the canvas is created

to be specific, i don't understand where other frames of a canvas are stored. i tried dissecting several canvases in phinxel's field notes (in native decker), especially the cookies on the "sliders" page and the trees on the "timing and sleep()" page, the but i don't get where decker is pulling the other frames/states of these canvases. it doesn't seem to be the cards they are on. are the frames in another card? is there a way to "enter" canvases that i've been missing?

thanks in advance ^^

(1 edit) (+2)

A field widget stores some text, a slider widget stores a number, a canvas widget stores a picture, that’s about all there is to it.

If you see a canvas widget’s content changing between different frames of animation, then either the canvas is being redrawn by code (as in the Canvases card in the built-in tutorial deck), or there’s some other card or canvas somewhere that has all the different frames, which are being copied into the canvas to create animation.

Decker comes with an example deck called Puppeteer, which includes a module you can include in your own decks to do this kind of animation.

somehow i missed the existence of puppeteer...d'oh

(4 edits) (+2)

You're off about canvases, unfortunately... they're so much more basic that you're currently thinking. 

(Though there is something else that you an look inside... I'll come back to that)

A Canvas doesn't really store any data except for the image that is currently displayed on it.

But canvases are very flexible and convenient as the display component of anything interactive or animated that uses images. 

This might be a weird metaphor but if we were trying to play a film in Decker.... a canvas is like a projection screen. 
It's not the projector (that's probably the script, wherever it lives) or the film (your stored images).

---

Okay! So! In Phinxel's Field Notes almost all of the extra images are stored in separate canvases on a card named 'storage'.

This card can't be navigated to while flipping through the book in interact mode because I prevented that... but you can find it by arrow key navigating around in widget mode or by opening up [ File > Cards ] to see the full list of cards and navigate to it that way("storage" is near the very bottom of the list)  if you want to see all the stuff in there.

Inside of the script for the cookie slider example you mentioned there's a snippet that looks like this:

 plate.paste[ storage.widgets[x].copy[] ]

What this does is copy an image from a canvas on my storage card onto the canvas on the same card that we're on now... the relevant canvas on this slider example card is named 'plate'. 

storage.widgets[] is telling Decker to look at the widgets on my "storage" card and 'x' is a temporary variable combining the naming pattern I used for my stored canvases and the current number that the slider is set to. Don't worry about that part... I think I was trying to make my own example a little more compact.

If I was going to rewrite it to copy from a single specific named canvas it might look like this:

 plate.paste[ storage.widgets["cookie3"].copy[] ] 
     # or, alternatively #
 plate.paste[ storage.widgets.cookie3.copy[] ] 
     # or if I was copying from a canvas on the same card as the one I'm pasting on...#
 plate.paste[ cookie3.copy[] ]

So... we have to store our extra image data somewhere else that isn't just on the 'projector screen' and there's a few options:

Canvases

Storing images in other canvases is totally fine! Depending on how many images you're storing it might not be ideal but it works. Canvases are built for displaying images and they have easy to use .copy[] and .paste[] functions to move those images around.

Fields

When you make a new field it'll be set to "rich text" by default, which is exactly what we need for it to be able to store images. If we put some images into a field we can use the .images attribute to refer to them in scripts.

You can see some examples of this on one of the pages about Fields in Phinxel's Field Notes (here's a direct link to the page) but it probably warrants more discussion here on the forums because it's very handy! This is a particularly good method for storing lots of animation frames in one place.

Other Places ....

Images can be stored in grid widgets as text (image data correctly stored this way would begin with %%IMG) or maybe also as pasted images if the grid column format is set to support rich text (this is not the default for grids).

(I've never really used grids for storing images for animations, honestly. I just know that it should technically be possible....)

You can also store images directly on a card and refer to the card.image or even use a widget as a marker for a smaller area on the card that you'd like to use. Someone can probably explain more about this if it sounds appealing.

But I personally tend to use canvases and fields for most things.

---

The other thing I wanted to mention is Contraptions, which do actually have an "Inside". Contraptions are custom widgets made of the 5 basic types of widgets + scripts (see the contraption bazaar thread to tour some of the community contributed contraptions).

Going back to the idea of a projector...  a contraption could be made of a canvas to play your sequence of images and a field to store the full collection of frames. And you'd definitely also need a script to tell the widgets how to relate to each other.

This could absolutely just be built directly on a card (or split across a display card and a storage card...) without getting contraptions involved but sometimes it's handy to package these combinations of widgets together. And this is the concept that exists in Decker where a widget does actually have a secret "inside" area so I wanted to mention it. :) It's a much bigger topic though so I'll stop here.

Hopefully this made a little sense.

thanks so much for the explanation, i now see the truth of the noble contraption (and of the canvas) \o/

Developer(+3)

I think of canvas widgets as being sort of like <canvas> elements on web pages: a drawing surface that contains one image at any given time and which can be manipulated with scripts.

Building on what Ahm said, it's certainly possible to create contraptions that bundle together a canvas and storage for a sequence of animation frames, with logic for playing those sequences back. The WigglyKit deck comes with a contraption along these lines called wigglyPlayer.

Here's a little demo video of using a WigglyPlayer to create looping animated "sprites" on top of a drawing, with no custom scripting required:


thank you for the demonstration- having frames in a sprite sheet type configuration is pleasantly gamedev-y

(+1)

Hello! I need a little help figuring out how to specify specific rows to pull data from.

So basically what I'm trying to do is make a very simple text box that draws from a specific row in the graph, and then pastes the value into the field, then also takes the size data from the row next to it and applies it to the same field. 

I've figured out how to get the text to paste and how to change the size, but right now the only way I know how to call for rows is through this random command.

on click do  
   field.value: random[grid.value].value 
end

I mostly just need to know how to call on specific rows though since I haven't been able to figure it out. I should be able to figure out the rest from there.

Developer(+1)

Let's say I have a grid widget like this:


The .value attribute of a grid widget is a table value.

Tables can be indexed by a string (a column name) to retrieve a column as a list, or by a number (a row number) to retrieve a row as a dictionary:

somegrid.value[1]
# {"fruit":"cherry","price":0.35,"amount":15}
somegrid.value.price
# (1,0.35,0.75,2.99,0.92)

Thus, if you want a specific cell, you can index by row and then column, or column and then row, whichever way you find convenient:

somegrid.value[1].price  # 0.35
somegrid.value.price[1]  # 0.35

Any questions?

(+1)

No questions yet, I've got it working now! Thank you for you help!

(+1)

Ok actually I ran into a weird hiccup. I'm able to call on specific cells for text just fine, but when it comes to the size I'm just not able to get it to read properly. When I try to specify a cell under size, it glitches out the size of the field and makes it disappear. (code im trying below just as example to make sure im not messing up something small lol)

on click do    
   n:random[0,1,2]    
   field.value: grid.value.words[n]    
   field.size: grid.value.size[n] 
end

Weirdly, it "works" when I don't specify a cell, but it takes the first numbers of the first two cells in the column rather than the numbers from one cell.

on click do    
n:random[0,1,2]    
field.value: 
grid.value.words[n]    
field.size: grid.value.size 
end

I tried to put the size in a different grid, but I ran into the same issue.

Developer(+2)

I suspect that what's happening is you've placed e.g. the string "50,20" into a cell rather than a pair of numbers.

There are several ways of converting a string of comma-separated numbers into a proper list. For example,

"%i,%i" parse "50,20"
0 + "," split "50,20"
eval["50,20"].value     # (this is opening a walnut with a sledgehammer)

Alternatively, if you want to store structured data within a grid cell, you can specify a column's format as "j" (JSON data) or "J" (LOVE data, a superset of JSON) and then enter your pairs like so in CSV mode:


or like so in JSON mode:

(+2)

It works! Thank you!

Hi, I have a question about resolutions. For my current project, I have a height of 360, so that the project will go fullscreen on most screens. But I was wondering if the fullscreen effect on web-decker, that fills the screen no matter the resolution, can also be possible on native decker or is it a feature that's only on the web version?

Developer(+1)

Currently native-decker doesn't include a "stretch-to-fit" fullscreen mode.

(+1)

Thank you for the fast answer! I'll keep that in mind.

(+2)

locked myself out of the deck and the ctrl + U + L + D shortcut in native decker isn't working :') is it over for me

(1 edit) (+1)

Don't worry! Open up your file in a basic text editor (notepad or whatever you've got).

You'll see stuff at the top that looks kinda like this:


Change that line to say locked: 0 and you should be good.

(+2)

thank you for saving my bacon again!

(i'm not sure why but decker doesn't respond to hotkeys in expected ways)

(+1)

No problem! :D

With the unlock deck shortcut (CTRL + U + L + D) sometimes I forget to hold a letter until the end and that's why it doesn't work on the first try for me. 

And if I had to guess about other hotkey difficulties people might have (not assuming in your case, just general advice):

Sometimes people aren't familiar with the "^c" notation in the menus. Where the ^ means "CTRL on Windows and Linux"/"CMD on mac"

Or if someone is using web decker, I believe some of the hotkeys are effectively blocked by web browsers because browsers use those shortcuts too and they take priority.

If you're having trouble/weirdness that don't seem related to any of that stuff then it might be worth making a bug report about it?

(+2)

how do you hide the corners of a deck? i see the scripting syntax for it but i cant figure it out..

(1 edit) (+3)

This kind of thing is easiest to do with the Listener, I think. 

Go to [Decker > Listener] in the menu, type the snippet of code and then use Shift+Enter to run it. 

(Or you can just put the script inside a button and click it in interact mode, if that's easier!)

For anyone finding this post later, this is about the rounded corners you see at the edge of decks published online.

You can use deck.corners:0 to remove the rounded corners from your project (this works by setting them to pattern 0/transparent) or you can use another pattern index number instead of '0' to change the corners to that color or pattern instead!

(+1)

Forgive me if this has been asked before, but how do I change a buttons outline to a color? I found out how to make the inside a color, but not the outline. I've tried everything. If its not a thing, would you mind implementing it? Thanks!

(1 edit) (+1)

It's not currently possible... So, widgets can have one .pattern attribute at a time. In the case of basic buttons we have that one color + black (or whatever else you've changed pattern 1 to be).

But there's still some options to get the result you want.

If this happens to be a visual direction you like... it might be good to know that the black lines and the inside color swap locations if you set the button to have inverted visibility:

And then there are the "Make a button look like anything" options. 

The first one is to have the appearance of a button as an image on the surface of the card and place an invisible button on top of it.

Or, if you want your customized button to have a specific click animation... you could paste images of your ideal button inside of the animButton contraption and use that. (It's the second contraption in the linked post)

If you want to copy an image of a standard button, select it and use [Edit > Copy Image] in the menu. This will copy the appearance of the widget into an image on the clipboard that you can paste anywhere else, to edit it or use it for other purposes.

If one of these options sounds good but it's unclear how to do something, please let me know.

(+2)

I apologize if this has been asked before, I looked and couldn't find anything. I also apologize if the answer is obvious, I'm dealing with a lot of brain fog so it's harder for me to figure things out these days. So, I want to have the palette change for a single card only so that a certain image displays correctly. Basically, I want the palette to change when you go to the specific card and revert to whatever it previously was when you leave. How would I go about accomplishing this?

(+1)

Hi,

So basically what you'll need is some code to change the palette when you go to that specific card, and change it back when you leave. This could be done in the button code or in the "on view" of the card. The "all about color" deck does have a bit of example code for doing this on the palette transitions page.

My palettefade module may be handy too, although it's primarily designed for doing fancy fade in/out transitions it does have some helpful utility functions for changing the palette. Hopefully should all be in the documentation but I'll try to go over some examples here.

So if you're using palettefade and you've added the module to your deck, you can get the current palette as a list of 16 integers by running pf.currentpalette[deck] in the Listener. Generally I'll take the output of that and make them like global constants e.g. in the deck-level script I'll have palette1:(16777215,16776960,16737536.... and so on for the various palettes I have.

Then when I want to change to a certain palette I'll use pf.setpalettte[deck palette1] and that'll change the palette. So I can have that in my "change to a new card" button or just in the "on view" so that however you got to the card it'll be at the correct palette.

If you want to get fancy then you could use the blackdip function in palettefade, that does a nice smooth fade to black and then fades up with the new palette, e.g. pf.blackdip[deck card2 30 palette2]. Or you can do something with transitions like in the all about colour deck example.

I hope at least some of this makes sense. Let me know if you're getting stuck though.

(+2)

Hello everyone! I have a question: D :Is there a code here that allows one sound to play immediately after the previous one finishes? Because when I use code like  play[""] , all the sound effects play and stop at the same time, but I want them to play one after another!

Developer(+2)

If you haven't already read it, I recommend checking out All About Sound.

In a simple linear script, like part of a cutscene, playing sounds in sequence is straightforward with sleep["play"]:

play["sound1"]
# do anything else you want while the sound is playing...
# ...
sleep["play"] # wait for all playing sounds (sound1) to finish
play["sound2"]

In more elaborate cases, with sounds playing while a deck remains interactive, you may want to rely upon the loop[] event or keep track of your own timer to trigger subsequent sound effects.

Does this help point you in the right direction?

(+2)

Oh my god, I totally forgot I’d seen it before! Thanks for the reminder!

(+2)

I tried using the sleep[] code, but I found that when I wanted to play these music tracks, the other buttons on my screen became unclickable. I need players to be able to click them while listening to the music, so I tried using random, but it causes random playback from the music list. I'm trying to find a code that can control the sequential playback of music without affecting the screen content, but unfortunately I haven't found it. Maybe I need help again.(PS:Due to network issues, I wasn't sure if that message went through, so I sent it again 😌)

Developer(+1)

If you want background music playing while a deck remains interactive, you will definitely need a more complicated approach than sleep[]; the discussion in this thread has some examples that may do what you need.

(+1)

Got it!

(+2)

Hello all.  I'm new to Decker.  I'm building a deck that has differently themed groups of cards.  I'd like to intercept field hyperlink clicks such that clicking a link from one card to another card within the same group navigates as normal, while clicking a link to a card in a different group plays a transition.  How can I achieve this?  Thanks!

Developer(+1)

Since you're overriding this behavior on many cards, it's easiest to define an overload for the link[] event at the deck level; see Deck -> Properies... -> Script... via the menu. I'll assume for the sake of this example that cards are named with a "group_cardname" convention, so we can use the portion of the name preceding the underscore to determine whether two cards belong to the same group:

on link x do
 on groupname x do
  first "_" split x
 end
 if groupname[deck.card.name]~groupname[x]
  send link[x]
 else
  go[x "BoxIn"]
 end
end

Make sense?

You may have a different method of distinguishing groups, like invisible metadata fields on cards; I'd be happy to clarify how to adapt this approach to your deck, if needed.

(+2)

Thank you.  That was very helpful.  Here's what I ended up using:

on link x do
    target: deck.cards[x]

    if target
        if !(target.widgets.channel.text = card.widgets.channel.text)
            go[x "Wink"]
        else
            go[x]
        end
    else
        send link[x]
    end
end

(+1)

What about go["Back"]?  I want to keep the simplicity of go["Back"], but need to ensure that my transition plays when going back to a different card group.  Thanks again!

Developer (1 edit) (+1)

Hmm. Tricky.

How about something like this?

on link x do
 here:deck.card
 send link[x]
 there:deck.card
 if !(here.widgets.channel.text=there.widgets.channel.text)
  go[here]
  go["Back" "Wink"]
 end
end
(+1)

Sorry for the confusion.  I have links and buttons in the mix.  Your answer solved the link issue.  However, I also have buttons with the Back action.  I need to make sure that if a back button from a channel one card would go back to channel two card, it plays the transition.

Developer

In that case you might want to consider giving the buttons a script that delegates to your link[] logic:

on click do
 link["Back"]
end
(+3)

Hey! I just discovered Decker and I think it's awesome. I have an idea for a game but I'm not sure if Decker's the right software for it. 2 questions:

- is there any way to give players the option to save and load their game (while in locked mode)? I'd like to make a game that takes a while to finish (with lots of stuff to read) so without saving, probably noone would ever reach the end of it. I don't know how to code, though 😇

- that being said; I'm not sure if a long game would be possible to make with Decker? I'd love some kind of point & click / vn hybrid with lots of branching. When testing out Decker I got the impression that this would get too complicated for the card system as you have to manually choose the card you're linking to. Is there any way around this, if you have, say, hundreds and hundreds of cards?

Any help would be much appreciated. I'm already in love with Decker, I'm so psyched to make something in it! <3

(+2)

Alright. So first up, you don't know how to code YET! You may yet learn to code. I think what you want to do is doable, if you are prepared to start dabbling in a bit of code. And as you get more comfortable you can try out more stuff

If you make a button and hit the "Script..." button, you'll see this pop up

on click do
end

In between is where we can put code that we want to run!

In terms of saving, you can save out a copy of the deck using the code app.save[], that's basically the same as hitting the save menu when you're unlocked. So in a button you can do

on click do
 app.save[]
end

With some more advanced coding, there are some other ways of saving out stuff but we'll start simple for now. But if you want a more complicated example, my game The Wayward Mage uses a custom save format that basically saves out the game state in a custom file.

A long game is ABSOLUTELY possible. It sounds like you're looking at basically doing branching purely on cards. If you're finding the "picking the next card to branch to" tricky with having to manually navigate to it, this is another thing that can be easier with code.

If you set up a button to go to a card with a transition, and then open its script up you will see something like this.

on click do
  go["card1" "SlideLeft"]
end

It might be easier, with lots of cards, to basically use this but change the names of the cards manually in the code, like if you know you want to go to a card named "branch2a" you can just write that into the code.

If you're doing visual novel stuff, it could be easier to do things without needing a separate card for each screen. If you use the dialogizer and puppeteer modules that come in the Decker examples folder, they basically let you write and run a whole visual novel script with sprites and a background and text and such. So you're not using a whole card for just one screen of text - you basically just have a card for a background, and some cards to store your character sprites. And then a hidden field somewhere to stash your script. It's again a bit of simple coding, if you look in the dialog.deck and puppeteer.deck files in the Examples folder they'll have documentation.

Finally, if you haven't checked it out definitely take a look at Phinxel's Field Notes, it's a very thorough Decker tutorial that'll teach you some simple coding things among many other Decker tricks, and it doesn't assume any existing coding knowledge. Another thing I've found helpful is pulling apart other people's decks to find out how they did things.

(+3)

Wow, how do I even reply to such an in-depth answer?? Thanks for helping out, friend! 😊 Just so you know, I'd really like try out some coding so that doesn't bother me. I've made stuff in Twine (only Chapbook though, the easiast variant, but I really enjoyed that!). Thanks for the tips, I'll definitely try them out <3 It's especially helpful to know that I can use code to refer to different cards instead of choosing them manually, that's really good to know! This shows I have no idea to what extend the software can be used.

I'm not sure whether the visual novel module would be the right choice but I'll try it out. I did read the phield notes, which were super helpful (and not to forget: darn cute)! 😁 

(By the way, thanks for sharing your game! I'm sure I can learn a lot from it 😋)

Developer(+2)

Just in case you didn't see it already, we have a library available for using Decker in concert with Twine: Twee.

In the simplest cases you can write normal Twine passages using the "Ply" story format, which is like an extremely stripped-down version of Harlowe, export a .twee file and pop it into a "plyPlayer" contraption; no other coding required. With a little scripting there are many ways to make a Ply story interact with a deck or vice versa- change cards, display visuals, play sound effects, etc.

I hope you'll find that Decker is a very flexible digital arts-and-crafts medium that you can use for a wide range of creative projects, tools, toys, and games. Welcome to the community!

(+2)

No, that I hadn't discovered yet, thank you so much! Sounds really interesting. I'll have to dabble around in it a bit to see what works best! At this moment, I think using the card system would be ideal, but I'll need to get to know Decker better first 😁.

The game I envision goes something like this: you have to find the way through a story which is built up by different characters' point of views. The story only progresses after you met certain conditions, like having visited a location of having unlocked a core memory.

When you select a character, you can visit certain places on a map which are not always accessible to other characters. You also have access to their thoughts and memories which you can explore, and make certain choices that will shape what happens after. (I've already made a thorough schematic overview of all the choices, consequences and endings.) 

I like the idea of cards with reading material which lead to several other cards, because this would become some kind of reading puzzle to the player. They'd have to go search deep into the story to find a way to progress, while finding out secrets and lore. But maybe the visual novel module would come in handy here, I'll have to see. Other suggestions are still welcome of course! 😊

(+2)

It's great that you've got it all planned out in advance, it can make stuff a lot easier.

If you've got different characters that you select and you're needing to track progress, there's ways to do that fairly easily. I'll try to explain how you might be able to accomplish this, without having to have like a separate set of cards for every possible path.

Let's say you've got a card that's a certain location, and maybe there's one door that you only want a certain character to be able to enter, and another door that you can only enter if you've unlocked it, or something like that. Like in general there's a certain state of the game that you need to be able to keep track of, to know who you are and what you've done so far.

I've found the easiest way to handle this is basically to have a separate hidden card, that's basically filled with checkboxes (and other widgets) that I can use to keep track of and store all this sort of "state" info. Like I might have one that says what character you are currently, and one for each task you might have already completed,or something.

Then on the location card, you can refer to these checkboxes to decide what happens when you click something. Like either entering the door or popping up a box saying it's locked.

The pages in Phield Notes on Referring to Other Widgets and If-Else Statements are probably the best explanation of how to do this.

(+1)

Making notes ✍🏼 Thank you! That's an interesting approach, though I'll have to check if it can be used for what I was planning on doing. Because each character gets a whole different array of options (thoughts, dialogues etc.) when visiting a location. It's not like there's 1 path that they all follow. For example character A could try to enter a door but character B gets haunted by memories and ignores the door.

(+1)

Yeah, an approach like this would work for exactly that. Like you code the door so it's like "if character A, then enter the room, if character B then pop up a message about being haunted by memories". So you can have the one card with things coded to behave differently depending on which character you are at the time.

(+2)

Alrightie! I'll try it all out, thanks again for helping a noob out <3 This community must be one of the nicest on the internet! (The Twine community as well 😊)

(+1)

Hello ! Was wondering how to prevent to change slide with the keyboard ? 

Developer(+1)

In "Interact" mode, pressing arrow keys fires a navigate[] event to the current card. The default navigate[] event handler flips between cards:

on navigate x do
  if x~"right" go["Next"] end
  if x~"left"  go["Prev"] end
end 

But you can override this behavior in the deck-level script to do nothing instead:

on navigate do end

See "consider a custom navigate event" here for another example: https://ahmwwmaaa.neocities.org/decker/phield-notes#publication