Wow. I had thought about this, but I didn’t know how to do it and I figured Decker might not be fast enough anyway. That’s… really impressive.
A member registered Oct 02, 2017 · View creator page →
Creator of
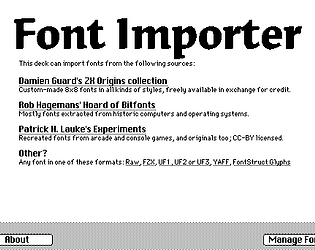
Import fonts from various niche formats for use in creating Decker decks.
Run in browser
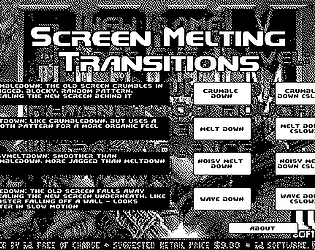
Extra melty-looking card transitions for your Decker project.
Recent community posts
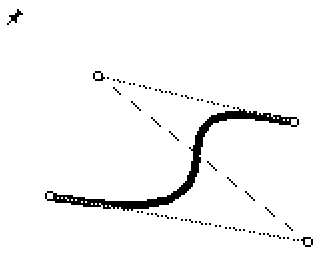
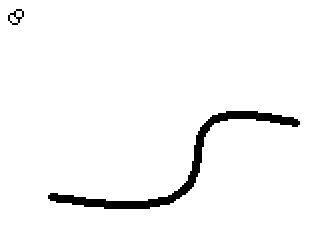
I would like to have some swoopy lines decorating my deck, but I do not have a graphics tablet to draw them with, and drawing large curves pixel-at-a-time can be tedious. Some graphics apps have a “curve” or “Bézier curve” tool, which is like a regular line-drawing tool except you get some extra “handles” you can move around to affect how the line bends. Decker doesn’t have a “curve” tool either, but it does have contraptions, so I made a Bézier contraption.
Edit: Version 2 changes how you set the pattern used to draw the curve, and adds the “step size” property to speed up rendering. Version 3 significantly speeds up rendering, so the “step size” is less necessary. Version 4 adds a little “pin” button in the top left to quickly hide the handles so you can see what the curve looks like without having to switch modes twice, lock and unlock.
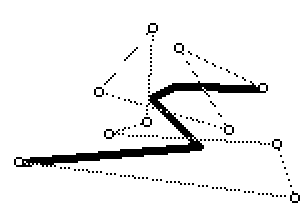
Normally, the contraption draws the curve, plus a little circle at each handle, and a dotted line connecting them so you can see which one is which. In interact mode, you can drag the handles around and see how they affect the shape of the curve.
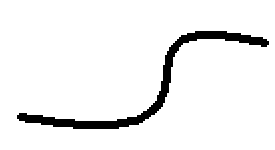
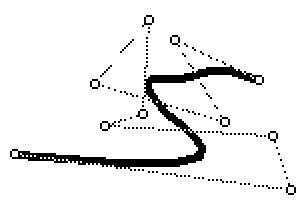
If you want to quickly see what the curve looks like without the handles, you can click the “pin” button in the top-left, then click it again to unpin:
If you switch to Widget mode, lock the contraption, then switch back to Interact, the curve is drawn without the handles or the pin, and clicking won’t change the shape. You can just use this as a decoration directly, or go back into Widget mode and do Edit → Copy as Image to get something you can paste into your own artwork, or touch up with Decker’s tools.
In Widget mode, you can use Widget → Pattern… to set the pattern used to draw the curve.
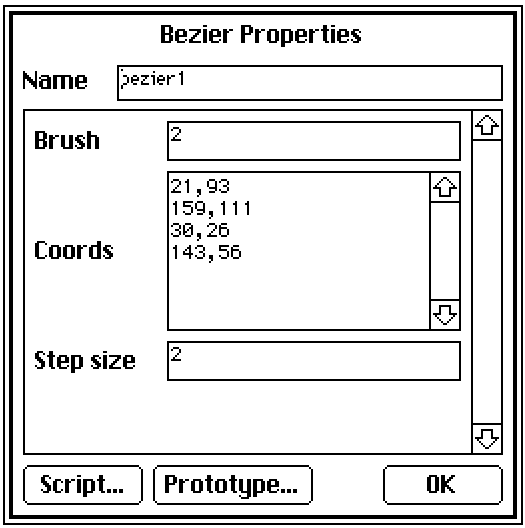
The properties are pretty simple: you can set the brush and set the handle coordinates specifically. You can have as many handles as you like, if you want a lot of control over the shape of the curve.
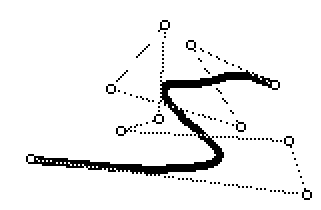
If you do have a lot of handles (or make the contraption very large) it may take a while to calculate the exact position of the curve, which can make editing laggy. Here is a curve with 10 handles, and on my computer dragging one gets very laggy.
If I set the “Step size” property up to 50, the line gets very chunky, but dragging handles around becomes buttery smooth:
If I set the “Step size” back down to 10, it’s nearly as smooth as the original but still a lot less laggy:
The exact number you use depends on how fast your computer is, how big you make the contraption, how many handles you want, and what brush you use (smaller brushes make the chunkiness more visible). There’s also nothing stopping you from bumping the number up for editing, and then back down for display (or to use Copy as Image).
%%WGT0{"w":[{"name":"bezier1","type":"contraption","size":[189,137],"pos":[16,32],"show":"transparent","def":"bezier","widgets":{"canvas":{"size":[189,137]},"brush":{"size":[64,27],"pos":[205,0],"value":"2"},"coords":{"size":[96,137],"pos":[285,0],"value":{"x":[21,150,45,143],"y":[93,116,33,56]},"row":3},"sprites":{"size":[64,27],"pos":[205,55]},"stepsize":{"size":[64,28],"pos":[205,27]},"pinned":{"size":[64,28],"pos":[205,82]}}}],"d":{"bezier":{"name":"bezier","size":[80,80],"resizable":1,"margin":[0,0,0,0],"description":"Draws a Bezier curve. Use Widgets -> Pattern to set the colour, click the pin to hide the handles, lock the contraption to prevent editing.","version":4,"script":"on lerp t a b do a+(b-a)*0|1&t end\n\non bezier t ps do\n # Use lerping to combine adjacent pairs of positions\n # until there's only one left\n while 1 < count ps ps:lerp[t 1 drop ps -1 drop ps] end\n \n # Return the one that's left\n first ps\nend\n\non get_brush do brush.data end\non set_brush b do brush.data:b end\non get_stepsize do stepsize.data end\non set_stepsize s do stepsize.data:1|s end\n\non get_coords do\n (\"\\n\", \"%i,%i\") format coords.value.x join coords.value.y\nend\n\non set_coords t do\n coords.value:table \"xy\" dict flip \"%i,%i\" parse \"\\n\" split t\nend\n\non view do\n if !brush.data set_brush[0] end\n \n canvas.clear[]\n handles:coords.value.x join coords.value.y\n steps:ceil (max canvas.size)/stepsize.data\n canvas.pattern:card.pattern\n canvas.brush:brush.data\n canvas.line[0.5+each t in (range steps+1)/steps bezier[t handles] end]\n \n if ! card.locked\n if pinned.value\n # Draw the pinned sprite\n canvas.paste[sprites.images[2] 0,0]\n else\n # Draw a dotted line connecting the handles in order\n canvas.pattern:13\n canvas.brush:0\n canvas.line[handles]\n \n # Draw the handle sprite on top of each handle\n sprite:sprites.images[0]\n # Paste the handle sprite on top of each handle\n each pos in handles canvas.paste[sprite pos-(floor sprite.size/2) 1] end\n \n # Draw the unpinned sprite\n canvas.paste[sprites.images[1] 0,0]\n end\n end\nend","attributes":{"name":["brush","coords","stepsize"],"label":["Brush","Coords","Step size"],"type":["number","code","number"]},"widgets":{"canvas":{"type":"canvas","size":[80,80],"pos":[0,0],"volatile":1,"script":"on click pos do\n if ! (pinned.value|card.locked)\n best_row:-1\n best_mag:me.size[0]*me.size[1] # an impossibly large number\n \n each handle i in coords.value.x join coords.value.y\n handle_mag:mag (handle - pos)\n if best_mag > handle_mag\n best_row:i\n best_mag:handle_mag\n end\n end\n \n coords.row:best_row\n end\nend\n\non drag pos do\n if ! (pinned.value|card.locked)\n coords.rowvalue:\"xy\" dict pos\n view[]\n end\nend\n\non release pos do\n if ! card.locked\n # If the pointer was released in the top left 8x8 pixels...\n if min pos < 8,8\n pinned.value:!pinned.value\n view[]\n end\n end\nend","pattern":13,"show":"transparent","border":0,"scale":1},"brush":{"type":"field","size":[64,16],"pos":[96,0],"locked":1,"style":"code","value":"0"},"coords":{"type":"grid","size":[96,80],"pos":[176,0],"locked":1,"scrollbar":0,"lines":0,"format":"ii","value":{"x":[9,27,69],"y":[15,55,35]},"row":0},"sprites":{"type":"field","size":[64,16],"pos":[96,32],"locked":1,"value":{"text":["","i","i","i"],"font":["","","",""],"arg":["","%%IMG3AAUABQZAQGAoBBmHRhDyKCQGAQ==","%%IMG3AAgACAZAgBAACoCGwqKRCFIGjM9okygdOo/U5hKwxQKC","%%IMG3AAgACAZAgBAQKA6JoGSAWEyCmk8n9GkMOJ9Dq/JYXAqD"]}},"stepsize":{"type":"field","size":[64,16],"pos":[96,16],"locked":1,"style":"code","value":"2"},"pinned":{"type":"button","size":[64,16],"pos":[96,48],"locked":1,"text":"Pinned","style":"check","value":0}}}}}
Fun fact: Bézier curves are named for Pierre Bézier, the second person to discover them and use them to design more attractive vehicles at a French car manufacturer.
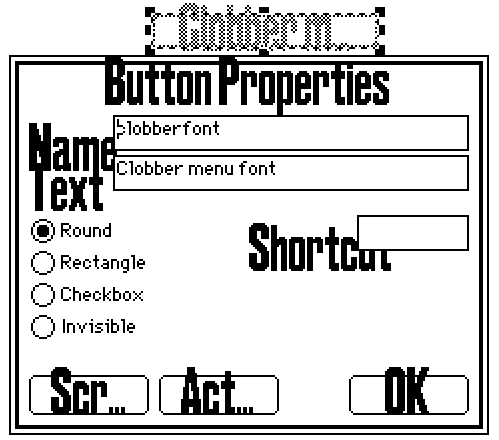
Here’s a more automated way to clobber the menu font with a custom one.
-
Copy this text to the clipboard:
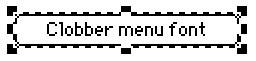
%%WGT0{"w":[{"name":"clobberfont","type":"button","size":[112,16],"pos":[208,64],"script":"on click do\n s:me.font\n t:deck.fonts.menu\n \n t.size:s.size\n t.space:s.space\n each i in range 256\n t[i]:s[i]\n end\nend","font":"body","text":"Clobber menu font"}],"d":{}} -
Open a deck with a font you like
-
Go into Widget-editing mode (Tool → Widgets)
-
Paste the widget (Edit → Paste Widgets)
-
This should give you a button like this:
-
Set the button’s font to be the font that you want to use as the menu font (Widgets → Font…)
-
You now have a button that will clobber the menu font of the deck it’s in, with a font of your choosing
To set the font of a deck:
- Copy your customised button to the clipboard (Edit → Copy Widgets)
- Open the deck whose menu font you want to change
- Go into Widget-editing mode (Tool → Widgets)
- Paste your customised button into the deck (Edit → Paste Widgets)
- Go into Interact mode (Tool → Interact)
- Click the button
- You should see the font in Decker’s menu-bar change
- Now this deck has a custom menu font, you can delete the button and save the deck, and the change will persist
Warning: Unlike patterns and palettes, Decker does not have an easy way to reset a font to its default appearance. If you decide you want the old font back again, that’s going to be trickier.
Also note that Decker’s interface does not adapt well to fonts that are larger than the default. It does its best, but there are limits: