




Indie game storeFree gamesFun gamesHorror games
Game developmentAssetsComics
SalesBundles
Jobs
TagsGame Engines

Internet Janitor

1,037
Posts
60
Topics
8,367
Followers
29
Following
A member registered Aug 02, 2018 · View creator page →

Creator of

Recent community posts

(1 edit)

The zazz.scrol[] function is a thin wrapper around image.translate[], which updates every pixel of an image in-place.

Given a large source canvas/image that you want to scroll and a comparatively small window that you want to be visible at any given time, it is much less work to leave the source canvas static and copy out a window from a varying position than it is to scroll every pixel of the entire source canvas and then have Decker's compositor implicitly clip off the parts that are outside the card. See the example below.
You are very welcome to publish anything you've created with WigglyPaint and/or Decker as you see fit. Feel free to share a link to your creations!

Well done, Screwtapello!

The presentation is slick and the explanations are clear; you've done an excellent job motivating the intuition for how and why the DFT works.

FYI: caught a last-minute bug with the interaction between deck.esize and transition animation; if you've already downloaded 1.72 please update again. Sorry for the inconvenience!

Decker 1.72's new "esize" setting alters Decker's editor window size, which offers another way to avoid the problem of the main menu obscuring part of the card. If this works well in practice, I may change the default setting in a future release.

In Lil, the "+" operator is exclusively for addition. The "," operator joins strings into lists, and writing to the ".text" attribute of a field implicitly concatenates together the elements of a list. In a string literal, a backslash followed by the letter "n" is an escaped newline.

Putting this all together, you could write that fragment as:

on run do
 if (me.text = "hello") | (me.text = "Hello")
  log.text:log.text,"\nHello to you as well!"
 else
  log.text:log.text"\nI do not understand."
 end
 me.value:""
end

You could further simplify the conditional by factoring out the common parts of each subexpression:

on run do
 log.text:log.text,"\n",
 if (me.text = "hello") | (me.text = "Hello")
  "Hello to you as well!"
 else
  "I do not understand."
 end
 me.value:""
end

To make the initial comparison case-insensitive, you could use the "%l" formatting pattern to convert the input to lowercase:

on run do
 log.text:log.text,"\n",
 if "hello" = "%l" format me.text
  "Hello to you as well!"
 else
  "I do not understand."
 end
 me.value:""
end

Does that help?

This is a neat concept; very intuitive for creating color ramps.

The "Sheet" editor I described above is a bit too cramped for working with full DeckRoman fonts at 36x36, but that's just the font editor; there's no intrinsic problem with fonts of that size in Decker.

October 19th marks four years since Decker's public release. I've compiled another annual summary of developments in Decker, Lil, and the Decker user community:

http://beyondloom.com/blog/fouryearsdecker.html

I'd like to once again express my thanks to everyone who has contributed to the community here; you all are the reason Decker is worth building.

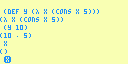
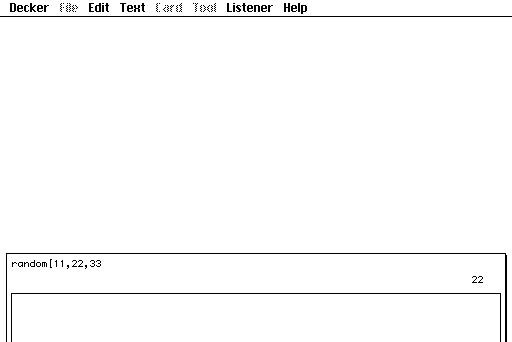
Lil's parser will currently tolerate source code ending without the full number of closing braces and/or parentheses; they're just implied.  This design is a potential foot-gun, but mildly handy when using the Listener like a calculator:


I was able to reproduce the crash you describe, but it's not specific to those script typos; it's a deeper race condition in Native Decker that just happens to become easier to reproduce when you have the toolbars open and custom brushes installed. Will fix.

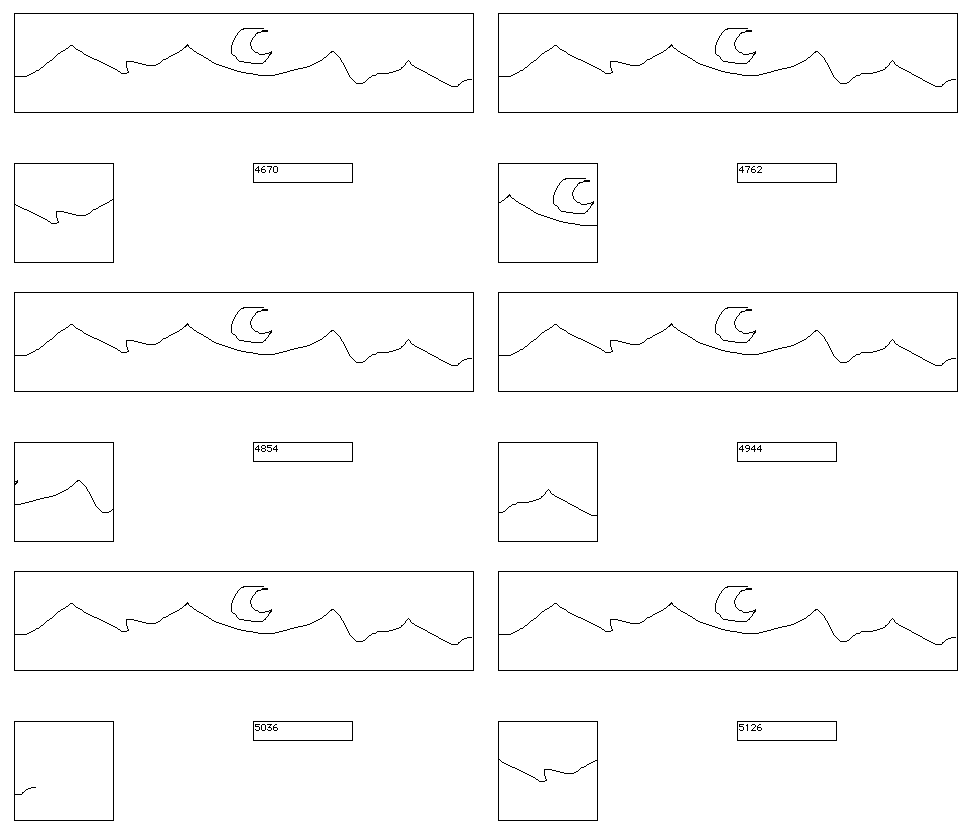
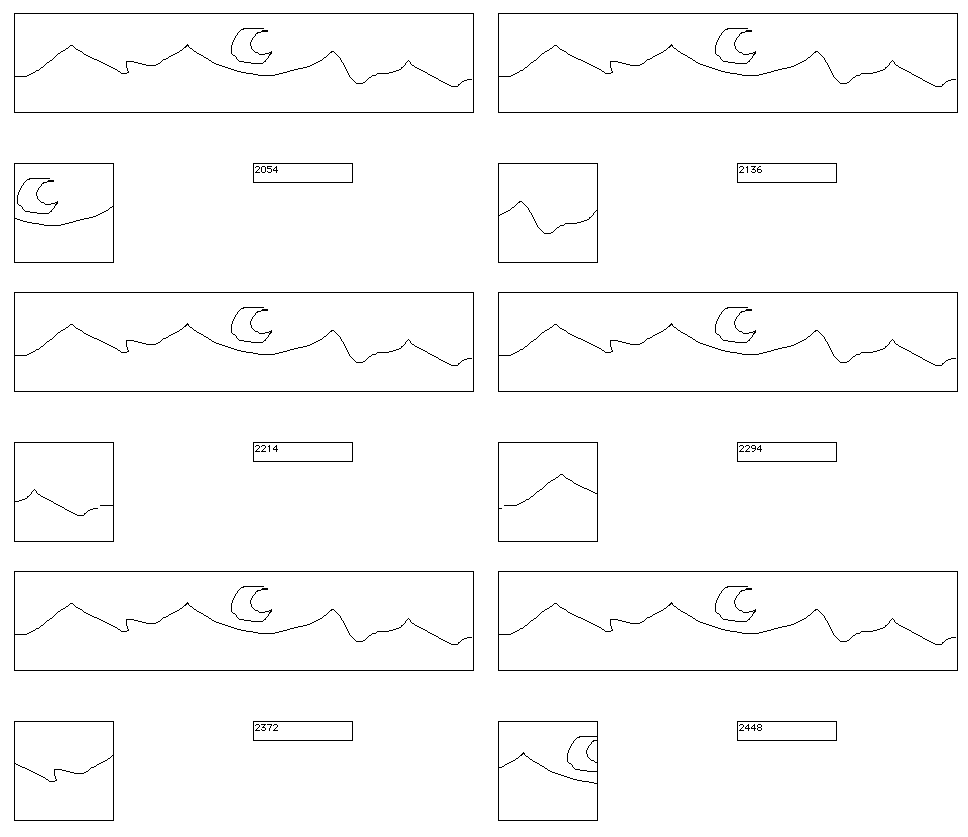
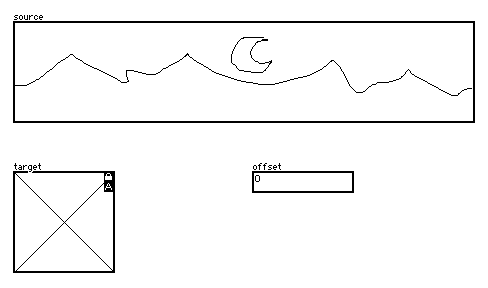
Let's say we have a wide canvas with graphics in it, "source", a smaller display canvas of the same height, "target", and a field for keeping track of how far we've scrolled, "offset". In this example "target" is marked as "volatile"- since we'll be redrawing it on each frame- and "animated"- so that it gets a view[] event for redrawing itself each frame:


We can nearly achieve a horizontal scroll effect by filling in target's view[] event handler to increment the number in "offset", wrap it based on the size of "source" using the modulus operator "%" (note that this operator takes its arguments in the opposite order of modulus/remainder in many non-Lil programming languages!) and pastes a chunk copied from "source" onto "target" based on this horizontal offset:

on view do
 offset.data:offset.data+2
 x:source.size[0]%offset.data
 target.paste[source.copy[x,0 target.size]]
end

It looks like this:


When our offset reaches the edge of "source", we're missing a screenful of graphics on the right edge. Here's one way to patch it up:

on view do
 offset.data:offset.data+2
 x:source.size[0]%offset.data
 target.paste[source.copy[x,0 target.size]]
 w:source.size[0]-target.size[0]
 if x>w
  x2:target.size[0]-x-w
  target.paste[source.copy[0,0 target.size] x2,0]
 end
end


Here's the whole card as an example you can copy and paste:

%%CRD0{"c":{"name":"home","widgets":{"source":{"type":"canvas","size":[460,100],"pos":[26,46],"image":"%%IMG3AcwAZAKEj6nL7Q+jnLTai7PevPsPhuJIluaJpurKtu4Lx/JM1/aN5/rO9/4PDAqHxKLxiEwql8ym8wmNSqfUqvWKzWq33K73Cw6Lx+Sy+YxOq9fstvsNj8vn9Lr9js/r4YG+/w8YuDdIGOVXiJi4FZAhqPgIicOIETgZeYnZYjnxl+n5ybIp0QdaamoiCpF6ytpKabHqKjvbEOtgS5ubi7vAq/vL6psgDFz8SXyAbLz8qAzgzBxN6AwtbX1Hfa2Nmb3tTVXd0f2td0hnHgpLXp48RxquUQ2/LiY6v2h5r75PL0eqoO9Kqn8p5PXzdyvgFFsKVb062IZgQjQSexVsBFFNRVUNlRDbGGKeso4j0GWsAI9kEZC3UG0w2YuljX8qpckc9eXmxJIeBh7SKcPeSZziavIAypFn0U7JjIqzOLQlCKQeO1KlcPWCUw4MozIwmnVIWE5KRWx9+eCsq7NjfbBVWVOtVmFyTdVtmwMvLKtmd4z0+kyT3hgwL37gq2NcxsEv6z4l3FChY04GV1KswdhApciYDzPdKyml5ck9Mk+9t+qz1humhzmSOlMf6Xjt6h0VnTBr69MnNquesXv26tpghGOtHOG3a7e7jTQPDERoTiFh5fkW+/xHds3aY3Yx3ggZ+NjjURSe6ha2wPLhk5s5j0Q5Cfbe09J3uQToffJHALnYj4B4AKLnxE0D8qcdfOmwBs12MCiYRFcRORgehcMBN5iFKhzIG1RuyLcChMBBFhmHyZkYEkAo+gViSCJ2FsqLlKyoIhev4VFJTzJKcppvdwWhIWDH7dhUkCVwFltpNHrlY45NiERkiLM1aaSQdeDGnJVapojSkk1tCSZXWPXnZZh2ERVfj1WaqYgvZe5UIZtD4fJmUqDJyWR9UOiGp5VOgkNXn4JWIdOagx4qmIeILrrnjYw+Cmmkkk5KaaWWXopppppuymmnnn4Kaqiijkpqqaaeimqqqq7KaquuvgprrLLOSmuttt6Ka6667sprr77+Cmywwg5LLDAFAA==","scale":1},"target":{"type":"canvas","size":[100,100],"pos":[26,196],"locked":1,"animated":1,"volatile":1,"script":"on view do\n offset.data:offset.data+2\n \n x:source.size[0]%offset.data\n target.paste[source.copy[x,0 target.size]]\n \n w:source.size[0]-target.size[0]\n if x>w\n  x2:target.size[0]-x-w\n  target.paste[source.copy[0,0 target.size] x2,0]\n end\nend","scale":1},"offset":{"type":"field","size":[100,20],"pos":[265,196]}}},"d":{}}

Alternatively, you could make the graphics in "source" include an extra duplicate screenful at the end, and adjust where you wrap the "x" coordinate. Then there's no need for the "fixup" part of the script, but preparing the graphics in the "source" canvas might be more annoying and it'll take up a bit more space in the file.

To be able to scroll both left and right, you'd need to similarly handle a fixup on the left edge of the display, and so on.

Does that make sense?

(1 edit)

We were just having a discussion about improvements to general image compositing performance that may positively impact your use-case once v1.72 comes out.

You may also find performance is much better if you copy[] out a screen-sized chunk of a large canvas and paste[] it to a smaller canvas or card background image using coordinates that change over time instead of scrolling the large canvas (which necessarily updates every pixel) in-place. I'd be happy to work up an example if you need more detail.

The maximum size for widgets is currently 4096x4096 pixels, but I'd expect performance to be abysmal if a deck contained widgets that were close to that big on both axes!

(2 edits)

Woodring definitely deserves credit here. I took a somewhat different approach in my patches and added a few additional ideas of my own after some careful benchmarking, but Woodring's post made me realize I'd left significant low-hanging fruit in image.copy[] and image.paste[] (as well as a variety of places throughout Decker which rely on the same internal routines.) I think v1.72 will offer a significant boost to many existing projects.

Thanks to both of you for pushing the limits of the platform!

If Decker itself doesn't have APIs for doing something, and you're willing to constrain an application to only work in web-decker, calling internal functions via danger.js[] may be the only way to make it happen; I just reserve the right to change those internal functions in the future.

I'm a bit puzzled by the specific example you're raising, though. Clicking a button widget to fire a script takes place while in "interact" mode, whereas the internal "undo()" function in web-decker is part of the apparatus used in "widget" and drawing tool modes. Can you provide some broader context for what you're trying to do?

I'm very glad to have you in the Decker community, Missooni. :)

Excellent; Looking forward to seeing what you're cooking up!

The idea of explicitly storing the state of contraptions (and, more broadly, the state of applications built as decks) in widgets is an unusual feature of Decker that many beginners trip over, and I'm still trying to improve the way I explain it in the docs and tutorial materials.

I call it an "embodied data model": everything important about the state of a program in Decker has a "physical" storage location somewhere in the deck. Different widget types are designed to store different types of data: booleans in checkboxes, text in fields, etc. The ".data" attribute of fields is a sort of catchall for complex structured data, and contraptions make it possible to build custom "containers" for new kinds of data, like how all the contraptions in WigglyKit are designed to store animations. Every time Decker is finished processing an event- whether it's a change[] event triggered by a user typing in a field or a view[] event generated by Decker itself- the deck can be treated as a complete "save-state" for everything that's going on.

This model means that if you edit a script, modify the structure of a deck, or even edit a prototype definition, there's a very clear and straightforward way of understanding what information will be retained: widgets on a card retain their contents unless they're edited or removed, and the primitive widgets inside a contraption retain their "value" attributes (.value, .scroll, .row, .col, and the image on a canvas) if they've ever been modified since the contraption was created, and everything else is "inherited" from the prototype.

If there were true mutable global variables or hidden backing storage for contraption attributes, the lifespan of that information would be less clear over the course of editing, and might behave differently when loading a deck into a fresh session versus working with a deck that has been built up and edited live over the course of a session, which would be very error-prone. Everything about the design of Decker is sort of coiled around the concerns of maintaining a coherent view of the world while you build and reshape things.

Hopefully that makes some amount of sense. :)

(1 edit)

You're sort of on the right track here. I'll see if I can explain it better.

Inside a contraption, any settings we want to remember will need to be stored in widgets inside the contraption. These widgets will often be invisible; just for internal use by scripts.

An ordinary widget has "attributes", like the "text" attribute of a field which can be read from or written to by scripts; I'm sure you've done this many times:

myField.text:"welp"   # write to the text attribute of the field widget myField
myField.text          # read the text attribute of the field widget myField

In contraptions, we need to tell Decker what should happen when an attribute is read from or written to by defining appropriately-named event handlers.

If you wanted to be able to manipulate a contraption from an external script like this:

myThing.textColor:23 # write to the textColor attribute of the contraption myThing
myThing.textColor    # read from the textColor attribute of the contraption myThing

Inside the contraption you'd need to have a widget to keep track of that text color setting. Let's say the internal "storage" widget for the textColor attribute  is a slider widget named "gringus" set up to store an integer between 0 and 255. The contraption prototype's script would then need to include something like the following to wire up the attribute to the storage:

# handle reading from the .textColor attribute, retrieving the value from gringus:
on get_textColor do
 gringus.value
end
 
# handle writing to the .textColor attribute, storing the new value (x) in gringus:
on set_textColor x do
 gringus.value:x
end

The "get_textColor[]" event handler is called on a read, and the "set_textColor[]" event handler is called on a write. If only a "get_textColor[]" handler is written, the attribute is read-only. If only a "set_textColor[]" event handler is written, the attribute is write-only (which is a bit unusual). In your example it looks like you have the naming convention backwards; for example you have "bCol_set" instead of "set_bCol".

To actually do something with that "textColor" attribute aside from storing it, you'd also probably have a view[] event handler in that contraption prototype script along the lines of your example. You can freely choose between retrieving the text color setting directly from "gringus" or by calling "get_textColor[]":

on view do
 canvas1.clear[]
 canvas1.pattern:gringus.value    # this works
 canvas1.pattern:get_textColor[]  # equivalent to the above
 # etc...
end

In some cases you may want writing to a contraption attribute to have a "side-effect" in addition to storing the new setting. For example, after recording the new textColor we could call the view[] event handler to immediately update the appearance of the contraption to reflect the change:

on set_textColor x do
 gringus.value:x
 view[]
end

(There's a bit of subtlety here for complex contraptions, as the scripts triggered by a get_ or set_ have to finish quickly; I'd be happy to expand on this later if needed, and there's some general advice in the reference manual. For simple contraptions this approach is fine.)

The "Prototype Attributes" panel is how you tell Decker that certain attributes are meant to be manually-editable in the properties pane of each instance of the contraption, and how they should look. These will only work properly if there are underlying get_ and set_ event handlers in the prototype script corresponding to the "name" of each attribute in this list.

In the Decker Reference Manual, the example describes building a prototype which externally exposes an attribute named "value", accessed like "counter1.value", which is stored in an internal field named "val", and wired up with internal event handlers named "get_value" (which reads from the "val" field) and "set_value" (which writes to the "val" field). I can see how the similarity in these names might get a little confusing; I'll consider rewriting some sections of that tutorial.

Is this explanation any clearer?

Looks to me from those screenshots like you're using one of the many knockoffs of WigglyPaint instead of the actual program on this page. Please read the description!

You might also enjoy some of the decks Crowspace has released.

(Your prototypes and doodles are all very creative; it'll be interesting to see what other works they inspire! I especially like the drawings for "scan".)

(2 edits)

I'm very glad you had a positive experience trying Decker. I enjoyed reading about the making of your game. For whatever it's worth I thought the lighting effects at the end of the tunnel were quite effective!

If you're interested, there are a few ways you can simplify the script in this post for future projects. Widgets have a ".toggle[]" function that serves as a shortcut for toggling their visibility between solid/transparent and none. It takes the "shown" style as a first argument and a true/false condition as its second argument. Since .toggle[] shows things when the condition is true, it's the reverse of your conditional, so I have to add a ! (not) operator:

on view do
 distractions.widgets.button5.toggle["solid" !distract.widgets.points.value<4]
end

In this case I think you could also write the condition as:

on view do
 distractions.widgets.button5.toggle["solid" distract.widgets.points.value>3]
end

Another trick for making scripts more readable is to define local "shorthands" for widgets- a name followed by a colon followed by the path to a part of the deck lets you use that short name instead of the whole path; especially handy if you need to refer to the same widget several times in the same script:

on view do
 button: distractions.widgets.button5
 points: distract.widgets.points
 button.toggle["solid" !points.value<4]
end

If you haven't seen it before, Phinxel's Phield Notes has a lot of very useful simple scripting examples and other Decker tips.

Sorry for the long comment, and best of luck on your future projects!

(1 edit)

Do you have a widget on the active card named "place2" where you want your dialog box centered?

On the example on the documentation card for the ".pos" setting that is the name of a button widget set to "show none".

(2 edits)

Decker is open-source, so nothing is impossible if someone is sufficiently motivated to tinker with wild ideas in their own fork.

That said, I don't think porting Decker to the 3DS would be at all easy. Decker's user interface is designed with a minimum resolution of 512x342 pixels, while the 3DS screens are functionally 400x240 and 320x240 pixels. Decker is designed to be usable with a stylus and no extra buttons, but only the lower screen of a 3DS can respond to touch, and you'd probably need that entire touchscreen to serve as a keyboard whenever you want to edit a script, rename a widget, or generally interact with a field. The 3DS has very little RAM and a very slow CPU compared to most of the computers people typically use Decker on, so you'd need to do some careful optimization and possibly remove  or otherwise constrain some features entirely, like the unlimited undo history or the ability to have hundreds of cards in a deck.

Performance aside, I think you'd need to completely overhaul Decker's UI to suit such a device, and it would be difficult to run the decks and interactive docs people have already made for Decker's normal resolution (or bigger). It might be more technically feasible to make some kind of a stripped-down "Decker-player" for handheld consoles that exclusively runs premade decks designed with a lower screen resolution and lighter specs in general in mind, but it would be kind of a shame not to have the editing tools or the existing library of decks...

If you apply it to a single number, the "mag" primitive gives the absolute value:

mag -23    # 23
mag 5      # 5

In the more general case, "mag" gives the magnitude of a vector of numbers, also known as the Euclidean distance:

mag 3,4    # 5
mag 3,7    # 7.615773

If you want the absolute value of each element in a list, you can "push" mag down to each number with @:

mag @ -3,4,-5   # (3,4,5)

Base64 encoding as used in %%IMG datablocks in Decker uses digits, upper- and lower-case letters, and the symbols +, /, and =.

URL encoding leaves digits and letters unchanged, but reads + as a space and / is technically reserved. If I open web-decker with a URL like:

http://beyondloom.com/decker/tour.html?i=a1+/b2

app.params comes out as

{"i":"a1 /b2"}

If I instead encode that + and / with the appropriate percent-codes:

http://beyondloom.com/decker/tour.html?i=a1%2b%2fb2

I get the intended payload:

{"i":"a1+/b2"}

I think this explains the behavior you're seeing; your image-string is getting scrambled before you try to decode it.

Here's one way to encode those special characters- and other reserved chars, too- if you're using a Lil script to assemble the URL:

on url_escape x do
 a:"" split " !#$&'()*+,/:;=?@[]"
 b:3 window "%20%21%23%24%26%27%28%29%2A%2B%2C%2F%3A%3B%3D%3F%40%5B%5D"
 rtext.string[rtext.replace[x a b]]
end

If you're exclusively pasting Decker image strings into URL parameters I guess it might also work to translate spaces back into + before decoding?

How's that?

Declaring deck-level "shortcuts" to widgets and helper functions are definitely useful techniques!

For a simple key-value store, one alternative to using a grid widget is using the ".data" attribute of a field widget, which can directly represent numbers, strings, lists, or dictionaries, among other things.

Here are some equivalents to your grid-based helper functions:

on get x k do x.data[k] end
on set x k v do x.data:x.data[k]:v end

Used like so:

set[field1 "alpha" 5]
set[field1 "beta" 2]
get[field1 "alpha"]  # 5

For the specialized case of games that just need to keep track of a bunch of global boolean "game flags", you could make something like this:

flags:somecard.widgets.some_storage_field
on get   k do 0+flags.data[k] end
on set   k do flags.data:flags.data[k]:1 end
on clear k do flags.data:k drop flags.data end

Since these functions only take a single string argument, we can use an extra-concise syntax for calling them:

set["beta"]  # this works
set.alpha    # this also works!
get.alpha    # 1
clear.alpha
get.alpha    # 0

Thanks for helping share what you've learned, Missooni!

(5 edits)

Decker users are constantly cooking up useful goodies to share with their fellow creators. In this thread I'll attempt to maintain an index so we can all find what we need.

For everything that isn't a contraption in the Bazaar, feel free to post links to new resources here and I'll add them to the index. If you have your own webpage with information about Decker, we'd love to see it!

Fonts for Decker:

Lil Modules:

Tools for Decker:

Deck Templates:

Guides and Tutorials:

Don't forget all the resources, tools, and tutorials included in the "examples" folder when you downloaded Decker. You can also find them all on the main Decker page on my website!

Take a look at All About Color. There are also some great user-made palette editing tools on the community forum!

For the benefit of other readers, the relevant script in the linked deck is

b:bar.value
if     b=1|b=7          exit.text:1 #( ,1, , , , , ,7)
elseif b=0|b=3|b=4|b=6  exit.text:2 #(0, , ,3,4, ,6, )
elseif b=2|b=5          exit.text:3 #( , ,2, , ,5, , )
else        exit.text:"none" end    #Fail

All operators in Lil have uniform right-to-left precedence unless overridden by parentheses.

An expression like

b=0|b=3|b=4|b=6

Is understood by Lil as equivalent to

b=(0|(b=(3|(b=(4|(b=6))))))

In this case, you'd probably get something closer to your intent by writing

(b=0)|(b=3)|(b=4)|(b=6)

Note that you could also write these kinds of test with the "in" operator:

b:bar.value
if     b in 1,7      exit.text:1
elseif b in 0,3,4,6  exit.text:2
elseif b in 2,5      exit.text:3
else                 exit.text:"none"
end

The "if ... elseif ... else ... end" structure evaluates to the last expression of each clause, so you could also lift out that assignment like so:

b:bar.value
exit.text:
if     b in 1,7      1
elseif b in 0,3,4,6  2
elseif b in 2,5      3
else                 "none"
end

Another alternative would be to use a "lookup table" instead of conditionals:

exit.text: (2,1,3,2,2,3,2,1)[bar.value]

To handle a default case for an invalid key- which will index out "nil"- we can use the "unless" operator:

exit.text: "none" unless (2,1,3,2,2,3,2,1)[bar.value]

If the keys for the lookup table aren't sequential integers, you could use the same approach with a dictionary instead of a list.

Does any of that help?

Anyone can lock a deck to hide the menu bar and suppress Decker's editing tools. I've deliberately left them enabled in WigglyPaint to make it easier to customize.

Everything in the top menu is part of Decker, the tool WigglyPaint is built in.

If we view the script of the "dd" module, we can find the definition of dd.chat[] here:

module.chat:on chat text choices do
 r:0
 st:getstyle[]
 while count choices
  k:keys choices
  style[st]
  v:ask[text k]
  vv:choices[k[v]]
  if "number"~typeof vv
   choices:()
   r:vv
  else
   choices:k[v] drop choices
   say[vv]
  end
 end
 r
end

If we were to pluck this out into a deck-level utility function that calls into the "dd" module via its public functions, along with a bit of tidying up, it might look like:

on chat text choices do
 local r:0
 local st:dd.getstyle[]
 while count choices
  local k:keys choices
  dd.style[st]
  local v:dd.ask[text k]
  local vv:choices[k[v]]
  if "number"~typeof vv
   choices:()
   r:vv
  else
   choices:k[v] drop choices
   dd.say[vv]
  end
 end
 r
end

The first two lines declare a variable "r" to hold the return value of this function and stash a copy of Dialogizer's current "style" settings in a variable "st". The dialog responses might contain !-commands which alter the styling of dialog boxes, so it's important to restore these settings after each sub-dialog completes:

local r:0
local st:dd.getstyle[]

The "while" loop repeats so long as there's at least one element left in "choices", and then after the loop completes we'll return "r":

while count choices
 # ...
end
r

Now we just need to pick apart that loop body.

The "choices" variable contains a dictionary mapping choices (strings) to responses (numbers, strings, or rtext tables). The "keys" operator applied to the dictionary peels out the list of choice-strings, then we restore our backed-up style settings, and then we call dd.ask[]. The "v" variable will store the index of the choice the player made, so we use it to look up "vv", the corresponding response: 

local k:keys choices
dd.style[st]
local v:dd.ask[text k]
local vv:choices[k[v]]

The "vv" response will either be a number or a string/rtext table; we can use the "typeof" operator to check. If it's a number, we're done: set "choices" to an empty list (terminating the "while" loop on the next pass) and set our return value to that number. Otherwise, discard the choice the player picked from "choices" using the "drop" operator (drawing us a step closer to terminating the "while" loop) and call dd.say[]:

if "number"~typeof vv
 choices:()
 r:vv
else
 choices:k[v] drop choices
 dd.say[vv]
end

One possible way to generalize this function would be to add another case here which permits the response value to be a function and responds by calling it:

on metachat text choices do
 local r:0
 local st:dd.getstyle[]
 while count choices
  local k:keys choices
  dd.style[st]
  local v:dd.ask[text k]
  local vv:choices[k[v]]
  if "number"~typeof vv
   choices:()
   r:vv
  else
   choices:k[v] drop choices
   if "function"~typeof vv vv[] else dd.say[vv] end
  end
 end
 r
end

Allowing us to write more complex conversations:

on chicken_discussion do
 dd.say["Chickens are amazing animals!"]
 if 0~dd.ask["Do you like chickens?" ("Nah.","Yeah!")]
  dd.say["I'll presume you haven't met any."]
 else
  dd.say["Very cool!"]
 end
end
dd.open[deck]
r:metachat[
 "Ask me anything you like."
 raze insert q a with
  "Tell me about chickens." chicken_discussion
  "Tell me about bugs."     "Bugs are neat."
  "I have to go." 0
 end
]
dd.say["goodbye, then."]
dd.close[]

It would be less straightforward- though possible- to make those sub-conversations in turn alter the remaining "choices" for metachat[], etc.

Does any of that help?

The dd.chat[] function is only designed for handling a specific "shape" of conversation: a list of choices which each trigger a linear dialog sequence that comes back to the original list of choices or concludes the choices.

The simple answer to your question is that dd.chat[] doesn't handle the kind of conversation tree it sounds like you're trying to make.

A more complex answer to your question is that dd.chat[] is written in terms of dd.style[], dd.ask[], and dd.say[]. While dd.chat[] doesn't do what you want, it is very possible to write a similar utility function that behaves differently. If you're willing to dive into some involved programming with Lil, I'd be happy to explain how dd.chat[] works internally.

You're very welcome!

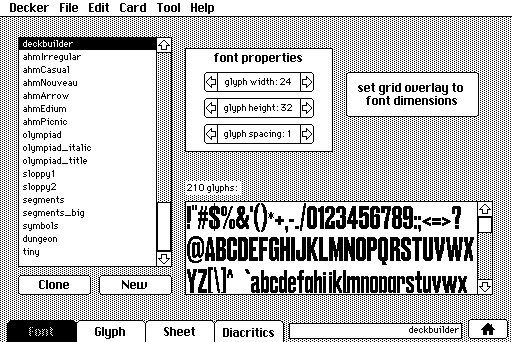
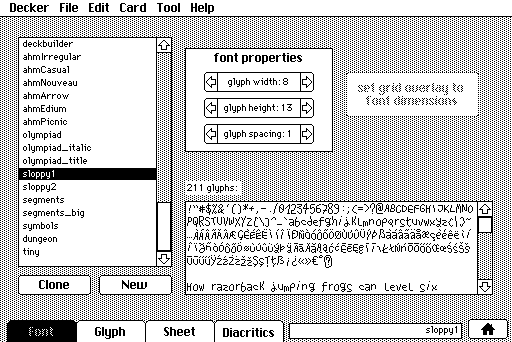
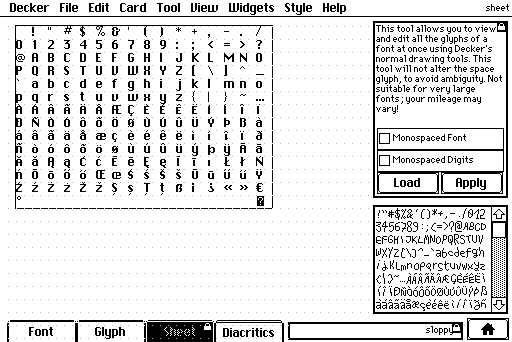
If you haven't tried it already, the "Sheet" tab in the font editor is meant to help with editing multiple font glyphs at once:

First, in the "Font" tab, pick the font you want to work on (or create a new one and choose its dimensions) and then click "Set grid overlay to font dimensions". (You can also set the grid dimensions manually with "View -> Grid and Scale..." in the menu with any drawing tool selected.)


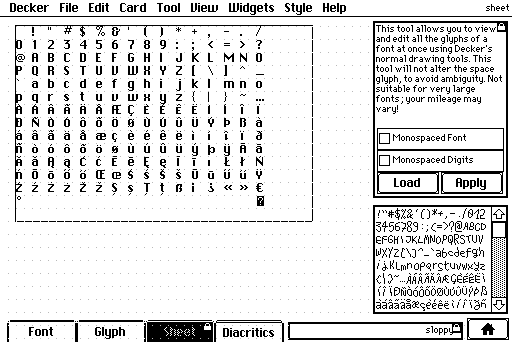
Then, on the "Sheet" tab, switch to widget mode and turn on "View -> Show Grid Overlay" and "View -> Snap to Grid" in the menu. Reposition and resize the "workzone" widget to make room for all your glyphs:


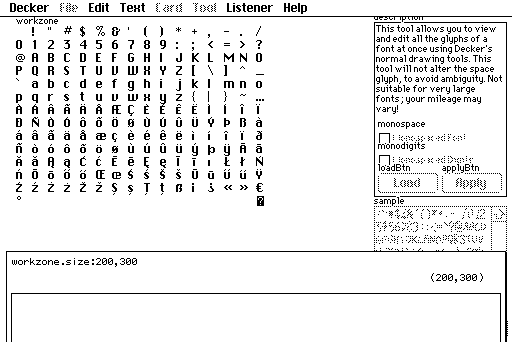
if you want to set up workzone with a precise size, you can use The Listener:

Then, in interact mode, click "Load"; this will splat all the glyphs of your font onto the card background, wrapped and aligned within "workzone". You can then make any edits you want to with Decker's normal drawing and image-editing tools, including importing images and reordering or copying and pasting glyphs:


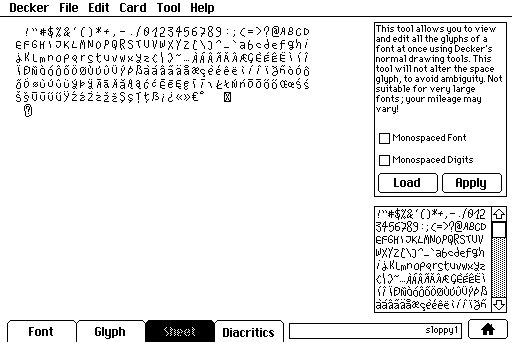
When you're done, click "Apply" and Decker will read the glyphs back out from the card background and update the font. By default this will measure the horizontal pixels taken up by each glyph to set their widths, but you can use the checkboxes to force it to keep all glyphs monospaced or just the digits.

This tool doesn't work for very large fonts, but for small fonts it's a very fast way to perform sweeping edits!

Huh. Very odd.

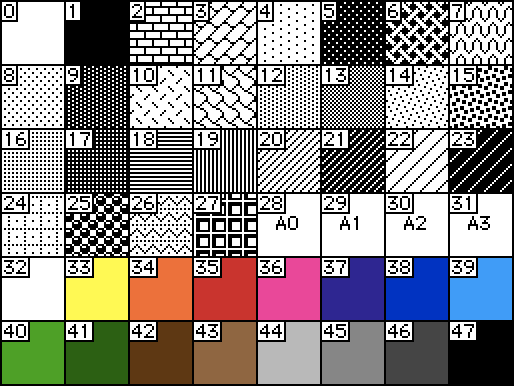
That screenshot must have been screwed up by an editing  tool at some point during development. I've checked in a replacement with the correct color values based on the diagram in All About Color.

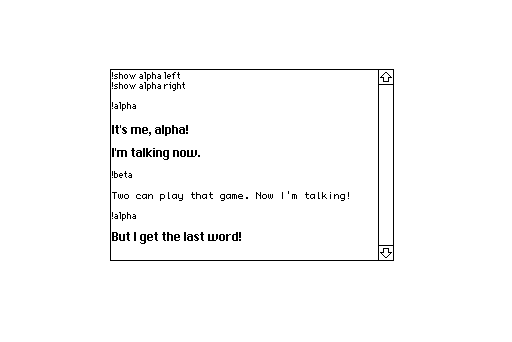
Let's say you have a scene with two characters, Alpha and Beta, which takes place on one card. I'll further assume that you're using both Dialogizer and Puppeteer together.

Alpha's speech should use a sound clip named "alphaVoice" and Beta's speech should randomly choose between sound clips named "betaVoice1" and "betaVoice2". We'll define two commands for use in our prose for dd.say[]: "!alpha" will switch to Alpha's voice, and "!beta" will switch to Beta's voice. To make the difference even more stark, I'll also give Alpha's text boxes a light color scheme and Beta's text boxes a dark color scheme. Voices are chosen with the "tsound" style setting, which also requires us to set a "speed" for animating in text. "fcolor" and "bcolor" are used to change the text box color schemes.

On the card script, we'll include an event handler for command[] events that looks like this:

on command x do
 if x~"alpha"
  o.speed:3
  o.tsound:"alphaVoice"
  o.fcolor:colors.black
  o.bcolor:colors.white
  dd.style[o]
 elseif x~"beta"
  o.speed:3
  o.tsound:("betaVoice1","betaVoice2")
  o.fcolor:colors.white
  o.bcolor:colors.black
  dd.style[o]
 else
  pt.command[deck x]
 end
end

Notice how there are blocks of code when the argument to command[] is "alpha" or "beta", and when it is neither it will fall through to calling pt.command[] to allow puppeteer !-commands to work normally. If you wanted to reuse these style-changing commands across your project, you could "lift" this definition up to the deck-level script.

Your prose for the scene might be stored in a field named "scene" and look something like


To play the cutscene, you'd then have a script triggered by, for example, a button:

on click do
 dd.open[deck]
 dd.say[scene.value]
 dd.close[]
 pt.clear[]
end

Is that more clear?

(1 edit)

You can define commands that change the style of dialog boxes mid-stream, including sound effects.

You'll need to define the handler for these commands either at the card level (if they're only used in one scene), or at the deck level (if they're used in multiple scenes). If you're also using Puppeteer, your custom command handler needs to ultimately defer to pt.command[] as its default case.

Does that make sense? I can furnish a more complete example if the one in the docs isn't clear enough on its own.

Ah, I see the problem now. Patched.

The issue was related to event dispatch failing when directed at a "deactivated" widget instance like those whose parent container has been removed from the deck. In this specific case, by overlapping the button and the canvas widget, Decker was attempting to send a final release[] event to the canvas after the button's script destroyed the surrounding contraption. The same logical flaw existed in web-decker, but there it is much less likely to cause a visible failure.

Until the v1.71 release it should be possible to avoid this specific problem by not overlapping the canvas and the button or even by ensuring that only canvas release[] events trigger removal of the contraption, leaving no pending events to process after the removal; this is why the problem was not visible in the original WigglyModal.

Thanks for developing the clear reproduction case, everyone!

If you don't change the code, this contraption will use whatever color is in slot 39 as the mask color.

Thanks for sharing!

Is there anything in particular about Decker fonts that you're finding confusing or unclear how to proceed with?

In Decker's default palette, cyan is pattern index 39. The actual visible color doesn't matter, just the pattern index:


If you want to use a different index for your mask color in a custom palette, you can replace "colors.cyan" in the script of the prototype for this contraption with a different pattern index. Does that make sense?