

Play game
Catapult: Launcher Bot Meets Piper's itch.io pageResults
| Criteria | Rank | Score* | Raw Score |
| Story | #159 | 2.867 | 2.867 |
| Music | #290 | 2.933 | 2.933 |
| Mechanics | #388 | 2.800 | 2.800 |
| Aesthetics | #409 | 2.933 | 2.933 |
| Overall | #439 | 2.733 | 2.733 |
| Theme | #478 | 2.667 | 2.667 |
| Fun | #508 | 2.333 | 2.333 |
| Sound | #635 | 1.533 | 1.533 |
Ranked from 15 ratings. Score is adjusted from raw score by the median number of ratings per game in the jam.
How many people worked on this game in total?
2
Did you use any existing assets? If so, list them below.
Yes. Luis Humanoid's music. GDQuest's Assets with CC License. Assets from SAKPIX's steampunk megapack.
Leave a comment
Log in with itch.io to leave a comment.
Comments
Nice art and music!
The gameplay looked interesting, but it took me a second to realize that "Z" is to pick up the wrench. At the beginning (the text window with controls) is says press "X" to pick up and "X" to throw. Might be a typo.
Well done!
it was 100% a typo and was my bad.
Like the art style and the music choice.
I think the mechanics could do with a bit of work though, just to make things a bit more intuitive.
Thanks for the game.
Neat game, but very fiddly with the puzzles which makes them hard/frustrating.
Consider using a more standard control scheme so players are already familiar with how to control the character.
That text animation is beautiful! Need to look into how to do that.
I kept pressing the wrench button but it would only sometimes let me throw things, not sure why? I also got trapped by the box on the second level.
Love the art! And some great puzzle ideas in here
Thanks! You'll want to start by looking into "CharFXTransform" in the Godot documentation. The "visible" boolean is what you want to play with. For the fade out part, just make it wait for the fade in process to finish before starting and repeat the logic except change opacity from 100 to 0, so the same thing but in reverse visually... To make it wiggle, you can actually offset each individual character with [var].offset = Vector2(X, Y), but you want to make sure you make X and Y something like X = sin(something)* amplitude and Y = sin(something)* amplitude. or cos. Basically you leverage that sin/cos is a wave, and multiply it by how wiggly you want it to be. Create this in a standalone .gd, give it a classname, be sure to include a declared variable called "bbcode" = "[sickradeffect]" then you can call your sick rad effect into code attached to dialogue box if and only if you wrap text in the inspector like this. "[sickradeffect]SICKRADEFFECTEXAMPLE[/sickradeffect]" That way sickradeffect only applies if and only if you wrap text in this. You're essentially adding something custom along side the ability to write out text like this "[b]THIS WOULD BE BOLD[/b]".
This is the way to do it to save yourself from typing it out over and over again in whatever project. Even cooler, you can create a permanent, personal library of text effects that to include in any project from the get go. If you haven't written anything like that yet, once you do, congrats, you've crafted your first personalized boilerplate code. Ideally each text effect that you design should be in a seperate .gd file, and should have a unique bbcode to prevent conflicts. In your dialogue box code include something like "text_label.custom_effects = [sickradeffect.new(), sickradeffect2.new(),...etc]",. "custom_effects" is a pre-existing array designed for you to fill it with....custom effects in the manner described here. And then make sure to @onready your label. I hope that helps!
Actually, I went ahead and had a conversation with some AI so it could output a super generic guide to probably better explain what I'm talking about, in full, and in order, and with descriptive variables wrapped in square brackets. I was just steam of consciousness typing my last reply. 😅 This should *actually* help you do this. I read it over and I think it's right.
1. class_name — making a script globally available
When you put
class_name [YourEffectName]at the top of a GDScript file, Godot registers it project-wide. Every other script can use[YourEffectName]by name with no import needed.Without
class_nameyou'd have to useload("res://[path/to/your/file].gd").new()every time.class_nameskips all of that.2. RichTextEffect — what it is and how Godot uses it
Godot's
RichTextLabelnode has a built-in system for per-character visual effects. You plug in any number of effects and Godot calls them automatically every frame for every character.To create one, extend
RichTextEffectand implement one function:3. The bbcode variable — which characters get the effect
The
bbcodevariable tells Godot which tag to listen for. If you set it to"[your_tag]", only characters wrapped in[[your_tag]]...[[/your_tag]]get processed.Setting
bbcode = ""applies the effect to all characters with no tag needed. Built-in tags like[b],[color],[i]are unaffected — they run independently and stack fine.4. custom_effects — registering effects on a label
custom_effectsis a built-in array on everyRichTextLabel. It ships empty. You fill it with instances of your effects and Godot runs all of them every frame.All registered effects are active. Which ones actually do anything depends on whether the text contains their BBCode tag.
5. @onready — safely referencing child nodes
Node references can only be resolved once the scene tree is ready.
@onreadydelays the assignment until that moment automatically.The variable name (
[your_label_variable]) is your choice. The node path ($[YourPanelNode]/[YourLabelNode]) must match the actual scene tree structure.6. Combining multiple effects
Because each effect has its own BBCode tag, you can stack them freely on the same text:
Godot runs each registered effect on each character. A character inside both tags gets both effects applied.
One file per effect is the right structure. Don't try to bundle multiple effects into one file — you can only declare one
bbcodevariable per class, and GDScript only allows oneclass_nameper file.7. The full plug-and-play setup
1
Create effect files — one per effect, each with
class_name [YourEffectName],var bbcode = "[your_tag]", and_process_custom_fx().2
Register them in [YourDialogueScript] — add all effects to
[your_label_variable].custom_effectsin_ready().3
Use tags in text — wrap any text in
[[your_tag]]..[[/your_tag]]and the effect runs automatically.4
Adding a new effect — create the file, add one line to
custom_effects. Nothing else needs to change.8. What "boilerplate" means here
Boilerplate is reusable code that solves a general problem with no project-specific logic in it. A well-written
[YourEffectName]qualifies — it knows nothing about your game, just how to transform characters visually. Drop it into any Godot project and it works.A dialogue box script is boilerplate at its core (entry cycling, timing, dismiss fade) but often has project-specific parts on top (portrait modes, character-specific flags). Strip those out and the skeleton becomes reusable too.
I got stuck on the second puzzle when piper gets stuck, I thought the platform will go up so it is easy to aim but aiming for the switch with a wrench is very difficult. Idk if it is intentional and I am doing it wrong or it is a bug. Very neat design on the puzzles, a really nice combo of difficult and easy. There is a nice satisfaction of solving the puzzles. if aiming was with mouse input, it would have been mush easier for me. Also not seeing the trajectory of the wrench is making it difficult for me to aim. An awesome job on the puzzle, as much as I could play they were perfect and satisfying. An overall great entry!
Neat concept! Although I did run into a problem during the second level. When Piper dropped the box for LB it fell on LB's head and he got stuck.
Yeah! Sorry about that, I'm fiddling with ways to make the box bouncy in that situation now
Nice job! Some solid mechanics in there that could be expanded upon nicely
Good game, the art and mechanics are nice. Good work.
And if you want to try mine, I’d be happy.
I absolutely will!
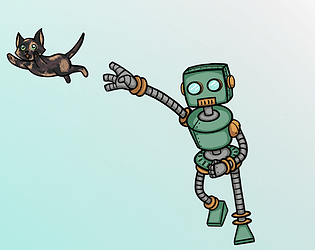
Solid game overall! The WASD button not being move took me a while to get used to but I got the hang of it. The background though is very cool, it is very distracting to me considering I'm throwing small wrenches and stuff which made it harder to see. I love the two characters cat and robot and I love the dynamic of them though! I wish there were also a bit more feedback of when things are happenign (door opening, etc) but other than that, you did a great job! Also congrats for submitting your first game jam!
The not having WASD controls made this game a lot more difficult because I kept pushing the wrong buttons just on instinct.
Solid choice on the music though.
The game had a great visual language but I found the controlls foreign and hard to overcome. I think it needs a cleared indications of where you are supposed to go and where you are throwing.
Best of luck on your game dev journey.
The buttonless input on the start screen caught my attention, and the animation on the text was really cute. I also liked that you showed the controls inside the game itself.
When I escaped from the pile of robots, I expected them to stay in the scene, but they all disappeared. Reaching the platform was frustratingly difficult for me, or maybe I’m just bad at it, ahaha.
Overall though, it was fun. Congratulations!
Nice game. :)
Glad you figured out how to get it published as a web build, will hopefully allow for more people to give it a try.
I liked the ideas behind the mechanics but found the controls a little awkward. The dissolving platforms are a nice mechanic but could use better visual indication before you jump on them.
There were a few times when I got the characters soft locked - an example is pushing the first crate partially down the stairs and then going over the top of the create and falling down you then can't get back up the stairs.
I like the little initial interaction with the cat, would have been interesting to see how that developed.
Oh man, I really did typo the instructions. Yes, Z picks up and shoots, not x.
The parallax background I find it very imposing and all the characters and items blend into it and its hard to differentiate them.
Also I could not get 'X' to work with the robot. I pressed 'Z' to pick and pressed 'Z' to shoot.
Also the intro with the robot is really well done. I like it. The art of the cat and the robot are nice and the music is good.
For a first time game jam I think this is really good imo.
Good idea and interesting challenges. Hard to master controls while being used to WASD and SPACE. In the beginning tutorial explains that throwing wrench would be done with X, I had to use Z for throwing and aiming wrench.