
If you're having trouble or run into any bugs with the code, post a comment here! I will try to get back to you within a few days.
Apply dynamic outlines in-engine to buttons, images, and more. · By
Hello! As mentioned in the compatibility section, shaders require GL2, which isn't present in versions before 7.4. If you can update your engine version to 7.4 or later, then you will be able to use the shader, but it is not compatible with earlier version like 7.3.2. It does work with `show`; you can use it as an ATL transform the same way as `show character at left`.
Hello! As mentioned in the page the lowest version the shader has been tested on is 7.5; it seems like one of those properties is more recent - likely gl_drawable_resolution. You can comment out those properties until it works, or what I recommend, is updating your engine version (at least to 7.5). 7.4.11 came out in 2021 and we're currently on 7.7/8.2.
Hello again! Using the shader and I was wondering a few things.
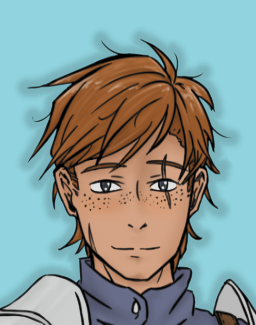
I have applied the shader to the characters in our game before, and the results are different when I apply them when showing the character or when defining the character. It seems the gradient is calculated differently, and it looks like it starts the gradiant close to the outside edge of the shader. I attached a screenshot of one of my poor characters struggling with his spiky hair, and the transform applied. If I apply the shader after the character has been defined, the gradiant seems to look better. Is there a way to smoothly transition from the two colors when defining a character with this shader?
Thank you!
transform shadowOne:
outline_transform(30, "#0000002f", 4.0, end_color="#00000000", num_passes=1.0, gradient_smoothing=1.0, is_mesh=True, mesh_pad=True, drawable_res=True, offset=(0, 0))
image low Normal A cape:
"Lowri/LowAHNormal.png"
shadowOne
zoom .25
yoffset 200
Hello! I'm afraid I don't quite understand what you're asking - can you elaborate on what difference you are seeing between the two methods? What are the two colours you want to transition between? If you prefer the look of one method, is there a reason you can't use that method for the effect you want?
Hello! Sorry for the confusion. I want a drop-shadow effect on each character (to make them standout from the background), and I would prefer not to have to apply the transformation every time I show a character, but on the character definition. As you can see in the screenshot I attached, the dropshadow effect is not displaying correctly when attaching to the character definition. The two colors are black, one with a bit of transparency, and one with full transparency. I want a smooth transtion between the two, but I am getting a transition only at the edge of the outline. This was not the case when applying the transformation when showing the character for some reason, but if I had to apply the transform on every time I show a character... it would take a really long time, and it would break some of my existing transformations.
I think there's perhaps a mismatching of expectations here - there's always going to be a visible seam where the gradient ends because it's a set size and at some points the step between "can make out the outline" and "outline is too transparent to reliably discern" will be visible simply because of how perception works. You can make glowing outlines in an editor like photoshop and you'll still see where the glow ends.
As for applying the outline to a character, you can use a LayeredImageProxy or just apply it right to the image declaration, depending on how you've set up things. For example, image eileen outline = LayeredImageProxy("eileen", outline_transform(...)) will automatically apply the transform to the layered image "eileen" for whatever attribute combinations you need just by show eileen outline, or if you don't want it toggleable then just add an at outline_transform(...) right at the top of the layeredimage declaration itself.
mmm I understand the outline will be visible. I am more trying to reproduce the soft shadow effect I see on the dagger example on the page of this plugging, but for me it is looking different. It is like the gradiant is only being applied to the outside border of the outline, instead of the entire width of the outline. Lets say the width of the outline is 20px, the gradiant seems to only apply to the last 5pixels of the outline.
As for applying the transform on a proxy, let me try that and see if it changes the behavior of the outline. Thanks!
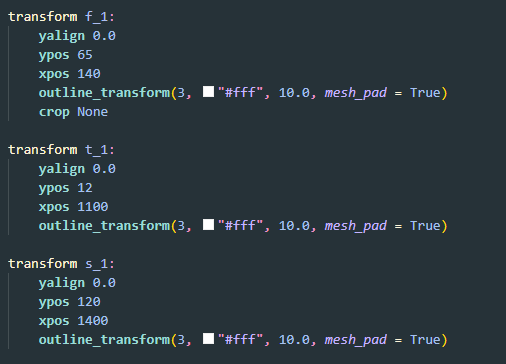
Thanks! Only thing I can say right now looking at the code is that it seems the current blending is depending on the scale of the image, instead of the outline width. That is probably why if I apply the outline after the existing transformation or before it changes the smoothness of the border. (my characters are zoomed out so the scale changes quite a bit). I still have to try the proxy transformation. That might solve my issues as it applies the outline transform after my zoom transform.
Oh I think I understand what you mean now - yes order of operations matters. If you apply the shader to a zoomed image, the outline won't be zoomed. If you apply the shader and then zoom the image, the outline gets zoomed as well. You can see the property order here: https://www.renpy.org/doc/html/atl.html#property-order So if you want to go out of order, you'll have to make an image that's got the shader already applied and then zoom that, for example.
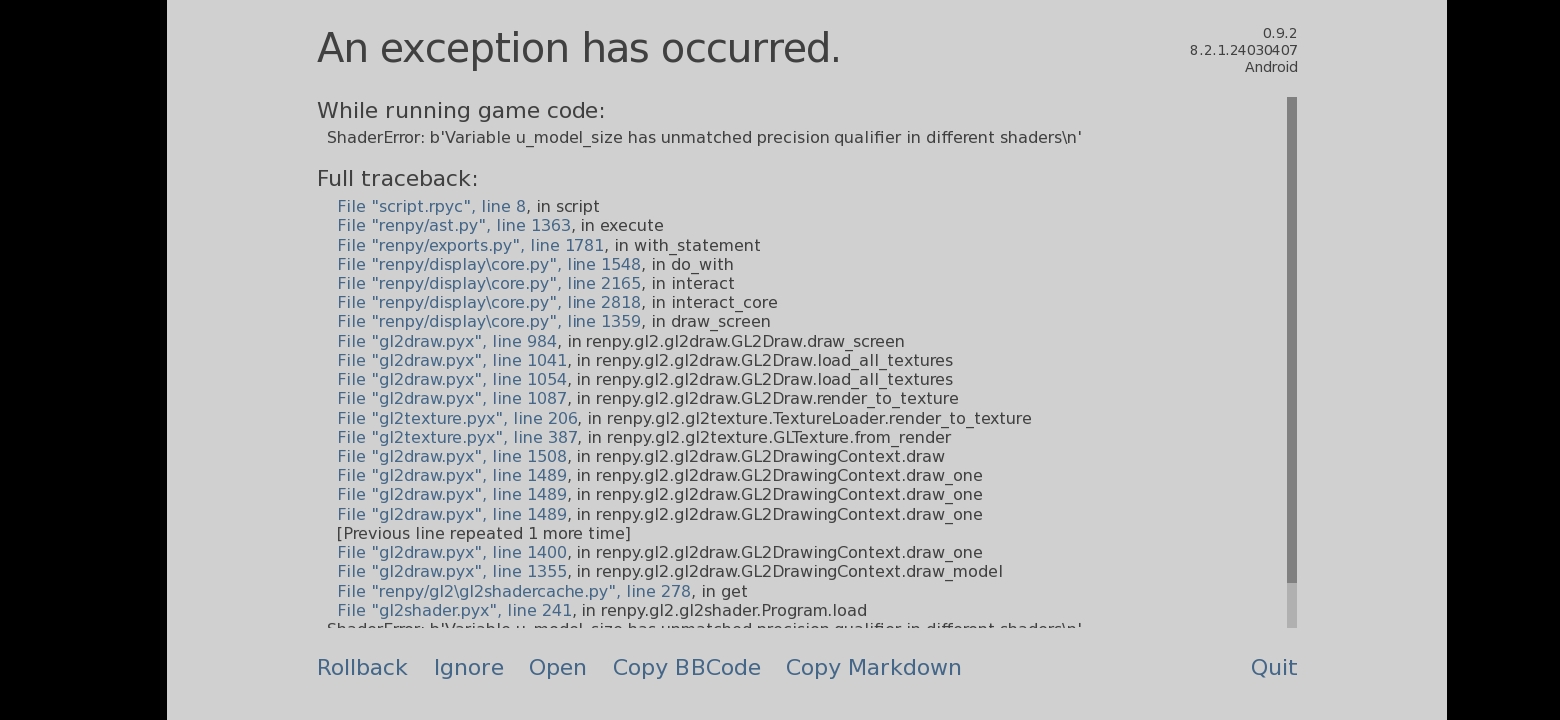
Hello! Thanks for the report. I believe I should have this fixed in an upcoming update I've been planning for this shader - if you don't mind waiting a week or so, I hope to have it released by then. This is an issue I've seen when using the ANGLE2 renderer instead of GL2; usually systems default to GL2 but some phones may not. I'll put out a devlog once the update is out, and then please let me know if it fixes your problem!
Thanks for replying again. I downloaded the new version and remade my transforms like the example you set and it works perfectly on android now. Thanks for coming to the rescue!
Hello! Someone playing the android version of my game ran into an error and I'm not sure how to help them:

I did(do?) have a gradient that was slightly edited from tom's example gradient shader code on the documentation page -- though the android version doesn't/shouldn't be using it at all at this point....
I think it's only on android, though the phone I used to test was fine + the PC builds arent having an issue-- At this point I think I might have to wait for the person who got this to get back to me (though I'll update the android dl to have absolutely nothing else shader-wise.)
Thank you for helping me narrow it down! ><
Yep, you can apply the outline shader to just about anything! I do also recommend you try playing around with Ren'py's built in outlines to see if you can get the effect you want, as the outline shader will be somewhat similar; you can apply outlines with decreasing transparency and increasing size through the outlines text property. Notably your example image is more a blobish suggestion behind each letter, whereas the outline shader (and built in text outlines) will be more like *glowing*. You might also be interested in my gradient shader tool if you want more blended gradients generally.
That's good to know! Unfortunately it does mean that it's interacting with something in your project then, which I can't debug. Note that shaders can interact with each other in odd ways sometimes, in case that gives you an idea of where to look. If you find any more information, let me know in case there are compatibility changes I can make!
Interesting! As that's the nightly version, it's also possible it has some unresolved bugs etc, so it's not something I'll really be looking into solving unless it makes it into the public 8.4 release. Though, engine updates generally should not retroactively change the behaviour of shaders, so it would likely be an engine regression of some kind in that case. If you can reproduce the behaviour change from 8.3 to 8.4 in a basic project, it might be worth a bug report in the Ren'Py GitHub.