


Yeah this is a weird issue with the Ren'Py engine actually - if it runs into a problem during init, sometimes it still tries running the interaction callbacks, but it hasn't done all the setup (because there was an error) so it runs into a new error in the callback, and reports that instead. Usually this is because you have duplicate label names actually, sometimes due to orphan rpyc files.
You can adjust the function to
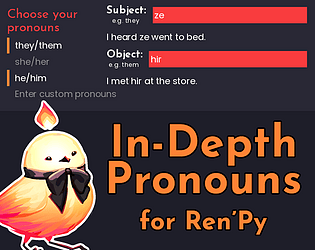
def randomize_pronouns_per_line(*args, **kwargs):
    """
    An interaction callback which will randomize the player's pronouns on
    every line, if they have selected that option.
    """
    try:
        if store.pronoun_switch_freq != "line":
            return
        ## Otherwise yes, randomize.
        randomize_pronouns()
    except AttributeError as e:
        ## Typically this occurs if there's an init time error, but should
        ## be passed along so the actual error can be reported.
        pass
and that should at least allow the error to pass through and report what really went wrong.