
the text is too small to read… and where is the menu option so i could edit the size of font or change their font?
A member registered Feb 21, 2017 · View creator page →
Creator of
Recent community posts
look like i'm not alone having a problem with the GUI being smaller than normal... here a screenshot to illustrate the problem:
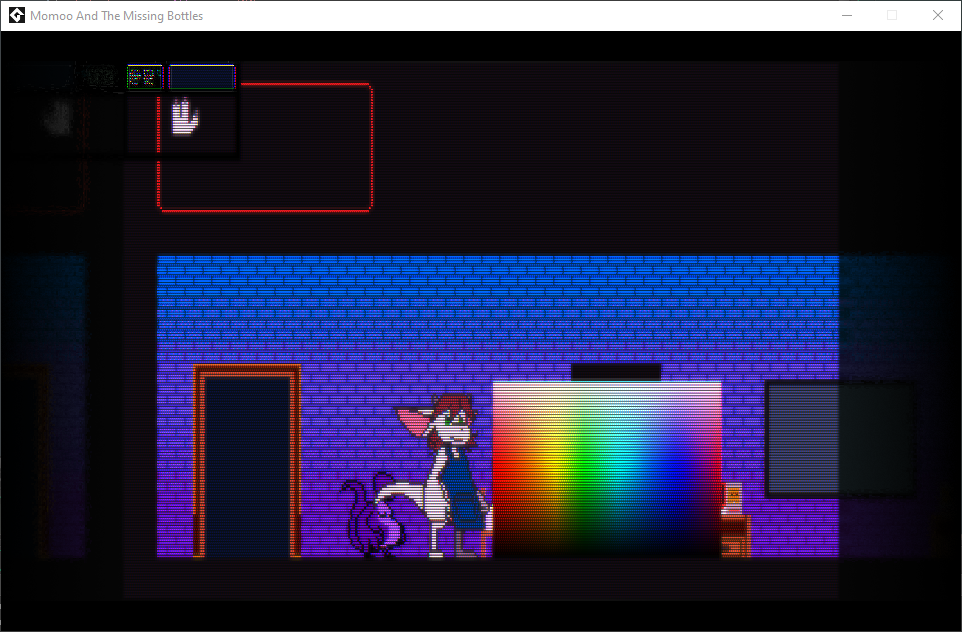
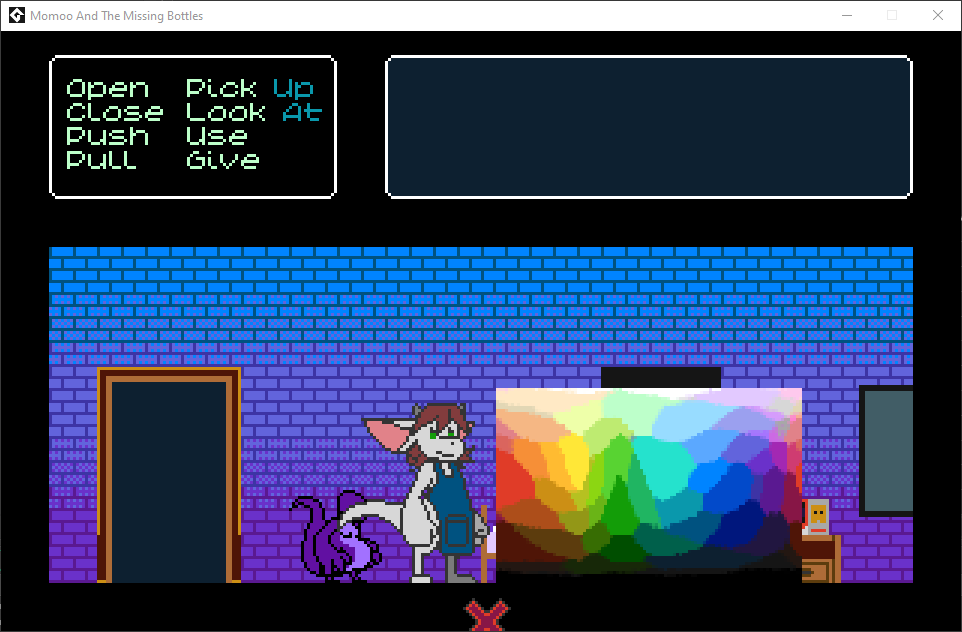
as you can see, the game is messed up, it should looked like this without crt:
update: i managed to make it work by removing "resize_window()" variable in room_start but one problem: my game use the aspect ratio of 16:10 instead of 4:3 or 16:9, it might be a good idea to split the aspect ratio variable into 2 variable on the height and width. example: if it's 16:10, it will be aspect_ratio_width: 16 and aspect_ratio_height: 10. what do you think?
just noticed that in the bitmap folder, there is a lack of png files.
edit: i had to make my own version of a true monospaced on your font because it need to be exactly in the 8x8 grid space... such as "g" "j" "y" in lowercase are problematic. especially since it will overlap with other letters and symbols when the font will be rendered in a nes game style. here 2 examples to demonstrate what i mean:
this is my version:

this is your version:
as you probably noticed, the text get overlapped with each other...
check the folder that contains all the javascript files, it's from them that you can edit the whole thing done as well adding some features that doesn't exist from the rpg maker mv software. here a screenshot as example:
i hope it helped you out.
ps: your game was fun to play!
edit: you can edit the code source from the mjshi's plugin, you will be able to find the "sell" function that you could remove completely. that is where you could find the information as well the code to edit: Remove the "Sell" option from the shop menu completely? | RPG Maker Forums (rpgmakerweb.com)
Pixel Vision 8 community » Bugs · Replied to Harmonie Games in How do I get out of Sound Test screen?
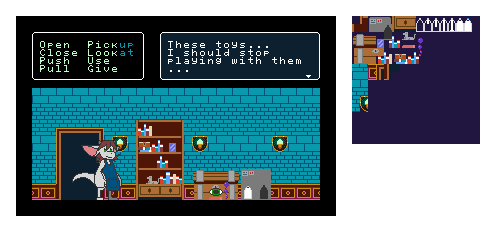
alright, after a few day of figuring out how to display correctly the hud and the room, i successed it, unfortunately, i encountered a weird bug that is driving me nuts... so, here the problem i have:
function Draw(HUD)
    if(drawHUD == true) then
        BackgroundColor(0)
        Clear()
        DrawTilemap(0, 0, 40, 8)
        drawHUD = false
    else
        BackgroundColor(31)
        Clear()
        DrawTilemap(16, hudHeight, 288, 112)
    end
end
function Draw(ROOM)
    BackgroundColor(31)
    Clear()
    DrawTilemap(16, hudHeight, 288, 112)
end
function Draw(OBJECTS)
    -- body
end
function Draw(SPRITES)
    BackgroundColor(31)
    Clear(16, hudHeight, 288, 112)
    DrawTilemap()
-- character position starter.
    local newX = 48
    local newY = 121
--that line of code will tell where to get the sprite data. so, the game will be able to animate them.
    local frameData = speakingNormal2Frames[idleFrame]
-- that little "if(frameData ~= nil) then" is REALLY important to add. so, it will not display "out of the range"
-- everytime i start the game.
-- each variable will be called from the array code at the start of file.
    if(frameData ~= nil) then
        DrawSprites(frameData.spriteData.spriteIDs, newX, newY, frameData.spriteData.width)
    end
-- We are going to detect if the mouse is on the screen. When the cursor is within the bounds
-- of the DisplayChip, we will show its x and y position.
    if (mousePos.x < 0 or mousePos.y < 0) then
    else
-- We also need to draw it to the display. We'll be using the DrawSprites() method to take the four cursor sprites and render them in a 2 x 2 grid.
        DrawSprites(greenCursorSprites, mousePos.x, mousePos.y, cursorWidth)
        OverscanBorder(1,1)
    end
end
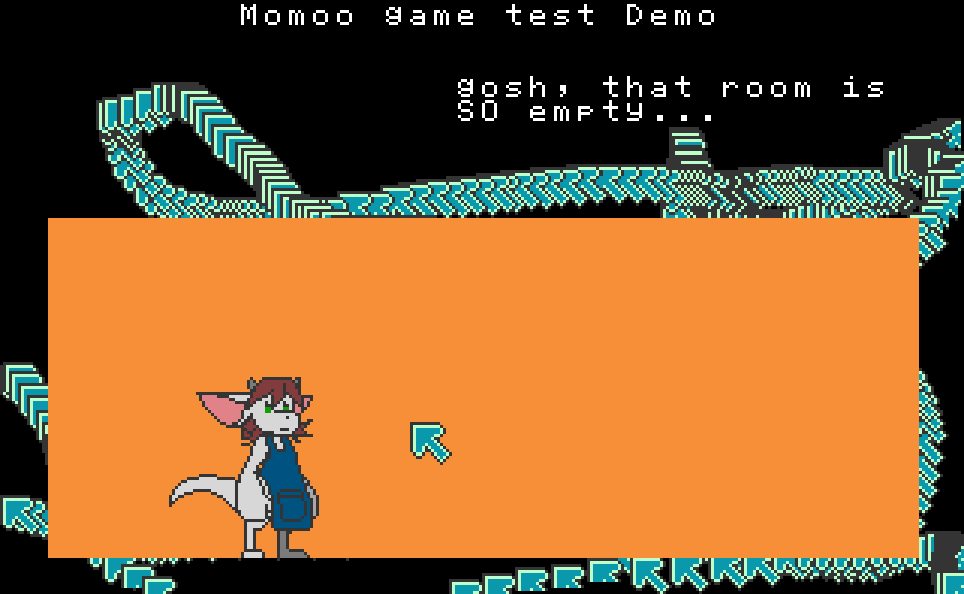
any idea why it isn't working like i wanted? also, the background bug is anoying as well. ah yes, here the pic of how annoying it is:
that is before i change Draw() to Draw(HUD), Draw(ROOM), Draw(OBJECTS), Draw(SPRITES) which the background color become all orange.
any suggestions are welcomed!
alright! here how far i've done with the sprites and the like:
first of all, here the sprites sheet:

now here the animation of these sprites:
and now here 2 rooms wips i've done so far:
the second level which it's still far from done:
here a few icons i made for the "game":

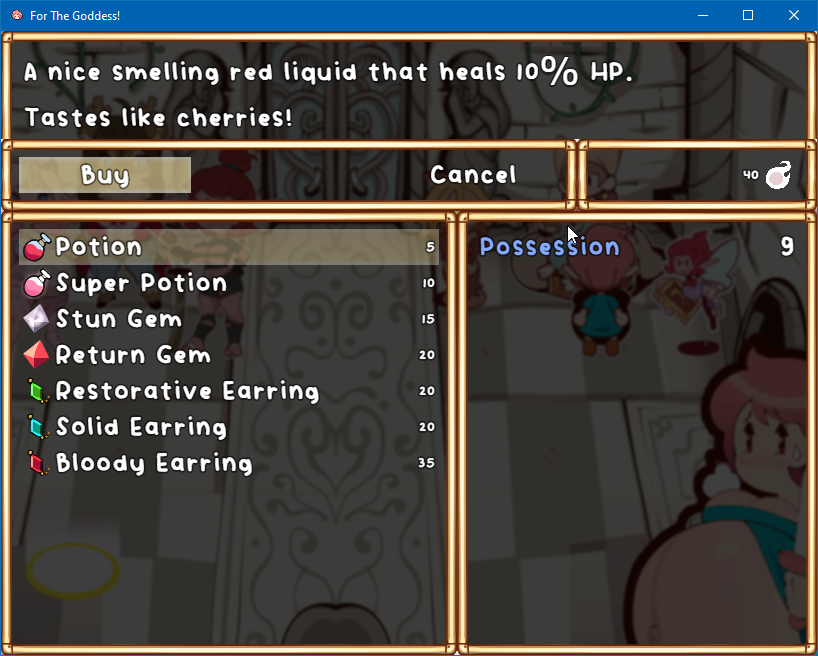
the result of the "game":

bonus just for fun that i've done it before the release of PV8 0.70a, a pregnant version of the main character... ^^; :
that is all for now!
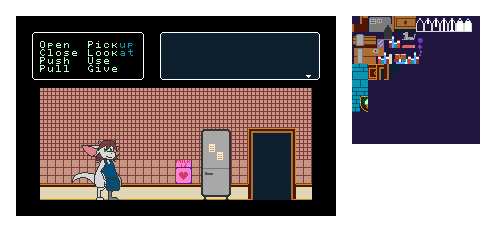
alright! now that the PV8 update is finally here, the new features are wonderful but that doesn't solve the problem i have.
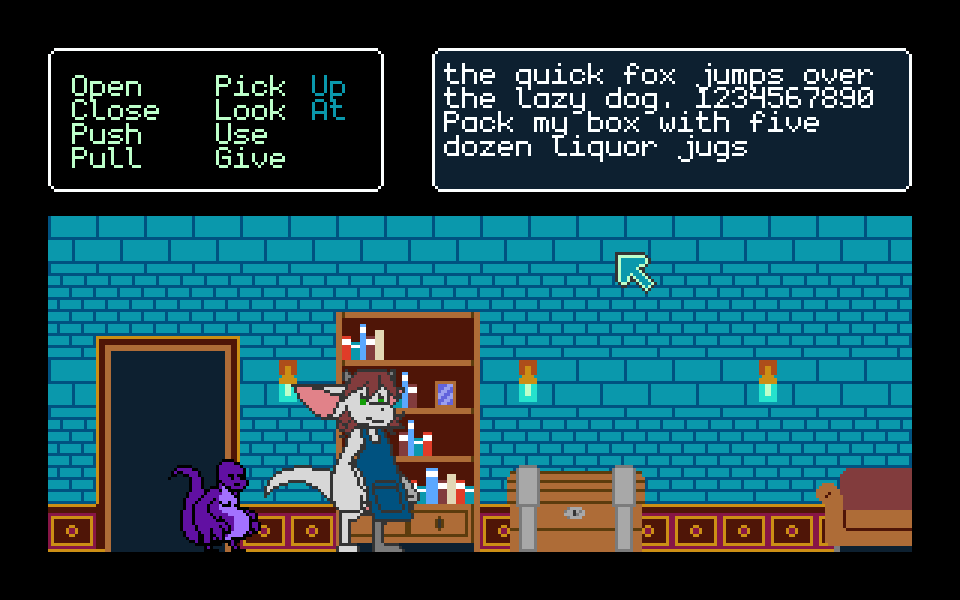
here how it will happen when i use the current code as result:
as you can see, it's not what i'm trying to achieve, here what is the goal i wanted the game display:

as you can see, the duration of each frame are dynamic which it's exactly what i'm trying to achieve. do you know what is the right methode to achieve it?
i will upload the code source once i finish cleaning them all from the old api to the new api.
alright, i just finished cleaning my code source and added the mouse features that worked pretty well but not yet fixed the sprite part of character... i always get that message:
"IndexOutOfRangeException:
Array index is out of range."
wondering why it happened even though i did them right... might have something about the last part of code. allright, here the code source:
-- spritelib-start
-- idle cycle of normal udder and clothed edition.
MomooIdleN2_1={width=8,unique=37,total=64,spriteIDs={-1,-1,-1,-1,0,1,2,-1,-1,-1,15,16,17,18,19,-1,-1,-1,45,46,91,92,49,-1,-1,-1,-1,-1,112,113,114,-1,-1,158,159,160,161,224,225,-1,-1,235,236,237,238,321,322,323,-1,-1,-1,348,349,428,429,430,-1,-1,-1,-1,452,489,490,-1}}
MomooIdleN2_2={width=8,unique=37,total=64,spriteIDs={-1,-1,-1,-1,3,4,5,-1,-1,-1,20,21,22,23,24,-1,-1,-1,50,51,93,94,54,-1,-1,-1,-1,-1,115,116,117,-1,-1,158,159,164,226,227,228,-1,-1,235,236,242,243,324,325,326,-1,-1,-1,270,353,431,429,432,-1,-1,-1,-1,452,489,490,-1}}
MomooIdleN2_3={width=8,unique=36,total=64,spriteIDs={-1,-1,-1,-1,3,4,5,-1,-1,-1,20,21,22,25,24,-1,-1,-1,50,51,95,96,57,-1,-1,-1,-1,-1,118,119,117,-1,-1,167,168,169,229,227,230,-1,-1,245,246,247,248,327,328,329,-1,-1,-1,355,356,433,434,-1,-1,-1,-1,-1,452,489,490,-1}}
MomooIdleN2_4={width=8,unique=37,total=64,spriteIDs={-1,-1,-1,-1,3,4,5,-1,-1,-1,20,21,22,23,24,-1,-1,-1,50,51,93,97,59,-1,-1,-1,-1,-1,115,116,117,-1,-1,158,159,164,226,227,228,-1,-1,235,236,242,243,324,325,326,-1,-1,-1,270,353,431,429,432,-1,-1,-1,-1,452,489,490,-1}}
MomooIdleN2_5={width=8,unique=37,total=64,spriteIDs={-1,-1,-1,-1,0,1,2,-1,-1,-1,15,16,17,18,19,-1,-1,-1,45,46,91,98,61,-1,-1,-1,-1,-1,112,120,121,-1,-1,158,159,160,161,224,225,-1,-1,235,236,237,238,321,322,323,-1,-1,-1,348,349,428,429,430,-1,-1,-1,-1,452,489,490,-1}}
MomooIdleN2_6={width=8,unique=37,total=64,spriteIDs={-1,-1,-1,-1,0,1,2,-1,-1,-1,15,16,17,18,19,-1,-1,-1,45,46,91,99,63,-1,-1,-1,-1,-1,112,113,114,-1,-1,158,159,160,161,224,225,-1,-1,235,236,237,238,321,322,323,-1,-1,-1,348,349,428,429,430,-1,-1,-1,-1,452,489,490,-1}}
MomooIdleN2_7={width=8,unique=37,total=64,spriteIDs={-1,-1,-1,-1,0,1,2,-1,-1,-1,15,16,17,18,19,-1,-1,-1,45,46,91,100,49,-1,-1,-1,-1,-1,112,113,114,-1,-1,158,159,160,161,224,225,-1,-1,235,236,237,238,321,322,323,-1,-1,-1,348,349,428,429,430,-1,-1,-1,-1,452,489,490,-1}}
-- spritelib-end
-- mode enums
local Up, Down, Right, Left, A, B, Select, Start = 0, 1, 2, 3, 4, 5, 6, 7
    local MomooIdleNormal2Sprites = {
            MomooIdleN2_1[1],
            MomooIdleN2_2[1],
            MomooIdleN2_3[1],
            MomooIdleN2_4[1],
            MomooIdleN2_5[1],
            MomooIdleN2_6[1],
            MomooIdleN2_7[1],
            MomooIdleN2_8[1]}
local idleNormal2Animation = {
    {sprite = MomooIdleNormal2Sprites[1], hFlip = false, vFlip = false, time = 2},
    {sprite = MomooIdleNormal2Sprites[2], hFlip = false, vFlip = false, time = .1},
    {sprite = MomooIdleNormal2Sprites[3], hFlip = false, vFlip = false, time = .16},
    {sprite = MomooIdleNormal2Sprites[4], hFlip = false, vFlip = false, time = .4},
    {sprite = MomooIdleNormal2Sprites[5], hFlip = false, vFlip = false, time = .08},
    {sprite = MomooIdleNormal2Sprites[6], hFlip = false, vFlip = false, time = .1},
    {sprite = MomooIdleNormal2Sprites[7], hFlip = false, vFlip = false, time = .1},
    {sprite = MomooIdleNormal2Sprites[8], hFlip = false, vFlip = false, time = .08}
}
-- Here we will store the random idle animation data
local idleDelay = .2
local idleTime = 0
local idleFrame = 1
-- The Mouse Demo shows off how to capture mouse input and display a cursor on the screen.
-- Pixel Vision 8 requires the runner to supply mouse data via the ControllerChip.You will
-- need to implement the IMouseInput interface and register a custom Mouse Class with the
-- ControllerChip in order for this demo to work.
-- We need to create some fields to store the mouse cursor's sprites, dimensions, position, and offset.
local greenCursorSprites = {0493,0494,0495,0496}
local redCursorSprites = {0497,0498,0499,0500}
local greyCursorSprites = {0501,0502,0503,0504}
local handCursorSprites = {0505,0506,0507,0508}
local eyeCursorSprites ={0509,0510,0511,0512}
local crossCursorSprites ={0513,0514,0515,0516}
local cursorWidth = 2
local fontOffsetX = 128
local mousePos = {x = -1, y = 0}
-- The Init() method is part of the game's lifecycle and called a game starts. We are going to
-- use this method to configure background color, ScreenBufferChip and draw a text box.
function Init()
    -- Before we start, we need to set a background color and rebuild the ScreenBufferChip. The screen buffer
    -- allows us to draw our fonts into the background layer to save on draw calls.
    BackgroundColor(31)
    DrawText("momoo game test Demo", 1, 1, DrawMode.Tile, "default")
    -- This default text will help display the current state of the mouse. We'll render it into the
    -- ScreenBufferChip to cut down on sprite draw calls.
    DrawText("MOUSE POSITION", 1, 1, DrawMode.Tile, "large-font", 0);
    DrawText("BUTTON 1 DOWN", 1, 3, DrawMode.Tile, "large-font", 0);
    DrawText("BUTTON 2 DOWN", 1, 4, DrawMode.Tile, "large-font", 0);
    local pipeX = 1
    local pipeY = 21
end
-- The Update() method is part of the game's life cycle. The engine calls Update() on every frame
-- before the Draw() method. It accepts one argument, timeDelta, which is the difference in
-- milliseconds since the last frame.
function Update(timeDelta)
    -- The APIBridge exposes a property for the mouse's x and y position. We'll store this in a field and
    -- retrieve it during Draw() execution of the GameChip's life cycle.
    mousePos = MousePosition()
    -- While this step may appear to be wasteful, it's important to separate any calculation logic from
    -- render logic. This optimization technique will ensure the best performance for Pixel Vision 8 games
    -- and free up the Draw() method to only focus on rendering.
    -- Here we are tracking the fireball animation
    idleTime = idleTime + timeDelta
    if(idleTime > idleDelay) then
        idleFrame = idleFrame + 1
        if(idleFrame > #idleNormal2Animation) then
             idleFrame = 1
        end
        idleTime = 0
        end
    end
-- The Draw() method is part of the game's life cycle. It is called after Update() and is where
-- all of our draw calls should go. We'll be using this to render sprites to the display.
function Draw()
    -- We can use the DrawScreenBuffer() method to clear the screen and redraw the tilemap in a
    -- single call.
    Clear()
    DrawTilemap(0, 0, 32, 30)
    -- We can use the RedrawDisplay() method to clear the screen and redraw the tilemap in a
    -- single call.
    RedrawDisplay()
    -- For the last bit of code we are just going to display whether the left or right mouse button is being held down by using the
    -- GetMouseButton() method on the APIBridge.
    DrawText(tostring(MouseButton(0)):upper(), fontOffsetX - 8, 24, DrawMode.Sprite, "large-font", 0)
    DrawText(tostring(MouseButton(1)):upper(), fontOffsetX - 8, 32, DrawMode.Sprite, "large-font", 0)
    -- We are going to detect if the mouse is on the screen. When the cursor is within the bounds
    -- of the DisplayChip, we will show its x and y position.
    if (mousePos.x < 0 or mousePos.y < 0) then
        DrawText("OFFSCREEN", fontOffsetX, 8, DrawMode.Sprite, "large-font", 0)
    else
        -- Pixel Vision 8 automatically returns a -1 value for the mouse x and y position if it is out of the bounds of the DisplayChip
        -- or if a mouse was is not registered with the ControllerChip.
        -- Since the mouse within the display, let's show its current x and y position.
        DrawText("(" ..  mousePos.x .. "," .. mousePos.y .. ")", fontOffsetX, 8, DrawMode.Sprite, "large-font", 0)
        -- We also need to draw it to the display. We'll be using the DrawSprites() method to take the four cursor sprites and render them in a 2 x 2 grid.
        DrawSprites(greenCursorSprites, mousePos.x, mousePos.y, cursorWidth)
    end
    local newX = 8
    local newY = 48
    local frameData = idleNormal2Animation[idleFrame]
    newX = newX + 16
    DrawSprite(frameData.sprite, newX, newY, frameData.hFlip, frameData.vFlip) --frameData.time)
end
to be honest, this new api is really more elegant and cleaner than the old version which i'm very happy of the result! :) too bad that last portion of code is bugging me for a while now XD;
Pixel Vision 8 community » Feature Requests · Replied to Pixel Vision 8 in Option for Locked Aspect Ratio/Maintain Square Pixels
hello folks, after many test with the draw sprite demo, i wasn't able to make it work so, i decided to share it:
first, the code source:
--
-- Copyright (c) 2017, Jesse Freeman. All rights reserved.
--
-- Licensed under the Microsoft Public License (MS-PL) License.
-- See LICENSE file in the project root for full license information.
--
-- Contributors
-- --------------------------------------------------------
-- This is the official list of Pixel Vision 8 contributors:
--
-- Jesse Freeman - @JesseFreeman
-- Christer Kaitila - @McFunkypants
-- Pedro Medeiros - @saint11
-- Shawn Rakowski - @shwany
--

-- These values represent the shell's position, speed, animation
-- time and frame.
local shellAPos = {x = 0, y = 8*8}
local shellBPos = {x = 8*22, y = 0}

-- This 2D array stores sprite IDs for the turtle shell animations.
-- Each shell is a made up of 4 sprites in a 2x2 grid.
--local shellSprites = {{0,0,2,2},{1,1,3,3}}

local shellSprites =
    {
        {0,0,flipH,2,2,flipH},{1,1,flipH,3,3,flipH}
    }


local speed = 100

local time = 0
local frame = 1

-- The Init() method is part of the game's lifecycle and called a game
-- starts. We are going to use this method to configure the DisplayChip,
-- ScreenBufferChip and also draw fonts into the background layer.
function Init()

    -- Here we are starting by changing the background color and telling
    -- the DisplayChip to wrap.
    apiBridge:ChangeBackgroundColor(32)
    apiBridge:ToggleDisplayWrap(true)

    -- Here we are rebuilding the screen buffer so we can draw tile and
    -- fonts to it. This will cut down on our draw calls.
    apiBridge:RebuildScreenBuffer()

    -- With the ScreenBuffer ready, we can now draw fonts into it. Here
    -- we are creating two new labels to display under our demo sprites.
    apiBridge:DrawFontToBuffer("Sprite Test", 1, 1, "large-font", 0)
    apiBridge:DrawFontToBuffer("Position Wrap Test", 1, 6, "large-font", 0)

end

-- The Update() method is part of the game's life cycle. The engine
-- calls Update() on every frame before the Draw() method. It accepts
-- one argument, timeDelta, which is the difference in milliseconds
-- since the last frame. We are going to keep track of time to sync
-- up our sprite animation as well as move the sprites across the screen.
function Update(timeDelta)

    -- We are going to move the sprite positions by calculating the speed by
    -- the timeDelata. We can then add this to the x or y position of our sprite
    -- vector.
    shellAPos.x = math.ceil(shellAPos.x + (speed * timeDelta))
    shellBPos.y = math.ceil(shellBPos.y + (speed * timeDelta))

    -- We are going to keep track of the time by adding timeDelta to our time
    -- field. We can then use this to tell if we should change our animation frame.
    time = time + timeDelta

    -- Here we'll determine when it's time to change the sprite frame.
    if(time > 0.09) then

        -- If time is past the frame we'll increase the frame number to advance the animation.
        frame = frame + 1

        -- We need to reset the frame number if it is greater than the number of frames.
        if(frame > #shellSprites) then
            frame = 1
        end

        -- Now we can reset time back to 0 to start tracking the next frame change.
        time = 0

    end

end

-- The Draw() method is part of the game's life cycle. It is called after Update() and
-- is where all of our draw calls should go. We'll be using this to render each of
-- the sprites and font characters to the display.
function Draw()

    -- It's important to clear the display on each frame. There are two ways to do this. Here
    -- we are going to use the DrawScreenBuffer() way to copy over the existing buffer and clear
    -- all of the previous pixel data.
    apiBridge:DrawScreenBuffer()

    -- Here we are going to draw the first example. The turtle shell is made up of 4 sprites.
    -- We'll draw each sprite out with a few pixels between them so you can see how they are
    -- put together.
    apiBridge:DrawSprite(0, 8, 24, false, false, true, 0)
    apiBridge:DrawSprite(0, 18, 24, true, false, true, 0)
    apiBridge:DrawSprite(2, 8, 34, false, false, true, 0)
    apiBridge:DrawSprite(2, 18, 34, true, false, true, 0)

    -- For the next two examples we'll use the DrawSprites() method
    -- which allows us to combine sprites together into a single draw request.
    -- Each sprite still counts as a draw call but this simplifies drawing
    -- larger sprites in your game.
    apiBridge:DrawSprites(shellSprites[1], 32, 24, 2, false, false, true, 0)
    --apiBridge:DrawSprites(shellSprites[frame], 54, 24, 2, false, false, true, 0)

    -- Here we are drawing a turtle shell along the x and y axis. We'll take advantage of the Display's wrap
    -- setting so that the turtle will appear on the opposite side of the screen even when the x or y
    -- position is out of bounds.
    --apiBridge:DrawSprites(shellSprites[frame], shellAPos.x, shellAPos.y, 2, false, false, true, 0)
    apiBridge:DrawFont("("..shellAPos.x..","..shellAPos.y..")", shellAPos.x, shellAPos.y + 20, "large-font", 0)

    -- The last thing we are going to do is draw text below each of our moving turtles so we can see the
    -- x and y position as they wrap around the display.
    --apiBridge:DrawSprites(shellSprites[frame], shellBPos.x, shellBPos.y, 2, false, false, true, 0)
    apiBridge:DrawFont("("..shellBPos.x..","..shellBPos.y..")", shellBPos.x, shellBPos.y + 20, "large-font", 0)

end
and the sprites i used for the coding part:
![]()
the idea is that we could display the shell with only one half of sprite and than mirroring it like the nes games actually does it. let take a look at that example i found from google:

as you may noticed, alot of sprite are only one half but can be mirrored thank to the coding part unfortunately, it's not pratical because it was in assembly language. so, that is why i'm trying to reproduce it in lua scripting because i know it might be possible but i haven't yet found how to do that. all i found as information is this:
https://nesdoug.com/2015/11/22/6-sprites/ as you see, many nes games used that trick to make it as a whole sprite by only using half, that is exactly what i'm trying to achieve. i don't know if the guy from nesdoug is using the lua scripting but it's clear that he found a way to do this way.
also, i found this interesting information about mirroring and flipping from nes dev:
https://wiki.nesdev.com/w/index.php/Mirroring and this: http://wiki.nesdev.com/w/index.php/PPU_OAM
if you have a better suggestion, feel free to share it!