Indie game storeFree gamesFun gamesHorror games
Game developmentAssetsComics
SalesBundles
Jobs
TagsGame Engines

The Contraption Bazaar Sticky

A topic by Internet Janitor created Feb 28, 2023 Views: 21,418 Replies: 199
Viewing posts 41 to 46 of 46 · Previous page · First page
(6 edits) (+3)

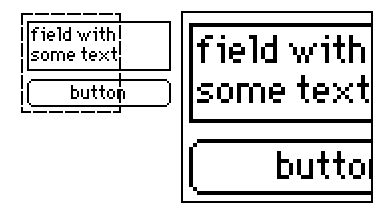
Another contraption! This one creates a pair of (configurable) canvases to magnify certain parts of your card. You can drag both of them around as you see fit.
Resize it to an area you'd like to use it on, then drag the small dashed square around to use the magnifying lens. This can help mobile users or people who are visually impaired see small components in your decks.

%%WGT0{"w":[{"name":"Magnifying Field","type":"contraption","size":[408,272],"pos":[39,43],"show":"transparent","def":"Magnifying Field","widgets":{"z":{"size":[116,116]},"l":{"size":[60,60],"pos":[122,3],"pattern":0},"zoom":{"size":[32,13],"pos":[368,-19]},"scale":{"size":[33,13],"pos":[322,-19],"value":"60"}}}],"d":{"Magnifying Field":{"name":"Magnifying Field","size":[162,106],"resizable":1,"margin":[0,0,0,0],"description":"Resizable contraption that displays large, zoomed in view within a square lens.","version":1,"script":"on set_scale x do scale.text:x end\non get_scale do scale.text end\non set_zoom x do zoom.text:x end\non get_zoom do zoom.text end\n\non view do\n card.show:\"transparent\"\n l.size:scale.text,scale.text\n l.clear[]\n l.pattern:23\n l.brush:0\n l.box[0,0 l.size]\n l.pattern:0\n z.scale:zoom.text\n z.size:(l.size-2)*zoom.text\n z.pos:3,3\n l.pos:(z.size[0]+6),3\nend\n\non secure x do\n mx:card.size-x.size\n if x.pos[0]<0 x.pos:0,x.pos[1] end\n if x.pos[1]<0 x.pos:x.pos[0],0 end\n if x.pos[0]>mx[0] x.pos:mx[0],x.pos[1] end\n if x.pos[1]>mx[1] x.pos:x.pos[0],mx[1] end\nend","attributes":{"name":["scale","zoom"],"label":["scale","zoom"],"type":["number","number"]},"widgets":{"z":{"type":"canvas","size":[96,96],"pos":[3,3],"volatile":1,"script":"on click pos do\n \nend\n\non drag pos do\n secure[me]\nend\n\non release pos do\n \nend","draggable":1,"scale":2},"l":{"type":"canvas","size":[50,50],"pos":[102,3],"locked":1,"volatile":1,"script":"on click pos do\n \nend\n\non drag pos do\n secure[me]\n z.clear[]\n z.paste[app.render[deck.card].copy[card.pos+me.pos+1 me.size-2]]\nend\n\non release pos do\n \nend","pattern":23,"show":"transparent","border":0,"draggable":1,"scale":1},"zoom":{"type":"field","size":[13,13],"pos":[146,-19],"locked":1,"show":"none","value":"2"},"scale":{"type":"field","size":[13,13],"pos":[128,-19],"locked":1,"show":"none","value":"50"}}}}}
(58 edits) (+3)

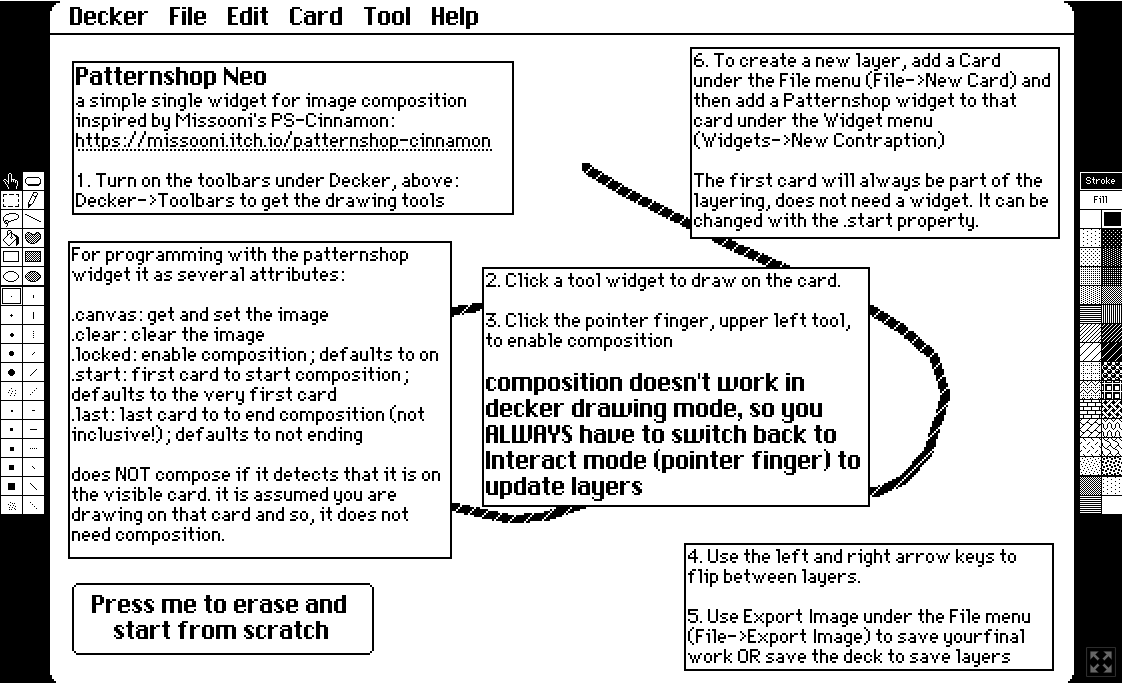
Patternshop, a widget for many-layered drawing. It’s like underpaint mode, but can do many layers through a contraption and multiple cards.

%%WGT0{"w":[{"name":"patternshop1","type":"contraption","size":[512,342],"pos":[0,0],"def":"patternshop","widgets":{"vis":{},"beg":{},"fin":{}}}],"d":{"patternshop":{"name":"patternshop","size":[512,342],"margin":[0,0,0,0],"script":"on view do\n  if !lock.text+0\n    me.show:\"transparent\" vis.show:\"transparent\"\n    s:(beg.text=\"\") e:0 i:image[(first deck.cards).size]\n    each c in keys deck.cards\n      s:(!c=beg.text)&s e:(c=fin.text)|(c=deck.card.name)|e\n      if (!e)&s i:deck.cards[c].image.copy[].paste[i 0,0 1] end\n    end\n    vis.paste[i]\n  end \nend\n\non set_patternshop x do 1 end\n\non get_patternshop   do 1 end\n\non set_canvas x do vis.paste[x] end\n\non get_canvas   do vis.copy[] end\n\non set_locked x do lock.text: x+0 end\n\non get_locked   do lock.text+0 end\n\non set_clear x  do vis.paste[image[card.parent.size]] end\n\non get_clear    do vis.paste[image[card.parent.size]] end\n\non set_start x  do beg.text: x end\n\non get_start    do beg.text end\n\non set_final x  do fin.text: x end\n\non get_final    do fin.text end","attributes":{"name":[],"label":[],"type":[]},"widgets":{"vis":{"type":"canvas","size":[512,342],"pos":[0,0],"locked":1,"show":"transparent","border":0,"scale":1},"beg":{"type":"field","size":[1,1],"pos":[-32,-32],"locked":1,"show":"none","style":"plain"},"fin":{"type":"field","size":[1,1],"pos":[-32,-32],"locked":1,"show":"none","style":"plain"}}}}}

Usage:

  • The first card is the first layer, no contraption needed
  • Each additional card is a layer, add a Patternshop contraption to it
  • Use the arrow keys to flip left and right between layers
  • Use the regular Decker drawing tools to draw on a layer (turn them on in the Decker menu)
  • Switch back to interact mode (pointer finger or the menu) to have the layers composed - you’ll have to do this when you switch to a layer. Missooni has it part of the layer selection to automatically do that in Patternshop Cinnanom.

It has several properties for programming:

.canvas: get/set the image
.clear: clear the image
.locked: disable composition
.start: the card to start composition, defaults to the first card
.final: the card to end composition (non-inclusive!), defaults to never ending

Thanks to Missooni for inspiration.

(2 edits)

I’ve made several updates. In particular, added over and under composite modes, along with several other things.

It probably operates more like people expect, now.

I plan on merging a lot of the functionality into the canvas target and layer widgets, to reduce the number of contraptions. Card target and layer contraptions will mostly remain the same. While the cards seem relatively limited compared to the canvases, they both serve a purpose: 1. being able to composite with the existing Decker drawing tools, and 2. a composited background for a canvas layer to trace over or underpaint.

(+1)

it’s already gone through a big revamp for usability as I tested it under “real” conditions.

it’s been massively simplified to three contraptions; card, canvas, and layercake.

(3 edits) (+1)

Video and tutorial card are still on their way.

I’ve made a couple of more usability passes as I’ve been trying to use it for real (the actual reason this exists).

off the top of my head:

  • wipe (clear) button
  • +/- buttons for incrementing and decrementing the brush and pattern on canvas layers
  • other things that I don’t remember

I’ve done a pretty simple sketch of a face and torso where I sketch the rough on one layer, switch to another to outline the face by overpainting, and then switch to a third to add shading by underpainting. It works pretty well.

There will be a learning curve - but (not that this excuses it) most drawing programs with layering, that I know of, have a steep learning curve.

What needs to be added - but the last two, I don’t know if I’ll get to it. It works for my needs and the amount of work to make them functional is way over my annoyance threshold.

  • the tutorial
  • DONE ~don’t allow C to be activated if there are no active layers~
  • DONE ~a “logical lock” - once switched to layer mode, make it ask more when switching to composite mode and vice versa - to protect drawings from being wiped.~
  • (maybe, but I probably won’t) a grid widget for globally reordering layers (an overview of the composite)
  • (maybe) a couple of levels of undo
(+2)

I'm really curious about this one! I think I'll need the tutorial card to really get my head around it, but I'm definitely interested in checking it out when that's ready.

(+1)

I’ll try to get it out soon - I’d like to have your feedback, in particular - as I thought this might be useful for you. Thanks for your interest.

(+1)

Another big usability refactor. It’s down to two widgets. patternshop and ps_layercake. Will be working on the tutorial, now.

(1 edit) (+1)

Also, the README is simplified a lot. Maybe it’s actually readable for some now, before I get the tutorial deck done. (I tend to write too much - my ADHD brain’s tendency to info dump.)

(2 edits) (+1)

teaser for the tutorial deck

–removed– needs to be redone

(+1)

As an aside - I only just now noticed there was a WigglyPaint retrospective.

Related to that - in my attempts for making this easier to use:

  1. make compositing order implicit based on the card order, since there’s already the ability to reorder cards

  2. make the background automatically the composite target

  3. probably all that is wanted is underpaint/masking, so I’ll probably remove operator selection. or make it less up front and center

  4. I like the palette/swatch selection. so make it go directly to a “physical palette” where you can select the pattern visually with a select tool. apply your patterns in swatches like paint. kind of like how layercake can be used now to lift brushes off the palette.

this will remove all of the buttons and probably all that’s needed is a few hot keys to operate the layercake tool.

(+1)

Yeah - this is going to way simplify everything… sorry for the delay. It will be a much better, though.

(+1)

OK - it’s been redone. Hopefully this is the last one for a while.

  • no more layer buttons; order is implicit on card order

  • no more operation buttons; probably the only thing that is wanted is underpaint. over is achieved by reordering the cards.

  • everything has a hotkey and the buttons show what they are. they can be hidden.

  • UNDO! (infinite right now, but I should limit it - otherwise, you can run out of memory)

  • support for the palette card: a goto/return button, an eyedropper, copy brush and pattern from palette

  • probably a few other things

(1 edit) (+2)

Updated teaser:

reload if the video is not playing

(+1)

Tutorial is still on the way - but I’ve been slacking. (I’m asking Houdini will let me submit this to the App Jam - which will force me to finish it. I’d give myself a deadline of the 29th to be fair.)

(2 edits) (+1)

https://woodring.itch.io/patternshop tutorial and playable deck

  • added a button to start from scratch
(+1)

See https://missooni.itch.io/patternshop-cinnamon for a more Decker-like drawing experience with layers (rather than my complicated mess)

(1 edit) (+1)

I added a quick and dirty hack inspired by Missooni’s Patternshop Cinnanom, on my Patternshop page. It’s completely a single contraption now (Patternshop Neo) without any modules. Download the patternshop_neo.html to try it out or get it from my codeberg page.

  1. The first card is the first layer, no contraption needed
  2. Each additional card is a layer, add a Patternshop contraption to it
  3. Use the arrow keys to flip left and right between layers
  4. Use the regular Decker drawing tools to draw on a layer (turn them on in the Decker menu)
  5. Switch back to interact mode (pointer finger or the menu) to have the layers composed - you’ll have to do this when you switch to a layer. Missooni has it part of the layer selection to automatically do that.

This can be much more easily used standalone now as a contraption.

It has several properties for programming:

  • .canvas: get/set the image
  • .clear: clear the image
  • .locked: disable composition

And most importantly:

  • .active: sets the “active” card name. composites from the first up to but NOT including the active card. it assumes that you are drawing on active and thus don’t want it composed. setting it to nil automatically detects what card it is on.
Deleted 24 days ago
(1 edit)

Old historical, see my top post in this thread for the latest single widget version

https://woodring.itch.io/patternshop tutorial and deck

See: https://missooni.itch.io/patternshop-cinnamon for a Decker drawing with layers

patternshop

a compositing tool for cards and ps canvases as layers

https://woodring.itch.io/patternshop

Also: see https://missooni.itch.io/patternshop-cinnamon for a more Decker-like experience with layers

reload if the video is not playing

tutorial and playable deck: https://woodring.itch.io/patternshop

direct download of deck: https://codeberg.org/woodring/decker.patternshop/raw/branch/main/patternshop.deck

project and readme, which is pasted below: https://codeberg.org/woodring/decker.patternshop/src/branch/main

see https://codeberg.org/woodring for more decker things

synopsis

It’s a module and several contraptions that emulate layered drawing in other drawing tools. Or, it can be thought of as “Decker mega-underpaint mode.”

https://woodring.itch.io/patternshop

teaser video apng

  1. make at least three cards

  2. put the patternshop contraption on each of those cards.

  3. switch to interactive mode.

  4. press 0 (zero) on each of the cards to activate the contraption.

  5. draw on the first card in interactive mode.

  6. switch to the second card. what was drawn on the first card appears there.

  7. draw on the second card.

  8. switch to the third card. what was drawn on the second will be under the first.

  9. et voila, layered drawing!

Why is this important? Imagine:

  • card1 has a rough sketch.

  • card2 shows card1, to trace over card1’s sketch.

  • card1 is deactivated, automatically removing the sketch, without having to manually erase it from card2.

  • card3 shows the outline of card2, to add shading without worrying about staying exactly in the lines.

layered drawing - how it works

patternshop is a contraption that combines multiple images into one. In another PS or other drawing programs, it’s what’s called layering. In graphics, it’s what we call compositing or image composition.

Another analogy is that it’s like old school cel drawing, for animation, where the scene is composed of several stacked layers of transparent celluloid.

The mode of operation is to draw on the patternshop canvas, which is a transparent drawing surface, in front of the card background. All of the active patternshop drawing surfaces are combined together - in a stack. Then, the combined stack is copied onto each card background of each card that patternshop is on. This provides the combined result on each layer - i.e., card.

Images are combined in card order. To change it so a drawing appears under another, reorder the cards in the Decker menu, i.e. File->Cards. Later cards in the stack appear under the ones in front of it. For n layers, make n+1 cards with patternshop on it. The final card will show everything together, by itself.

IMPORTANT: Drawing on patternshop requires interactive mode - not drawing mode. Decker drawing mode only works on cards. To use the Decker drawing tools, draw on a card then use the patternshop swap function to move the image to the patternshop contraption. Alternatively, use ps_layercake contraption to copy it.

When drawing on a card, with an image on the patternshop canvas, it will be under the canvas - which is what might be wanted for more accurate underpainting. Drawing on patternshop only supports the freehand pencil with custom brushes and patterns.

But, what makes patternshop different is that allows for drawing on the canvas and simultaneously seeing the card background underneath - to trace over it. It’s like Decker’s built-in underpainting, but with patternshop there’s an arbitrary number of underpainting layers.

Note: the only composite mode that patternshop supports is under. To achieve over, move the card to the front of the card stack. The other compositing modes that Decker likely aren’t used in practice by most people and are not included.

usage notes

  • To save your work, save the deck. Everything is retained between sessions.

  • Reordering cards to change layer combining order is immediate, after closing the card order dialog.

  • The starting visibility of patternshop and ps_layercake is transparent for the canvas to provide tracing over the card background, by default. They can both toggle between “solid”, “transparent”, “invert”, and “none”.

  • Everything is hotkey driven - for two reasons: (1) save screen real estate, but more importantly (2) when drawing, especially with a tablet, it is common to have a hand hovering over hotkeys or program the tablet for the hotkeys. It starts with a toolbar that can be hidden with q after learning the hotkeys.

    • Buttons for 4, Z, and X only work with hotkeys. They are visually present to show what they hotkey is.
  • As noted earlier, there’s a second contraption, ps_layercake, which is an advanced rubberband/select box that knows how to work with patternshop contraptions and cards.

  • The patternshop and ps_layercake contraptions can be used in any Decker project, as long as the ps module is copied over, too. They will not work without it.

  • Switching to a card will composite (combine) all layers if there is an activate patternshop on a card. It only updates “on view”; i.e., changing cards or having an animated widget on that card. But, having an animated widget on a patternshop card will slow Web Decker down quite significantly. While drawing, I do not suggest having animated widgets on the cards.

controls for patternshop

patternshop home row

1: toggle canvas visibility between “solid”, “transparent”, “invert” and “none”. starts in “transparent”. “solid” will hide the card background and “none” will hide the canvas.

2: toggle to the last brush used. starts with brush “1”.

3: toggle to pattern 0 and back to the last pattern used.

4: eyedropper tool that picks a pattern under the cursor. picks from the canvas first and the card second. does not change the pattern if it is pattern 0.

5: goto a card named palette. to be used in concert with 4, w, e, and ps_layercake’s custom brush function - to store patterns and brushes on a card, like a real-world palette. the palette card can contain whatever you wish - as long as it has a patternshop contraption on it. pressing 5 when on the palette card returns you to the previous card.

after learning the hotkeys or needing to temporarily move it

q: hide the toolbar

palette support

w: copy the brush from the palette card.

e: copy the pattern from the palette card

off patternshop home row

6: swap the image between the canvas and the card. to use Decker drawing tools - draw on the card and then swap it to the canvas.

7: erase the canvas.

8: set the brush. it will ask to provide a brush number or custom brush name. 2 swaps between two brushes.

9: set the pattern. it will ask to provide a pattern number in. for quicker pattern changing, use 4 and 5 with 3.

0: activate/deactivate the patternshop on this card. once activated, it will show all other active patternshops combined in card order. to remove a layer, deactivate it with 0. IMPORTANT activating a pattershop will ERASE any existing card background image.

undo and redo

z: infinite undo for canvases - up to available memory. no effect for cards. TODO need to put an undo limiter in to not accidentally run out of memory.

x: redo after undo. drawing after redoing will clear the redo stack.

ps_layercake support

r: make a ps_layercake at 100,100

ps_layercake hotkey to support patternshop

y: remove all layercake instances from the card. IMPORTANT: if there is more than one on a card, it will remove ALL of them.

controls for ps_layercake

ps_layercake is a select/rubberband box companion for patternshop. It can copy and move selections around the canvas and card background, more selectively than the patternshop swap (6) function.

It works in interactive mode, like patternshop. The upper-left box moves it and the lower-right box resizes it. All of the other controls are hotkey driven, like the rest of patternshop.

Also, it can be copy and pasted to any other card, just like any other contraption, moving the copied image between cards.

layercake to-and-from the card background

c: copy card background into layercake.

v: paste layercake onto card background.

n: merge card background into layercake. this is different than c, because it treats pattern 0 as transparent.

m: merge layercake onto card background. like n, this is different than v, because it also treats pattern 0 as transparent.

layercake to-and-from the canvas

d, f, h, j: copy, paste, merge into, merge onto for the canvas layer, instead of the card background.

other functions

t: toggle layercake visibility between “solid”, “transparent”, “invert” and “none”.

g: erase the layercake image contents.

b: save the layercake image contents as a custom brush. it will ask for a name.

y: remove all layercake instances from the card. IMPORTANT if there is more than one on a card, it will remove ALL of them.

on patternshop to support layercake

r: make a ps_layercake at 100,100

https://woodring.itch.io/patternshop

(7 edits) (+3)

Here's some contraptions I had lying around, plus some new ones to celebrate the existence of the 1.66 Decker Gamepad interface. :3

1. Sticker

I noticed that ahmwma's deck, "Phinxel's Field Notes" had these amazingly cute stickers I wanted to use in one of my own decks, so I turned them into contraptions with attributes to change their sprites and constrain the dragging region within another widget.

%%WGT0{"w":[{"name":"Sticker","type":"contraption","size":[23,29],"pos":[240,128],"script":"on drag do\n if me.constrain\n   b:me.parent.widgets[me.constrain]\n   # 'constrain' script written Internet Janitor, from the 'rect' module.\n   me.pos:(b.pos+b.size-me.size)&b.pos|me.pos\n end\nend","show":"transparent","def":"Sticker","widgets":{"c":{"show":"transparent"},"is":{},"wc":{}}}],"d":{"Sticker":{"name":"Sticker","size":[23,29],"resizable":1,"margin":[1,1,1,1],"description":"Draggable, self-resizing  contraption that toggles between two images when pressed.\n\nCan be constrained if a widget name is provided under the 'constrain' attribute.\n\nInspired by stickers seen in 'Phinxel's Field Notes' created by ahmwma","version":2,"script":"# Code for making stickers draggable was repurposed from the 'follower' contraption found in path.deck.\n\non get_sprites do is.value end\non set_sprites x do is.value:x end\non get_constrain do wc.text end\non set_constrain x do wc.text:x end\n\non click pos do\n update_view[1]\nend\n\non drag pos do\n if !card.locked\n  card.pos:pointer.pos-c.size/2\n  c.pos:0,0\n  card.event[\"drag\"]\n end\nend\n\non release pos do\n update_view[]\n card.pos:card.pos+(0,1)\nend\n\non update_view x do\n if x then\n  i:last is.images\n else\n  i:first is.images\n end\n c.clear[]\n c.size:i.size\n c.paste[i]\n c.show:card.show\n card.size:c.size\nend\n\non view do\n update_view[]\nend","template":"on drag do\n if me.constrain\n   b:me.parent.widgets[me.constrain]\n   # 'constrain' script written Internet Janitor, from the 'rect' module.\n   me.pos:(b.pos+b.size-me.size)&b.pos|me.pos\n end\nend","attributes":{"name":["sprites","constrain"],"label":["sprites","constrain"],"type":["rich","string"]},"widgets":{"c":{"type":"canvas","size":[23,29],"pos":[0,0],"locked":1,"volatile":1,"border":0,"draggable":1,"scale":1},"is":{"type":"field","size":[18,18],"pos":[-2,-25],"locked":1,"show":"none","value":{"text":["","i","i"],"font":["","",""],"arg":["","%%IMG3ABcAHQZAgFAIKg6PyCSgyFQ6iSCX1PhEFl2prMtIfV5TKFRqywRVv2Hxdmp2stDhsUpF9kbBcdWK3k2+72Apenx9VlFSWXtSbEpXc497j4SGLiojlyOPIpsik1CVmJiPl5uTjqQhIqGhpWSnI5yrrISvm7KzrlGWt7KduaC8q75lwMGkhCx/xcHDba/MyELKu7zNR8+90UPT1KLaR8qVknRkLG5Mi4tM5k9/ZWXsVcnvIMlVSMn58UlB","%%IMG3ABcAGwZAgFAIKg6PyCSgyFQ6iSCX1PhEFl2prMtIfV5TKFRqywRVv2Hxdmp2stDhsUpF9kbBcdWK3k2+72Apenx9VlFSWXtSbEpXc497j4SGLiojlyOPIpsik1CVmJiPl5uTjqQhIqGhpWSnI5yrrISvm7KzrlGWt7KduaC8q75lwMGkhCx/xcHDba/MyEJ/ZUW9nlDUTJjNLEcsLeDg2XNk3U7h4kzlVUjpRebsSMnJSUE="]}},"wc":{"type":"field","size":[12,12],"pos":[21,-25],"locked":1,"show":"none","border":0,"style":"plain","align":"right"}}}}}


Note: I referenced the "follower" script from the path.deck module to make this contraption draggable, but I  could not reproduce the dragging behavior of the follower script without copy-pasting the exact canvas used. If you want to reproduce the steps to 'break' the follower contraption in a way that renders it undraggable, go to path.deck, specifically #followeranim, edit the follower contraption, then attempt to change the canvas script. At a glance, it doesn't look like the canvas has any scripts attached to it, so it will auto-fill with the default 'click' 'drag' 'release' functions, however, if you then save the canvas the contraption will not be draggable anymore. If you then go back and delete the entire script, it will still be permanently broken. I have found no way to fix this, other than copy-pasting the exact canvas used from path.deck.

2. Palette Storage

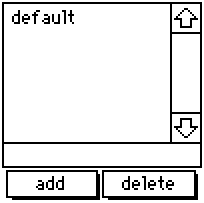
A resizable list to store and update color palettes, containing the default Decker palette when created. If you happen to change the colors in your deck manually or by importing a .hex file, you can give the new palette a name, add it to the list, then return to it any time using this contraption. If you click 'add' after specifying a name already listed, it will update that entry instead of making an entirely new one. By editing the contraption itself, you can specify more default palettes.

%%WGT0{"w":[{"name":"Palette Storage","type":"contraption","size":[100,100],"pos":[194,125],"def":"Palette Storage","widgets":{"s":{},"d":{},"t":{},"add":{},"delete":{}}}],"d":{"Palette Storage":{"name":"Palette Storage","size":[100,100],"resizable":1,"margin":[4,70,6,5],"description":"Adapted grid for storing and accessing color patterns sets.","version":1,"script":"on get_s do t.text end\non set_s x do \n t.text:x\n palz[x] \nend\n\np:32,33,34,35,36,37,38,39,40,41,42,43,44,45,46,47\n\non view do\n d.value:keys cols s.value\n w:add,delete,t,d\n w..show:card.show\nend\n\non palz x do\n if s.value[x]\n  each v k i in s.value[x]\n   patterns[p[i]]:v\n  end\n end\n card.event[\"change\"]\nend\n\non addz x do\n a:cols s.value\n a[x]:()\n each v in p\n  a[x]:a[x],patterns[v]\n end\n s.value:table a\n view[]\nend\n\non delz x do\n s.value:x drop s.value\n view[]\nend","attributes":{"name":["s"],"label":["selected"],"type":["string"]},"widgets":{"s":{"type":"grid","size":[100,22],"pos":[0,-31],"locked":1,"show":"none","value":{"default":[16777215,16776960,16737536,14417920,16711831,3539095,202,38911,43008,25856,6632960,9921846,12171705,8816262,4539717,0]}},"d":{"type":"grid","size":[100,71],"pos":[0,0],"locked":1,"volatile":1,"script":"on click row do\n v:me.rowvalue.value\n palz[v]\n t.text:v\nend","headers":0,"lines":1,"bycell":0},"t":{"type":"field","size":[100,13],"pos":[0,70],"volatile":1,"style":"plain"},"add":{"type":"button","size":[47,15],"pos":[2,84],"script":"on click do\n addz[t.text]\nend","font":"body","text":"add","style":"rect"},"delete":{"type":"button","size":[48,15],"pos":[50,84],"script":"on click do\n delz[t.text]\nend","font":"body","text":"delete","style":"rect"}}}}}

3. Gamepad Buttons

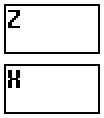
Scalable, vertical buttons that display the state of the action and cancel buttons introduced with the Decker 1.66 gamepad interface. They provide a visual interface for people without a keyboard or controller, and transmit the state of the buttons through boolean attributes 'action' and 'cancel'.  By observing the attributes of this widget instead of the global gamepad interface, mobile users or people on touch-screen exclusive devices are able to interact with elements in a deck as if they were using a keyboard.

%%WGT0{"w":[{"name":"Gamepad Buttons","type":"contraption","size":[48,55],"pos":[96,128],"def":"Gamepad Buttons","widgets":{"b1":{"size":[48,25]},"b2":{"size":[48,25],"pos":[0,30]},"handler":{},"action":{"size":[48,25]},"cancel":{"size":[48,25],"pos":[0,30]},"t1":{"size":[48,25]},"t2":{"size":[48,25],"pos":[0,30]},"locka":{"pos":[0,58]},"lockc":{"pos":[14,58]}}}],"d":{"Gamepad Buttons":{"name":"Gamepad Buttons","size":[48,104],"resizable":1,"margin":[2,2,2,2],"description":"Minimalistic, resizable buttons to add gamepad button functionality.","version":1,"script":"on get_action do action.brush end\non get_cancel do cancel.brush end","attributes":{"name":["action","cancel"],"label":["action","cancel"],"type":["bool","bool"]},"widgets":{"b1":{"type":"field","size":[48,48],"pos":[0,0],"locked":1,"pattern":12,"show":"invert"},"b2":{"type":"field","size":[48,48],"pos":[0,56],"locked":1,"pattern":9,"show":"invert"},"handler":{"type":"canvas","size":[8,8],"pos":[0,-8],"locked":1,"animated":1,"script":"t:(\"solid\",\"transparent\")\non view do\n if !locka.value\n  g1:gamepad.held[\"action\"]\n  action.brush:g1\n end\n if !lockc.value\n  g2:gamepad.held[\"cancel\"]\n  cancel.brush:g2\n end\n action.show:t[action.brush]\n cancel.show:t[cancel.brush]\nend","show":"none","scale":1},"action":{"type":"canvas","size":[48,48],"pos":[0,0],"locked":1,"script":"on click pos do\n locka.value:1\n me.brush:pointer.held\nend\n\non release pos do\n me.brush:pointer.held\n locka.value:0\nend","scale":1},"cancel":{"type":"canvas","size":[48,48],"pos":[0,56],"locked":1,"script":"on click pos do\n lockc.value:1\n me.brush:pointer.held\nend\n\non release pos do\n me.brush:pointer.held\n lockc.value:0\nend","scale":1},"t1":{"type":"field","size":[48,48],"pos":[0,0],"locked":1,"script":"on change val do\n \nend","font":"menu","show":"transparent","border":0,"style":"plain","value":"Z"},"t2":{"type":"field","size":[48,48],"pos":[0,56],"locked":1,"font":"menu","show":"transparent","border":0,"style":"plain","value":"X"},"locka":{"type":"slider","size":[8,8],"pos":[0,107],"locked":1,"show":"none","interval":[0,1]},"lockc":{"type":"slider","size":[8,8],"pos":[14,107],"locked":1,"show":"none","interval":[0,1]}}}}}

4. Gamepad Joystick

Similar to the previous contraption - except this one is meant to simulate a physical joystick. Exposes the attributes 'x' and 'y' for external scripts, observing both gamepad.dir and mouse inputs simultaneously.

%%WGT0{"w":[{"name":"Gamepad Joystick","type":"contraption","size":[100,100],"pos":[206,121],"def":"Gamepad Joystick","widgets":{"handler":{},"cir":{},"stick":{},"x":{},"y":{},"lock":{}}}],"d":{"Gamepad Joystick":{"name":"Gamepad Joystick","size":[100,100],"resizable":1,"margin":[0,0,0,0],"description":"Minimalistic, resizable joystick to add gamepad joystick functionality.","version":2,"script":"on get_x do x.value end\non get_y do y.value end\n\n# Circle drawing script provided on the Lil Playground\non view do\n card.show:\"transparent\"\n cir.clear[]\n cir.pattern:1\n c:cir.size/2           # center of canvas\n r:.7*c                    # radius of the pattern\n a:(pi/0.5*16)*range 16    # angle per wedge\n p:flip c+r*flip unit a    # points around a circle\n each x i in p\n  cir.line[x p[(count p)%1+i]]\n end\n cir.pattern:34\n cir.paste[cir.fill[0,0].copy[].map[(34,0) dict (0,1)]]\n stick.size:cir.size/2\n stick.paste[cir.copy[].scale[.5].outline[(35,32)].map[(1,35) dict (13,47)]]\n center[]\nend\n\non center do stick.pos:cir.pos+(stick.size/2) end\non stickz input do\n cntr:cir.pos+(stick.size/2)\n diff:(cir.size/2)-(stick.size/2)\n if input=\"gp\"\n  x.value:gamepad.dir[0]\n  y.value:gamepad.dir[1]\n  stick.pos:(cntr[0]+(diff[0]*x.value)),(cntr[1]+(diff[1]*y.value))\n else\n  x.value:(stick.pos[0]/diff[0])-1\n  y.value:(stick.pos[1]/diff[1])-1\n end\nend","attributes":{"name":["x","y"],"label":["x","y"],"type":["number","number"]},"widgets":{"handler":{"type":"canvas","size":[8,8],"pos":[0,-16],"locked":1,"animated":1,"script":"on view do\n if !lock.value\n  stickz[\"gp\"]\n end\nend","show":"none","scale":1},"cir":{"type":"canvas","size":[100,100],"pos":[0,0],"locked":1,"pattern":34,"show":"transparent","border":0,"image":"%%IMG3AGQAZAKEj6nL7Q+jnLTai7PevPsPhuJIluaJpurKtu4Lx/JM1/aN5/quBP4f4I2AxCJReDEql0AkhAmFOhnR6nKasGqNWMD2y0WCx0ce+fzToddpG/sdpMHh8jl7ZqfD8vMX3+7y18ciCKhSmJeCyIeymGjiyFgS+UhCaWh5OSiiiRnSufkJ+pY5esdpeiqaijbE2rr6SoYqexZbC3aLu6W7a9XrGwUcfEVLLGx8zOSqLJXcXFQKHfY83cZs3SSdHbedDcl97Q3dGK74fTjdQr7e7HccQ4y3W4dbY+/2qjYqBOqk2cVRlwOIBiIQZLBHqIQKZzGkUOUhhzISK1q8iDGjxo0cO3r8CDKkyJEkS0osAA==","scale":1},"stick":{"type":"canvas","size":[50,50],"pos":[25,25],"script":"on click pos do\n lock.value:1\nend\n\non drag pos do\n  mx:(cir.size+cir.pos)-me.size\n  if me.pos[0]<mn[0] me.pos:mn[0],me.pos[1]="" end\n="" if="" me.pos[1]<mn[1]="" me.pos:me.pos[0],mn[1]="" me.pos[0]="">mx[0] me.pos:mx[0],me.pos[1] end\n  if me.pos[1]>mx[1] me.pos:me.pos[0],mx[1] end\n  stickz[]\nend\n\non release pos do\n center[]\n lock.value:0\nend","show":"transparent","border":0,"image":"%%IMG3ADIAMgZAgHBILBqPyKRyyWw6n9CodEqtWq9YKmjL7WaZ3Jd4TOZ+j6BxY81uj0FnYrpNrzde2/P2Ze+zxXBYaXx+hXeBVXOGi3iJhIuMiFGKkJFSlJWWT5iZho1OnJ2ekkqhooWfS6anfalJq6x2rkiwsXSzaI+2o6q6u364RbW/a8FyvsR1xkPDxMtCzb/PANG709Wx09DIycWktNzd2tThzt+v5dbn6N1/6+zt40bYvFrpmfLg1vnwp3jvk8SI4tdkTyVAcY6pUQYIoKAwZBo6TNjFTMKLGDNq3Mixo5Ig","draggable":1,"scale":1},"x":{"type":"slider","size":[8,8],"pos":[25,-16],"locked":1,"show":"none","interval":[-1,1],"step":0.01},"y":{"type":"slider","size":[8,8],"pos":[39,-16],"locked":1,"show":"none","interval":[-1,1],"step":0.01},"lock":{"type":"slider","size":[8,8],"pos":[0,112],"locked":1,"script":"on change val do\n \nend","show":"none","interval":[0,1]}}}}}</mn[0]>
(+2)

These are all great! (And I'm extra happy about the sticker contraption. I love it.)

(+1)

Updated the Sticker contraption to use the same 'constrain' script as the one in the 'rect' module, which is a lot more succinct. ^^

Developer(+2)

When you update a contraption, be sure to increment the "version" property: if a user pastes a contraption snippet of a higher version than an existing definition in their deck, Decker will upgrade all the instances of that contraption in the deck.

(2 edits) (+4)

Standalone toolboxes for more Decker developments..!


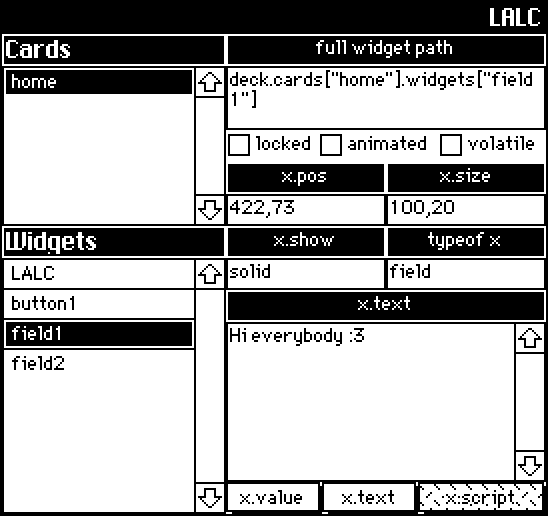
LALC ( Look A Little Closer! 

A read-only viewer that displays a list of every card in a deck, along with some general information about the widget interfaces that exist on any selected card.  Eventually I plan on having better support for canvases/grids.

%%WGT0{"w":[{"name":"LALC1","type":"contraption","size":[272,256],"pos":[114,44],"def":"LALC","widgets":{"tab4":{},"widgetz":{},"cardz":{},"c1":{},"w1":{},"t":{},"val":{},"path":{},"t2":{},"locked":{},"animated":{},"volatile":{},"p1":{},"s1":{},"pos":{},"size":{},"show":{},"sh1":{},"tab1":{},"tab2":{},"tab3":{},"to1":{},"to":{},"handler":{},"optype":{},"v1":{}}}],"d":{"LALC":{"name":"LALC","size":[272,256],"margin":[5,20,5,6],"description":"'Look A Little Closer!'\nA live, read-only viewer used to examine common attributes shared across all widgets.","version":1,"script":"on get_selected do path.text end\n\non view do\n card.show:\"transparent\"\n cardz.value:deck.cards\nend\n\non getwidgets x do\n widgetz.value:deck.cards[x].widgets\nend\n\non loadwidget do\n w:deck.cards[cardz.rowvalue.key].widgets[widgetz.rowvalue.key]\n if w.name \n  path.text:\"deck.cards[\\\"\",w.parent.name,\"\\\"]\",\".widgets\",\"[\\\"\",w.name,\"\\\"]\"\n  to.text:typeof w\n end\n if w.pos[0] pos.text:w.pos[0],\",\",w.pos[1] end\n if w.size[0] size.text:w.size[0],\",\",w.size[1] end\n show.text:w.show\n font.text:w.font\n locked.value:w.locked\n volatile.value:w.volatile\n animated.value:w.animated\n otxt:optype.text\n if to.text=\"canvas\" tab1.show:\"none\" tab2.show:\"none\" tab4.show:\"solid\" else\n tab1.show:\"solid\" tab2.show:\"solid\" tab4.show:\"none\" end\n if otxt=\"value\" val.value:w.value\n elseif otxt=\"text\" val.text:w.text\n elseif otxt=\"script\" val.text:w.script\n elseif otxt=\"encoded\" val.text:w.copy[].encoded end\nend\n","attributes":{"name":["selected"],"label":["selected"],"type":["string"]},"widgets":{"tab4":{"type":"button","size":[96,16],"pos":[112,240],"script":"on click do\n v1.text:me.text\n optype.text:\"encoded\"\nend","font":"body","pattern":0,"show":"none","text":"x.copy[].encoded","style":"rect"},"widgetz":{"type":"grid","size":[112,128],"pos":[0,128],"locked":1,"volatile":1,"script":"on click row do\n loadwidget[me.rowvalue.key]\nend","headers":0,"widths":[80,0]},"cardz":{"type":"grid","size":[112,80],"pos":[0,32],"locked":1,"volatile":1,"script":"on click row do\n\nend","headers":0,"bycell":0,"widths":[80,0]},"c1":{"type":"field","size":[112,16],"pos":[0,16],"locked":1,"font":"menu","show":"invert","border":1,"value":"Cards"},"w1":{"type":"field","size":[112,16],"pos":[0,112],"locked":1,"font":"menu","show":"invert","border":1,"value":"Widgets"},"t":{"type":"field","size":[272,16],"pos":[0,0],"locked":1,"script":"on change val do\n \nend","font":"menu","pattern":47,"show":"invert","border":0,"align":"right","value":"LALC"},"val":{"type":"field","size":[160,80],"pos":[112,160],"volatile":1,"script":"on change val do\n \nend","scrollbar":1},"path":{"type":"field","size":[160,32],"pos":[112,32],"volatile":1,"script":"on change val do\n \nend"},"t2":{"type":"field","size":[160,16],"pos":[112,16],"locked":1,"show":"invert","align":"center","value":"full widget path"},"locked":{"type":"button","size":[48,16],"pos":[112,64],"volatile":1,"font":"body","text":"locked","style":"check"},"animated":{"type":"button","size":[66,16],"pos":[158,64],"volatile":1,"font":"body","text":"animated","style":"check"},"volatile":{"type":"button","size":[54,16],"pos":[218,64],"volatile":1,"font":"body","text":"volatile","style":"check"},"p1":{"type":"field","size":[80,16],"pos":[112,80],"locked":1,"show":"invert","border":1,"align":"center","value":"x.pos"},"s1":{"type":"field","size":[80,16],"pos":[192,80],"locked":1,"show":"invert","border":1,"align":"center","value":"x.size"},"pos":{"type":"field","size":[80,16],"pos":[112,96],"volatile":1},"size":{"type":"field","size":[80,16],"pos":[192,96],"volatile":1},"show":{"type":"field","size":[80,16],"pos":[112,128],"volatile":1},"sh1":{"type":"field","size":[80,16],"pos":[112,112],"locked":1,"show":"invert","align":"center","value":"x.show"},"tab1":{"type":"button","size":[48,16],"pos":[112,240],"script":"on click do\n v1.text:me.text\n optype.text:\"value\"\nend","font":"body","pattern":0,"text":"x.value","style":"rect"},"tab2":{"type":"button","size":[48,16],"pos":[160,240],"script":"on click do\n v1.text:me.text\n optype.text:\"text\"\nend","font":"body","text":"x.text","style":"rect"},"tab3":{"type":"button","size":[64,16],"pos":[208,240],"script":"on click do\n v1.text:me.text\n optype.text:\"script\"\nend","font":"body","pattern":10,"text":"x.script","style":"rect"},"to1":{"type":"field","size":[80,16],"pos":[192,112],"locked":1,"show":"invert","align":"center","value":"typeof x"},"to":{"type":"field","size":[80,16],"pos":[192,128],"volatile":1},"handler":{"type":"field","size":[16,15],"pos":[-21,240],"locked":1,"animated":1,"volatile":1,"script":"on change val do\n \nend\n\non view do\n getwidgets[cardz.rowvalue.key]\n loadwidget[]\nend","show":"none"},"optype":{"type":"field","size":[32,32],"pos":[278,223],"locked":1,"volatile":1,"script":"on change val do\n \nend","show":"none"},"v1":{"type":"field","size":[160,16],"pos":[112,144],"locked":1,"show":"invert","align":"center","value":"x.value"}}}}}


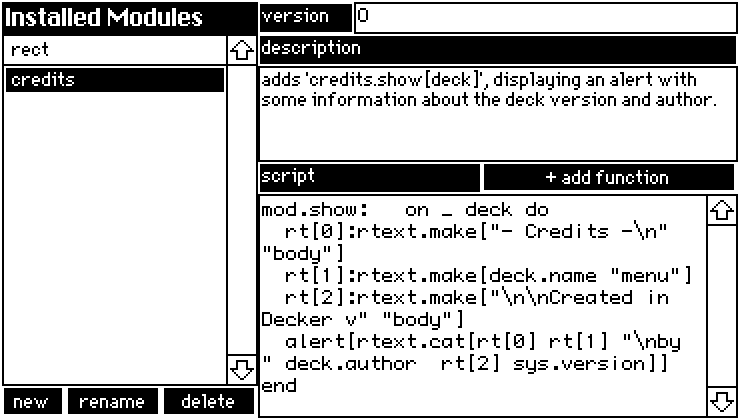
QuickMod
A GUI for creating simple modules and edit existing modules from within Decker - I've even provided a placeholder script for adding functions!

%%WGT0{"w":[{"name":"QuickMod","type":"contraption","size":[368,208],"pos":[69,71],"def":"QuickMod","widgets":{"mods":{},"m1":{},"v1":{},"new":{},"delete":{},"rename":{},"d1":{},"s1":{},"script":{},"description":{},"version":{},"name":{},"s2":{}}}],"d":{"QuickMod":{"name":"QuickMod","size":[368,208],"margin":[0,0,0,0],"description":"A combination viewer/editor for simple modules. \nEditing the 'data' interface must still be done externally.","version":2,"script":"on view do\n mods.value:deck.modules\n if !(count deck.modules) loadmod[] delete.locked:1 rename.locked:1\n else loadmod[mods.rowvalue.key] delete.locked:0 rename.locked:0 end\nend\n\non namecheck x do\n n:alert[\"name module\" \"string\" x]\n while deck.modules[n]\n  n:alert[\"name already in use\" \"string\"]\n end\n if !n n:\"module\" else n end\nend\n\non newmod do\n deck.add[\"module\" namecheck[]]\n loadmod[n]\nend\n\non loadmod x do\n mod:deck.modules[x]\n version.text:mod.version\n description.text:mod.description\n script.text:mod.script\n name.text:mod.name\nend\n\nmod:deck.modules[name.text]\n\non updatemod x y do\n mod[x]:y\nend\n\non renamemod do\n mod.name:namecheck[mod.name]\nend\n\non deletemod do\n if name.text\n  if alert[\"permanently delete '\",name.text,\"' module?\" \"bool\"]\n   deck.remove[mod]\n  end\n end\nend\n\non addfunction do\n r:alert[\"name function\" \"string\"]\n mod.script:mod.script,\"\\nmod.\",r,\":   on _ do \\n# script\\nend\"\nend","widgets":{"mods":{"type":"grid","size":[128,176],"pos":[0,16],"volatile":1,"script":"on click row do\n loadmod[me.rowvalue.key]\nend","headers":0,"widths":[100,0]},"m1":{"type":"field","size":[128,16],"pos":[0,0],"locked":1,"font":"menu","show":"invert","border":0,"value":"Installed Modules"},"v1":{"type":"field","size":[48,16],"pos":[128,0],"locked":1,"show":"invert","style":"plain","value":"version"},"new":{"type":"button","size":[32,16],"pos":[0,192],"script":"on click do\n newmod[]\nend","font":"body","show":"invert","text":"new","style":"rect"},"delete":{"type":"button","size":[48,16],"pos":[80,192],"script":"on click do\n deletemod[]\nend","font":"body","show":"invert","text":"delete","style":"rect"},"rename":{"type":"button","size":[48,16],"pos":[32,192],"script":"on click do\n renamemod[]\nend","font":"body","show":"invert","text":"rename","style":"rect"},"d1":{"type":"field","size":[240,16],"pos":[128,16],"locked":1,"show":"invert","style":"plain","value":"description"},"s1":{"type":"field","size":[112,16],"pos":[128,80],"locked":1,"show":"invert","style":"plain","value":"script"},"script":{"type":"field","size":[240,112],"pos":[128,96],"volatile":1,"script":"on change val do\n updatemod[me.name val]\nend","scrollbar":1,"style":"code"},"description":{"type":"field","size":[240,48],"pos":[128,32],"volatile":1,"script":"on change val do\n updatemod[me.name val]\nend","scrollbar":0},"version":{"type":"field","size":[192,16],"pos":[176,0],"volatile":1,"script":"on change val do\n updatemod[me.name val]\nend"},"name":{"type":"field","size":[16,8],"pos":[0,224],"locked":1,"show":"none","value":"credits"},"s2":{"type":"button","size":[128,16],"pos":[240,80],"script":"on click do\n addfunction[]\nend","font":"body","show":"invert","text":"+ add function","style":"rect"}}}}}
(+2)

This is so neat. 👀

(4 edits) (+6)

I would like to have some swoopy lines decorating my deck, but I do not have a graphics tablet to draw them with, and drawing large curves pixel-at-a-time can be tedious. Some graphics apps have a “curve” or “Bézier curve” tool, which is like a regular line-drawing tool except you get some extra “handles” you can move around to affect how the line bends. Decker doesn’t have a “curve” tool either, but it does have contraptions, so I made a Bézier contraption.

Edit: Version 2 changes how you set the pattern used to draw the curve, and adds the “step size” property to speed up rendering. Version 3 significantly speeds up rendering, so the “step size” is less necessary. Version 4 adds a little “pin” button in the top left to quickly hide the handles so you can see what the curve looks like without having to switch modes twice, lock and unlock.

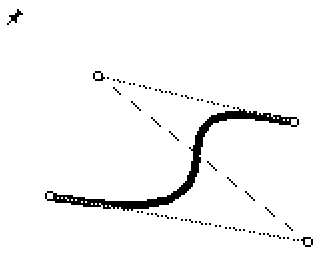
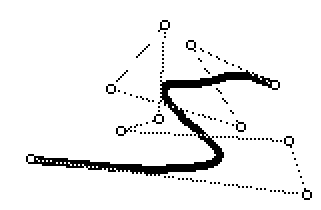
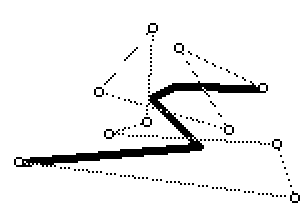
Normally, the contraption draws the curve, plus a little circle at each handle, and a dotted line connecting them so you can see which one is which. In interact mode, you can drag the handles around and see how they affect the shape of the curve.

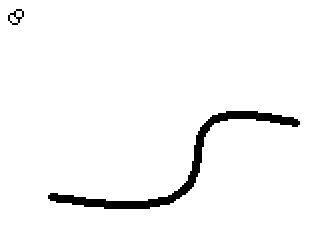
Bezier curve with handles visible, and a little push-pin at the top left

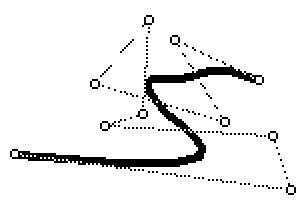
If you want to quickly see what the curve looks like without the handles, you can click the “pin” button in the top-left, then click it again to unpin:

Bezier curve with no handles visible, and the push-pin pushed in

If you switch to Widget mode, lock the contraption, then switch back to Interact, the curve is drawn without the handles or the pin, and clicking won’t change the shape. You can just use this as a decoration directly, or go back into Widget mode and do Edit → Copy as Image to get something you can paste into your own artwork, or touch up with Decker’s tools.

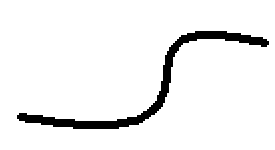
Bezier curve unadorned

In Widget mode, you can use Widget → Pattern… to set the pattern used to draw the curve.

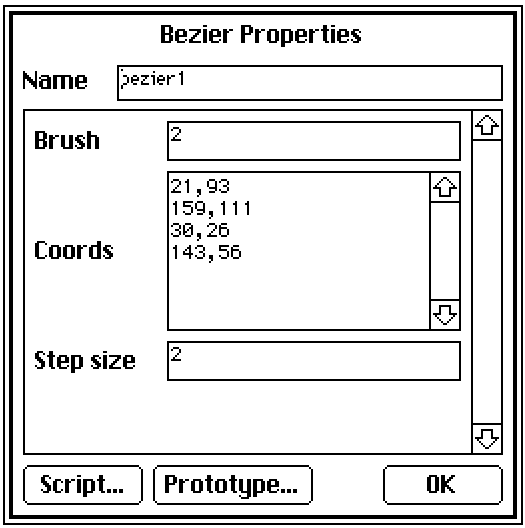
The properties are pretty simple: you can set the brush and set the handle coordinates specifically. You can have as many handles as you like, if you want a lot of control over the shape of the curve.

Contraption properties, listing “Brush”, “Coords” (coordinate pairs, one per line) and Step Size

If you do have a lot of handles (or make the contraption very large) it may take a while to calculate the exact position of the curve, which can make editing laggy. Here is a curve with 10 handles, and on my computer dragging one gets very laggy.

A very complicated Bézier curve

If I set the “Step size” property up to 50, the line gets very chunky, but dragging handles around becomes buttery smooth:

If I set the “Step size” back down to 10, it’s nearly as smooth as the original but still a lot less laggy:

The exact number you use depends on how fast your computer is, how big you make the contraption, how many handles you want, and what brush you use (smaller brushes make the chunkiness more visible). There’s also nothing stopping you from bumping the number up for editing, and then back down for display (or to use Copy as Image).

%%WGT0{"w":[{"name":"bezier1","type":"contraption","size":[189,137],"pos":[16,32],"show":"transparent","def":"bezier","widgets":{"canvas":{"size":[189,137]},"brush":{"size":[64,27],"pos":[205,0],"value":"2"},"coords":{"size":[96,137],"pos":[285,0],"value":{"x":[21,150,45,143],"y":[93,116,33,56]},"row":3},"sprites":{"size":[64,27],"pos":[205,55]},"stepsize":{"size":[64,28],"pos":[205,27]},"pinned":{"size":[64,28],"pos":[205,82]}}}],"d":{"bezier":{"name":"bezier","size":[80,80],"resizable":1,"margin":[0,0,0,0],"description":"Draws a Bezier curve. Use Widgets -> Pattern to set the colour, click the pin to hide the handles, lock the contraption to prevent editing.","version":4,"script":"on lerp t a b do a+(b-a)*0|1&t end\n\non bezier t ps do\n # Use lerping to combine adjacent pairs of positions\n # until there's only one left\n while 1 < count ps ps:lerp[t 1 drop ps -1 drop ps] end\n \n # Return the one that's left\n first ps\nend\n\non get_brush      do brush.data        end\non set_brush b    do brush.data:b      end\non get_stepsize   do stepsize.data     end\non set_stepsize s do stepsize.data:1|s end\n\non get_coords do\n (\"\\n\", \"%i,%i\") format coords.value.x join coords.value.y\nend\n\non set_coords t do\n coords.value:table \"xy\" dict flip \"%i,%i\" parse \"\\n\" split t\nend\n\non view do\n if !brush.data set_brush[0] end\n \n canvas.clear[]\n handles:coords.value.x join coords.value.y\n steps:ceil (max canvas.size)/stepsize.data\n canvas.pattern:card.pattern\n canvas.brush:brush.data\n canvas.line[0.5+each t in (range steps+1)/steps bezier[t handles] end]\n \n if ! card.locked\n  if pinned.value\n   # Draw the pinned sprite\n   canvas.paste[sprites.images[2] 0,0]\n  else\n   # Draw a dotted line connecting the handles in order\n   canvas.pattern:13\n   canvas.brush:0\n   canvas.line[handles]\n   \n   # Draw the handle sprite on top of each handle\n   sprite:sprites.images[0]\n   # Paste the handle sprite on top of each handle\n   each pos in handles canvas.paste[sprite pos-(floor sprite.size/2) 1] end\n   \n   # Draw the unpinned sprite\n   canvas.paste[sprites.images[1] 0,0]\n  end\n end\nend","attributes":{"name":["brush","coords","stepsize"],"label":["Brush","Coords","Step size"],"type":["number","code","number"]},"widgets":{"canvas":{"type":"canvas","size":[80,80],"pos":[0,0],"volatile":1,"script":"on click pos do\n if ! (pinned.value|card.locked)\n  best_row:-1\n  best_mag:me.size[0]*me.size[1] # an impossibly large number\n  \n  each handle i in coords.value.x join coords.value.y\n   handle_mag:mag (handle - pos)\n   if best_mag > handle_mag\n    best_row:i\n    best_mag:handle_mag\n   end\n  end\n  \n  coords.row:best_row\n end\nend\n\non drag pos do\n if ! (pinned.value|card.locked)\n  coords.rowvalue:\"xy\" dict pos\n  view[]\n end\nend\n\non release pos do\n if ! card.locked\n  # If the pointer was released in the top left 8x8 pixels...\n  if min pos < 8,8\n   pinned.value:!pinned.value\n   view[]\n  end\n end\nend","pattern":13,"show":"transparent","border":0,"scale":1},"brush":{"type":"field","size":[64,16],"pos":[96,0],"locked":1,"style":"code","value":"0"},"coords":{"type":"grid","size":[96,80],"pos":[176,0],"locked":1,"scrollbar":0,"lines":0,"format":"ii","value":{"x":[9,27,69],"y":[15,55,35]},"row":0},"sprites":{"type":"field","size":[64,16],"pos":[96,32],"locked":1,"value":{"text":["","i","i","i"],"font":["","","",""],"arg":["","%%IMG3AAUABQZAQGAoBBmHRhDyKCQGAQ==","%%IMG3AAgACAZAgBAACoCGwqKRCFIGjM9okygdOo/U5hKwxQKC","%%IMG3AAgACAZAgBAQKA6JoGSAWEyCmk8n9GkMOJ9Dq/JYXAqD"]}},"stepsize":{"type":"field","size":[64,16],"pos":[96,16],"locked":1,"style":"code","value":"2"},"pinned":{"type":"button","size":[64,16],"pos":[96,48],"locked":1,"text":"Pinned","style":"check","value":0}}}}}

Fun fact: Bézier curves are named for Pierre Bézier, the second person to discover them and use them to design more attractive vehicles at a French car manufacturer.

Developer(+2)

This looks handy!

If you referenced card.pattern from within the prototype, you could take advantage of the normal Widgets -> Pattern menu item/modal for changing line color.

(+2)

Ah, that’s really handy! Thanks for pointing it out!

(2 edits) (+4)

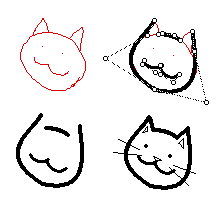
I love this!! Even though I do have an art tablet, sometimes I would rather do the work with my mouse instead. Have a Bézier kitty for your hard work:


For anyone else doing this, you can do a sweeping-select of every widget and lock them all or assign show:none/show:transparent all at once. From the listener, you can run the script 'deck.card.image:app.render[deck.card]' to flatten all visible widgets to the card background.

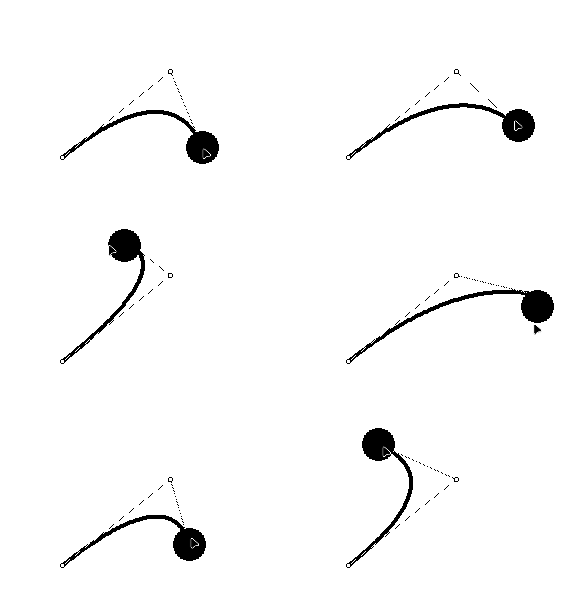
I immediately saw a future where this can be used to 'tether' other widgets or create wiring:

# this is a script attached to the black sphere, which is an animated, draggable canvas widget.
on view do
 p:"\n" split bezier.coords
 newpos:me.pos-bezier.pos-(floor me.size/2)
 p[2]:"," fuse newpos
 bezier.coords:"\n" fuse p
end

 (As a note: When using a larger contraption size / more handles on the Bézier curve,  the script profiler shoots up anywhere between 20%-70%, I didn't have any performance issues while using this on Decker native, but after adding 3 handles to a single curve, usage went up to 200%, and I wasn't able to edit it anymore. )

(+3)

Have a Bézier kitty for your hard work

Wow, thank you!

When using a larger contraption size / more handles on the Bézier curve, the script profiler shoots up anywhere between 20%-70%

Yeah, I was working on Native Decker, with only three or four handles total. Computing the curve position can be expensive (up to the square of the number of handles), and the original contraption I posted tried to do it for every pixel along the curve for maximum smoothness, so I’m not surprised it might be expensive.

(+3)

I’ve updated the contraption to version 3, which leans harder on Lil’s “conforming” to calculate the curve rendering. As a result, the ten-handle curve that was “very laggy” on my computer before (with the Script Profiler capping out at 100% CPU usage) is now smooth (capping out at 64% CPU) even at the default step-size of 2. The new version still has a step-size property, though, because somebody might want to draw an even bigger curve. :)

(+2)

I got sick of having to switch to Widget mode, lock the contraption, and switch back to see what the curve “really” looked like, then do the dance again to resume editing. Now there’s a little “pin” button in the top left to hide and disable the handles in Interact mode. Locking the contraption now hides the handles and the pin.

I also updated the rendering code to try rounding coordinates to the nearest pixel, which might make lines a bit smoother.

(+4)

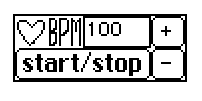
baby's first contraption. The Heartbeatizer.

will take a sound called "heartbeat", and play it continuously in the pattern of a hearbeat. It is very janky and goes regularly goes offbeat in bpms higher than 90 for some reason, but it exists and I made it!

%%WGT0{"w":[{"name":"heartbeatizer1","type":"contraption","size":[85,32],"pos":[243,155],"def":"heartbeatizer","widgets":{"timer":{"animated":1,"value":"22"},"start":{},"control":{"value":"1"},"bpm":{},"check1":{"value":"42"},"check2":{"value":"61"},"plus":{},"minus":{},"heart":{"show":"none"}}}],"d":{"heartbeatizer":{"name":"heartbeatizer","size":[85,32],"margin":[0,0,0,0],"description":"makes a heartbeat sound. bpm on the right side.","image":"%%IMG3AFUAIAKEj6nL7Q/jC9TQCsLRsnt2cRuWWaVZkd/ahaRrlqJGn+wNuSl81qiMCzp0RI7RVvMJl4iiDqVM2phU52V0zEhFVKb1daVlp92ltQmdbcrlYuLIRbK7RAX8vZ5XQ4s7OqbndWWnRaYWWNUwGHeI6PgIGSk5SVlpeYmZqbnJ2en5CRoqOkpaanqKmqq6ulAA","widgets":{"timer":{"type":"field","size":[34,16],"pos":[102,16],"script":"on view do\n   time1:floor 2520/bpm.data\n   time2:floor 3600/bpm.data\n      \n   if control.data=1\n      timer.data:timer.data+1\n      \n      if timer.data=time1\n         check1.data:me.data\n         play [\"heartbeat\"]\n      elseif me.data>time2\n         check2.data:me.data\n         me.data:0\n         play [\"heartbeat\"]\n      end\n   end\nend","value":"0"},"start":{"type":"button","size":[68,16],"pos":[0,16],"script":"on click do\n   if control.data>0\n      control.data:0\n      timer.data:0\n      timer.animated:0\n      heart.show:\"transparent\"\n   elseif control.data=0\n      control.data:1\n      timer.data:0\n      timer.animated:1\n      heart.show:\"none\"\n   end\nend","text":"start/stop"},"control":{"type":"field","size":[34,16],"pos":[102,0],"script":"on change val do\n \nend","value":"0"},"bpm":{"type":"field","size":[34,16],"pos":[34,0],"script":"on change val do\n \nend","value":"60"},"check1":{"type":"field","size":[34,16],"pos":[153,0],"value":"31"},"check2":{"type":"field","size":[34,16],"pos":[153,16],"value":"46"},"plus":{"type":"button","size":[17,16],"pos":[68,0],"script":"on click do\n   bpm.data:bpm.data+6\nend","text":"+"},"minus":{"type":"button","size":[17,16],"pos":[68,16],"script":"on click do\n   bpm.data:bpm.data-6\nend","text":"-"},"heart":{"type":"canvas","size":[17,16],"pos":[0,0],"locked":1,"show":"transparent","border":0,"image":"%%IMG3ABEAEAZAgHBILBqPyIAyUFwSA6AoiCmERqkAq5SpnQ67V+n1Ky5vn2Yxtpo+N9trdDkudyOz9jteqX/2/0NB","scale":1}}}}}
Viewing posts 41 to 46 of 46 · Previous page · First page