

Hey! Sorry about the late response, if you'd like to add your submission to the Snowjam game jam page (and to our collection page), you can do so through this link https://itch.io/jam/327081/add-game/1840138/1053309?token=HRlsGOxSub488Ca4o7EbPB...! Thank you <3
A member registered Apr 20, 2018 · View creator page →
Creator of
Recent community posts
itch.io Community » Game Development » General Development · Created a new topic Bite-Sized Tutorial Collection

- Bite-Sized Tutorial 1 - Intro to Unity
- Learn how to navigate the Unity interface and basics of how to utilize the engine (Game Objects and Monobehavior scripts).
- Bite-Sized Tutorial 2 - Basic Movement in Unity
- An introduction to Rigidbodies and Physics in Unity to implement basic movement.
- Bite-Sized Tutorial 3 - Accessibility in Games
- Simple ways for you to design accessibility into your games--everyone should get a chance to play!
- Bite-Sized Tutorial 4 - UI Components
- Here are some of the building blocks and tips you can use to create great UI in your games.
itch.io Community » Game Development » General Development · Posted in Bite-Sized Tutorial 4 - UI Components

Additional Materials
Key Points in UI:
- Anchoring + Pivot: determines how UI will scale and move when the screen or its parent resizes and moves
- Canvas settings are important
- Rule of thumb: Set your canvas to “scale with screen size,” reference resolution to a desired aspect ratio (such as 1920 x 1080), so that your UI scales according to your screen
On Optimization/Workflow
- Turn off "raycast target" if it doesn’t need to be clickable
- Can toggle canvas component to enable or disable canvas objects (vs. setting active or inactive for the entire game object)
- Scale uniformly by clicking and dragging scale tool center
- Hold shift/alt to set pivot or scale while setting anchor presets
Helpful Links
Check out our ACM Studio UI Tutorial
- UI Best practices
- Optimizing unity UI
- Scrollview grid tutorial
- Enabling UI with the new input system
- Unity UI course
The Unity documentation for each UI component is linked in the images!
itch.io Community » Game Development » General Development · Created a new topic Bite-Sized Tutorial 4 - UI Components

UI Elements in Unity
(by Faustine)
The Unity User Interface (UI) system offers a variety of built-in elements and components that may be helpful while you are creating your games! Here is a list of some major UI elements in Unity.
Play around with them and check out their different features and components!

Buttons

- As the name suggests, buttons allow you to create interactive buttons in the game! You can use them to create menu buttons or to represent any action done via a single click/tap.
- Notes:
- Connect to functions from “On Click ()” under the Button Component in the inspector (inspector > button component > OnClick()).
- Transition Types (color tint, sprite swap, animation) determine how the button looks when clicked on or disabled.
- Automatic navigation may cause your button to stay “clicked.” Turn it off to remove that effect (This may affect button interactions with controllers 🎮).
Text (TextMesh Pro)

- Text (TextMesh Pro) allows you to create text for things like titles, labels, and descriptions in your game!
- Notes:
- Why we recommend TextMesh Pro (TM Pro): unlike normal text, TextMesh Pro stays crisp at any size and includes many additional options for customization.
- You can import your own fonts through TextMesh Pro font asset creation.
- You can explore the different formatting options, including the “auto size” function (note that auto size may incur performance costs)!
- To edit TextMesh Pro text in code:
- using TMPro;
- TextMeshProUGUI example;
- example.text = "whatever you want here";
- using TMPro;
Images


- Images can take in sprites (source images) to display them! You can use them to make menu backgrounds, displays, profiles, and more.
- Notes:
- What are panels?
- You may notice something called “panels” when you create UI elements in the scene: they are just images! The image components on panels are preset to some specific values, and may be convenient for creating menus and displays.
- What are panels?
Sliders

- Sliders are used to represent values that are within a certain range (for example, from 0-1), such as volume, text speed, and text size.
- Notes:
- The sliding direction can be adjusted in the slider component: it can be left to right, right to left, bottom to top, and top to bottom.
- The "min” and ”max" values are what the slider knob represents at each end of the slider area (0-1 normally).
- Check the "whole numbers" box to slide up in whole-number increments.
- "Value" returns the value the slider knob represents.
Toggles

- Toggles can be used to represent values that can be switched on or off, such as full screen or windowed options, mute or unmute, stonks or no stonks.
- Notes:
- "Is On" adjusts whether the toggle is switched on/off.
- The visuals of the toggle are children of the Toggle game object, you can customize them as needed.
- If you have mutually exclusive options (such as a multiple choice question with a single answer), toggle groups may come in handy.
- Toggle labels do not have a built-in TextMesh Pro option, you can add one as needed.
Input Field

- Do you want players to be able to name their in-game pets? Input fields are the way to go. Players will be able to click on the box and type in information.
- Here’s some information on how to access text from a TextMesh Pro Input Field.
Dropdown Menu

- Dropdown menus allow players to select from a list of predefined values. For example, the player can select from a list of supported languages for the game.
- Here’s how to create a dropdown menu and access the value.
Scroll View

- Can’t fit everything on screen at once? Use a scroll view! It is conveniently built-in, and is made up of a few components, including scroll bars, a scroll rect, a mask and an image.
- You can use scroll rect/scroll bar by themselves
- Notes:
- The mask component in the scroll view hides game objects that are outside of the view port (the box on screen)
- masks can be used in other contexts as well (such as in health bars)
- You can toggle whether it supports vertical or horizontal scrolling
- Consider using layout components in the Content child object (Scroll View > Viewport > Content) to organize the content in the scroll view:
- Content size fitter: if you need objects to scale according to the number of objects present
- Vertical/horizontal layout group for things to distribute evenly and stay aligned
- The mask component in the scroll view hides game objects that are outside of the view port (the box on screen)
itch.io Community » Game Development » General Development · Posted in Bite-Sized Tutorial 3 - Accessibility in Games

itch.io Community » Game Development » General Development · Posted in Bite-Sized Tutorial 3 - Accessibility in Games

References and Resources
Quick Info
- Video Game Accessibility - YouTube (Game Maker’s Toolkit )
- The Last of Us Part II: Accessibility Features Detailed || Naughty Dog (Case study)
- 5 Big Ideas for Designing Accessible Video Games (Very condensed tips)
Tools
- Testing for colorblindness
- Testing for flashes & patterns (paid service)
- Xbox Adaptive Controller
Guides
- A Practical Guide to Game Accessibility (Guideline Checklist on Page 6)
- Game accessibility guidelines (Differing levels of complexity)
- Game accessibility guidelines | Why and how (How to approach)
- Excel checklist download (Highly detailed checklist)
Organizations/Websites
- AbleGamers
- Accessible Player Experiences (APX) (by AbleGamers)
- SpecialEffect (hardware)
- DAGER System (consultancy + reviews)
Deeper Dive
- Gaming accessibility fundamentals - Learn | Microsoft Docs (Free course)
- Video Gaming Accessibility - National Library Service for the Blind and Print Disabled (NLS) (Large list of gaming accessibility resources)
itch.io Community » Game Development » General Development · Posted in Bite-Sized Tutorial 3 - Accessibility in Games

Extra Notes
Playtesting/Feedback
- Playtest without audio, from afar, with colorblind filters
- Listen to feedback from players with disabilities!
Both options and clarity need to work together
- Have OPTIONS for more CLARITY
- OPTIONS need to be CLEAR (presets)
Accessibility is a broad subject, but even just making an attempt to make your game accessible will go a long way. This guide is in no way comprehensive of all possible accessible designs, but we hope that it provides a good place to start. Consider checking out the resources linked below for more information!
Bottom line: keep all audiences in mind. Design accessibility!
itch.io Community » Game Development » General Development · Posted in Bite-Sized Tutorial 3 - Accessibility in Games

Clarity
Multisensory feedback
- Info conveyed through multiple forms (Especially key information)
- Feedback: Sound effects + Visual feedback (+ Haptics)
- Screen reader support, varied soundscape for different information
- Caveat: as mentioned above, if effects may cause negative responses in certain audiences, it should be optional
- Key info should not rely on colors or a single sense (visual/auditory/rumble) alone
- Subtitles for ambient noise/convos (as in Minecraft)
- Ambient noise or conversations that convey key information about the surroundings or game rules need to be subtitled
- Feedback: Sound effects + Visual feedback (+ Haptics)
Clear UI/Subtitles
- Large, well-spaced, easy-to-read font, high contrast
- Special in-game fonts should also have more readable option

Clear instructions
- Use simple language and instructions for key info or tutorials
- Tutorials need to be easily understood
- Tutorials need to be replayable to be relearned
itch.io Community » Game Development » General Development · Posted in Bite-Sized Tutorial 3 - Accessibility in Games

Options
Controls
(especially helpful for individuals with motor or cognitive disabilities)
- Have Flexible Controls
- Controls need to be customizable (support control remapping), or at least have alternative control presets that are more accessible
- Support external devices (allow players to use their own hardware)

- Easy to pause
- Pause menu needs to be easily accessible, so settings are easily accessible and players can take time to rest
- Toggle control complexity
- Complex actions, such as button-mashing (rapidly tapping), button-holding, quick-time events (QTEs), need to be toggleable (meaning they are not mandatory, and can be switched off)
- Sensitivity controls (how much movement input affects on-screen movement)
- Simplify interactions for input
- Allow players to reduce the input types needed, such as supporting analog-stick-only, mouse-only, or keyboard-only gameplay
- Option to have fewer buttons representing a variety of actions (Bayonetta 2’s fighting combos can be executed with one button)
Visuals & Audio
(especially helpful for individuals with visual or hearing impairment)
- Colorblind options
- Adjustable colors or colorblind color palettes for players to maximize color contrast (generally, blue and orange are accessible colors)
- Shapes, icons, symbols supplement color information (ChromaGun's symbol system)

- Subtitle and UI options
- Customizable: allow players to change the size/font/contrast of the text and buttons
- Identifies speaker, shows ambient noise
- Separate volume controls
- Adjust speaker voice, sound effects, music, separately to allow players to prioritize different auditory information
Assistance
- Gameplay assistance
- Game-specific, some examples: allow the camera to be controlled automatically, assist mode in Celeste
- Difficulty levels (consider making different difficulties separate, like combat difficulty, puzzle difficulty, platforming difficulty)
- Option to toggle certain effects
- Motion sickness: turn off head bob, screen shake, motion blur
- Epilepsy: flashing, certain visual patterns (like the snow in Stardew Valley)
- Other effects that may create barriers or even be harmful to certain populations, such as rumble (may make controllers difficult to hold)
itch.io Community » Game Development » General Development · Created a new topic Bite-Sized Tutorial 3 - Accessibility in Games
itch.io Community » Game Development » General Development · Created a new topic Bite-Sized Tutorial 2 - Basic Movement in Unity
(by Jin)
Welcome back to ACM Studio at UCLA’s second bite-sized tutorial! Today we’ll be focusing on making our sphere move, with simple inputs, rigidbodies, some physics, and colliders.
This tutorial starts from where we left off last time. If you haven’t had a chance to read that yet, we suggest going there first!
Rigidbodies and Physics
Generally, if we want something to move in Unity, we want it to obey the rules of physics first. Currently, our sphere just hangs there, defying gravity. To make it obey physics, add a Rigidbody component to the script by selecting the Sphere in the Scene Hierarchy, going to the Inspector on the left, scrolling to the bottom, and clicking the Add Component button. Add the Rigidbody component from the dropdown list.
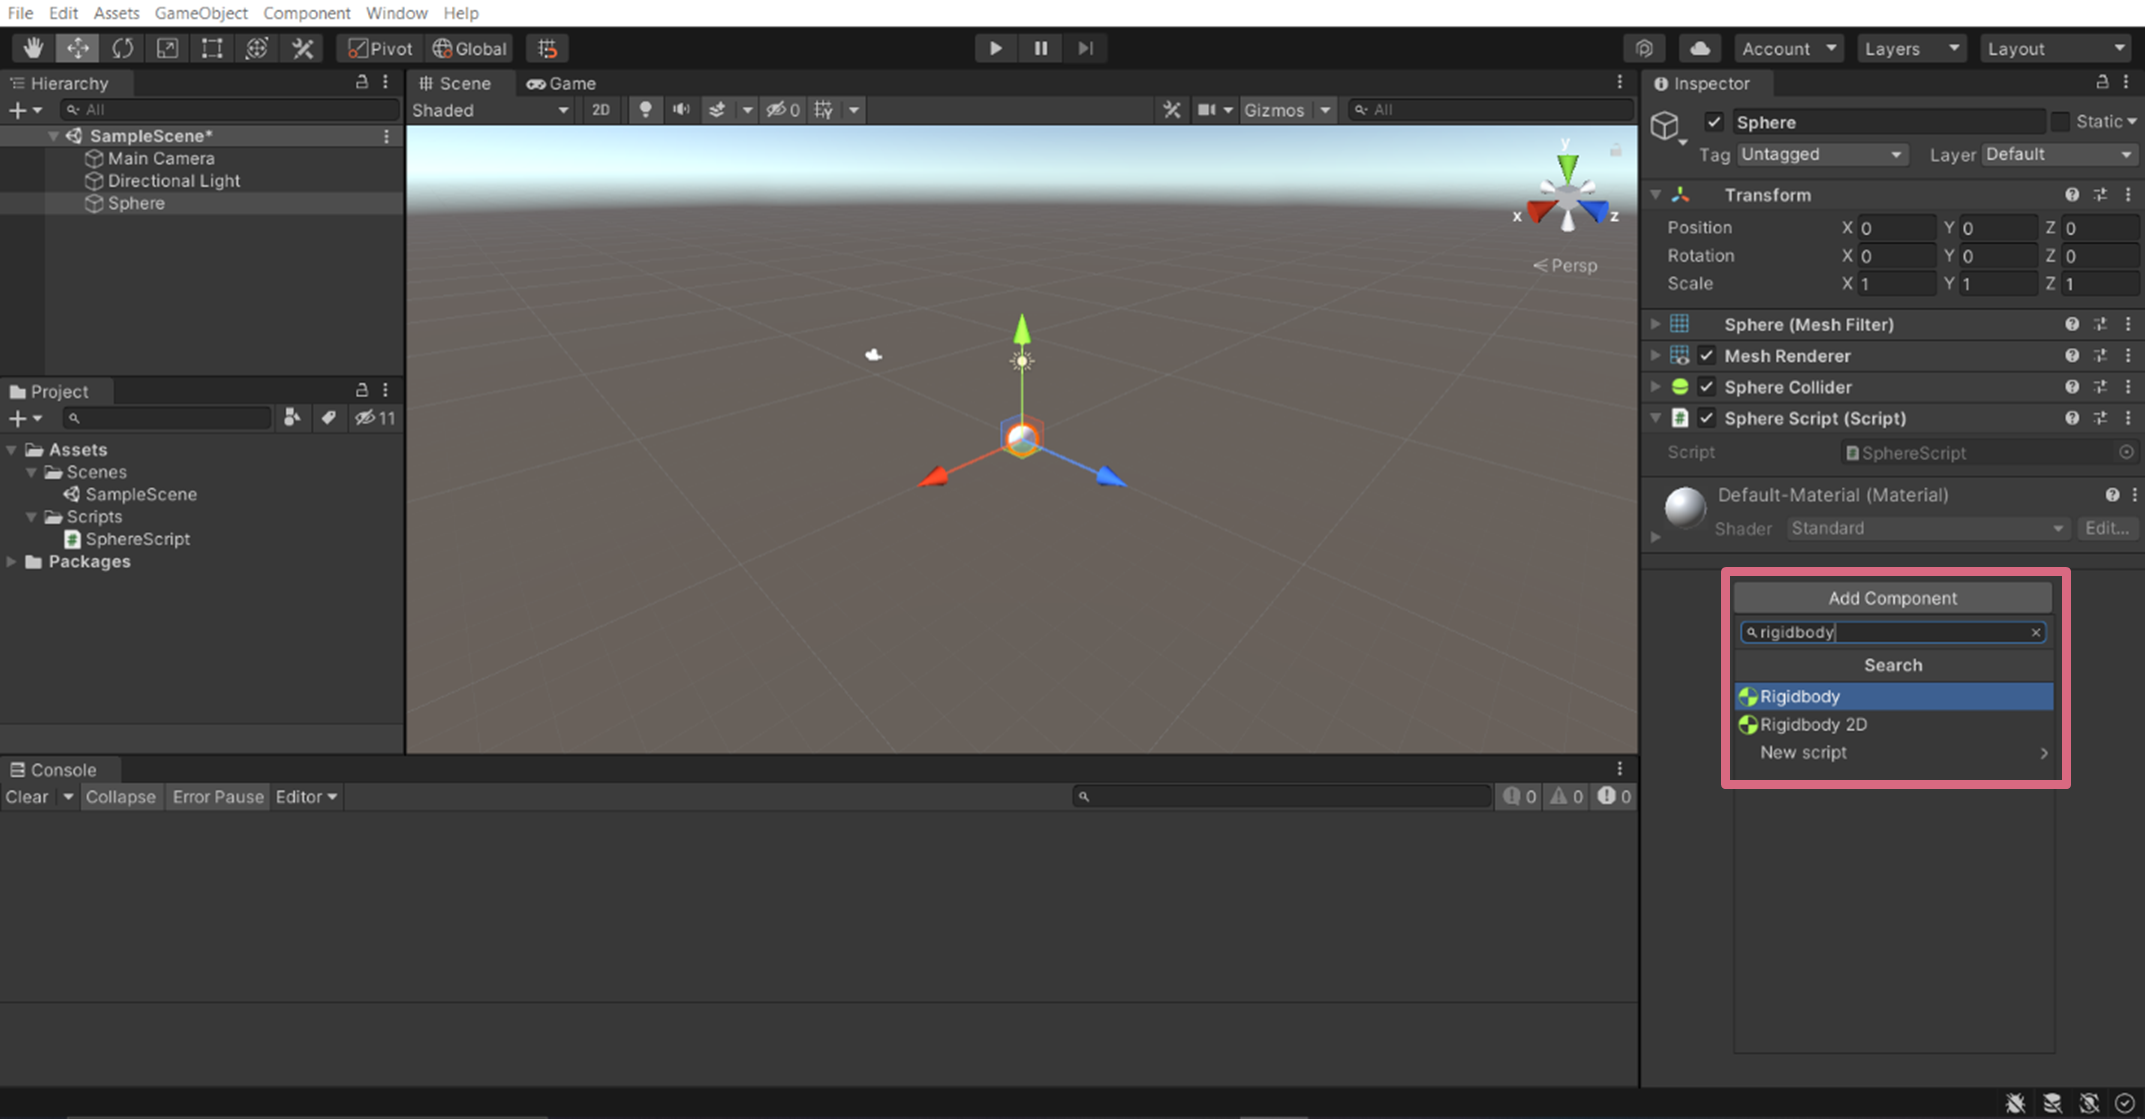
If we now click play, the sphere falls down properly (yay).
To make a ground that we can move the sphere on, create a new plane by right clicking on the Scene Hierarchy and selecting 3D Object -> Plane. Recall: this plane is also a Game Object!
Let’s move our sphere slightly above the plane by tweaking its Transform’s position have a Y value of 2. Recall: Transform is a component that governs the position, rotation and size (scale) of the Game Object it is attached to.
We’ll end up with something like this:
If we click play, the sphere falls a short distance onto the plane.
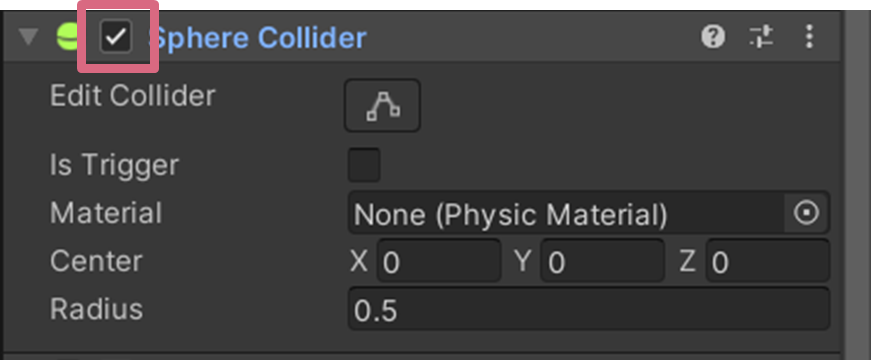
The sphere collides and is stopped by the plane thanks to a Collider component in both the sphere and the plane. Take a look at their components in their inspector and you’ll see Unity has automatically added a Sphere Collider and a Mesh Collider (for the plane). You can try disabling one (or both) of these by deselecting the checkmark beside the component, and the sphere will fall right through the plane!
Scripting: Inputs and Movement
Recall: to control Game Objects in Unity, we attach Monobehavior scripts on them. Our sphere already has SphereScript.cs attached to it. Let’s open it up by double clicking the script in either the Project Hierarchy or in the Inspector of the sphere. I’ve commented out the two lines of code we used previously to showcase what Start and Update by adding the two forward slashes // before the lines of code.
Type the following 6 new lines of code in.
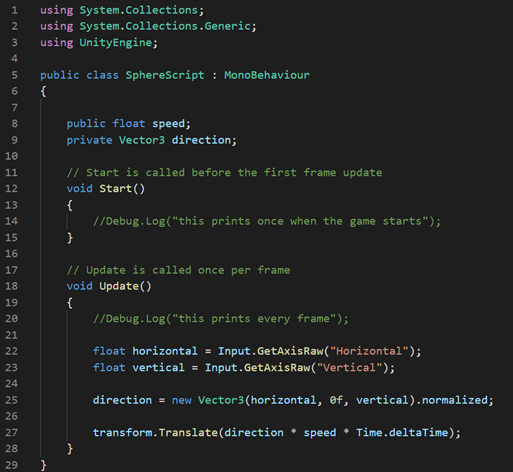
After saving the script, go to the sphere’s Inspector and change the value of Speed to something reasonable (like 3). This corresponds to the variable speed declared in Line 8 of the script, which will determine how fast the sphere moves (it’s speed).

If you press play, you now can move the sphere as you would control a player character with the arrow keys or the WASD keys.
Let’s go over the lines and what they do. Don’t worry if you don’t understand everything perfectly right now. The intuition behind the code comes with practice and messing around with Unity!
Lines 8 and 9 declare two variables that the entire class can access:
- speed: a float (decimal) value, which we'll use to specify how fast the sphere should move. The scope of this variable is set to public, so we can go into the inspector and see/change its value there (which is what we did above).
- direction: a Vector3 value (which has three components: x, y, and z). We will use this variable to store the direction the sphere should move in. The scope is set to private, so this variable can only be accessed within this class’s script (and not in the inspector).
Lines 22 and 23 take in input from the player:
- We create two temporary variables horizontal and vertical. These are type float (decimal) and will store the two directions we want the sphere to move in.
- Input.GetAxisRaw() returns a value from -1 to 1 for the desired axis. E.g., Input.GetAxisRaw(“Horizontal”) would return -1 if you press the left button.
- For keyboard these values are discrete (-1, 0 and 1), while for joysticks there are decimal values in between
- Recall: Update is called every frame the entire duration the game runs. This means the script will continuously take new inputs every frame, and move the ball accordingly (see the two lines of code explained below).
- We also cannot access horizontal and vertical outside of Update, since they are temporary (declared within Update), which means they will be created and destroyed each frame (which is okay since we only want them to hold the current instance’s input).
Line 25 creates the direction vector:
- We combine both the two values in horizontal and vertical into a Vector3 (in Unity, the Y component is the component that above and below our plane, while X and Z are on our plane, so the Vector3 created has horizontal as its X component and vertical as its Z component; the Y component is just set to zero since we don't want any movement in this direction). This is stored in our previously declared variable direction
- We also normalize direction with normalized() so direction has magnitude 1 (we’ll be scaling this up later with the speed variable). This makes sure the sphere doesn’t move faster while moving diagonally
Line 27 moves the sphere:
- This is the line that actually moves the sphere. We translate (move) it’s transform (position) by a distance of speed * Time.deltaTime (this is just the time that has elapsed since the previous frame) in the direction specified by direction
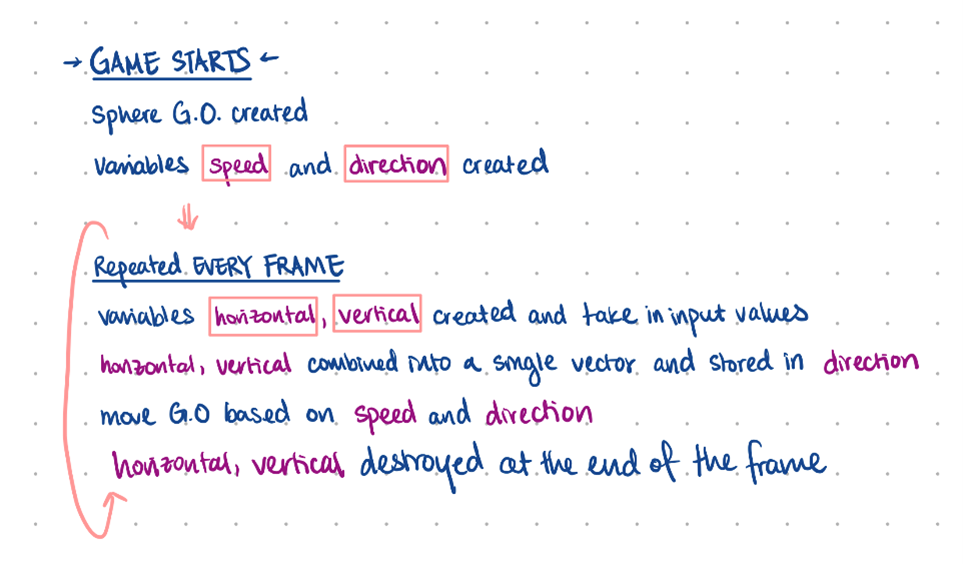
Here’s a quick recap diagram about the order the code runs:
There are other ways to make an object move, for example by changing the velocity of the Rigidbody, or by adding force to the Rigidbody. Some argue that these methods are better, since they aim to model physically accurate movement. However, they also have their own caveats, so the most straightforward way of moving something by changing (translating) it’s position (transform) was presented here. (Note that our current code using transform.Translate doesn’t require the Game Object to even have a Rigidbody. You can remove the sphere’s Rigidbody and it will still move with inputs, hanging midair.)
Unity Documentation!
If you’re curious to learn more in depth about all the Unity functions mentioned above (like Input.GetAxisRaw(), normalized(), transform.Translate(), Time.deltaTime etc.), go to Unity’s own C# documentation and search up the function you’re interested in. This is seriously your best resource and reference in learning Unity and C#, since the documentation presents basically everything you need to know about a specific concept/topic/function in a concise and compact way.
Tweaking the Camera
You’ll notice that the camera’s angle is rather awkward right now. Let’s move and rotate this camera so that it looks directly down at our plane. Do this by changing the fields in the Camera’s transform to the following values:
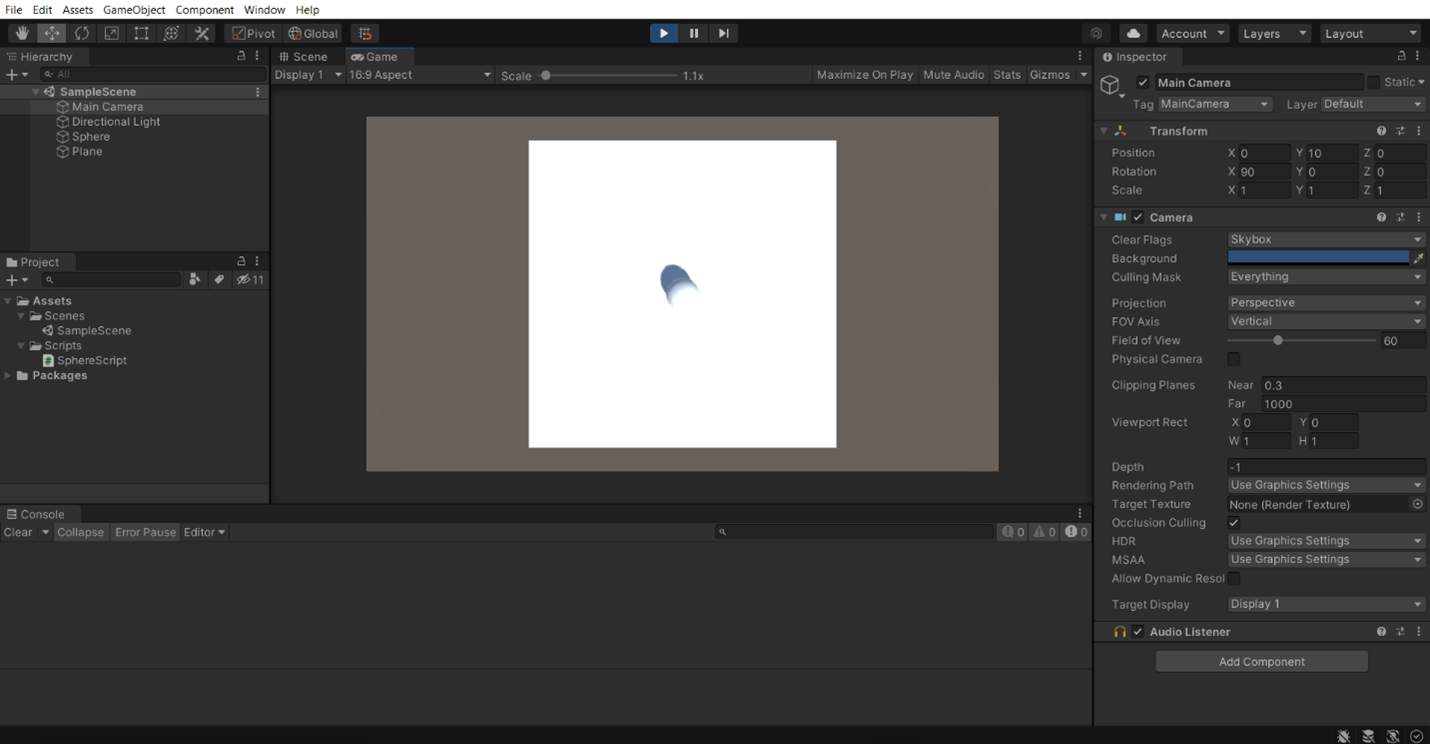
The position (0, 10, 0) moves the camera up directly above the plane, while the rotation (90, 0, 0) rotates the camera to look down.
More Resources
Other than Unity’s own documentation mentioned above, here is a good tutorial if you want to build a more fleshed out 3D player controller.
And that is all for this tutorial! Come back next time for a discussion on how to make your games accessible to everyone!
itch.io Community » Game Development » General Development · Created a new topic Bite-Sized Tutorial 1 - Intro to Unity
(by Jin)
Hello everyone! Welcome to the first installment of our short, digestible and “bite-sized” tutorials brought to you by ACM Studio at UCLA. This series will cover a handful of useful topics ranging from Unity basics and C# programming to accessibility and UIUX design, suitable for anyone just beginning Unity, looking for tips, or needing refreshers. We’ll be posting these tutorials throughout winter quarter, so new developers in our Student Run Studios program can easily start Unity (check out our student-made games on our itch page)!
Now, let's jump right into this first tutorial, where we give an intuitive intro into the building blocks of Unity games: Game Objects and Monobehavior scripts.
Working with Unity
Start by creating a new Unity Project. Open Unity Hub and select New Project -> 3D Project. You will see a window like this. You can drag the tabs around to change the setup.

Game Objects <3
You probably have some (or all) of the following things in your game: characters, NPCs, walls, platforms, obstacles, enemies. All of these are referred to as Game Objects in Unity, and are created by right clicking in the Scene Hierarchy, selecting Create Empty (or choosing from the various predefined objects Unity lists below).
A Game Object can have various components on it. A sprite renderer (how it looks) is a component, so is a script (more on this later).

Let’s start by creating a sphere (right click in the Scene Hierarchy, select 3D Object -> Sphere). If we click on the sphere (from the Scene Hierarchy or the Scene View), we will see that its inspector is no longer empty. Instead, it is filled with the following components. For now, we care about only one of these: the transform component.
The transform component determines the position, rotation and scale of the sphere. Try altering these values to see how the sphere changes! (Note that rotating a sphere wouldn't be very visible, so you can try creating different game objects like cubes if you want to visualize rotation)

Scripts
To make the sphere (or any Game Object) actually do something, we attach C# scripts on them to control their behavior. All scripts that are attached to Game Objects inherit from the Monobehavior class. For our current purposes, it is important to know two functions that every Monobehavior script has:
Start: this is called the instance a Game Object is created in game (our sphere is going to be created the instance the game starts, so whatever is in the Start method will be executed when we press play)
Update: this is called every frame (continuously throughout the game, until the Game Object is destroyed)
Right click on the Assets folder and select Create -> C# script. Rename this to SphereScript. Double click to open it up in Visual Studio (or any editor you have, I have Visual Studio Code). You’ll see that you are already given the two core Monobehavior functions.

Add the following two lines of code to see these functions in action.

Debug.Log prints the message inside the parenthesis to the console (that bottom area in the Unity UI). It doesn’t print in your actual game, and are just helpful as debugging messages for the developer.
Now, simply drag and drop the script onto the sphere inside the Scene Hierarchy (a Monobehavior script will only do something if it is actually on a Game Object in the scene). You’ll be able to see the script on the Sphere’s inspector window.

Click the play button and scroll through the console messages to see Start and Update in action! (You might want to pause or stop the game since the message in update will be printed continuously)

(It’s a good idea to keep your Project Hierarchy organized. Right click on the folder titled Assets, then select Create -> Folder and name this folder to Scripts. You can drag your script in here.)
In our next tutorial, we’ll see how to actually control the sphere and make it move!