Indie game storeFree gamesFun gamesHorror games
Game developmentAssetsComics
SalesBundles
Jobs
Tags

[devlog] The Pool - cyberpunk IF

A topic by Leethe Petali created Sep 09, 2017 Views: 1,090 Replies: 20
Viewing posts 1 to 14
Submitted (2 edits) (+2)

Hi! I'm jamming for the 1st time, and actually writing a game for the 1st time since forever - I think I last made one something like 15-20 years ago.

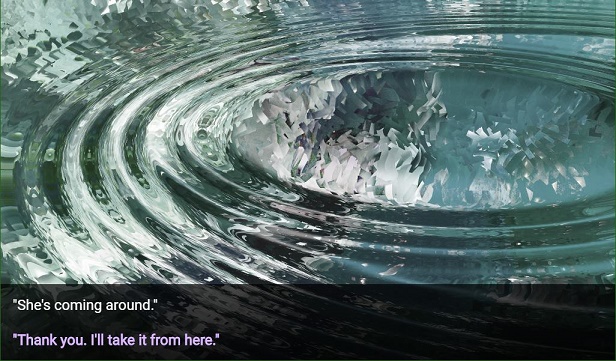
I'm using Twine to make a piece of interactive fiction about a woman who wakes up in an ambiguous facility, which seems to have only one member of staff. As this doctor? therapist? captor? walks her through her recovery, in the process she's exposed to memories. Some may be hers, some those of other women. Depending on her choices, she may go beyond remembering the lives of others and learn things which affect her relationship to the facility in the present

And the place where everything happens is the chamber in the centre of the facility: the Pool.

If people are interested, the first chapter is mostly done, including the first memory, and I should be able to put together a demo shortly.

Looking forward to seeing everyone else's work!

- Leethe

Submitted(+1)

Started the second chapter today! So far the adventure has featured:

  • Picking up Twine for the 1st time
  • Figuring out the basic CSS needed to display background images and move text elements
  • Nicking a code snippet to swap backgrounds based on passage tags
  • Babby's first branching path! Even if it is just for one passage. But that's what I'm aiming for. For my first game, I don't want to write everything twice or more.

Chapter 1 in green. Chapter 2 (in progress) in blue. Initialisation, notes and snippets on the left.

When I figure it out, I think I can upload the green part as a demo...

Submitted

lel i see cyberpunk and i come a-running

looking forward to playing this!

Submitted

The Pool now has an early draft demo! Play through Chapter 1 of the game. A lot of setup here, but we do reach the first memory, 'A Memory of Butterflies.'

Submitted

Quick update to the demo - switched out the large pngs I've been using locally for more web-friendly jpgs. It's still probably not ideal for mobile but should be fine for anyone else.

Submitted (2 edits)

Text jumping in Twine with dissolve transitions is incredibly annoying! This cropped up in my game and I'm currently using two fixes to get around it in Harlowe 2.

1. Put leading spaces outside of the transition macro, not inside.


2. When you add some words within an existing paragraph, and the sentence you add would naturally break onto a new line, they will "jump" as they dissolve; first they all appear together starting on a new line, then that line is properly split across two.

If you're developing for a known window width, you can get around this by separating the words into two hooks, both with an attached transition macro. One hook contains the words which appear on the first line, the second the words appearing on the second line. Here's an example of a passage from The Pool where I've had to use this technique:


The lines inside the blue and green boxes both fade in with the same action - clicking the link "eight chambers" - but I've split them into two separate hooks, because a line break falls between "currently" and "using".

(Note that $fade here is a variable which I've set to a value of "(transition:"dissolve")" - it just saves on retyping the transition hook every time I need it, which is a lot!

This is also an example of (1), because as you can see I've left the " - " text outside of the transition macros, also the single space between the blue and green hooks.

Technically, I suppose, you could fix this for any width window by wrapping every word in its own individual transition macro, but that sounds like a nightmare. I'd rather drop dissolve transition effects entirely or find a way to do them in CSS instead of using Harlowe 2's built in macros.

Submitted

Typo for Ana in "The water stirs slightly as Ame does something behind you to close the door, and the movement sends darts of colour flicking across its surface. The mirror images of the cables sway gently in the ripples."

Submitted (1 edit)

Fixed in unreleased current version - thx

I adore "waking up in an unfamiliar" place plots. Haven't had a chance to play through the demo yet, but I've got it on my list!

Submitted

Thanks! :) Hopefully a new demo going up this week, if I get my act together...

Submitted (3 edits)
The most common thing I want to do in Twine (I'm using Harlowe 2) is show a short block of text, then allow the user to click a word or phrase. When they do, I then want to use a (transition:"dissolve") effect to gracefully fade in a second block of text, which may itself include a clickable phrase, etc. If you try to do that just using all inline code, it works fine, but can be a little clunky. I thought I'd share the evolution of my approach in case others are trying to achieve the same thing.

In The Beginning, I used to use (click:) macros to specify my clickable hook, and then reveal the next bit of text, which was itself nested into a (transition:) macro, like this:


After a while, I realised you don't have to nest (transition:) inside (click:) like this. Using a Twine 2 feature called complex changers, you can just add them together, something like this:


It's better, but there's still a lot of words there which break up the flow when you're writing. The next thing I tried was to save the (transition:) macro into a variable rather than write it out in full. My passages now looked like this:


NB: The backslash at the end of the (set:) macro is to stop the line break at the end of that line from appearing in my passage as a blank line. This is one of two ways to stop errant whitespace from creeping in, I'll show the other one shortly.

Anyway, this is nice, but I eventually realised since I'm saving the transition effect into a variable, why not use complex changers again and save the whole thing into a variable? That now lets you do this:


Cool huh! The final step for me, and my current approach, is to take all those (set:) macros and move them into a passage of their own, which I tagged with startup. A passage with this special tag will be run automatically at the start of your game, meaning that those variables are always available without having to write out the (set:) statements every time you want to use them.


I've written out 5 of each here, I use 9 in The Pool and don't anticipate needing any more, since once you reveal 9 blocks of text, you have probably filled the screen and should move on to a new passage (at least, that's what I do in my story).

NB: Here you see the other way of hiding whitespace: I enclose my entire startup passage between {curly braces}, this causes all whitespace inside it to be hidden when it is displayed in Twine. I also use the (hook:) macro to create a changer, saved into the $ql... variables, which when applied to a hook gives that hook a name. I found this was cleaner in my story than using [hook nametags]<ql1|, your mileage may vary.
Submitted

Code snippets for those who want to try my final approach:

startup tagged passage:
{
<!-- Set up quick links to use throughout story passages; put a ql before a hook you want to click and a qt before a passage you want it to reveal. -->
(set:$ql1 to (hook:"quicklink1"))
(set:$ql2 to (hook:"quicklink2"))
(set:$ql3 to (hook:"quicklink3"))
(set:$ql4 to (hook:"quicklink4"))
(set:$ql5 to (hook:"quicklink5"))
(set:$qt1 to (click:?quicklink1)+(transition:"dissolve"))
(set:$qt2 to (click:?quicklink2)+(transition:"dissolve"))
(set:$qt3 to (click:?quicklink3)+(transition:"dissolve"))
(set:$qt4 to (click:?quicklink4)+(transition:"dissolve"))
(set:$qt5 to (click:?quicklink5)+(transition:"dissolve"))
}
story passage:
You stand at the base of a tree. The trunk is broad, supporting many $ql1[low branches].$qt1[
The branches look look like they should be able to take your weight if you were to $ql2[climb] up them.]$qt2[
Up you go! You scuff a knee, but are still pretty proud of yourself by the time you reach the canopy.]
Submitted

For anyone else thinking of using changers to apply (transition:) macros to their revealed text, be aware: you can't do this with text in hidden hooks shown using the (show:) command. That is to say, this won't work:

You leap over the low wall and [roll]<link1| as you hit the ground.|attack)[
Drawing your blade as you roll, you come up with a darting slash to the knees]\
(click:?link1)[(show:?attack)+(transition:"dissolve")]

and neither will this:

You leap over the low wall and [roll]<link1| as you hit the ground.(transition:"dissolve")|attack)[
Drawing your blade as you roll, you come up with a darting slash to the knees]\
(click:?link1)[(show:?attack)]

You'll have to do this, which is back to the annoying nested macros:

You leap over the low wall and [roll]<link1| as you hit the ground.|attack)[(transition:"dissolve")[
Drawing your blade as you roll, you come up with a darting slash to the knees]]\
(click:?link1)[(show:?attack)]

So I prefer not using (show:) and sticking with displaying my new text directly within the hook of the (click:) macro wherever possible.

Submitted(+1)

andddd just to document the stuff we've been talking about in Discord, if you want to style the "quicklink" hooks and the regular passage links, you'll want to open up the custom CSS page and pop this in:

tw-link, .enchantment-link { 
    CSS rules go here! eg: changing colour, font-weight, font-style, etc.
}
Submitted (1 edit)

Yep! Though I think this may be overridden in the case of hover & already-visited links, since those are "more specific" conditions again.

So the full set (bear in mind this is based off something I C&Pd from some page somewhere, but it does seem to work, and I'm fairly sure I see why):

tw-link, .enchantment-link { 
    color: red;
}
.visited, .visited > .enchantment-link {
      color: pink;
}
.enchantment-link:hover, tw-link:hover, .visited:hover {
      color: green;
}

(I put some colour formatting in for testing purposes so someone can see this working in their own project.)

Be warned that there are some weirdnesses here, the second selector should give you a clue that something odd is afoot!

1. If there is only a single tw-link on a page (this is the natural [[target]] type of link) then it will have the class "visited" if it's already been visited, and you can target it with .visited {}

2. All links which are instead done e.g. via the (click:) macro, that is, links identifiable using the class .enchantment-link, never acquire a "visited" class even if they have been visited, so you have no way to format these specially if they've been visited.

This means you're better off accepting that you should format links & visited links the same way.

3. Should you have a page containing both tw-links and .enchantment-links, that is, both [[target]] and (click:"target") links, even the [[target]] links are formatted differently to if they stood alone on a page. This is why I also added the second clause on the visited links selector.

A view from the inspector:

This is a [[target]] link by itself on the page, linking to a visited page. See the element type tw-link and the class "visited" visible in the inspector.


This is a page containing a (click:"target") link followed by a [[target]] link. As you can see the first link is red, it hasn't picked up any pink formatting. This is because if you look above the highlighted line to the first tw-enchantment element, there's no "visited" class.

BUT! Even the link which was visited doesn't have a "visited" class on the element itself. Or rather, it does, but the link text is contained in a child element which has its own enchantment-link. This means your visited formatting will be overridden by your non-visited formatting unless you also tell CSS to format something as visited if it has a parent which is visited.

All in all, I don't recommend trying to format visited links as different to non-visited. It isn't worth it. However, you should include the section above, just set the formatting as the same as your non-visited links.

Submitted (2 edits)

if you take my advice, you only need two selectors:

tw-link, .enchantment-link, .visited { 
 color: red;
}
.enchantment-link:hover, tw-link:hover, .visited:hover {
 color: green;
}

(or format them however you want)

Without that last .visited on the first selector, you wind up getting a different colour for your links to already-visited passages, if those are [[target]] links which don't share a page with (click:) links (the conditions may vary from this, but these conditions are sufficient). That's a specific & weird enough situation I gave up the first time I tried to solve it!

(the reason for this is that Twine default CSS has a selector for .visited, and this is considered more specific than tw-link so it overrides you)

Submitted

You're a legend! I had some of this stuff in my CSS, but not just .visited by itself, I was using tw-link.visited. I think your way is neater :) 

Submitted (1 edit) (+1)

Harlowe 2's debugger can get in the way. And if you have a lot of variables, the rows crunch up until the text on them is unreadable. Here's some CSS hacks to work with the debugger while that's still a problem.

div.variables {
    position: fixed;
    top: 0px;
    bottom: 70%;
    left: 50%;
    right: 0px;
}
.variable-row {
    flex-shrink: 0;
}
tw-debugger {
    position: fixed;
    top: 0px;
    bottom: auto;
    left: 0px;
    right: 50%;
/*  display: none;   */
}
tw-debugger:hover {
    opacity: 0.5; 
}

In order, then:

div.variables {}

The code in this is anchoring the list of variables at the top right of the screen, and is keeping it restricted to the right 50% and the top 30% of the screen. This is because my fresh text is at the bottom of my screen, because my game scrolls from the bottom up. So I want the debugger up and out of the way.

.variable-row {flex-shrink: 0;}

The most important. This keeps the rows at a minimum height and stops them getting so squished they're unreadable. If there are too many to fit in the area of the screen I've allowed them, the scroll bar is already enabled and will let me scroll through.

tw-debugger {}

The variables are anchored at the top right, so the debugger (with the "DEBUG" control on it) is anchored to top left. Likewise it's prevented from reaching into the right 50% of the screen to keep it separate from the variable list.

I also have a commented out line here, if you uncomment "display: none;" the debugger will vanish entirely. Useful for when you want to use the debug feature to preview a page of your story without bothering to reset the starting passage.

tw-debugger:hover {opacity: 0.5;}

Whenever I mouse over any part of the debugger it fades to let me look behind it. This is 50% opacity, you can change as needed.

With all these on, here's what my debugger looks like while mousing over it. Note the scrollbar, I've scrolled down a bit to hide some spoilers! You can see some of my quicklinks code, which is what inspired me to figure out how to fix the row height problem on the variable list.


Submitted

Summary

There seems to be a problem in Harlowe 2 where if you apply (text-style:"bold") to some text using (enchant:), you can't later remove it using (text-style:"none").

The second enchantment fails to overwrite the bold formatting, because it doesn't actually add a "font-weight: normal" attribute, so the text continues to inherit bold styling from the first enchantment.

Workaround

You can get around this by using (css:"font-weight: normal") in preference to (text-style:"none").

Reproduction of the problem and demonstration of fix

Paste this into a new Twine passage and run it:

[This is the text I will enchant.]<enchantme|
(link:"Make it bold red!")[(enchant:?enchantme, (text-style:"bold") + (text-colour:"red"))]
(link:"Make it normal again!")[(enchant:?enchantme, (text-style:"none") + (text-colour:"white"))]
(link:"Make it normal again, properly this time with CSS.")[(enchant:?enchantme, (css:"font-weight: normal") + (text-colour:"white"))]

The first link makes it bold and red; the second link makes it white again but leaves it bold.

You can see the issue in the inspector - this screenshot was taken after clicking the second link.


And this screenshot is taken after clicking the third link, correctly putting the text back to normal font weight.


Submitted (1 edit)

I wanted a way to style my links differently, depending on things that happen in the story. I'd like to do this dynamically; that is, rather than have links in certain passages hard styled in their own way (which would be possible to do via tagged passages, as described in this excellent post by greyelf), I want to be able to look at the value of some variables, and then decide at the time the passage is displayed what colour I want its links to be. Even better if I can do this in a header, so it happens automatically for every passage in the game.

However there aren't easy ways to look from the CSS side of the fence into the structure of the story, especially into variable values. So I've used a trick with the (css:) macro to wrap the passage in a dummy style (which does nothing), but that dummy style is then picked up from CSS and used to override the colour of links.

In the passage you want to dynamically format links, you want to add a (css:) macro like this:

(enchant:?passage, (css:"custom_style_red;"))

This wraps the passage in a tw-enchantment element with the property style set to the value "custom_style_red;" as visible in the inspector:


Then, in CSS, you can catch it like this using a variation on my recommended CSS link formatting selectors:

tw-enchantment[style="custom_style_red;"] tw-link,
tw-enchantment[style="custom_style_red;"] .enchantment-link,
tw-enchantment[style="custom_style_red;"] .visited {
    color: red;
}
tw-enchantment[style="custom_style_red;"] .enchantment-link:hover, 
tw-enchantment[style="custom_style_red;"] tw-link:hover, 
tw-enchantment[style="custom_style_red;"] .visited:hover {
    color: yellow;
}

The first line here basically says "all tw-links contained within a tw-enchantment element whose property style is set to "custom_style_red;", and subsequent lines are similar.

That's it! Your links in that passage are now red.

If you have multiple custom styles and only want one unified hover style (say, white) for simplicity, you can just use a single block of CSS for all of them by changing your selectors to:

tw-enchantment[style^="custom"] .enchantment-link:hover,
tw-enchantment[style^="custom"] tw-link:hover,
tw-enchantment[style^="custom"] .visited:hover {
    color: white;
}

This catches style attributes which begin with the value "custom", so just be consistent and also make sure you're not colliding with any valid CSS.

You can extend this approach to format things other than links, just change the targets of your CSS just as if you were formatting other elements without the custom styling.
Submitted (4 edits)

When you click a link in Harlowe 2 the link goes away. Usually what you want. Sometimes annoying. A couple of times I've wanted to make a word clickable, and when the player clicks it, it changes to a new word, but remains clickable. Keep clicking it and it cycles around to new values.

There's already sort of published ways to do this, but it's complex and tricky involving auxillary passages which you sub in with (display:)

So I figured out a way to do it using Harlowe's built in (link-repeat:). Here it is:


At the start, I make an array of colours and set the index to 1. Then, when you click the link, I advance the index (using modulo arithmetic to loop around from 3 to 1) and replace the word.

The trick which makes it work is inside the link-repeat macro. Normally link-repeat just takes a string, when you then have no way to alter except by running a blanket (replace:) on all similar strings.

That would fail for this example. If the dress was "red" and you tried to (replace:"red")[green], you would also change part of the word "bored". And when you tried to change "green", you'd also change the later sentence to read "silver with envy".

So what I do is I smuggle a named hook inside the link by putting it all in quote marks. Now I can change the text of the link by changing the inside of the hook while still leaving the link intact to be cycled.

Here's the source:

{
<!-- Initialise range of colours -->
(set:$colours to (a:"red", "green", "silver"))
(set:$colour_index to 1)
(set:$colour to $colours's $colour_index)
}The dress is (link-repeat:"[$colour]<colourhook|")[{
<!-- Pick new colour, then replace description inside the link. -->
(set:$colour_index to (it % $colours's length) + 1)
(set:$colour to $colours's $colour_index)
(replace:?colourhook)[$colour]
}], you're bored, and you just know it'll make them green with envy. Wanna steal it?

(Please note: I absolutely do endorse stealing dresses. Be smart.)