
Today I have another tutorial. This one should be simple enough to grasp. We're drawing a tortoise but in the process I think you'll learn a lot of little techniques the pros use when drawing pixel art (most importantly shading and selective outlining). To start, we'll be using a 32x32px canvas. This canvas will have 2 layers, one for a light blue background (color code #a2cddb) and one for the tortoise.
1. Sketch
Now we create a simple sketch. It doesn't matter too much how bad the sketch is for now because we will make adjustments as we go. Try to sketch the shell, the long head (curving upward), the feet, and the tail is optional.

2. Color
We can already start coloring if we really want. After coloring, you will need an outline to make it pop out against the background. In this example I will be using brown colors. I also drew lines for the shell pattern.
3. Shade
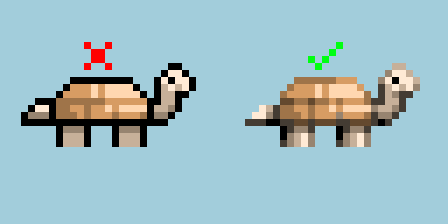
Yep, you heard me, we're jumping right into shading. I generally use an imaginary sun in the sky somewhere when shading so we will be shading from above. Make no mistake, that does not mean brighten the all the top pixels such as in this incorrect example below.

The sun (light source) is at an angle and you need to imagine the shell in 3d form. It is round in stature such as a sphere and so the light will be brightest where it hits the shell directly and decrease in value as it curves around the shell, same for the head. After shading, render in the shell pattern crevices like so. Keep in mind that the crevices aren't pure black because they receive light, and the amount of light they receive is relative to how direct the light is pointing into them.
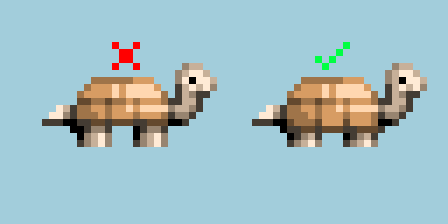
We also need to add shadow where light reaches less, most notably underneath the shell where the legs meet, and underneath the tortoises neck. Similar to above, don't make the mistake of darkening all the bottom pixels such as in this incorrect example below. You can see here the each of the bottom pixels of the shell are darkened as well as each of the pixels at the bottom of the feet. This is what not to do.

Yes underneath the shell is generally darker but you want take into account how light actually travels. Sunlight hits the shell but is blocked from reaching underneath the shell, however sunlight is also bouncing off the ground (lets say grass). This bounce causes some of that light to reach underneath the shell, however with each bounce, the light loses some of its value. If that's confusing, imagine a cavern completely closed off from all light. The cavern would be pitch black. However, if there is even but one small hole exposing light, the light would enter directly through the hole and bounce off any surfaces it hits, lighting up the cavern within. Another thing to keep is mind is the light strength. The sun has pretty strong light strength causing its light to reach very far, however something like a torch doesn't have as much light strength so the its light doesn't travel or bounce around as much. Anyway that's enough science. Here's what the tortoise might look like as a result.
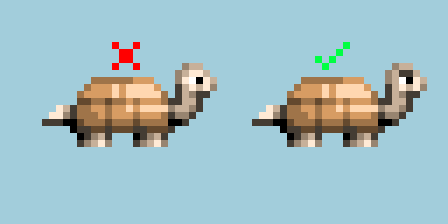
Simple edit... the shell top is still fully lit above, although now there is slightly less light where the legs enter shell. Big explanation, small change.
4. Selective Outlining ("Selout")
Alright now that you've hopefully learned a bit about shading, it's time to learn important technique called selective outlining, also known as "selout". In simplest terms, instead of using pure black outlines all around the entirety of your sprites, consider using outlines with the ability to receive some light. Where the outline receives less light, it is darker, and where it receives more light, it is brighter. Here's a visual representation. You can take a sprite like this and turn it into this.
It's still okay to use pure black within the outline, but in most cases, not all around. Only where the outline gets so little light that no color is visible other than black.
5. Polish
We're nearing the end of this tutorial! Just a few more things before we're done. First the shell. The shell isn't thick enough for the neck and tail to fit through so we go from this to this.
Next thing we fix is the eye. The eye looks too inexpressive just being a black dot, so now we draw out an actual eye. First you draw the eye, but then you'll notice it's hard to read against his skin so giving him a little bored eyebrow should add just enough contrast to do the trick.
Then his feet, his feet need some toes! However at this scale, drawing his super tiny toes could be a little tricky. If you try to add toes in front of his feet like in this image below, they appear too big,
What worked for me was drawing them without making them protrude the silhouette so much. I had to adjust the pose of the legs slightly to do this.

Lastly the tail, the tail is just a little too thick and receiving too much light for being tucked away behind the shell. Also I made the tail curve upward instead of down, so here's the edit.
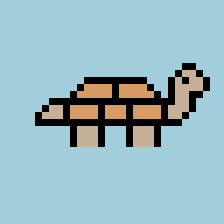
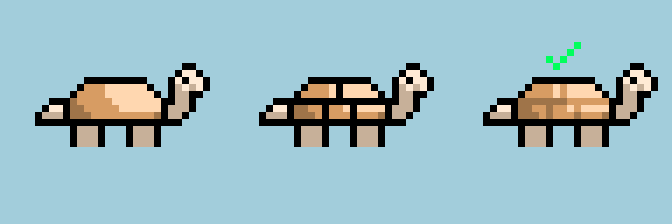
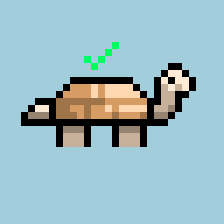
Those are all the main changes however being the stubborn perfectionist I am, I looked at the tortoise a bit longer and made a few more changes. You can see through this gif. It is mostly just me adding thicker crevices in the shell then tweaking colors for fun (hue/saturation/contrast), it's something I always love experimenting with at the very end.
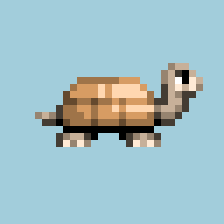
But there you have it for the tortoise tutorial! I hope you tried and learned a lot from it. I always try my best to explain what I'm talking about but I never have any idea how I'm doing that so far unless you guys let me know so always feel free to comment or message me on Twitter or Discord. Anyway see you next time!