Indie game storeFree gamesFun gamesHorror games
Game developmentAssetsComics
SalesBundles
Jobs
TagsGame Engines

The Contraption Bazaar Sticky

A topic by Internet Janitor created Feb 28, 2023 Views: 14,127 Replies: 141
Viewing posts 35 to 37 of 37 · Previous page · First page
(1 edit) (+1)

A tabstrip contraption
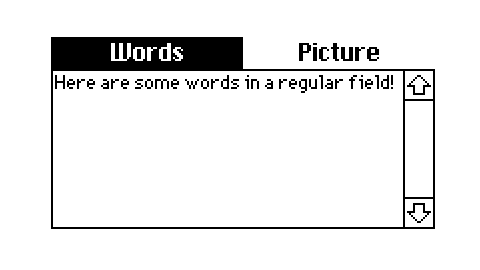
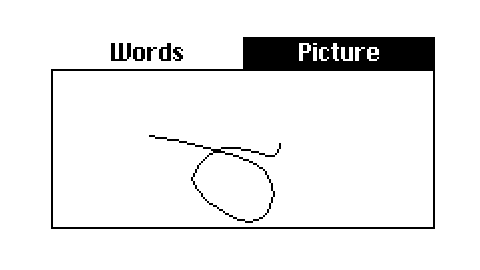
image.png image.png

I have a card that calculates some data, and displays it in various ways. Rather than have multiple cards that do the same calculation, I figured I’d have all of the views on the same card, and add a tabstrip to switch which ones were visible.

Attributes:

  • x.labels String. The text of the labels in the tabstrip, separated by \n. r/w.
  • x.current String. The text of the currently selected label. r/w.

Events:

  • on change label active Called when a tab is activated or deactivated. label (string) is the label of the tab that changed, active (bool) is true if the tab became active, or false if the tab became inactive.

The thing I’m proud of is the event model. Previously, I had separate Decker buttons for each tab, so when I added a new widget to a “tab” I had to add newwidget.show:"solid" on one button and newwidget.show:"none" on all the others, and I kept forgetting which buttons I’d updated, copy/pasting the line and forgetting to change "show" to "none" or vice-versa, it was a pain.

The new tabstrip contraption sends an event for the old tab deactivating, and an event for the new tab activating, so I can have one single event handler like this:

on change label active do
    if label = "Words"
        field1.show:if active "solid" else "none" end
    elseif label = "Picture"
        canvas1.show:if active "solid" else "none" end
    end
end

…and when I add a new widget, I can add just one line to one event handler, and be sure it will never be out of sync with anything else.

One awkward thing is that you wind up with different widgets overlapping, so you can’t easily click on one to select it. As a work around, you can use Widgets → Order… to bring up a list of widgets on the screen, select the widget you want to work with, and click the “Properties” button (if that’s what you want to do) or just click OK and drag the resize handles around.

%%WGT0{"w":[{"name":"tabstrip","type":"contraption","size":[192,16],"pos":[128,64],"script":"on change label active do\n    if label = \"Words\"\n        field1.show:if active \"solid\" else \"none\" end\n    elseif label = \"Picture\"\n        canvas1.show:if active \"solid\" else \"none\" end\n    end\nend","def":"tabstrip","widgets":{"canvas":{"size":[192,16],"font":"menu","pattern":47},"current":{"pos":[0,32],"value":"Words"},"labels":{"pos":[0,64],"value":"Words\nPicture"}}},{"name":"field1","type":"field","size":[192,80],"pos":[128,80],"scrollbar":1,"value":"Here are some words in a regular field!"},{"name":"canvas1","type":"canvas","size":[192,80],"pos":[128,80],"show":"none","image":"%%IMG2AMAAUAD/AP8A/wD/AP8A/wD/AP8A/wD/AP8A/wD/AP8A/wD/AP8A/wD/AP8A/wD/AP8A/wD/AAoBAwDAAQYAwAEGAMABBADAAQQAKgEBAJUBBAAmAQEAmQEEAAUBCgATAQEAnQEFAAoBBQANAQEAnwEGAA0BBAAJAQEAnQECAAYBBAANAQMABQEBAJ0BAQAMAQMADQEFAJ0BAQAQAQIArAEBABMBAwCoAQEAFwECAKUBAQAaAQIAogEBAB0BAQChAQEAHgECAJ4BAQAhAQEAnQEBACIBAQCbAQEAIwEBAJsBAQAkAQEAmQEBACUBAQCZAQEAJgEBAJkBAQAlAQEAmQEBACYBAQCZAQEAJQEBAJkBAQAlAQEAmgEBACQBAQCbAQEAJAEBAJsBAQAjAQEAmwEBACMBAQCcAQEAIQEBAJ4BAQAgAQEAnwEBAB8BAQCgAQIAHAEBAKMBAgAaAQEApQEBABkBAQCmAQIAFgEBAKkBAQAVAQEAqgECABIBAQCtAQIADwEBALABAgALAQIAswEEAAQBAwC5AQQA/wD/AJ0=","scale":1}],"d":{"tabstrip":{"name":"tabstrip","size":[192,32],"resizable":1,"margin":[0,0,0,0],"description":"A strip of mutually-exclusive options that can be clicked.","script":"on get_labels do\n   labels.text\nend\n\non set_labels x do\n   labels.text:x\n   new_labels:\"\\n\" split x\n   if !(current.text in new_labels)\n       set_current[first new_labels]\n   end\nend\n\non get_current do\n   current.text\nend\n\non set_current x do\n   valid_labels:\"\\n\" split labels.text\n   if !(x in valid_labels)\n       x:first valid_labels\n   end\n   card.event[\"change\" current.text 0]\n   current.text:x\n   card.event[\"change\" current.text 1]\n   view[]\nend\n\non view do\n    canvas.pattern:colors.white\n    canvas.rect[(0,0) canvas.lsize]\n    valid_labels:\"\\n\" split labels.text\n    width:canvas.lsize[0] / count valid_labels\n    height:canvas.lsize[1]\n    \n    canvas.font:\"menu\"\n\n    each val key in valid_labels\n        left:key * width\n        canvas.pattern:colors.black\n        if val = current.text\n            canvas.rect[(left,0) width,height]\n            canvas.pattern:colors.white\n        end\n        canvas.text[\n            val\n            (left,0) + (width,height)/2\n            \"center\"\n        ]\n   end\nend","template":"on change label active do\n \nend","attributes":{"name":["labels","current"],"label":["Labels (one per line)","Current Label"],"type":["code","string"]},"widgets":{"canvas":{"type":"canvas","size":[192,32],"pos":[0,0],"volatile":1,"script":"on activate pos do\n    valid_labels:\"\\n\" split labels.text\n    index:floor (pos[0]/canvas.lsize[0])*(count valid_labels)\n    set_current[valid_labels[index]]\nend\n\non click pos do\n    activate[pos]\nend\n\non drag pos do\n    activate[pos]\nend\n\non release pos do\n    activate[pos]\nend","border":0,"scale":1},"current":{"type":"field","size":[96,16],"pos":[0,48],"style":"plain"},"labels":{"type":"field","size":[96,80],"pos":[0,80],"style":"plain"}}}}}
Developer (1 edit) (+1)

You could mildly simplify your "on change" logic by using widget.toggle:

on change label active do
 if label = "Words"
  field1.toggle["solid" active]
 elseif label = "Picture"
  canvas1.toggle["solid" active]
 end
end

If you're frequently changing the set of widgets affected, it might also be worth considering a data-driven approach: form a dictionary mapping labels to lists of widgets, and then toggle entire lists:

on change label active do
 wids.Words:   field1,field2
 wids.Picture: canvas1,canvas2
 wids[label]..toggle["solid" active]
end

And in principle, with a somewhat different contract, you could even lift the toggling up to the tabstrip itself, just leaving the user code to construct such a dictionary. This would, of course, be somewhat less flexible.

(+1)

You could mildly simplify your “on change” logic by using widget.toggle…

Wow, how did I miss that? I should have more faith that Decker provides the kinds of features I’m looking for.

If you’re frequently changing the set of widgets affected, it might also be worth considering a data-driven approach…

Oooh, I shall do exactly that!

And in principle, with a somewhat different contract, you could even lift the toggling up to the tabstrip itself…

That did occur to me, but it wasn’t clear to me that a script could reach outside the contraption to toggle the visibility of other widgets on the card. If I have to write an event handler on the target card anyway, it’s already pretty easy, and you’ve just made it easier! And, as you note, this way it can be useful for things other than just toggling widgets, like an alternative to radio-button groups.

(1 edit) (+2)

Memory Watcher

This contraption shows a log of Native Decker’s memory usage. I thought Decker was using a lot of memory, but it turned out that I just didn’t understand how it was supposed to work, and studying this helped me figure it out.

image.png

The graph scrolls to the right, so the newest data is on the left. The height of the graph represents the total size of Decker’s heap (which is given as a specific number in the caption at the top). The black lines represent how many allocations were added on that frame (“allocs” in the caption is the number of allocations in the most recent frame), and the dithered portion represents how full the heap is.

In the screenshot above, you can see the heap was pretty empty, then I did some things that created a lot of allocations, and the heap filled up. When it gets above 90% or so, Decker cleans up all the unused allocations, freeing up space to do more allocations in future.

The lesson I learned is that it’s better to do lots of small memory allocations over several frames than one big memory allocation, especially if there’s a chance your big memory allocation might happen when the heap is already quite full. Badly-timed allocations can balloon the heap until it’s 10 times bigger than your allocation, and that can be gigabytes of memory.

%%WGT0{"w":[{"name":"memwatcher1","type":"contraption","size":[199,45],"pos":[182,265],"def":"memwatcher","widgets":{"history":{"size":[199,45]},"lastallocs":{"size":[199,16],"pos":[0,77]},"lastheap":{"size":[199,16],"pos":[0,93]},"label":{"size":[199,45]}}}],"d":{"memwatcher":{"name":"memwatcher","size":[96,96],"resizable":1,"margin":[2,3,5,3],"description":"A live-updating log of Decker's memory usage.\n\nThe dithered area represents how full Decker's heap is, the solid area represents new allocations on that frame.","image":"%%IMG2AGAAYABQAQEA/wD/AP8A/wD/AP8A/wD/AP8A/wD/AP8A/wD/AP8A/wD/AP8A/wD/AP8A/wD/AP8A/wD/AP8A/wD/AP8A/wD/AP8A/wD/ANI=","widgets":{"history":{"type":"canvas","size":[96,96],"pos":[0,0],"locked":1,"animated":1,"volatile":1,"script":"on view do\n # Extract values we'll need a lot\n lheap:0+lastheap.text\n cheap:sys.workspace.heap\n lallocs:0+lastallocs.text\n callocs:sys.workspace.allocs\n clive:sys.workspace.live\n cw:history.lsize[0]\n ch:history.lsize[1]\n\n\n # If the heap size has changed,\n # scale the histogram\n i:history.copy[0,0 history.lsize]\n if cheap > lheap\n  i:i.scale[1,lheap/cheap \"bottom_center\"]\n end\n\n # Scroll the histogram along\n history.clear[]\n history.paste[i (1,0) 0]\n\n # Draw a stipple for how full the heap is\n barh:ch*clive/cheap\n history.pattern:12\n history.line[0,ch 0,ch-barh]\n\n # Draw a solid line for how much was allocated this frame.\n barh:ch*(callocs-lallocs)/cheap\n history.pattern:1\n history.line[0,ch 0,ch-barh]\n\n label.text:\"heap:%i allocs:%i\" format cheap,callocs-lallocs\n\n lastheap.text:cheap\n lastallocs.text:callocs\nend","scale":1},"lastallocs":{"type":"field","size":[96,16],"pos":[0,128],"volatile":1},"lastheap":{"type":"field","size":[96,16],"pos":[0,144],"volatile":1},"label":{"type":"field","size":[96,96],"pos":[0,0],"locked":1,"volatile":1,"show":"transparent","border":0,"style":"plain","align":"right"}}}}}

Hello, I would like to ask a question. I apologize for not being able to understand the content in the "Path" tutorial. It is difficult for me, but I still want to use this plugin to add some interactivity to my visual novel. I want to make it so that when the character moves to different locations, different events and endings are triggered. I would really appreciate a straightforward video tutorial that teaches me how to use the "Path" plugin to create an interactive map. I am looking forward to your guidance, thank you very much.🥰

Viewing posts 35 to 37 of 37 · Previous page · First page