
IM SO GIGGLY RIGHT NOW HE'S PRECIOUS. This voice acting is so good dude, he's so silly!!!
A member registered May 25, 2023 · View creator page →
Creator of
It's menu time baby!
Let's see what these relationships can do!
Recent community posts
Ren'Py Relationship Menu [Beginner Friendly!] comments · Replied to GameVoidfromMC in Ren'Py Relationship Menu [Beginner Friendly!] comments
Make a folder inside of your "game" folder and name it fonts. When you have your font folder, place your font files in there!
Then go into the script and find the line "style relationmenustyles:" and beneath it add the line:
font "fonts/nameofyournewfont.ttf"
Like so:
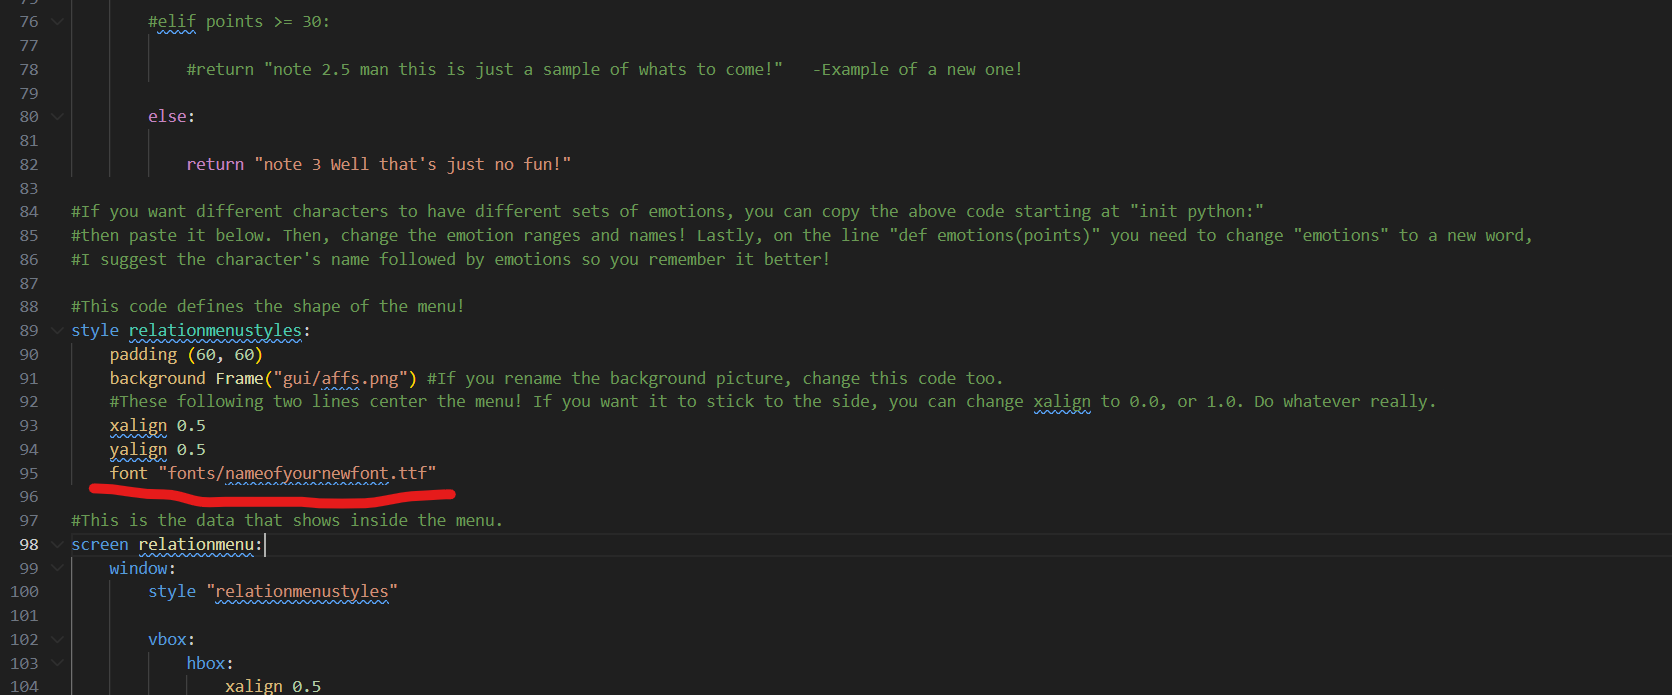
And that should do it! Follow up if you have any questions!
Ren'Py Description Menus (Beginner Friendly!) comments · Replied to laura_drawzz in Ren'Py Description Menus (Beginner Friendly!) comments
Sorry I'm late, I haven't been checking my inbox!
The easiest way to change it is to swap out the default font your game is using, this will change the font everywhere. There's a video that shows you how to do this in this link!
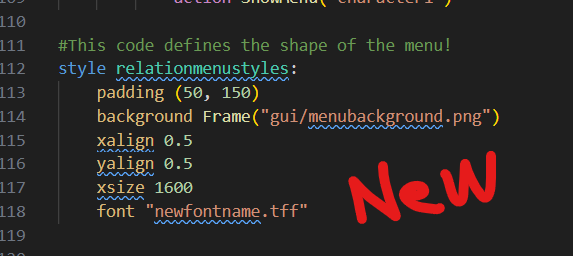
If you want to SPECIFICALLY have the font in the menus changed, and ONLY the menus, we can add a style rule to them! Follow the video I linked above to create a folder with fonts in it! Instead of changing gui script, go into the script from this plugin and look for where the styles are defined (the lines in the picture)! Then you just want to add "font "newfontname.tff" " in it! Like so: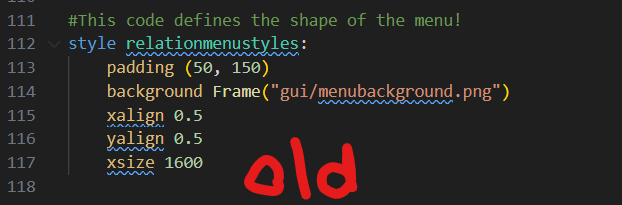
And that should get you where you need to go! Let me know if there's any problems!
Ren'Py Description Menus (Beginner Friendly!) comments · Replied to Fearling in Ren'Py Description Menus (Beginner Friendly!) comments
First you want to make a variable for whether you met the character. You would add code like this in the area where the variables are defined:
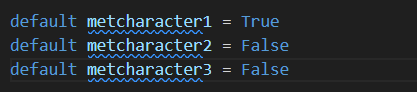
You should always leave a character set to true so the menu isn't empty! This will determine whether a character shows up in the menu, so when you're writing the script you can add the line $ metcharacter2 = True to make them show up! Alternatively you can make it False to hide the character again.
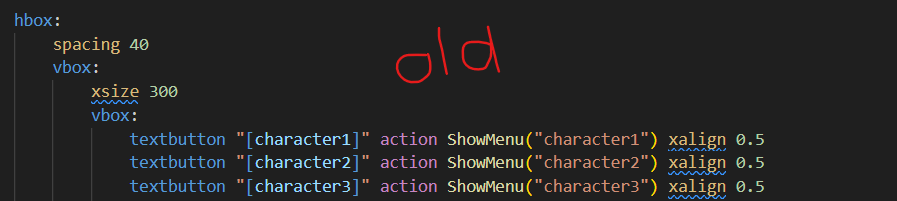
Then you need to set up the list inside of each menu. Just slap them into some if statements!
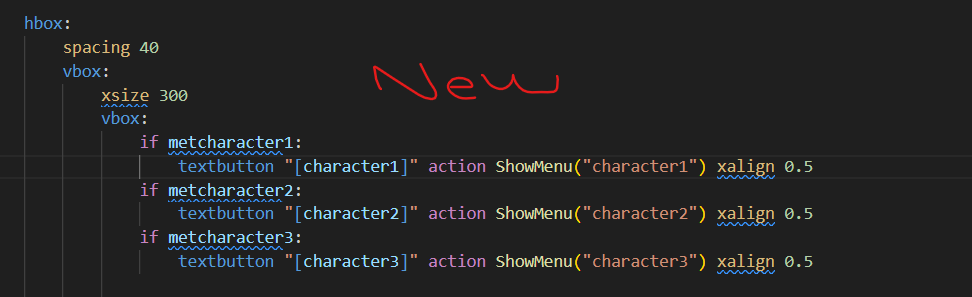
The list is different for each screen, so ensure you make this change on each screen so everything is consistent. This should be ready and working after that!
But remember there's always the option to just make the menu appear later on in the game after people are established too. You don't have to add the line "show screen onscreenmenubutton" at the very start of the script! I've always liked the idea of setting the name as "?" until you meet the character too! If something is unclear please follow up, good luck!
Ren'Py Description Menus (Beginner Friendly!) comments · Replied to aldriix in Ren'Py Description Menus (Beginner Friendly!) comments
 It would be the same process we use to make the description scroll! All you need to do is put the characters inside a frame and add the scroll+drag properties!
I'll show some pictures of my code so you can see what to change! You must make this change for every separate character screen, so you'll likely need to copy+paste it in each!
frame:
ysize scrollframeheight
has viewport:
draggable True
mousewheel True
vbox:
textbutton "[character1]" action ShowMenu("character1") xalign 0.5
textbutton "[character2]" action ShowMenu("character2") xalign 0.5
textbutton "[character3]" action ShowMenu("character3") xalign 0.5
textbutton "[character4]" action ShowMenu("character4") xalign 0.5
textbutton "[character5]" action ShowMenu("character5") xalign 0.5
textbutton "[character6]" action ShowMenu("character6") xalign 0.5
textbutton "[character7]" action ShowMenu("character7") xalign 0.5
textbutton "[character8]" action ShowMenu("character8") xalign 0.5
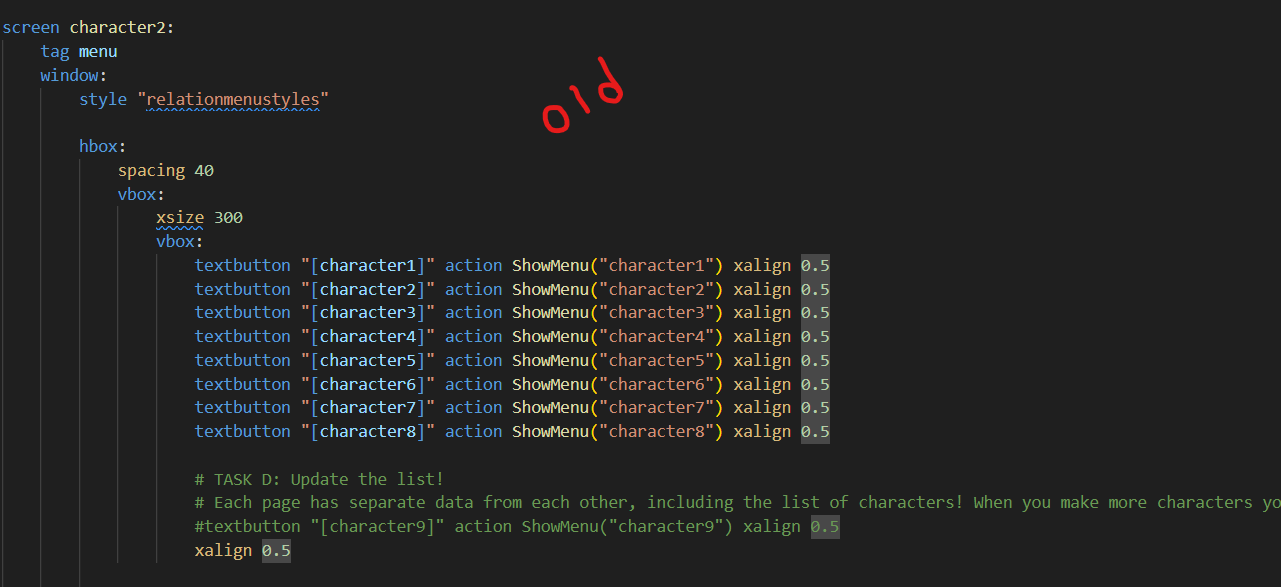
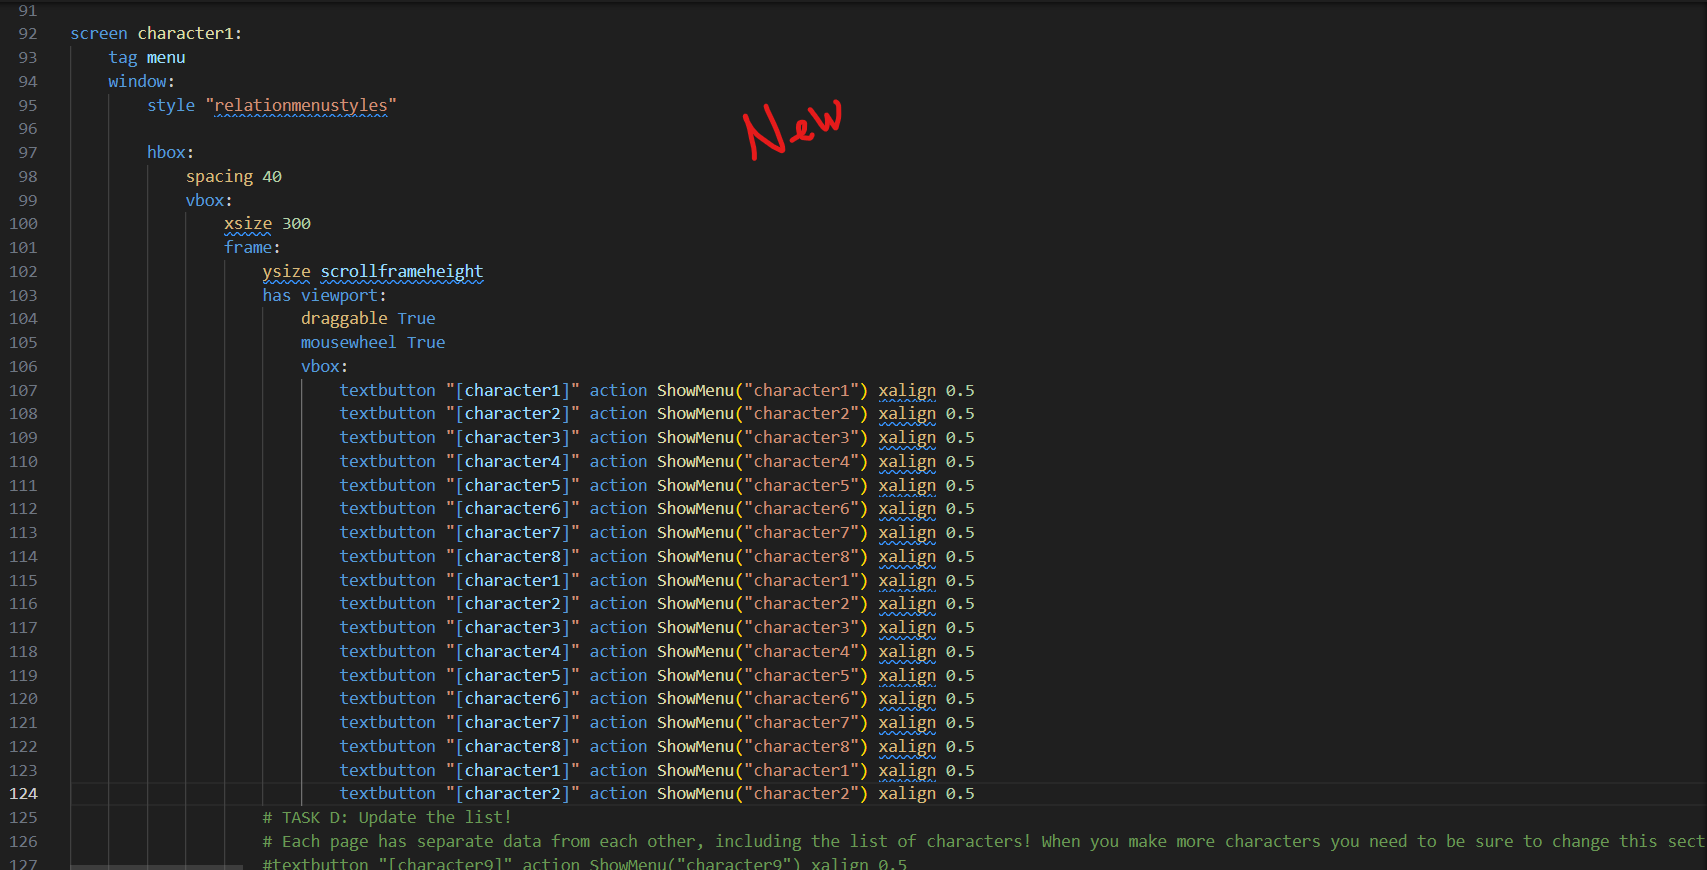 Be cautious the indentations match if you paste it directly in!
Also the frame's border bothers me, so you can add this line of code to remove it if you'd like.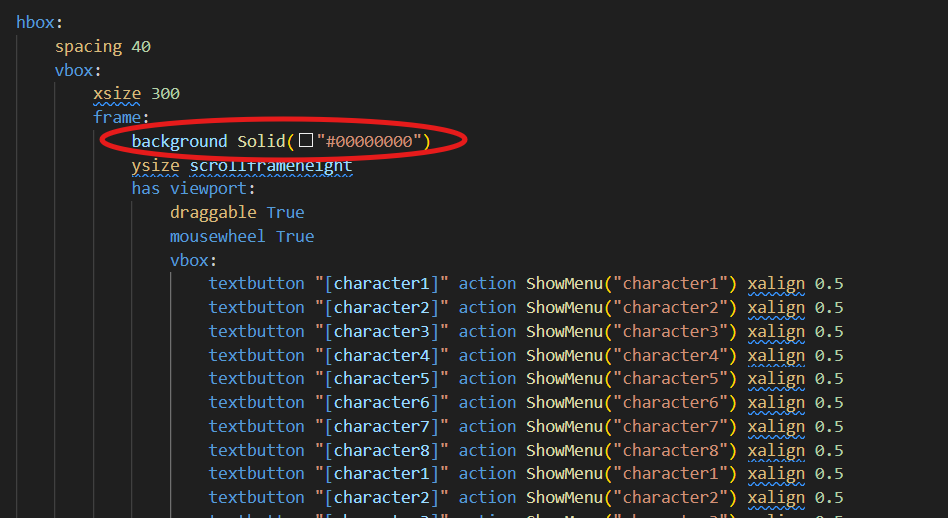
Good luck!!!!!
Ren'Py Description Menus (Beginner Friendly!) comments · Replied to aldriix in Ren'Py Description Menus (Beginner Friendly!) comments
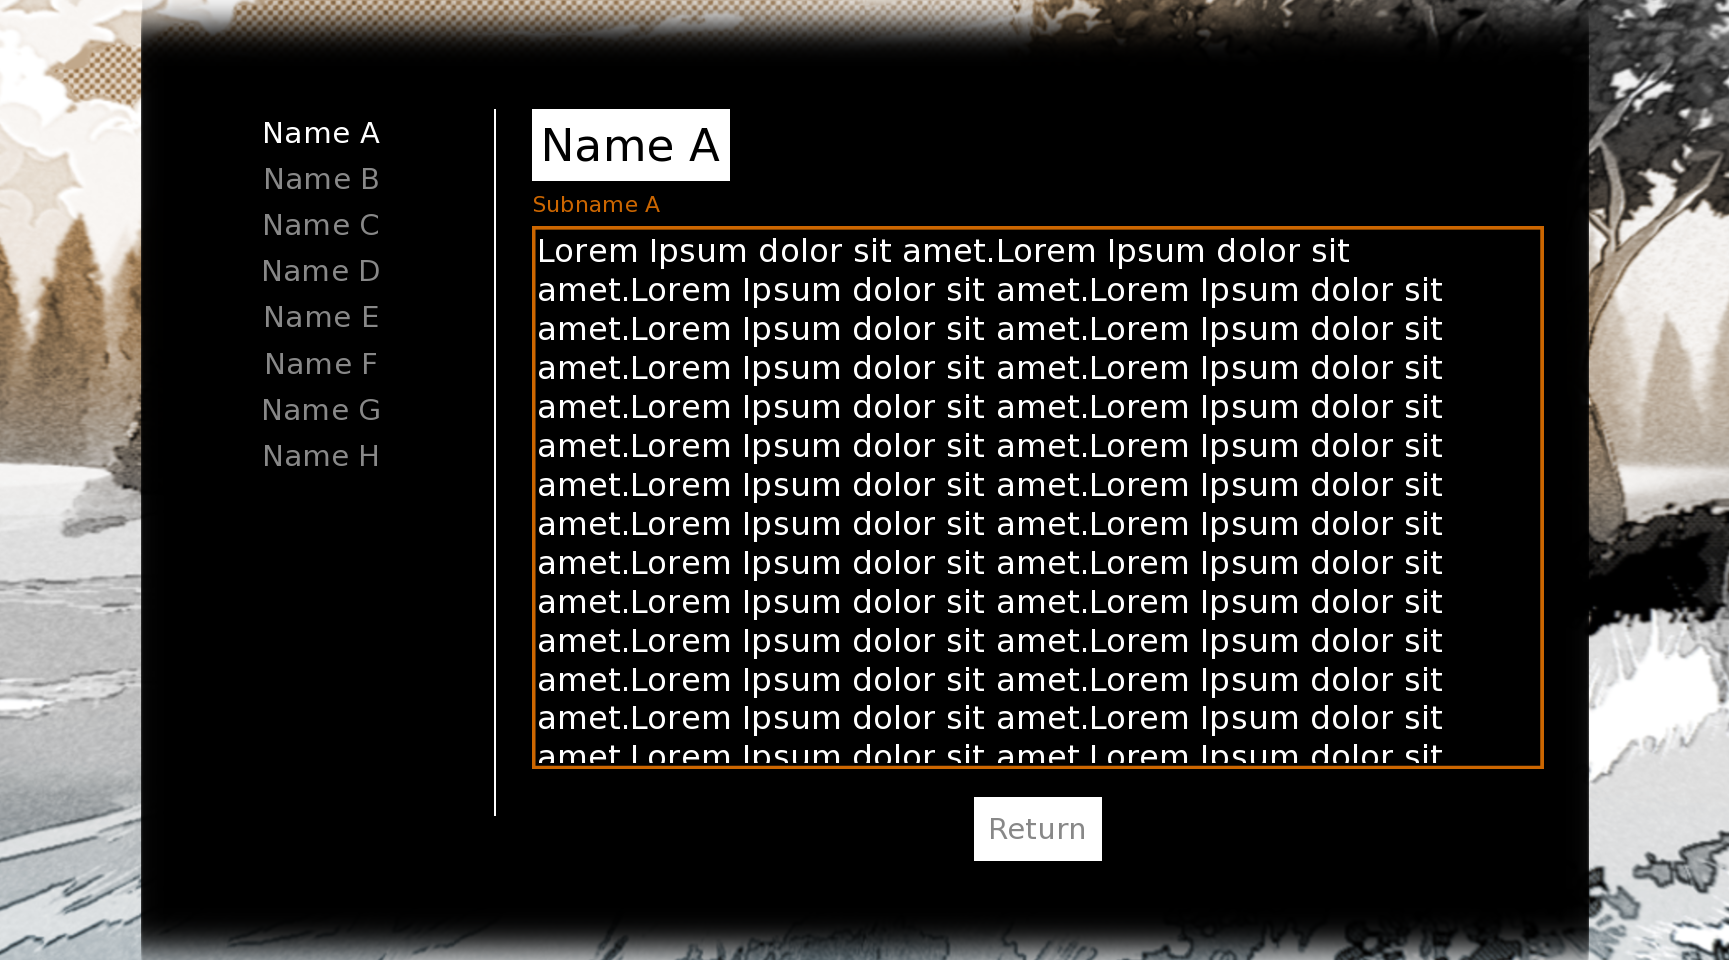 Yes yes the column part is a very simple change, the way I have it is that the portrait and the description are within an hbox, which displays them next to each other, you just delete the hbox and the portrait line of code to remove the icon, and you also need to delete the line that constrains the xsize of the description so it will naturally fill the box! The overflow scrolling is something I haven't done much before, but basically you just add the text inside of a frame and add the properties draggable and scrollwheel!
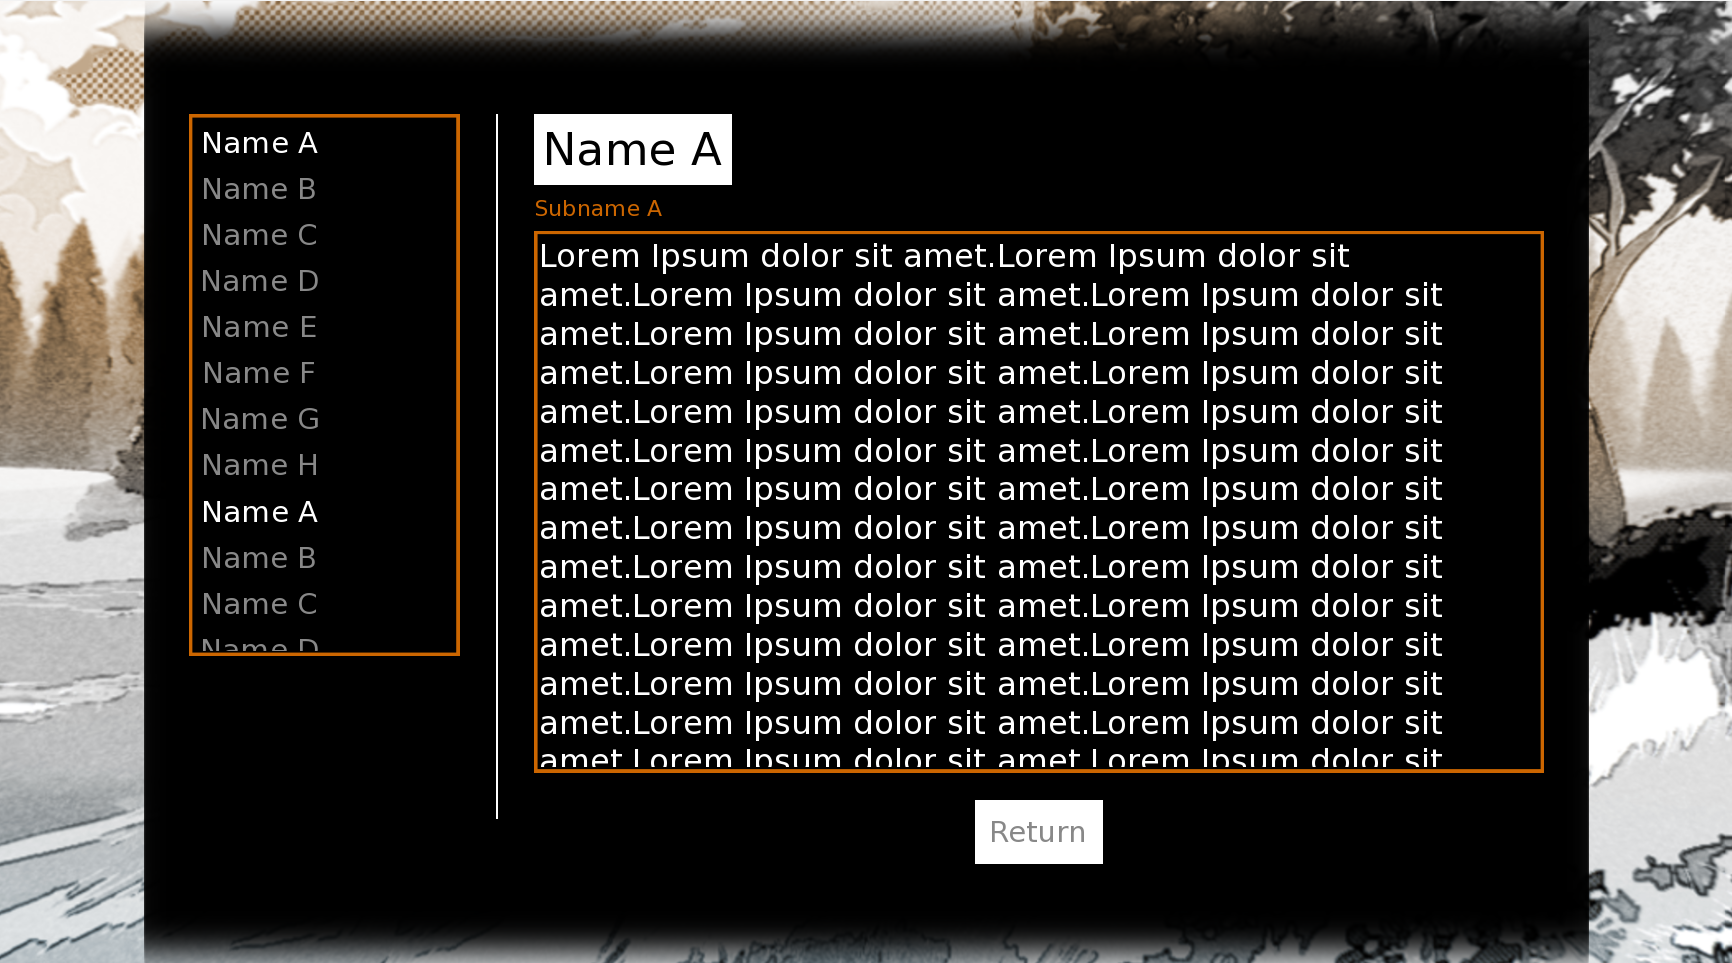
In example, each character profile has a line that says #layout starts and #layout ends, between these you can paste this code:
vbox:
spacing 10
frame:
background gui.selected_color
padding (10, 10)
label "{color=#000}{size=50}[character1]{/size}"
label "{color=[gui.accent_color]}{size=25}[character1title]{/color}"
frame:
ysize scrollframeheight
has viewport:
draggable True
mousewheel True
label "{color=#fff}[character1description]"
vbox:
frame:
background gui.selected_color
padding (10, 10)
textbutton "Return" action Return() xalign 0.5 #You can uncenter the return button by removing "xalign 0.5"
xalign 0.5
And that should get you where you're trying to go! I made a new layout code and posted it on the download page for you if you want to pop that in and give it a try, it'll save you the effort of renaming all the stuff and whatnot!
Let me know if you come across any errors or if something doesn't make enough sense, good luck!
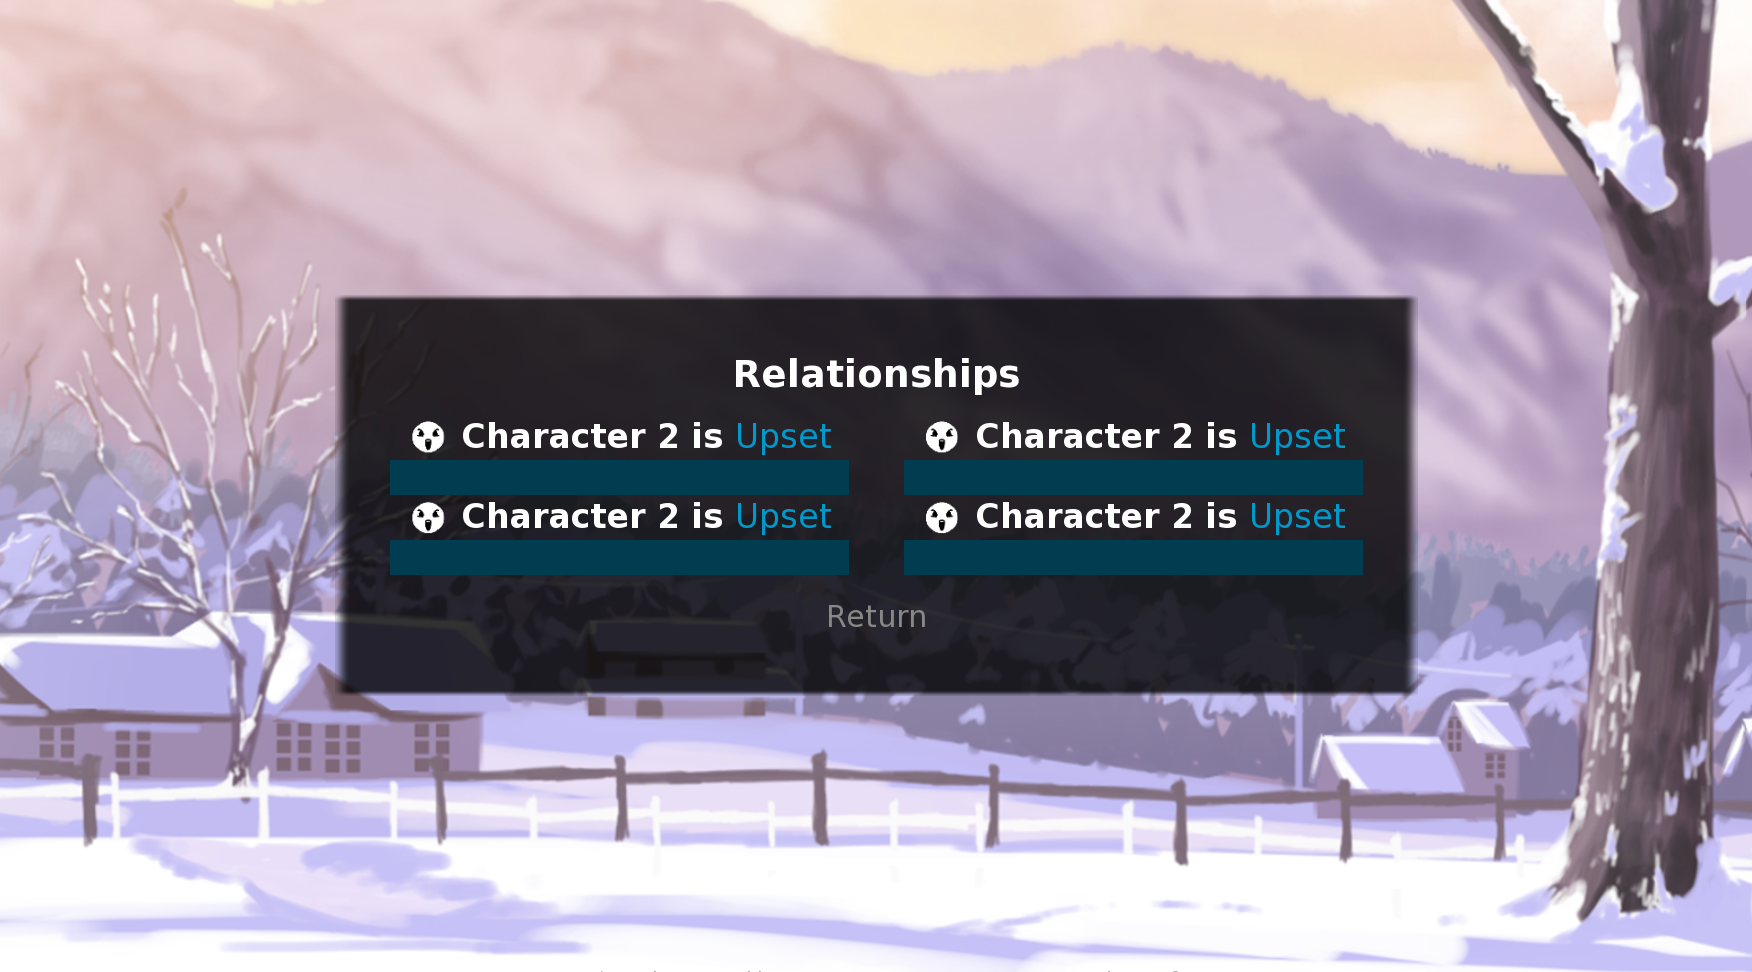
Ren'Py Relationship Menu [Beginner Friendly!] comments · Replied to hghrules in Ren'Py Relationship Menu [Beginner Friendly!] comments
Absolutely possible, all you really need to do is place each column into a vbox, and place the vboxes into and hbox so they show side by side. It would look something like this:
hbox:
spacing 60 # this is how far apart the bars are
xalign 0.5 # centering :3
vbox: #each of these vboxes represents a row. copy and paste everything inside of this for more, but make sure it stays within the hbox and stays outside of the vbox of the previous column
xsize 0.5 #should make the row take up half of the container horizontally. Making this larger will make it wider.
#this is the start of a character's bar
hbox:
xalign 0.5
add "gui/icon2.png" yalign 0.5 # Erase this line if you don't have icons
label " {b}{color=#fff}[character2] is {/b}{/color}[emotions(character2affection)]" yalign 0.5
hbox:
xalign 0.5
bar range maxpoints value character2affection xmaximum 500
#this is the end of the bar, copy and paste above code for more bars! make sure it stays within the vbox or the rows might look funky
The comments on this one aren't my best work I'm tired _(-ω-`_) . Let me know if it doesn't work, or if something is hard to understand. Good luck!
Ren'Py Relationship Menu [Beginner Friendly!] comments · Replied to l i s h ! in Ren'Py Relationship Menu [Beginner Friendly!] comments
Don't worry about buggin me! I'll try my best to help you out here!
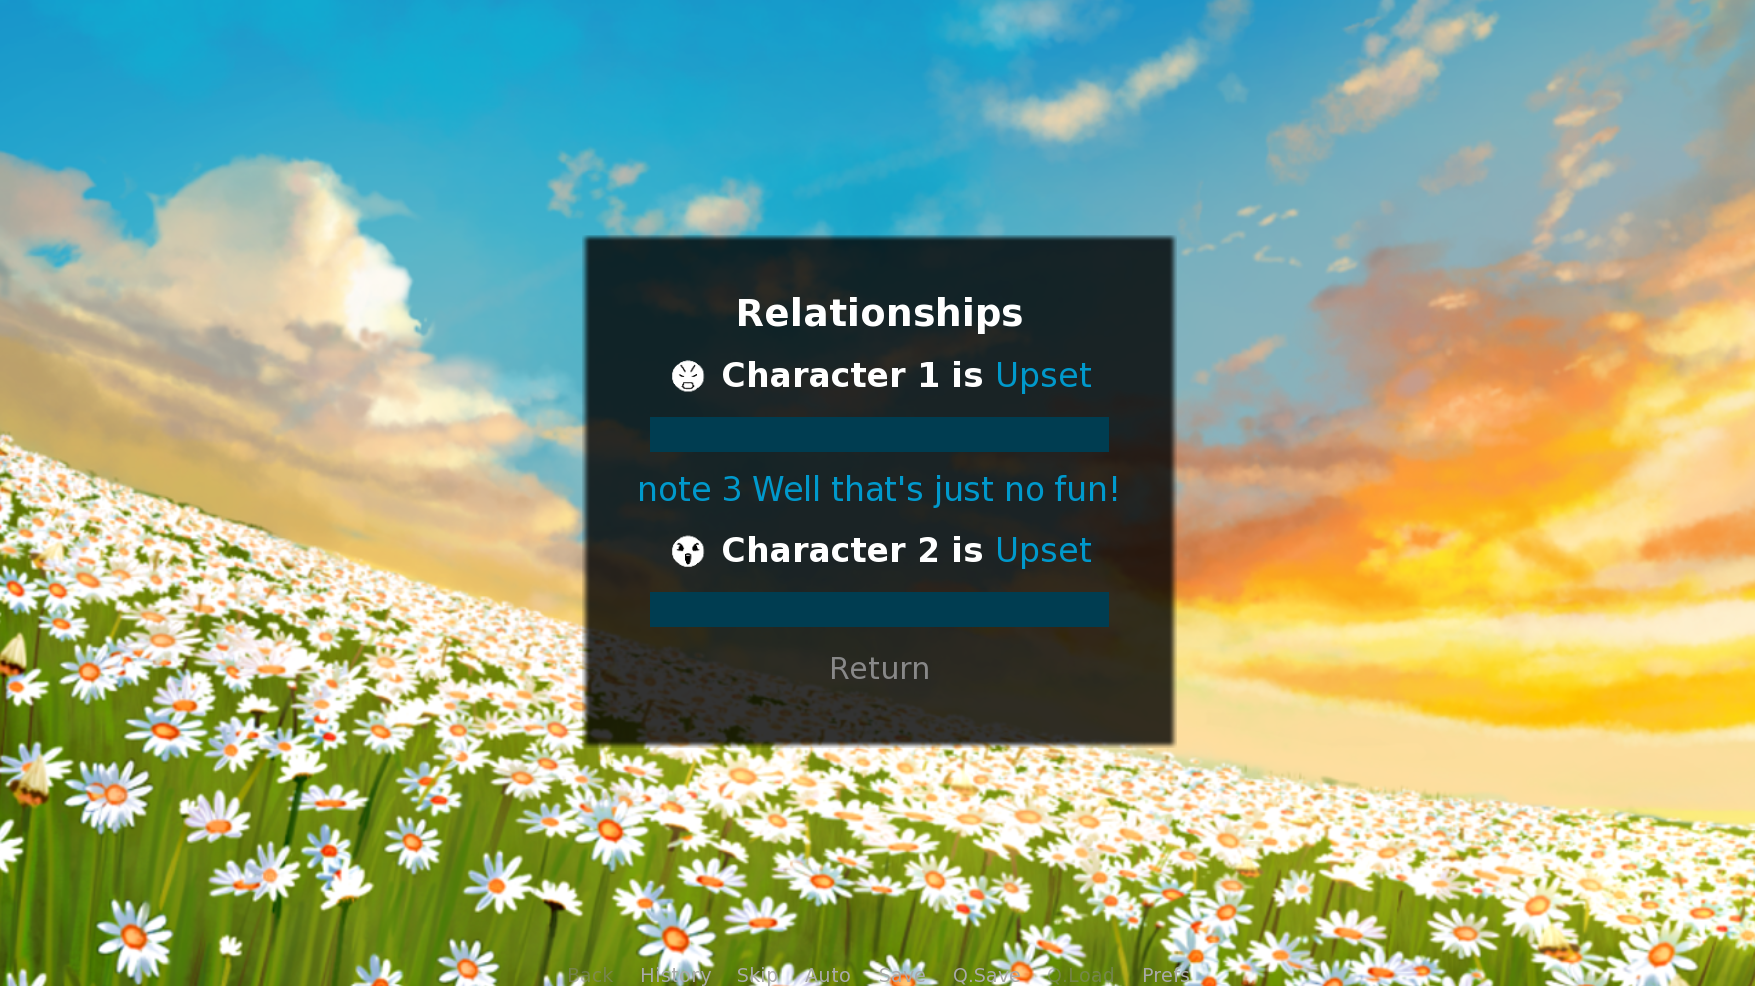
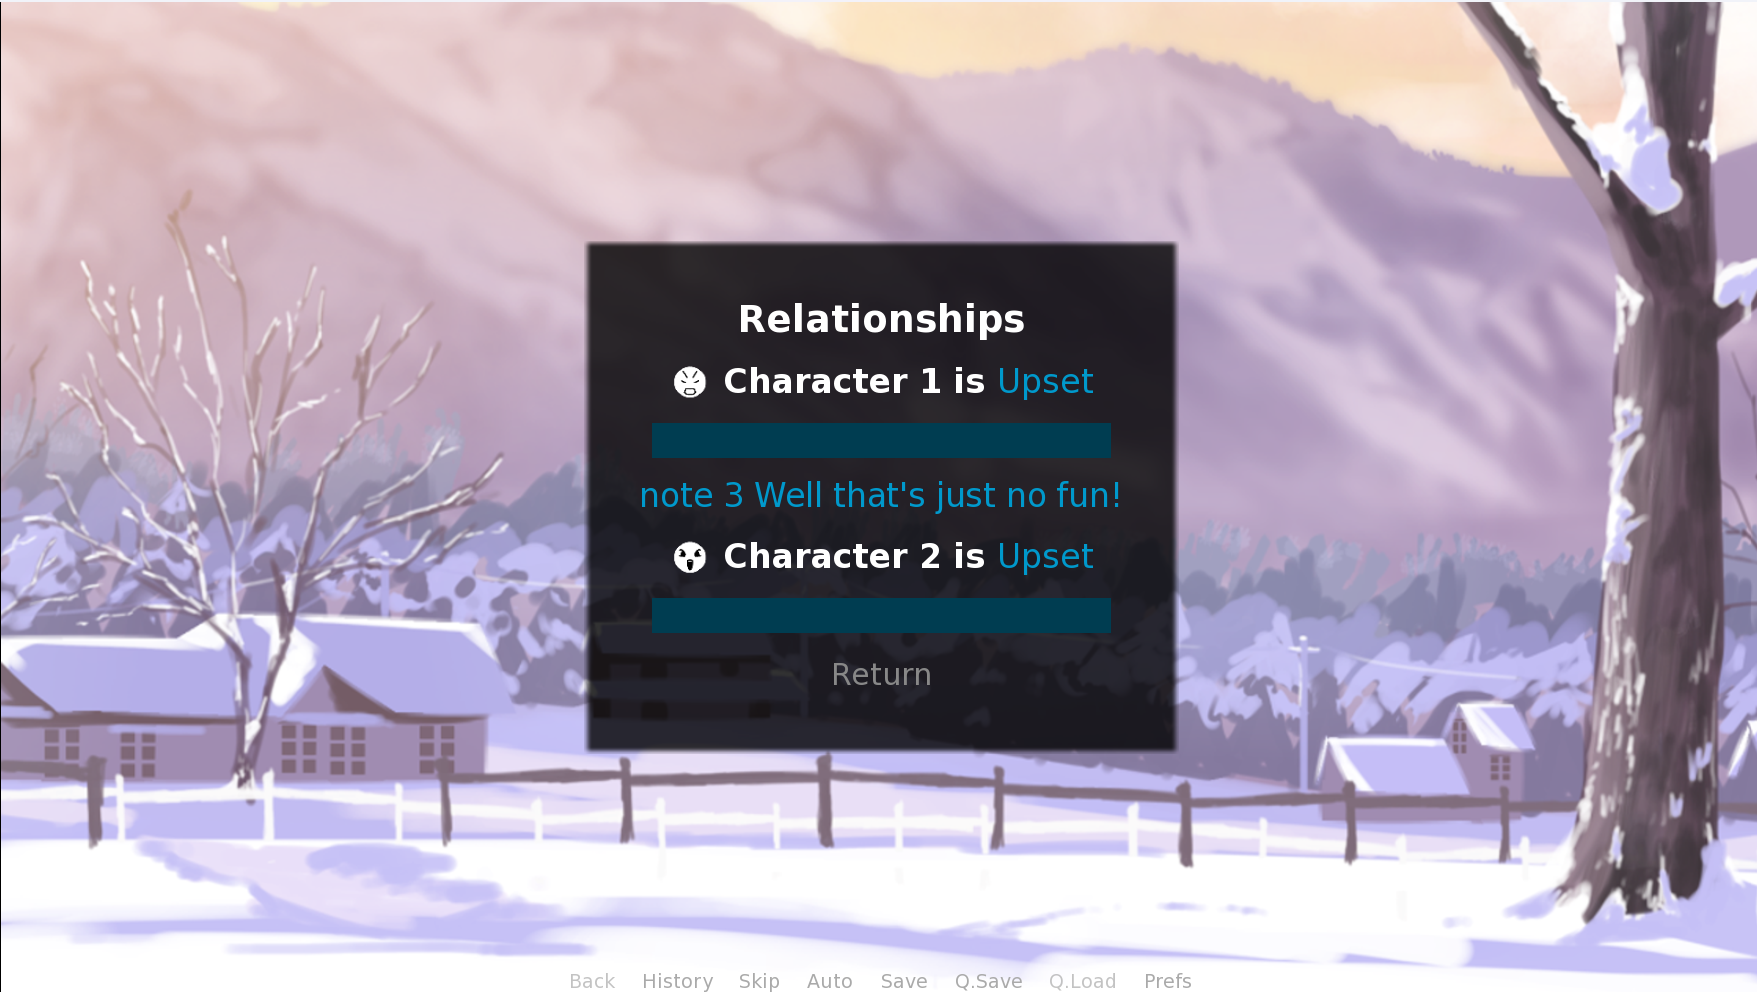
First of all, to make changing comments, you could probably reuse the code that sets the emotions. Add this code to define what the notes actually are:
---
init python:
def notes(points): #change "notes" to charactername1notes then duplicate these for different characters to have different notes!
if points >= 80:
return "note 1This character is babababababababa and abababifeifuneifune and boom!!!"
elif points >= 40:
return "note 2 GAAAAAH NOOOO THE ALIENS INVADED!!!! RUNNNNNNN!!!!"
#elif points >= 30:
#return "note 2.5 man this is just a sample of whats to come!" -Example of a new one!
else:
return "note 3 Well that's just no fun!"
---
You can put that anywhere, but it's best to put somewhere around the one that sets the emotions for organization's sake. Then we need to add the text underneath the bar!
There is a section where two hboxes are grouped together containing the character' s name and the relationship bar beneath it. All you need to do is paste the following code beneath them, make sure it' s not inside the other hbox though!
hbox:
xalign 0.5
label "[notes(character1affection)]" yalign 0.5 #If you changed the "notes" name earlier, you change it in this line as well. remember to also change the character's name too!
ALTERNATIVELY, if you want to manually change all of the notes, like if something happens in the story and you want their page to comment on how they feel about it, you can avoid adding the first chunk of code i put, and inside the second chunk you change the line with the label in it to:
label [notevariable]
Then you need to define notevariable, you can put this line somewhere at the top of your script.rpy file. This is the first thing it will say:
default notevariable= "Note 1"
Then whenever you want to change it you write this in the script :
$ notevariable= "this is a new note"
And if you want characters to have different notes, you always make a new variable for them and change "notevariable" to something like "character1notes"
And that should give you custom comments beneath the bars!
If you want the background to change when you open the menu as well (which is what I gathered from what you said ;u;) you can add a line to add a background when the screen opens. Use Ctrl+f to find this line "screen relationmenu:" and then add this code the line directly below it:
add "snow"
Where "snow" is the name of an image inside your game's images folder. If the image doesn't fit right, you can manually resize it to fit the dimensions your game is in.
Hopefully that works out right, if you have more questions I would be delighted to answer them! I was in a similar position once so I'm super glad you find use in this!