Indie game storeFree gamesFun gamesHorror games
Game developmentAssetsComics
SalesBundles
Jobs
Tags

codeguppy

8
Posts
7
Topics
5
Followers
1
Following
A member registered Nov 16, 2019 · View creator page →

Creator of

Recent community posts


Hello community,

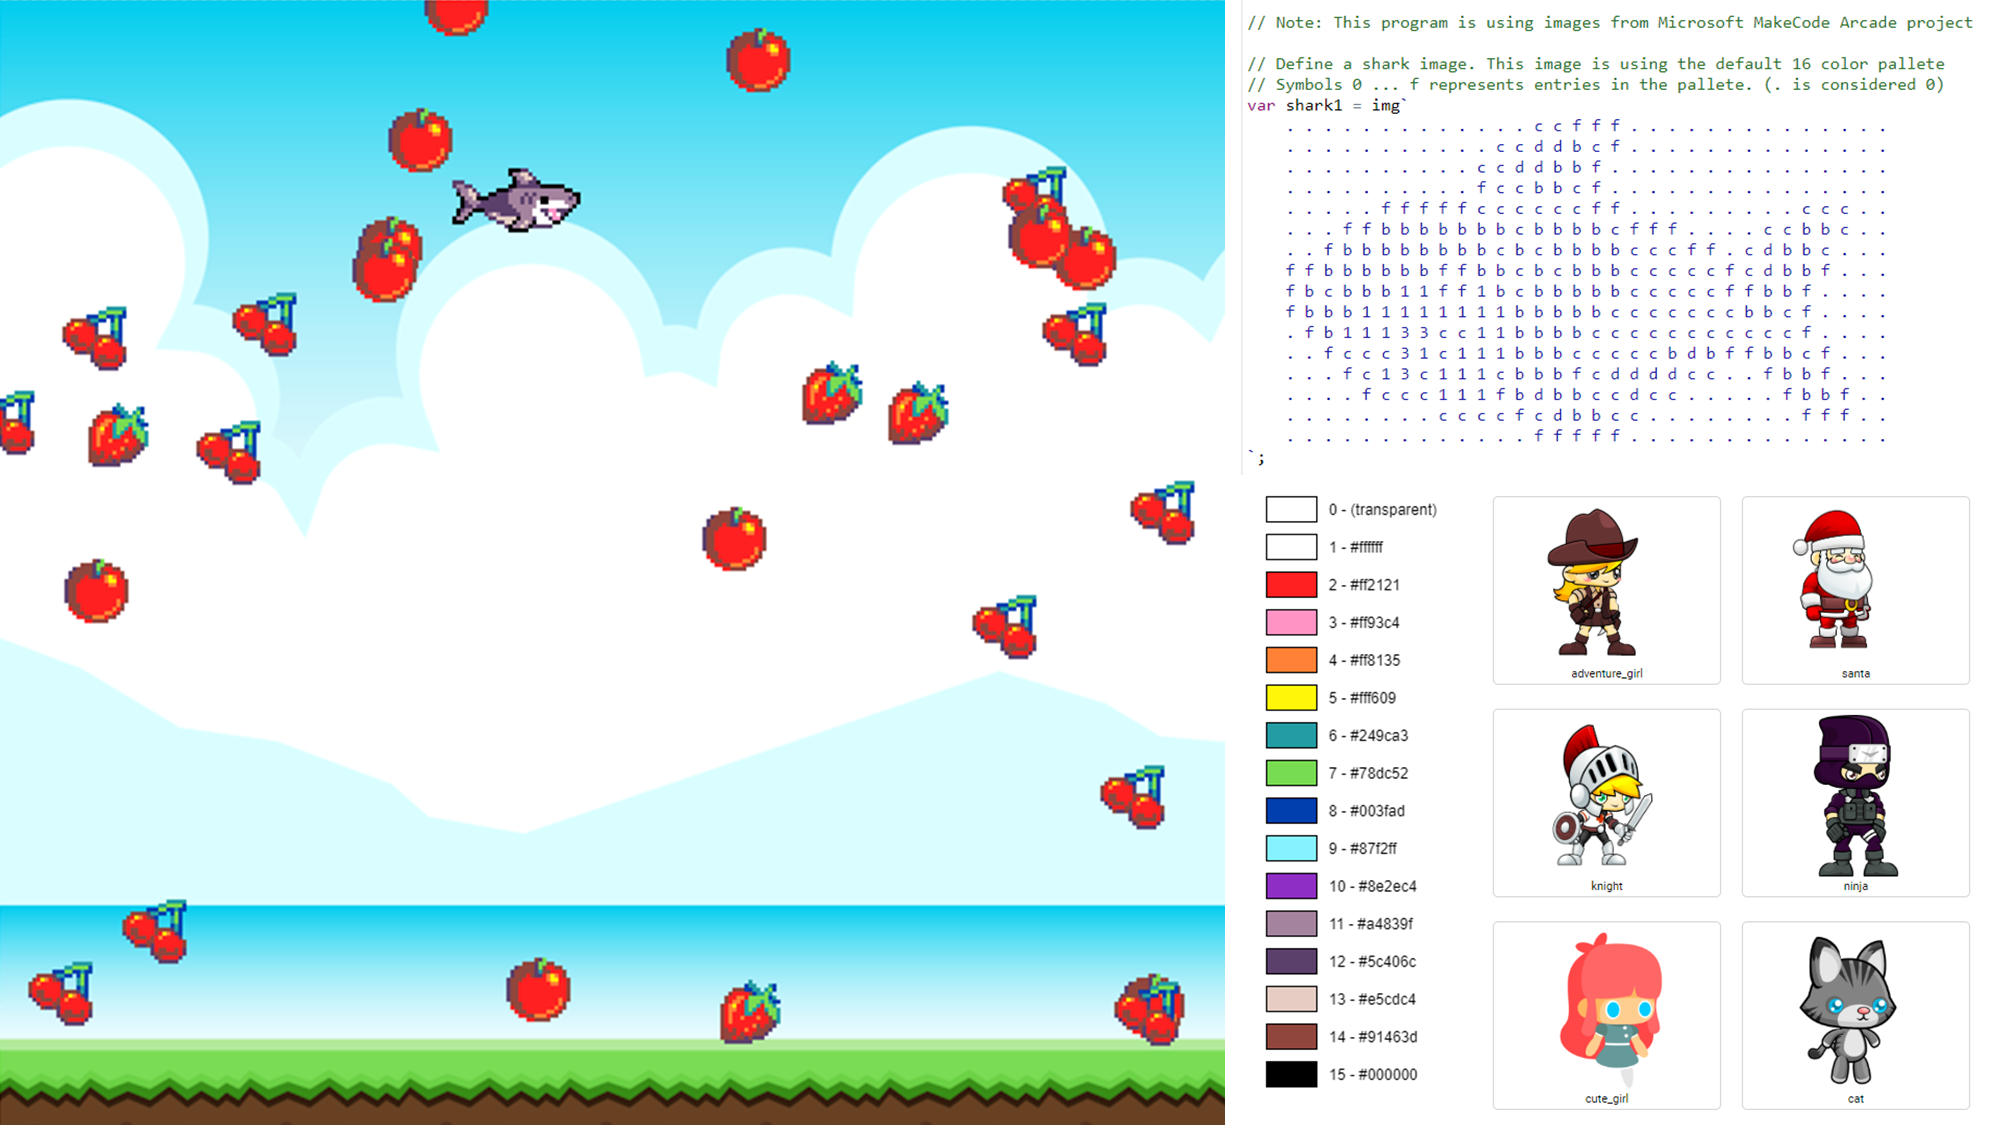
CodeGuppy.com had until now only built in sprites. Right now you can define custom sprites directly in the code using the Microsoft MakeCode Arcade format like this:

https://codeguppy.com/code.html?t=fruits

What mini-games do you imagine can be built with this kind of feature? Even better - if you get the chance to build something nice in this way in codeguppy.com please share.

Thanks in advance,

Adrian

propCog: you won the https://itch.io/jam/codeguppycom game jam. Please contact @codeguppy on Twitter for further details.

Dear all: Please let us know if we should host another codeguppy.com game jam for beginners (with prizes). Thanks all for the feedback!

propCog: Thank you for your submission. You won the codeguppy.com game jam. Please contact @codeguppy on Twitter for further details.

Hello itch.io community,

I just created my first game jam with prizes intended mostly for beginners:

https://itch.io/jam/codeguppycom


Your feedback if highly appreciated 🙂

I want to present you codeguppy.com - a *free* website that is encouraging beginners to build their own games using the provided assets and an integrated JavaScript coding editor.

There are several projects included as example.

Currently codeguppy.com allow sharing games via a link. Do you think should include also an export to itch.io? Your feedback is highly appreciated.


To build multi-scene games with codeguppy.com just create a new code page.

There is a simple API that allows you to show the appropriate scene:

https://www.youtube.com/watch?v=ngU5X6fFwak

codeguppy.com comes with all assets available and ready for use.

Just drag and drop them in your code:

https://www.youtube.com/watch?v=tCybjn2HC8k

To see this tutorial in an interactive way check: https://codeguppy.com/code.html?t=_p5


What is CodeGuppy?


CodeGuppy.com is an online environment where kids, teens and creative adults learn and practice JavaScript via creative coding.

CodeGuppy is based on the popular p5.js framework with a few modifications. This article tries to present the differences between CodeGuppy and p5.js for users that have already p5.js / Processing experience.


Online environment

With CodeGuppy there is nothing to install. You get straight to coding. The popular p5.js and p5.play libraries come included with CodeGuppy.

Because CodeGuppy is an online environment, users can use any HTML5 compatible browser with CodeGuppy. Windows, Mac and Chrome based computers are all perfect for CodeGuppy.


No setup()


Users familiar with p5.js know that one of the first functions they have to define in their sketch is the setup() function.

With CodeGuppy the p5.js setup() function is no longer required. It will be ignored if you try to define it. As an educational environment, CodeGuppy does a few decisions automatically for the program in order to simplify coding for beginners.

CodeGuppy automatically initiate the canvas to 800x600 resolution.


Gentle introduction to programming

In a typical p5.js sketch, the users are typically typing their own code after at least setup() function is defined.

Since there is no need to define the setup() function in CodeGuppy, students can learn programming in a progressive way.

Functions can be introduced later in the curriculum, once the basic knowledge of JavaScript is assimilated.

Enriched drawing API


CodeGuppy enriches the p5.js drawing APIs with a few new functions that are easier to use and understand by young coders.

For example: circle()


CodeGuppy defaults


CodeGuppy changes a few of the p5.js defaults to different values.

For instance:

  • -There is no fill color defined upon program initialization. Try to draw a few shapes and you’ll see that they are transparent
  • -The default angle mode is changed to DEGREES. p5.js sketches uses RADIANS as default.
  • -Backgrounds
  • -Sprites
  • -Music
  • -Sound effects
  • -Collidingcirclecircle


5 layers

CodeGuppy programs use up to 5 layers:

  • Background
  • sprites with depth <= 0
  • drawing layer
  • sprites with depth > 0
  • HTML widgets

The background layer is drawn at the bottom, and the objects from all the other layers are added on top.


Setting the background

The background() function operates in the background layer.

The function has also been enriched to accept more values as parameters. For instance, background() can be used with a color or a static background from the assets library.

Note: Because background() operates on the bottom layer only, you cannot use this function to erase the drawing layer inside the loop() event. For that purpose you need to use clear() as explained later.


Type-in programs

With CodeGuppy, type-in programs are back! Popular in the 70s and 80s, type-in programs were small programs included in magazines or other printed materials that required users to enter them from the keyboard.

Although this method of entering programs is not very time efficient, it is very good in educational terms. Users that type in programs gets comfortable much quicker with the language and eventually learn to program much faster.

Afterall, coding is all about typing programs using the keyboard.


How CodeGuppy enables type-in programs? Very simple: all assets and libraries come included! Users don’t need to focus on project organization or asset management. They only need to open the code editor and type the program.


Built-in assets


CodeGuppy comes with assets built-in. This allows users to focus on writing code, rather than organizing projects or managing assets. This is what enables “type-in” programs as mentioned before.

There are four groups of assets. Each asset has a unique name.

The following CodeGuppy functions can work with assets. They receive as argument the asset name.

  • -background()
  • -sprite()
  • -music()
  • -sound()

Because assets need to be pre-loaded before the program is executed, the CodeGuppy environment is parsing the code prior to execution to identify what assets are used by the program in order to load them.

In most cases users use static names with these functions. If variables are used instead, CodeGuppy won’t be able to figure the used assets. In that case users have to call the preload() function as explained later.


Games and Animations

The most popular way of building games and animations is by implementing the “game loop” pattern. In p5.js sketches, the game loop is implemented via the draw() function.

In CodeGuppy, this function is named loop() instead of draw(). If you’re porting p5.js sketches to CodeGuppy, make sure you rename your draw() function to loop().

Also – since the background() effects are visible on the bottom layer only, you cannot use background() calls inside the loop() to clear the screen. Instead you need to call clear()


Sprites

CodeGuppy comes with a library of pre-selected sprites. Many of the included sprites are animated. The CodeGuppy runtime takes care of proper animation display by leveraging the p5.play library.

However, for ease of use, a few functions and extensions are built on top of this library.

To load and display a sprite, you only need to call the sprite() function, passing as argument the sprite name.

You can also specify, the size of the sprite, the animation that you want to display and the position on the screen where you want the sprite to be initially displayed. You can obviously change these later.


Multi-scene games

Scene management is a common topic when building games. Even the most basic games have at least three scenes: an intro scene, the main game scene and the credits scene.

With CodeGuppy, beginners can quickly build these multi-scene games without having to worry about the details of scene management.

The editor itself places each scene in a separate code page. You can define as many scenes as you want. Upon execution the first scene code is executed. To switch the scene, you can use the friendly showScene() function providing the name of the scene you want to jump to.

You can optionally pass arguments to the new scene you’re switching.


To perform initialization actions when a scene is displayed, you can define an enter() function in each scene. This function will be automatically called when that scene is displayed.


Modules

As presented before, the code pages from the CodeGuppy editor are mostly used for writing code for scenes.

A second use of the code pages is for defining code modules. This usage is intended for advanced coding. Code modules can be used from the rest of the code via the require() function.

Note: the require() function is executing the code of that module upon each invocation.


Support “text-based output” programs

When teaching coding or when building algorithms / math programs it is very convenient to just print the results on the screen.

CodeGuppy allow users to quickly print numbers and strings via the print() and println() functions.

Note: These functions are printing on the top most layer in a dedicated HTML5 transparent area. This area is scrollable in order to accommodate an arbitrary number of rows. Once the printing layer has been displayed, you cannot hide it… therefore you need to decide ahead of time if you need a text-based output or a graphical output for your program.

Note: Since the printing layer is transparent, you can use the background() function to set a fun background for boring programs.


Support “INPUT” programs


If you’re building string processing programs, or even some games, you often need to ask for user input. For instance, to enter a long text using the keyboard.

CodeGuppy provides two very simple APIs to display textbox-es and buttons. The two functions are createTextBox() and createButton(). They operate on the top most layer, therefore they are displayed on top of the graphical canvas.


Other APIs


CodeGuppy contains also other useful APIs that help you easily build games and fun applications. For instance users may find particular useful the APIs for collision detection:


Preloading assets


In majority cases users are using background, music, sound, sprite with static arguments. This allow CodeGuppy environment to determine the assets used by a program and pre-load them automatically.

If however, the user wants to let the code at runtime determine what asset to use, then he must declare all assets used by the program using the preload() function. This can appear in any part of the program although it is recommended to place it at the beginning.