
Right now the square that you setup your hologram scene within is what you set the size of via the export dialogs:
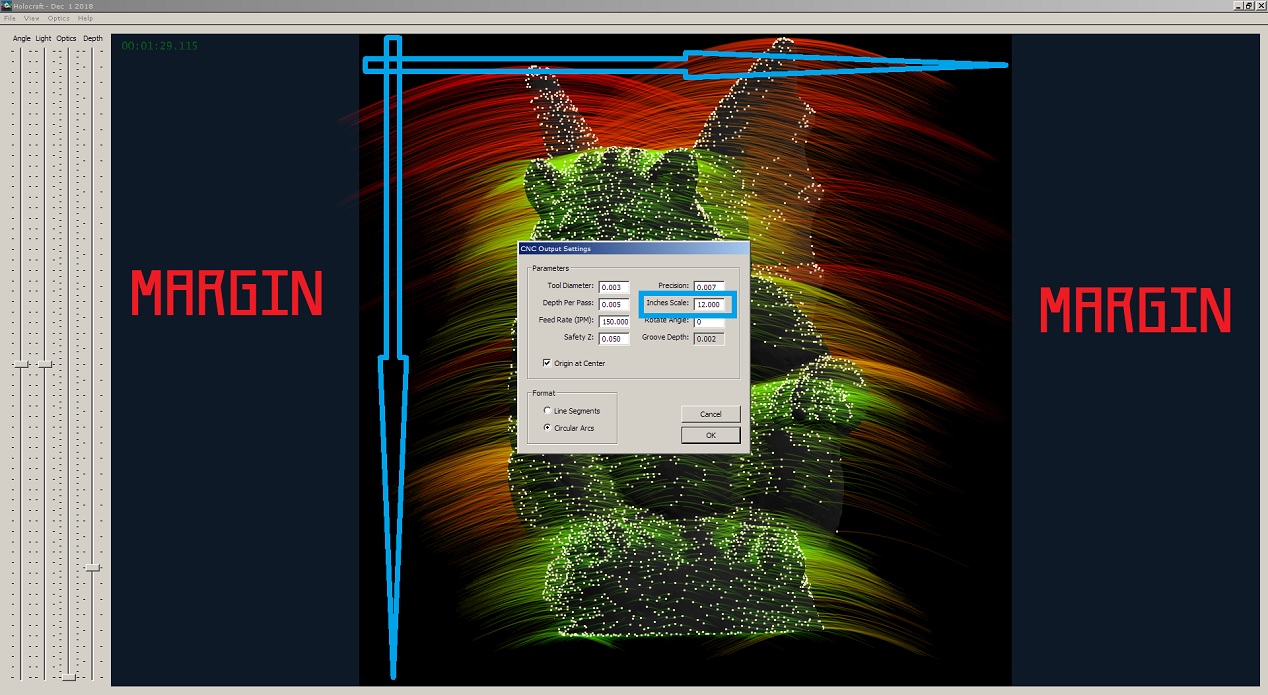
The blue arrows are the extent of your hologram, so you want to keep your optics within there if you're doing a square hologram. Otherwise, if you can extend your hologram horizontally further if you wish, and let your optics overlap into the MARGIN areas. The blue rectangle around the 'Inches Scale' CNC export parameter refers to the length of the arrows denoting the hologram's size, in inches.
Since you set the size of the hologram at export time all you need to worry about is keeping things inside the square, but there's not currently a way to specify a size ahead of time: the hologram-area square has no actual size, so there's nothing for rulers to show if they were there. But, if you want to make a non-square hologram that's wider than it is tall, then just keep all your optics within the top/bottom of the window, vertically, and let your optics extend out into the margins a bit, and then the Inches Scale parameter would just be referring solely to the height of your hologram. Keep in mind though that if you're not using 'Origin at Center' that the bottom-left of your hologram will only be for the square area. A rectangular hologram will not start at the actual bottom-left most corner of your hologram's optics. I personally recommend you use the center origin mode, and then measure the center of your material to zero your CNC at.
I've been trying to hack in a bunch of little things real quick into v2.2a before I upload it, while I have the time today. I'm starting to feel like I should expand Holocraft's model-loading capacity, because right now it's limited to very simple models with low vertex/polygon counts - due to the data structures it precalculates from the model to facilitate fast optic generation. I'm also going to separate the optics slider into two sliders: optic count and threshold, so that if you are in Vertex or Wireframe mode you can adjust the number of optics to squeeze onto a edge line while independently adjusting the threshold at which an edge line qualifies for having any optics created along it at all.
Right now I'm switching over to 64-bit compiler to allow Holocraft to allocate more memory and be able to load larger models (~4x more verts/polys), due to 64-bit EXEs being able to access tons more system memory. I've also changed Holocraft to allocate memory dynamically.
There's some weird thing going on where some models have more than two polygons attached to a single edge spanning two vertices. If I can figure out how to resolve these funky situations (or a model having 50+ polygons to one single vertex!) I can expand it pretty easily to allow for much more complicated models.
Your hologram looks pretty good so far, but I do have some pointers. It looks like your light angle doesn't match the actual incident light angle. The light source's angle changes the 'depth' of the hologram, as far as how much straight above the hologram it's shining in from. You can tell if your light is too high and not out in front of the hologram enough because the object rotates much faster/farther than the actual hologram surface itself. You want to match your light position with what you have your Light slider set to. This changes the vertical steepness of the optic grooves themselves to match the light source, and the holographic effect is much more pronounced when the viewer orientation (or hologram angle) matches the apparent orientation of the geometry being depicted.
Also, if you can find some kind of metal polish (I use one called 'Blue Magic') and put a bit onto a rag, and then just buff the whole surface of the hologram real quick after cutting it you can shine up your grooves and double their brightness really easy. You don't need to buff the whole thing to a mirror shine, just going over it with a rag and some metal polish real quick will clean them up and get brighter glints.
For cutting I took some little pyramid carbide engraving bits (they look like a 3-sided pyramid at the tip, but have a tiny trangle facet on the very tip where the 3 sides meet) and diamond-ground it into more of a very slightly rounded point - getting rid of that triangle facet. A rounded point will produce rounded grooves which can catch the light at almost any angle, maximizing your glints. This took me a bit of trial/error to get right, but basically I just ground the carbide to a point by spinning it in my spindle and put the diamond grinding surface on it. Once it was a sharp point then I just barely rounded it by tilting the diamond sharpener up and over to the opposite side once or twice. You want a super duper tiny diameter.
One last thing: you want to figure out what feed rate minimizes any wobbles you get in your optic grooves. A bunch of pressure and moving too fast or slow on a machine that has some flex can induce little speed-wobbles in the tool as it scores the surface, which produces 'blurry' looking holograms that don't have nice sharp defined glints - because the glints will appear all over the optic in multiple spots.
I'll have v2.2a up within a few hours. I almost want to get some more aluminum sheets and start making bigger holograms now! Maybe I'll throw a few bucks at McMaster Carr as a holiday splurge and see what I can make happen over vacation.