Indie game storeFree gamesFun gamesHorror games
Game developmentAssetsComics
SalesBundles
Jobs
Tags

Pixelbox

Create 2D games in JavaScript, made easier · By Cedric Stoquer

Beginner tutorial Locked

A topic by Cedric Stoquer created Apr 13, 2020 Views: 10,561 Replies: 23
This topic was locked by Cedric Stoquer Apr 15, 2020

To keep the forum organized, I will lock this topic. If you have questions, please post them in the "Question" section of the community forum.

Viewing posts 1 to 13
(3 edits) (+13)

Preparation

You only need Pixelbox and a text editor. Any text editor is fine but if you don’t have yet a preferred one, I recommend VS Code (https://code.visualstudio.com/) or Atom (https://atom.io/). Both are free and have very good support for JavaScript.

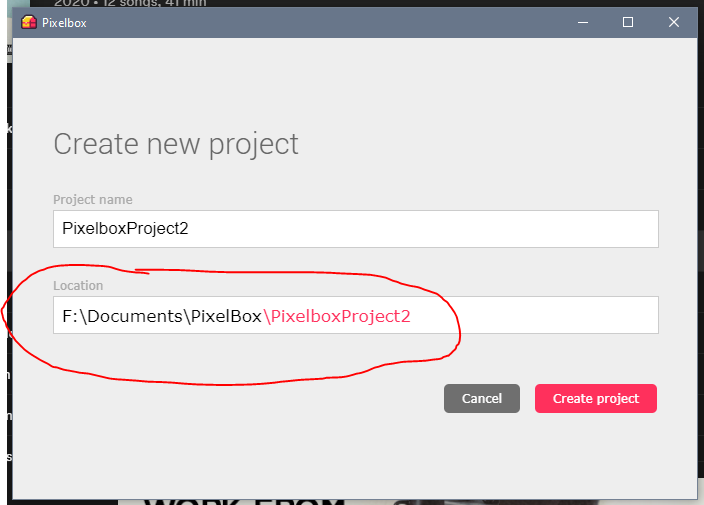
Open Pixelbox and click on the “NEW” button in the top left corner. A new UI will open in which you need to define the project’s name and its location (where the new project will be saved on your hard drive). Then click The “Create Project” button.

The project will be initialized and Pixelbox’s main UI will open. 

Test Pixelbox functions

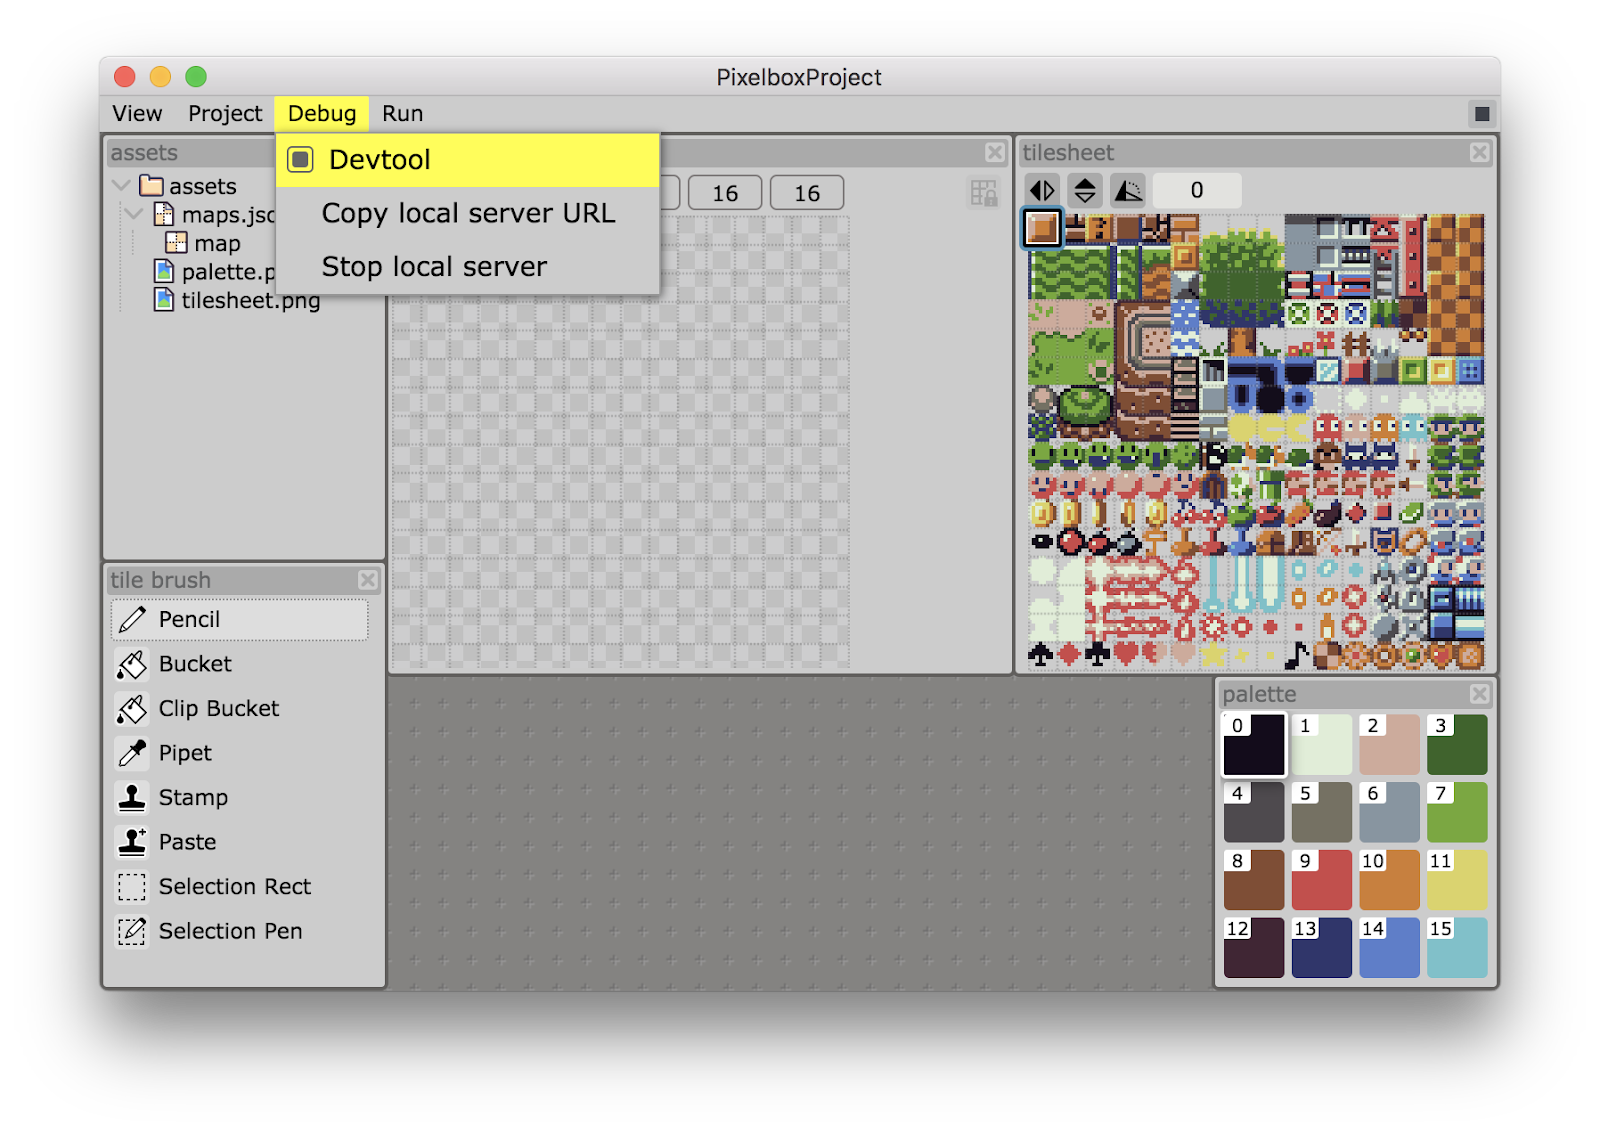
We can already tinker with Pixelbox without coding anything: First make sure you toggle the developer tools from the menu bar (Debug > DevTool). 

Click the “Run” button: two new windows should open: one with a black canvas (the game), and another which is the developer console. Inside this console, type the following code:

paper(14)
cls()
pen(11)
println("hello world")
sprite(153, 60, 60)

The display in the game window will change as you type each command. This is what you should get at the end:

You can learn what each function is doing by reading the documentation (https://github.com/cstoquer/pixelbox/blob/master/README.md).

Let’s Start programming

Close the game window, and return to the Pixelbox main UI. Open the game project directory. This can be done directly from Pixelbox menu: Project > Open src. Locate the file main.js in the src directory of your project and open this file in your text editor. The code should look like this:

// update is called once per frame
exports.update = function () {
};

When Pixelbox run your game, it will do the following things:

  • Initialize the engine and preload assets
  • Load and execute the code in the main.js file
  • Start the game loop

The game loop is a function that is called every render cycle (or animation frame), usually 60 times per second. Part of the game loop is to call this update function inside main.js

Let’s try to add something in the update function to see what happens. Change the code to look like this:

exports.update = function () {
    sprite(random(255), random(120), random(120));
};

If you save the file and run the game again, you should now see the game screen filling up with random sprites, at the rate of 60 new sprites per second. Lovely!

Adding interaction

A game would not be a game without player interaction. This is what you usually do during an update:

  • Read player input (keyboard, gamepad, etc.)
  • Update the game state
  • Render

To illustrate this, let’s create something very simple: draw a character on screen and let the player move it with the arrow keys of his keyboard.

Here is the code:

var character = {
    x: 60,
    y: 60
};
 
exports.update = function () {
    if (btn.right) character.x += 1;
    if (btn.left)  character.x -= 1;
    if (btn.up)    character.y -= 1;
    if (btn.down)  character.y += 1;
 
    cls();
    sprite(153, character.x, character.y);
};

The game state is the character variable. Notice that it is defined outside the update function, because we want to initialize it once and only make modifications during the game loop.

The code in the update function is in two parts:

  • First: read the value of each button right, left, up, down, and update the character attributes accordingly.
  • Then: clear the screen and render the sprite according to the character updated position.

If you test the game, you can now control a sprite with the arrow key
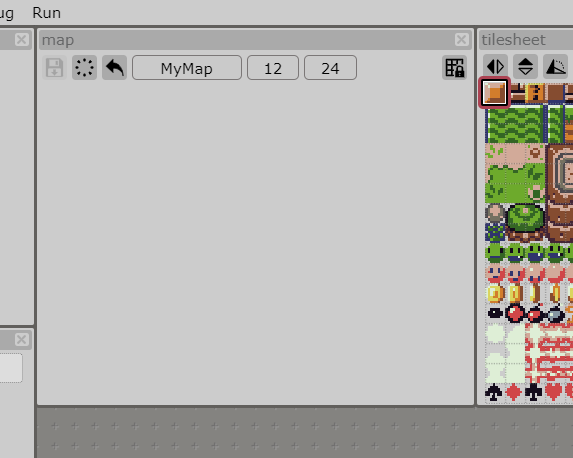
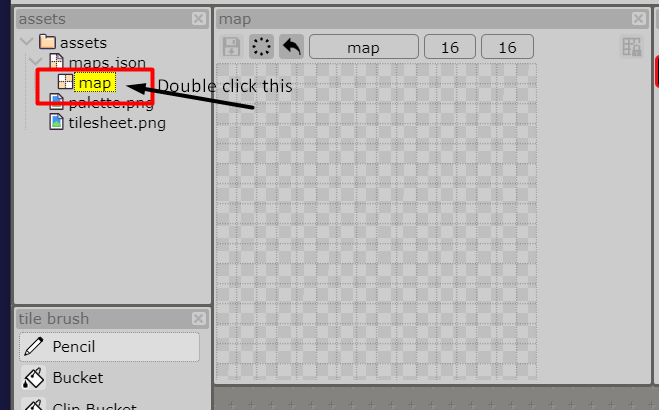
Create a background

Lastly, I want to present the TileMap component. Pixelbox includes a map editor to create levels, and all sorts of things. Select tiles from the tilesheet, and draw some grass and flowers in the map. This will be the background for our game.

Save the map with the save icon button, and let’s add this to our code:

var character = {
    x: 60,
    y: 60
};
 
var background = getMap("map");
paper(7);
 
exports.update = function () {
    if (btn.right) character.x += 1;
    if (btn.left)  character.x -= 1;
    if (btn.up)    character.y -= 1;
    if (btn.down)  character.y += 1;
 
    cls();
    draw(background, 0, 0);
    sprite(153, character.x, character.y);
};

This should give you the following result:

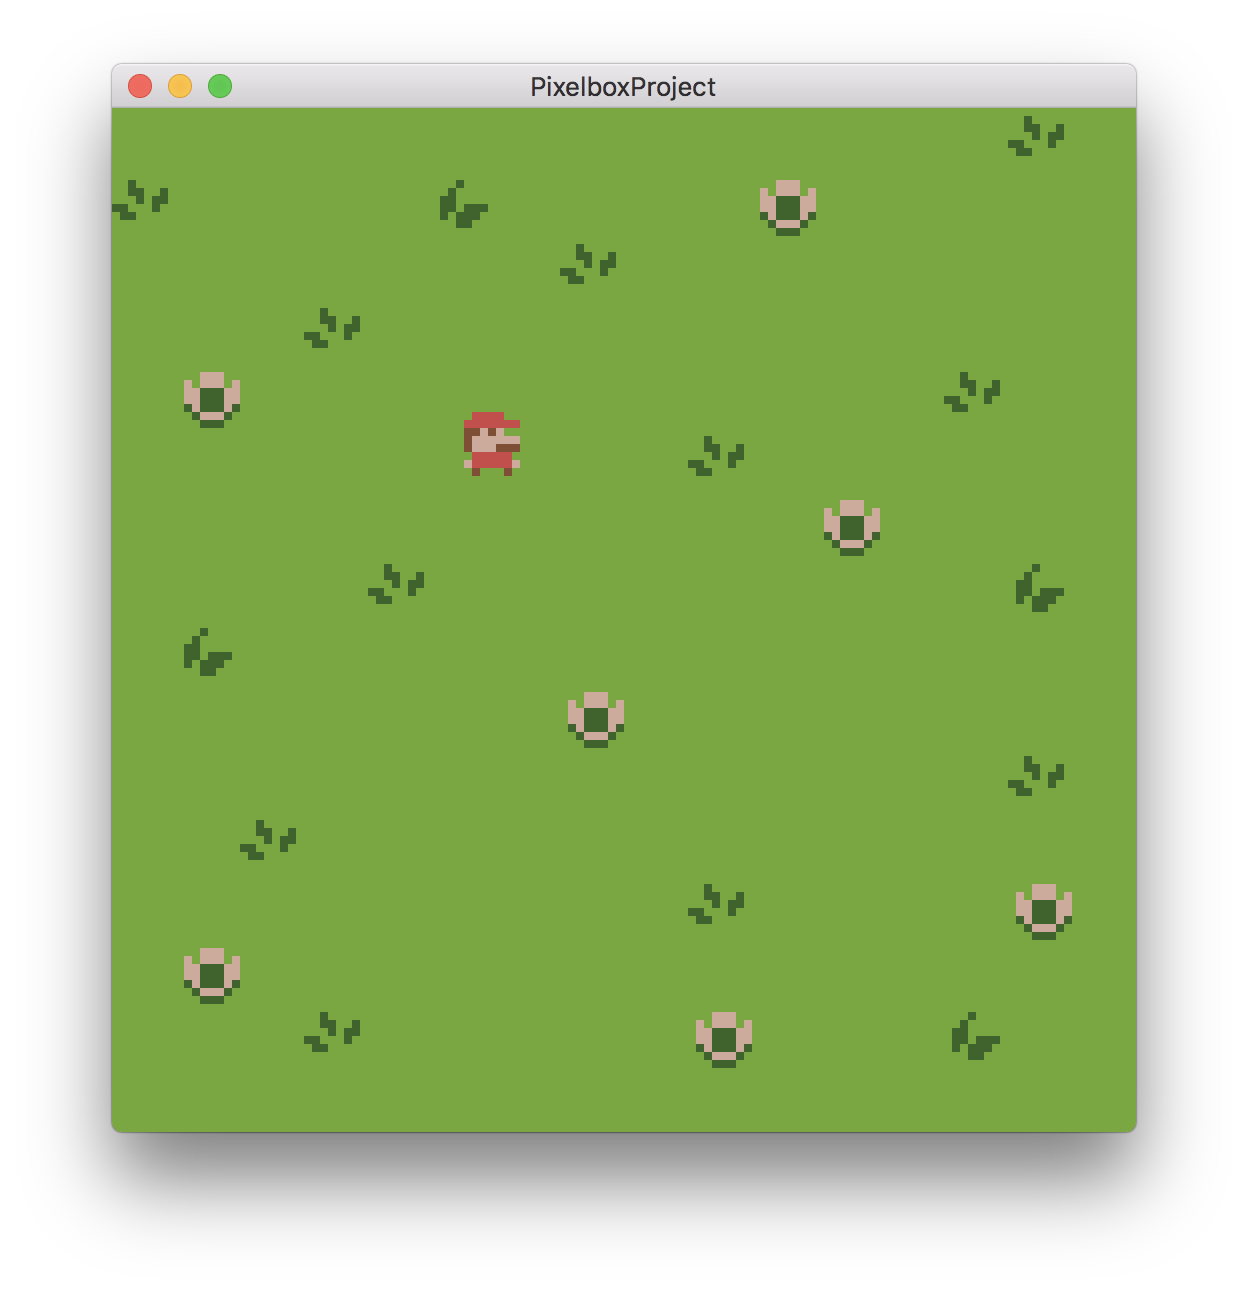
And that’s all for this tutorial.

Learn JavaScript

If you are new to JavaScript, here are some nice ressources to get started:

(+2)

Thanks for the tutorial!

(1 edit) (+1)

why does btn work on the arrow keys but not wasd

edit:  thought the keys you pressed were defined via javascript lol

my map isn't allowing me to place things down tho for some reason, i set the tile width and length

(+3)

I ran into this too. Is this what you see?

If so, I was able to enable the tile placement by double clicking "map" in the heirarchy.


Also it sounds like you figured out the "btn" thing, but just in case: You can set the buttons using the settings under "Project->Settings->Controls"

(+1)

Is there mouse input?

(1 edit) (+4)

There is a pointerEvents module for mouse and touch events. It is not documented because I didn't tested it enough and might change a bit in the future. Current usage is as follow:

var pointerEvents = require("pixelbox/pointerEvents");
 
pointerEvents.onPress(function (x, y, pointerID, event) { ... });
pointerEvents.onRelease(function (x, y, pointerID, event) { ... });
pointerEvents.onMove(function (x, y, pointerID, event) { ... });
pointerEvents.onCancel(function (pointerID, event) { ... });
 
// pointerEvents also exposes a pointer object containing the mouse position
console.log(pointerEvents.pointer);
(1 edit) (+2)

I haven't dug into this engine a ton just yet, but from what I've seen so far it looks amazing! I was JUST using pico 8 thinking "man I wish there were a JavaScript version of this" and here it is! This looks great. I've only been tinkering with it a little today but it looks awesome. It gives a ton of control to the developer while also getting rid of all the annoying boilerplate of setting up a local server, serving image files and textures, setting up your update loop, adding listeners for inputs, etc.

I'm excited to try this out more!

can I have a export.update function in another function then use the export.update function elsewhere?

(+1)
(1 edit) (+2)

I think, what you are trying to do is to recreate the concept of Game Objects.

Pixelbox doesn't have Game Object, but this can be implement without much difficulties (you just need to manage the pool of game objects yourself). Here's a possible solution:

var flakes = [];
 
class Flake {
    constructor () {
        this.xPos = random(150);
        this.yPos = 0;
        flakes.push(this);
    }
 
    update() {
        this.yPos += 0.5;
        this.xPos -= 0.15;
        sprite(192, this.xPos, this.yPos);
 
        if (this.yPos > 128) {
            this.destroy()
        }
    }
 
    destroy() {
        flakes.splice(flakes.indexOf(this), 1);
    }
}
 
 
exports.update = function () {
    cls();
 
    for (var i = flakes.length - 1; i >= 0; i--) {
        flakes[i].update();
    }
 
    var snowChance = random(30);
    if (snowChance == 25) {
        new Flake();
    }
};

Do you mind explaining what that last part is doing? why is the update before it creates a new flake?

Thanks so much for what you have helped me with already!

(1 edit)

Nothing happens when I click the "create project" button. I am running macOS Catalina 10.15.4. I read I have to change permissions but don't know where. Any help would be appreciated. Thanks. :)

(+1)

Can you check if it is the same problem described here:
https://itch.io/t/743160/i-cant-create-a-new-project
if not, can you show me the settings you have in the "new project" window?

Yes it was. It had to be a double click. I initially thought it was just a text box so I never thought to double click it. Thanks!

(+1)

You need to close the program and re open it. Then click on the location option and choose a valid directory

(+1)

Thank you! Turns out I had to double click the location text box in order for the directory box to popup.

(+1)(-1)

sorry, how to make collisions?

(+1)

Pixelbox doesn't have a physic engine. But there are several solutions to add collision detection in your game. It depend on what you are trying to do (it can be as simple as implementing tile or AABB collision test, or as complex as adding Box2D to your project)

(+1)

my game is like roguelike, but thanks for feedback anyway!

(+1)(-1)

animations?

(+2)(-1)

For some reason when i follow the directions for making the map it doesn't work and leaves me with just a green screen and my character

(1 edit)

I was looking through the code for the map, and I saw flagA and flagB attributes in the Tile class, and I was wondering what purpose they served, and if we could use it somehow. BTW I'm trying to figure out how to check if a map tile is clicked.

(+1)

I created a sound in bleeper called "sound" and played it in my code using 

if (btn.play) {
        sfx("sound");
} 

However, it says i dont have sound.mp3 in my audio folder.

I then clicked Audio -> Export in Bleeper, but i dont think it did anything?

Please help

(+4)

I figured it out! I had to go to Project -> Settings -> Components, and enable BleeperSFX

locked this topic