Today I'm making a quick tutorial covering a very simple shading technique I love to use all the time. This tutorial is mainly intended for beginners to gain some understanding of how to start shading. It won't be covering all shading concepts because I don't even know everything about shading, but I do think this concept is quick and easy to grasp and also super useful for starting out.
So at the very basic level, if you want to shade a drawing, there needs to be at least 1 light source. I usually draw with one light source anyway but also some ambient "outdoor" lighting to the entire piece so that no part of the drawing is too dark. But continuing on, this light source projects light towards the subject you are drawing. In this case a sphere. Simply speaking, the exposed side of the subject will catch the light and the unexposed side will not, simple. Here's a quick sphere sketch for example:

The exposed side appears brighter, and the unexposed side appears darker. However, this does not mean that light works like a Boolean value. If it was Boolean, it would look like this.
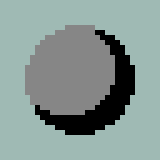
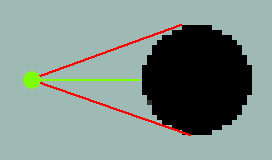
This is obviously wrong. Light works in a spectrum, so this is where the another factor comes in. So you know that the light source projects light straight at the sphere causing a bright white highlight to appear where it hits most directly, but value of the light decreases as it curves around sphere. This is because the value of light displayed on any given point of the sphere largely depends on the angle at which the light is hitting. The closer the angle is to a tangent, the less strong the light will appear. A tangent is "a straight line or plane that touches a curve or curved surface at a point, but if extended does not cross it at that point". It basically looks something like this, the green being the light source and direct light angle while the red is the tangents.
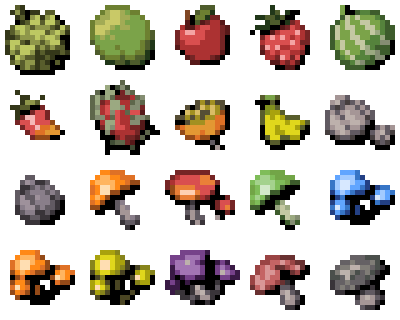
So just knowing this alone has helped me a ton with shading facial features and muscles in general. You will see on my character/ creature sprites I do this all the time with foreheads, brow ridges, cheek bones, chins, shoulders, biceps, thighs, etc. This concept actually applies to more than just organic features though, really anything that has curves! Here's a ton of examples I drew. I want you to see how this applies to everywhere that there are curves.
The curves of these round fruits, vegetables, and mushroom tops.
The curves on this creature's forehead and cheeks.

The curves on these reflective slimes.

The curve on this creature's belly.

The curves on this creature's forehead and cheeks... again!

The curve of this spherical killer coconut.

The curves of these alien Tyhrranoids, especially the big one in the back since it's very slimy and reflective.

And finally the curves on these other alien creatures, except for the red one on bottom left. That one has bad shading.

Alright so I think you get it at this point. It's a very simple concept but I think it's very effective for illustrating 3d form. It's almost as simple as "the more direct the light is pointing at the subject, the brighter, and the less direct the light is pointing to it, the darker". I suggest you try it out if you or others think your drawings are too flat. Also if the thing you're drawing isn't curved and consists of flatter surfaces, well a lot this info about light value still applies, just there's no curves. You may have also noticed I also draw everything at the same angle and lighting angle (sometimes flipped on the X axis). I just feel like this is such a good angle to portray the things I draw. It allows for nice silhouettes and lighting of the key features. So that's a little insight as to how I create my quick doodly sprites and I hope you now have a better understanding as to how I create them without overthinking. With this stuff in mind, maybe you can try to create or revise your own sprites but I don't want to overcomplicate this tutorial so I'll see you in the next one!

