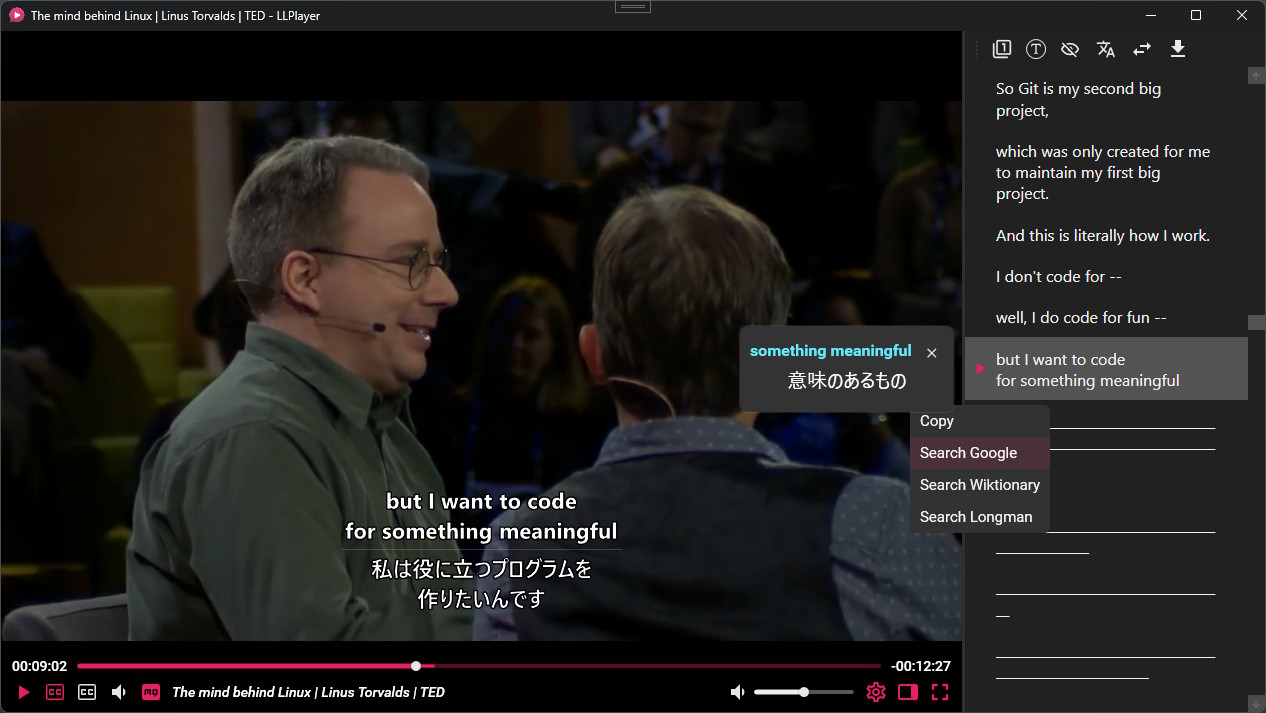
On Sale: GamesAssetsToolsTabletopComics
Indie game storeFree gamesFun gamesHorror games
Game developmentAssetsComics
SalesBundles
Jobs
TagsGame Engines

norby777

77
Posts
5
Topics
1
Following
A member registered Jun 16, 2025

Recent community posts

Yes, I can confirm the keybinding problem is fixed now. (੭˃ᴗ˂)੭

Thanks! 

Thanks.

Nope :) I mostly just use "One Shot" when I need it, but sometimes I accidentally hit the "Pause" button and then quickly press it again to keep the translation going. I guess that habit stuck, and that's why I occasionally try that quick-press thing I mentioned, which is how I noticed this. It's not a big problem for me at all because I hardly ever use it; I just saw it and figured I'd let you know.

(2 edits)

Hi,

The new 0.5.9-alpha 1 update has a weird little keybinding bug. My "Toggle Gametranslate" key was set to "Slash" in the app, but it stopped working with that key. If I go into the Dashboard and set it to the same key, it shows up as "Minus" instead, and then it works perfectly. All the other keys are fine.


Also, with the Stream friendly API, I noticed that hitting the "Pause" key (I use the "Period" button for "Pause") makes the translation reaction time super slow in Automatic mode. Before, when it was paused and new text showed up, quickly double-tapping Period would translate the text instantly. Now, with the Stream friendly API, the double-tap doesn't work. This seems to work fine if I use DXGI.

Just take it easy; no need to rush :) It's not that annoying.

My last comment was about the third bug. That one's fixed now. The second bug is still popping up sometimes, but not as often.

Yeah, the centering is fine now. The text hasn't been pushed to the right at all. Thanks! :) 

(2 edits)

Okay. Thanks for the explanation. (I just saw the first picture again, and those colored words are more orange than yellow, but whatever, I fixed those lol) Keep up the good work :)

Okay, I figured out what's causing the third bug (and maybe the second one too? The line breaks were actually fine in my quick check, but who knows :) ) It's the combo of Automatic font size and Attempt text centering, but this only happens in the very latest version. If I turn on Comic mode with those, it gets a little better because it doesn't shove it so far to the right. I switched back to alpha 3, and those same settings worked fine there. So, this bug is only in the newest release.

(2 edits)

Hey,

I noticed a few bugs in the new GameTranslate_0.5.8-alpha.4 update. They all showed up when I used Automatic mode.

1: If some words in the text are a different color—like orange or red—the app often fails to mask or hide them properly. The picture only shows the orange-word issue (I forgot to screenshot the red ones). It sometimes successfully hides the orange words, but sometimes it doesn't. It never hides the red words. You can see the successful and unsuccessful orange word masking in the images for the third bug down below too.


I'm not sure if this particular bug is new to this update, because I've never tested sentences that have different colored words before, or at least I don't remember doing it.

2: The translation text isn't wrapping right compared to the original text; it just outputs the translated sentences in one long line. The area selected for the translation is wide, but I don't think this was a problem before. It doesn't happen a lot yet, but it does show up sometimes.


3: This is the most annoying one. Very often, the translation just slides way off to the right. Sometimes it moves so far off the screen that I can't even read it. It's okay when the text is short, but it's a huge pain when the text is long.

I don't remember if the second and third bugs ever happened before. (Or maybe I just forgot :) )

Thanks.

(3 edits)

Nope. Everything's good; I didn't encounter any issue related to caching. Thanks :)

This update turned out pretty great. I'm especially thankful for this part: "Added a 'Show automatic border' checkbox to General config, letting users control whether they want the Automatic translation window to have a border or not." That's a super useful little feature for me—the border used to get in the way of my screen, and now I don't have to keep closing the window just to hide it. A huge thanks for this update! :)

(2 edits)

That's weird. The offline translator works well for me, too. I downloaded the en-fi language pack, and that’s also working perfectly for me. But hey, at least you got it working with Deepl.

I'm running Windows 10, and it works fine on my machine. The issue might be on your side. Have you tried switching to a different Screenshot capture API, like DXGI?

Alright, thank you. •ᴗ•

No worries at all. It will be ready when it's ready, and I'll patiently wait. Hang in there and keep up the great effort :)

I understand now :) and yes, your assumption is right. Thanks.

It's completely identical to a previous translation, but the "previous" I'm referring to isn't the one right before; it's showing the text from one that was captured, say, 10 or 20 minutes ago.
:)

Hi,

Lately, I've been using the Manual capture mode for games, and I've noticed a recurring issue: occasionally, when I select a new block of text, the app displays an old translation that was captured previously, instead of translating the new text. When this happens, re-selecting the text repeatedly still brings up the incorrect, old translation. My workaround has been to deliberately exclude about half of the first letter when making the selection, which then forces a correct translation. It's not a frequent problem, but it does pop up from time to time. For now, it's not a major inconvenience.

Just wanted to give you a heads-up about this.

I have tested it, and it's working properly now. I think this is a great start and will definitely be a useful feature down the line.

(1 edit)

Unfortunately, the application is crashing upon launch. I initially suspected the Dictionary feature because the app crashed immediately after I enabled it, but after testing, I found it continues to crash even when the Dictionary is disabled.

Edit: I have sent the crash reports for both scenarios. I generated the first report with Dictionary mode on (since that was my initial attempt to launch), and the second report with Dictionary mode off.

Oh, thank you for providing that information. I'm quite curious to see how it turns out :)

I have tested it and can confirm that there are absolutely no issues with Stream friendly mode anymore. It's working perfectly now. (੭˃ᴗ˂)੭

That's awesome. I'll be sure to test it out as soon as it's available (•̀ᴗ•́ )و

Hey there. 

Everything's working good now. The two bugs I mentioned are fixed. 

Thanks :)

Okay, so Stream friendly mode is finally working with Still background for both manga and games. I'm happy with this fix. While there's a small bit of extra processing time, it's not too bad and doesn't bother me, and it now translates the text when the image changes. It may be that Stream friendly mode only avoids misalignment when I use the Still Background feature, but even so, this is a great solution. I'm totally fine with this for now.

Unfortunately, this new update has introduced two bugs:
1. Manual capture mode only functions when Still background is active. If Still background is off, selecting text does nothing and no translation occurs.
2. In Automatic capture, if I hit Pause and try to select something new, the selection box is invisible, and it won't translate until I unpause. Also, the whole "translate while paused" thing only works if Still background is active, too. If it's off, no selection box, no translation. It didn't do this before; you could always select and translate while paused.

"If I'm not missing something else, you should be able to see the background being a few pixels misaligned." - Yes, that is correct.

Now, the only remaining issue with Stream friendly mode on my end is that misalignment issue. Previously, the only way I could fix it was by using that "Windows scaling workaround" I mentioned, which was too cumbersome and time-consuming. Fortunately, thanks to the new feature, I can now use the Still background button to mitigate this selection issue (for manga, for instance), which makes it much less annoying. I'm really glad that feature is available! 

Thanks for all your help.

That's interesting 😂 

Ah, now I get it, and that makes perfect sense :) It's probably not confusing at all; I must have misinterpreted it. My bad. 😔🙏🙏🙏

I was using version 0.5.4-alpha.2. Since I saw two available versions, I just downloaded the newest one right away.

I double-checked, and the result was the same. The fix only works when that specific feature is active; when it's off, the problem persists.

(2 edits)

I ended up running a quick test, lol. I tried out the Still background feature, but when I hit the New still background button, the text doesn't translate, and this happens with both manga and games. It successfully updates the background image, but it keeps showing the translation from the previous image instead of the new one.

I do want to point out a positive side effect: the Still background feature actually eliminated the text displacement problem I was having in Stream friendly mode. At least when the feature is active, the text displays correctly. It's just a pity that the new text doesn't get translated.
Obviously, this doesn't fully solve my Stream friendly mode issue since it only works with the Still background function for manga or vn, but I definitely see this as progress in the right direction :)

Well, I do play one game that's similar to that, but I think it has more animations than the average Visual Novel, so I'm curious if that will cause any interference. I'll test it out when I play next to see how it performs, but either way, I think this will be a very useful feature.

The Text removal expansion scale looks really promising. That sounds like an excellent feature that will be a big help.

Outside of that one VN-like game, I'm not playing any other Visual Novels right now, but I do read manga frequently. I will certainly test them out sometime :)

Thanks so much for adding these features!

Oh, I completely missed that one. I didn't notice it at all, but you're right, that looks bad too. 😅

I found two minor bugs. The text fields are oversized relative to the content.

Well, I'm not an expert, so I can't say for sure. I'm just playing around with this stuff for fun :)

That sounds interesting! I'm sure it will work out.

Yeah, it's definitely faster now. At least, it seems that way :) To be fair, I didn't really have a problem with the speed of the Custom APIs before; I was pretty happy with them, especially the ones where you can turn off or don't have the reasoning feature.

I'm all for any useful new features, so go for it!

Well, it works now, so that's what counts :)

I don't really use LLaMA because I haven't found a model that fits my needs or that my machine can handle. However, I just did a quick test and here's what I found: it's fast at translating single words or short sentences, but it gets a "Request timeout" when trying to translate longer, multi-sentence texts. This isn't a huge problem for me, though. If I really need to, I can run the same model through LM Studio on my machine. When I do that, it handles longer, multi-sentence texts just fine and even seems faster. I've never gotten a "Request timeout" with the smaller models I've tried there.

This is really useful, and if it wasn't fast enough before, it definitely is now. Thanks for that!

Keep up the great work (👍🏻ᴗ _ᴗ)👍🏻

(4 edits)

Yes, I confirm that both Deepl configs have unique API keys and names.

I can no longer reproduce the bug, as the configurations now appear to be working independently. The issue only happened initially when I was switching exclusively between the two Deepl configs. However, after I switched to a Custom API config just once, it seems the problem resolved itself, and the presets are now "good" because they are functioning separately. Since the API key is no longer visible and only dots are shown, I'll only be able to verify which key is which in the future, when I check the character usage on my Deepl account.

Update: Right as I was about to finish writing this, I checked my two Deepl accounts real quick to see if the character counts had updated, and they did! So, fortunately, it looks like the issue has been resolved, as characters were charged separately to each account.

Well, I went ahead and named the key in the “API Key Name” field and pasted the key into the “API Key” field. Then I switched to another DeepL config, and surprisingly the same key showed up there, even though I had erased everything earlier. I kept jumping between the configs, and the pattern held: any change I made in one reflected in the other. If I deleted the key in one, the other one lost it too.

That persisted until I first switched from a DeepL config to a Custom API config, and then went to the other DeepL config. From that point on, they behaved separately. Now, if I delete the key in one and immediately jump to another DeepL config (without going via Custom API), the other one still keeps its key. I hope it’s really working independently now, and not secretly using the same key under the hood, but we’ll see over time.

By the way the UI request you did is spot on. It’s exactly what I was looking for. Thank you! :)

You're welcome!

I was curious about this stuff and wanted to test it all out anyway, so I figured I might as well write up my findings and share them here.

Hi,

Thanks for clearing that up. I honestly thought it was a bug.

Yes, I do use more than one Deepl key, specifically two (ര ‿ ര ). That's why I brought this up, since I was running into issues with using two keys. It would be a huge help if you could get it working with multiple keys (˵ •̀ ᴗ •́˵)

Oh, got it.

And thanks so much for considering the UI request! ദ്ദി(˵ •̀ ᴗ - ˵ ) ✧

(1 edit)

Hi,

Unfortunately, a couple of config preset bugs have reappeared with the new update.

The Deepl API key is not being saved into the config. For example, if I paste the API key into one Deepl config and switch to another Deepl config, it probably gives the same one, because if I delete the key and nothing is there, and I switch to the other Deepl config, that one is also empty, even though it shouldn't be. Since the key is no longer visible in the app, I can only assume this is happening due to the reasons mentioned above. When I exported the configs, the API key wasn’t included either. But interestingly, right after updating, when I first opened the app and noticed that config presets could now be exported (before you couldn’t, right?), I exported them straight away. In those first exported files, the API key was still there.

Also, before, you could only pick the languages once the API key was entered, but now you can pick them without one. Not sure if that’s a bug or just a change, but it's not an issue for me. :)

I also noticed a bug with the API encryption setting. It appears to be shared across all Deepl configurations. If I enable encryption in one Deepl config, it incorrectly shows up as enabled when I switch to another Deepl config, even if I never set it there.

I have a small UI request regarding the config preset field. Could you possibly make that field a bit larger? It's currently quite small, and when a config has a long name, the full name gets cut off, making them hard to distinguish, especially when multiple configs start with the same name. Alternatively, showing the full name when the mouse hovers over the field, or displaying the full name near the version number above, would also be a great solution.

Thanks :)


17. RapidAPI: Example (AIbit Translator) - translator-based

Code:

Endpoint URL: https://aibit-translator.p.rapidapi.com/api/v1/translator/text

Headers: 

{

    "Content-Type": "application/json",

    "x-rapidapi-host": "aibit-translator.p.rapidapi.com",

    "x-rapidapi-key": "YOUR RAPIDAPI KEY"

}

Body:

{

    "from": "auto",

    "to": "en",

    "text": "%text%",

    "provider": "google"

}

Text Output Path: .trans

Model Selection: When switching to a different model, you must always examine the model's specific code and configuration, as these details will vary. Pay close attention to the fact that the x-rapidapi-host will change every time, and the parameters required in the Body tab will also be different. (The x-rapidapi-key, however, will be generated for you automatically.)

Models: Translator Models or AI Models.

How to: Choose an API, like AIbit translator -> Navigate back to the main API page or click API Overview -> Select the Basic plan -> Start Free Plan -> Subscribe -> In the left menu, select the appropriate method (usually a POST request named 'Translate Text' for translation, or 'chat'/'model' for AI) -> Under Code Snippets, ensure you set the Target: Shell and Client: cURL -> Go to the Body tab and modify the language parameters and/or insert your prompt text -> The final cURL code snippet shown is what you need to copy into the app

Finding the Text Output Path: Click Test Endpoint (top right) to execute the request -> In the response area (check the Raw tab for clarity), find the translated text and note the preceding JSON structure -> E.g.: {"trans":"%text%" meaning here the output path will be .trans. Or for Deep Translate: data:translations:translatedText: 0:"%text%" meaning here it will be .data.translations.translatedText[0].

I hope it is somewhat understandable, but if you're struggling to figure out the output path, copy the response text and ask an AI tool; it should be able to identify the correct JSON path for you.

Limits/Pricing: Details are available by clicking on the Basic plan within the API Overview section.

18. RapidAPI: Example (Lingvanex Translate) - translator-based

This service is similar to the Google Cloud offering, but I wanted to highlight it specifically because of the 500,000 Characters per Month usage.

Warning: This could be a bit risky if you're not paying attention, because if you go over the 500,000 character/month limit, you'll automatically start paying + $0.000005. But don't worry, you can set up a Budget Alert to help manage your spending.

You must provide your credit card details to use this service.

The configuration is the same as the previous one.

Code:

Endpoint URL: https://lingvanex-translate.p.rapidapi.com/translate

Headers: 

{

    "Content-Type": "application/json",

    "x-rapidapi-host": "lingvanex-translate.p.rapidapi.com",

    "x-rapidapi-key": "YOUR RAPIDAPI KEY"

}

Body:

{

    "platform": "api",

    "from": "ja",

    "to": "en",

    "enableTransliteration": false,

    "data": "%text%"

}

Text Output Path: .result

Limits/Pricing: While the limit is 500,000 Characters per Month, it is not a hard limit that stops the service; instead, once you reach it, your account automatically transitions to a pay-as-you-go model. In this case: + $0.000005. Check the Basic plan details under API Overview for more information.

19. RapidAPI: Example (ChatGPT 4-chatgpt-42) - AI-Based

Same as above. For an AI model, you'll select a POST method on the left that is labeled chat or model. For this example, I'm choosing the Llama 3.3 70B Instruct model. You simply need to rewrite the Body section with your desired prompt, and the resulting cURL will be used.

Code:

Endpoint URL: https://chatgpt-42.p.rapidapi.com/conversationllama3

Headers: 

{

    "Content-Type": "application/json",

    "x-rapidapi-host": "chatgpt-42.p.rapidapi.com",

    "x-rapidapi-key": "YOUR RAPIDAPI KEY"

}

Body:

{

    "messages": [

        {

            "role": "user",

            "content": "Your prompt goes here, for example Translate this text to English and only return the translated text: %text%"

        }

    ],

    "web_access": false

}

Text Output Path: .result

Limits/Pricing: This particular plan: Credit: 300 per month (Hard Limit) Tokens: 100,000 per month (Hard Limit) Requests: 300 per month (Hard Limit) Hourly Rate: 1,000 requests per hour. You can always find these details by clicking on the Basic plan information under API Overview.

20. LLM7

Token Key: Click Get Free Token at the bottom of the page -> Sign in -> Click ADD -> Name your token and set an expiration date -> Create.

Code:

Endpoint URL: https://api.llm7.io/v1/chat/completions

Headers: 

{

    "Content-Type": "application/json",

    "Authorization": "Bearer your api key"

}

Body:

{

    "model": "mistral-small-3.1-24b-instruct-2503",

    "messages": [

        {

            "role": "user",

            "content": "Your prompt goes here, for example Translate this text to English and only return the translated text: %text%"

        }

    ],

    "stream": false

Text Output Path: .choices[0].message.content

To switch models, you simply change the model's name in the Body. Models: You can find the list here, or use the 'Select model' dropdown on the homepage. A tip: You can try using models that aren't officially listed, like meta-llama/Llama-3.3-70B-Instruct; it might just work!

Limits/Pricing: The limits are tiered and listed at the bottom of the main page: 45 requests per minute (if you're anonymous and haven't signed up) 150 requests per minute (with a free token) 500+ requests per minute (on paid tiers) 

21. Google Translate API

Warning: This one requires attention! If you exceed the 500,000 character/month free limit, you will automatically be charged. Solution: It's highly recommended to set up a Budget Alert. For instance, you could set a total budget of $1 and receive email alerts when you hit 50%, 90%, 100%, and 150% of that tiny amount, giving you peace of mind. A credit card is required for usage (but $300 in free credits may be available).

API Key: Go to the console (top right) -> Under Quick access, select APIs & Services -> Credentials (left menu) -> Create credentials (top) -> API key -> Name it and Create.

Enabling the API: You also need to explicitly enable the service. In the left menu, go to Library -> Search for Cloud Translate API -> Enable. This will require you to set up a billing account first.

Code:

Endpoint URL: https://translation.googleapis.com/language/translate/v2?key=YOUR_API_KEY

Headers: 

{

    "Content-Type": "application/json"

}

Body:

{

    "q": "%text%",

    "source": "ja",

    "target": "en"

}

Text Output Path: .data.translations[0].translatedText

Limits/Pricing: The first 500,000 characters per month are free. After that, the cost is $20 per million characters. Link.

And that concludes the guide! If you found any mistakes, my apologies! :) And I hope everything made sense! The most important thing is that these APIs are confirmed to be working (or have worked) for me personally. :)

(2 edits)

9. Groq

API Key: Look for Api Keys in the top right -> Click Create API Keys -> Name it and hit Submit. A critical step: "Your new API key has been created. Copy it now, as we will not display it again." Make sure you save it!

Code:

Endpoint URL: https://api.groq.com/openai/v1/chat/completions

Headers: 

{

    "Content-Type": "application/json",

    "Authorization": "Bearer your api key"

}

Body:

{

    "messages": [

        {

            "role": "user",

            "content": "Your prompt goes here, for example Translate this text to English and only return the translated text: %text% /no_think"

        }

    ],

    "model": "qwen/qwen3-32b",

    "stream": false,

    "include_reasoning": false

}

Text Output Path: .choices[0].message.content

To switch models, just change the model's name in the Body. Models: Find the full list on the GitHub page, Official site, or directly in the playground. You can usually disable "reasoning" (the model's thinking process) for speed using flags like /no_think or "include_reasoning": false. For instance, you'd use "include_reasoning": false for qwen/qwen3-32b. Be aware: Some models (like moonshotai/kimi-k2-instruct-0905) are non-reasoning by default, so you might need to remove "include_reasoning": false if it’s there, just to get them working properly.

Limits/Pricing: Check the GitHub page or the official rate limits documentation.

10. Together (Free)

I haven't personally tested this one because it requires adding a credit card and topping up with $5. However, based on the documentation, the setup process should be the same as the others on the list.

The GitHub resource indicates that after the initial $5 payment, you gain access to two free models: https://www.together.ai/models/deepseek-r1-distilled-llama-70b-free and https://www.together.ai/models/llama-3-3-70b-free.

The API structure is very similar for both:

Pl: Url: https://api.together.xyz/v1/chat/completions

Headers: Authorization: Bearer $TOGETHER_API_KEY" \

"Content-Type: application/json" \

Body: {

    "model": "deepseek-ai/DeepSeek-R1-Distill-Llama-70B-free",

    "messages": [

      {

        "role": "user",

        "content": "Your prompt"

      }

    ]

}

Limits/Pricing: Up to 60 requests/minute

11. Cohere

API Key: The key is automatically generated the moment you sign up. You can find it later under the API keys tab in the left-hand menu.

Code:

Endpoint URL: https://api.cohere.ai/v2/chat

Headers: 

{

    "Content-Type": "application/json",

    "Authorization": "Bearer your api key"

}

Body:

{

    "model": "command-a-translate-08-2025",

    "messages": [

        {

            "role": "user",

            "content": "Your prompt goes here, for example Translate this text to English and only return the translated text: %text%"

        }

    ],

    "stream": false,

    "thinking": {

        "type": "disabled"

    }

}

Text Output Path: .text

To switch models, just change the model's name in the Body. Models: Check the official documentation or look in the model section of the Playground. You can disable reasoning for models like command-a-reasoning-08-2025 by including the parameter: thinking: {"type": "disabled"}.

Limits/Pricing: The limits are 20 requests per minute and 1,000 requests per month. For more details, see the official docs.

12. Github

Token Key: Go to your profile Settings (top right) -> In the left menu, scroll to the bottom and select Developer settings -> Choose Personal access tokens and then Tokens (classic) -> Click Generate new token (top right) -> Select Generate new token (classic) -> Give it a name and set the Expiration -> Click Generate token at the bottom. Crucial: "Make sure to copy your personal access token now. You won’t be able to see it again!"

Code:

Endpoint URL: https://models.github.ai/inference/chat/completions

Headers: 

{

    "Content-Type": "application/json",

    "Authorization": "Bearer your api key"

}

Body:

{

    "model": "meta/Meta-Llama-3.1-8B-Instruct",

    "messages": [

        {

            "role": "user",

            "content": "Your prompt goes here, for example Translate this text to English and only return the translated text: %text%"

        }

    ],

    "stream": false

}

Text Output Path: .choices[0].message.content

To switch models, just change the model's name in the Body. Models: You can browse the models on the GitHub Marketplace. To find the exact model ID: click on the model -> Go to the Playground tab at the top -> Click Code -> Look for the model string, e.g.: "model": "meta/Meta-Llama-3.1-8B-Instruct".

Limits/Pricing: Be aware that the input/output token limits are extremely restrictive. The actual limits depend on your Copilot subscription tier (Free/Pro/Pro+/Business/Enterprise). More details can be found in the documentation.

13. Cloudflare

API Key: Click the small person icon (top right) and profile -> In the left-hand menu API Tokens -> Create Token -> Workers AI -> Name it -> Include - All accounts -> Continue to summary -> Create Token -> "Copy this token to access the Cloudflare API. For security this will not be shown again."

CLOUDFLARE_ACCOUNT_ID: Link ->Account home-> Click the three small buttons next to the 'Account' text ->Copy account ID and this should be pasted into the URL.

Code:

Endpoint URL: https://api.cloudflare.com/client/v4/accounts/CLOUDFLARE_ACCOUNT_ID/ai/run/@cf/meta/llama-3.1-8b-instruct

Headers: 

{

    "Content-Type": "application/json",

    "Authorization": "Bearer your api key"

}

Body:

{

    "messages": [

        {

            "role": "user",

            "content": "Your prompt goes here, for example Translate this text to English and only return the translated text: %text%"

        }

    ],

    "stream": false

}

Text Output Path: .result.response

To switch models, just change the model's name in the Endpoint URL. Models: Browse the list here. When you pick a model (e.g., llama-3.1-8b-instruct), copy the entire Model ID (e.g., "@cf/meta/llama-3.1-8b-instruct") and insert it into your Endpoint URL right after the /run/ segment. Example URL structure: .../ai/run/@cf/meta/llama-3.1-8b-instruct

Limits/Pricing: Your free allocation is 10,000 neurons per day. You can find more details on their pricing page.

14. Google Cloud Vertex AI

This is part of the Google Cloud, but I wasn't able to get it working, so I skipped it.

Starting now, I'll be sharing a few extra APIs that weren't on the original list. I thought you might find them useful too!

15. Azure AI Translator

Warning: You will need to provide your credit card details to use this service.

Setup Steps: Use the search bar to find Translators -> Click Create -> Enter your details (name, region) and select the F0 free tier -> Hit 'create' again to finish.

API Key: Navigate to the new Translator service you just created -> In the left menu, you'll find everything you need under Keys and Endpoint.

Code:

Endpoint URL: https://api.cognitive.microsofttranslator.com/translate?api-version=3.0&to=YOUR_LANGUAGE_CODE_e.g.:en

Headers:

{

    "Content-Type": "application/json",

    "Ocp-Apim-Subscription-Key": "YOUR API KEY",

    "Ocp-Apim-Subscription-Region": "YOUR REGION (under Keys and Endpoint)"

}

Body:

[

    {

        "Text": "%text%"

    }

]

Text Output Path: .translations[0].text

Limits/Pricing: The F0 Tier gives you a generous 2 million characters per hour. The system automatically enforces this limit, so once you reach 2 million characters within an hour, the service will simply stop working until the next hour begins. Link, Link.

16. Z.AI

API Key: Click your profile (top right) -> Go to API Keys -> Select Create a new API key -> Give it a name and hit Confirm. That's all there is to it.

Based on what I've seen, it looks like there's only one free model available, which is the flash version.

Code:

Endpoint URL: https://api.z.ai/api/paas/v4/chat/completions

Headers: 

{

    "Content-Type": "application/json",

    "Authorization": "Bearer your api key"

}

Body:

{

    "model": "glm-4.5-flash",

    "messages": [

        {

            "role": "user",

            "content": "Your prompt goes here, for example Translate this text to English and only return the translated text: %text% /nothink"

        }

    ],

    "stream": false,

    "extra_body": {

        "chat_template_kwargs": {

            "enable_thinking": false

        }

    }

}

Text Output Path: .choices[0].message.content

Limits/Pricing: The free model, GLM-4.5-Flash, has a Concurrency limit of 2. "Explanation of Rate Limits:  To ensure stable access to GLM-4-Flash during the free trial, requests with context lengths over 8K will be throttled to 1% of the standard concurrency limit."Input Cached Input Cached Input Storage Output GLM-4.5-Flash Free Free Free Free You can find pricing and limit details in their documentation.