What if I Wanna Lockpick had boss battles?
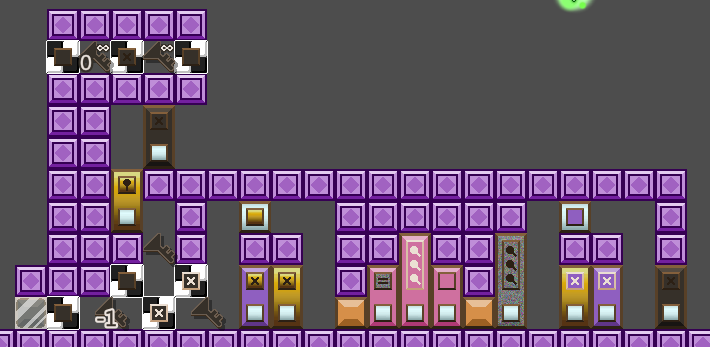
In this hypothetical, rather than gaining a world's Stone Key automatically when you've cleared enough levels there, clearing enough levels unlocks the "S" level of that world (1-S, 2-S, 3-S, etc.). In these levels, the Stone Key of the world starts out hovering freely in the level, but once Lily gets close to it, the Stone Key flies into the background, entering a slot in a wall of stone in the background and turning itself like the key to a car ignition, and the stone in the background comes to life as a huge golem. The golem then does some sort of roar that causes the rest of the level to rise and form, and what ensues is a boss puzzle where every so often the boss will do some sort of attack: usually these attacks will kick you out of the level/force a restart if one hits Lily, and then if you successfully dodge them they cause some change to the level. These are still puzzles: there's some UI thing you can pull up that shows you all of the boss's upcoming actions in order, so you know what it's going to do, the challenge is making sure it does what it does in the right places, as sometimes you can (and have to) use the boss's attack to your advantage in the solving. The goal of these levels is to reach the part of the screen where the Stone Key is lodged into the background, which is usually guarded with several doors the golem creates when it rises; once you touch the Stone Key, Lily turns it out of its slot, causing the golem to deactivate and giving her the Stone Key.
Here's what each boss would do:
• 1-S's boss is the Architect Golem, a golem that builds doors. This puzzle is primarily a "multiple tunnels" puzzle, and every few doors you open, the golem will gain a door in one of its hands and prepare to slam it down on Lily, and the next time you open a door once it's doing so, the golem will slam down the door. If Lily is crushed by it then you lose the fight, and if you do dodge, that door is now part of the level. Make sure that you're goading it to place its doors in the right places so you can still get through them! Since it'll only slam when you open a door, its slammed doors will only be placed within the tunnels - and if you exhaust its whole list of doors to slam, the last door on its list is a humongous one that takes up the whole screen (so you can't dodge it), acting as a limit on the total amount of doors you can open in the puzzle.
• 2-S's boss is the Golden Blade Golem, who wields a giant Master Key like a sword. Every few doors you open, it will raise its Master Key and prepare to strike, and it will slash at Lily the next time you open a door. Its slash will start near Lily in one direction and then slash in the other direction, and if you do jump over it (since if you don't it hits Lily and you lose), the slash will keep going in that direction until it hits a door, at which point it destroys that door and then the slash ends. There are a good mix of numbered doors and Blank Doors throughout the level, so sometimes it's good to have the golem destroy a door blocking you, other times you'd need to use that door to spend some Keys. If the golem's slash would hit one of the doors directly guarding its Stone Key, it reverses the direction of the slash and continues slashing. As with the first boss, the list of slash directions is finite, and if you run it out, the last entry on the list has the golem stab Lily directly from the background so you can't dodge it.
• 3-S's boss is the Blasting Golem. Every few doors you open, the Blasting Golem will get its targeting ready, and then the next door you open, the Blasting Golem will blow up the nearest Blast Door to Lily. This creates an explosion you need to get away from for a moment, but it also activates the Blast Door, setting your count of that key color to 0. The golem will not blow up a Blast Door that you have 0 of its key color for. Some Blast Doors are tucked into the walls here (so the golem's attack is the only way to trigger them), but others are available for you to use (which might change the golem's target!). If there are no valid Blast Doors for it to target (i.e. they've all already blown up or the ones that remain you have zero Keys of), only then will it blow up the huge Blast Door in the center of the level, whose explosion consumes the whole level.
• 4-S's boss is the Golem of Aura; the stone its made of has frozen, eroded, and painted chunks scattered around its design. In this fight, corruptions are stronger: if a door is frozen, you can still un-freeze it if you have a Red Key, but then if you go away from it it will re-freeze again, effectively meaning you have to satisfy the corruptions' requirements at the time of opening the door. Every few door openings, the golem will get ready to freeze, erode, or paint an area around Lily, and once you open your next door you have to get out of the area in time as it strikes. All doors in that attacked area will have that effect applied. Perhaps later on the golem can also do an attack in a smaller region that causes melting, overgrowth, or bleaching: a door struck with one of these attacks will become permanently inoperable (effectively a wall) unless it had the opposing corruption (in which case that corruption is canceled out)? If its attack list runs out, its last attack is a combination of freezing, eroding, and painting that covers the whole level.
• 5-S's boss is the Cursed Golem, whose attack is similar to the Golem of Aura, except it curses the region instead. The golem's curse overrides your own, so Brown is just a normal key color here, except for the fact that all doors attacked by the boss (except Pure Doors) become Brown. Perhaps some doors start cursed already, and later on the boss can also do an un-cursing attack? This boss may not need a turn limit since it might only have one attack, but if it does have a turn limit, its last attack is a stage-wide curse being released from its body.
• 6-S's boss is the Flipped Golem, which has negative flowers growing on it and parts of its body are upside-down. It has two attacks, both of which are AoE ones like the previous two: the first one causes all keys and doors in the area to be multiplied by -1, while the second one is more interesting: it's the first attack that won't make you lose if you're hit by it. Instead, if you let yourself be hit by this "flipping" attack, Lily's gravity direction is reversed. There's some platforming and bridge stuff in this level, so this is useful if timed right! This boss may not need a turn limit since it might only have one attack, but if it does have a turn limit, its last attack causes a color-inversion effect, implied to be deadly, that spreads out to the whole level.
• Upon clearing The Labyrinth, you unlock a second level in that "Somewhere" area: Labyrinth's Center. When you enter this level, the six Stone Keys you already have come flying out of Lily and enter ignition slots in the background, bringing all six of the frontside golems to life again. This puzzle is a larger boss puzzle (though probably not as large as The Labyrinth itself) where the attack that happens every few door openings switches between the attacks of the six golems (and the changes to the way corruptions and Brown work from 4-S and 5-S apply). If their combined attack list is exhausted, their final attack combines the insta-kill moves of the first six fights. The six Stone Keys are all in one place here, and you win by reaching them. There's no reward for this rematch (aside from some Kina dialogue probably), this is an entirely optional level.
• 7-S's boss is the Weather Golem, which has three attacks, each of which will target either the column that Lily's in at the time or the row that Lily's in at the time. It can cause a colored rain that changes the lock colors of all doors in that row/column to that color, it can make a colored bolt of lighting that changes the spend colors of all doors in that row/column to that color, or it can cause a shooting star to fly across the row/column that swaps the lock and spend colors of all doors in that row/column. If it runs out of attacks, its last attack is a screen-wide storm of all three.
• 8-S's boss is the Cobalt Blade Golem, which has the same attack as the Golden Blade Golem, but it wields a Negative Master Key instead, so the door it hits gains a copy instead. Perhaps this boss has a second phase, where it constructs a new level and now can start using either a positive or a negative Master Key attack?
• 9-S's boss is the Chiseled Golem, whose stone was meticulously carved with lock patterns. It has the same door-slamming attack as the Architect Golem, except when it gets ready to attack, it does so by pulling a lock off of whatever Combo Door is closest to Lily and turning that lock into a door to slam. Locks on Combo Doors are "ordered" from top-left to bottom-right for this purpose, and it won't pull a lock off of a door that only has one lock left since Lockless Doors haven't been introduced yet. It also has a second attack type, where it creates a new lock in its hands and then slams that towards Lily, adding the lock to whatever door is closest to Lily at the time.
• 10-S's boss is the Static Golem, whose stone has the Glitch static texture flashing across it. Certain regions of the screen have a static effect in this level: Lily can stand in the static fine normally, but whenever you open a door, the static regions fritz out, and if Lily's in one of them when that happens she gets glitched out of the level, otherwise the static regions switch to new locations. Glitch objects here don't change color normally, but every few door openings, a very transparent static effect will be visible across the whole screen instead of having the stronger static regions, and when this happens, the next door you open does change the Glitch color. This boss has a second phase, where now the Glitch color changes on every door open, but only for Glitch objects in one of the static regions. If you run out the attack list (which here is really a list of static region configurations), the last one causes a static region to take up the whole screen.
• 11-S's boss is the Golem of Truth. At the start of the fight, the Golem steals your Lens of Truth, and the rules regarding complex copies are changed slightly in this fight: you can now only open real copies in regular view and only open imaginary copies in I-View (a door with only imaginary copies in regular view acts as a solid wall, and vice versa). You can't switch views yourself here, but every few door openings, the boss will forcefully switch your Lens view. If you run out the attack list here, the last one has the boss spam the Lens to glitch it out and knock Lily out of the level via the aftershocks. This boss has a second phase where you get the Lens back, and now it acts the same as the Architect Golem, slamming doors down every so often (though by this point the doors it has to choose from are more complicated), but it does so every few Lens switches instead of every few door openings.
• Chromatic Monolith goes as normal until you open the last copy of the big goal door, at which point a cutscene plays where that door reconstitutes itself anyway and starts glowing a faint rainbow, truly becoming the "chromatic monolith", and in a flash of color it resets your key counts and rebuilds a new level to face. The monolith has attacks from all of the first ten bosses (and the changes to the way corruptions and Brown work from 4-S and 5-S apply, but you still have the normal Lens here, so the only thing taken from 11-S is the increased complexity of the slammed doors when compared to 1-S), but this fight has a similar "room" structure to the regular Chromatic Monolith, and what attack it uses depends on which room you're in. It has a list of probably two to four attacks per room, and if you're standing in a room where that attack list has been exhausted when it tries to attack, it'll do an insta-kill attack where it floods the whole room with a rainbow flash. You win this fight by opening the monolith door one more time.
• 0-S's boss is the Paused Golem: it seems to be inactive, but whenever you pause the game, it changes something in the level, so you need to be able to spot what it changed, learn that pattern (it does have a fixed attack list, but unlike the rest of the bosses the game doesn't tell you what it is because it's pretending the boss isn't active), and figure out when the right times to pause are. (Kina probably has a hint about this boss if you can't figure out what the gimmick is)
• 12-S's boss is the Golem of Infinity: In this level, Infinite Keys become transparent and intangible after you collect them once, but every few door openings, the boss does an AoE attack that time loops the area it hits. If Lily is caught in this then it force-undoes several steps, otherwise any Infinite Keys in that region come back. There are also "Infinite Doors" here, which have the same "goes intangible, becomes solid again when hit with the attack" effect. Some of the Gates in this level also have the Infinity symbol in their corner, and they work differently than normal Gates: their state doesn't update normally, they only do their status check whenever the boss attacks (but they do not need to be in the attack region, all "Infinity Gates" in the level update when the boss attacks). These Gates ignore Peek rules when they update - if Lily is inside of one and it closes, you're sent to Focal Point (which obviously means you have to restart the boss when you return).
• The Chapters don't have bosses in their progression, but that open area at the top-middle of T4 has a 13 Stone Door (or maybe it's 14 - whatever it takes to make you have to have beaten W0 and W12 to enter it) and a level behind it, Level TS. The boss here is the Golem of Dreams, and it attacks via Salvage Points: Output Points of various IDs spawn in the level, wait a few seconds, and then doors emerge from them, and if you're inside a door when it spawns, you're sent to Focal Point. Your job is to use the doors provided to get to an Input Point, then use the Input Point on the right door to change one of the doors the boss spawns on the next "wave" (the IDs used in the Salvage attacks are exclusive to this level, and this level is considered a hubworld area so when you Salvage a door you're taken right back into the level, like in Epilogue), until eventually you've assembled the right combination of Salvages such that you can use the doors it spawns to get through to its Stone Key. The Stone door blocking the second half of EX has its cost increased to 14, so you need to have beaten the Golem of Dreams in addition to the rest of the things you need to do to get there.
• Once you've beaten Epilogue and you're crossing the Bridge, a stone hand smashes the bridge and causes Lily to fall into a pit that opens up below. The room she falls into has a "two-screens" setup like EX's world map, with the first screen having an Omega Terminal, then when you enter the second half, the inactive body of the Golem of Dreams lies there in the background. All of your Omega Keys come flying out of Lily and insert themselves into ignition slots in the stone (presumably arranged in the Secret Lab diagram arrangement), and the golem bursts to life, now with streaks of all of the key colors across its stone. This is the Golem of Dreams Ω, the final boss. The fight goes similarly to the first Golem of Dreams fight, except this time there are no Input Points. Instead, you need to use the Omega Terminal to change the colors of the doors the boss Salvages in. However, that Omega Terminal isn't free: it has a lock on it that makes it cost 1 Pure Key each time you recolor something, and you can't do a recolor if you have no Pure Keys left. You start without any Omega Keys since the boss took them all, so at first you have to just solve the puzzle created by the first Salvage spawn attack normally, then when you reach the Omega Key slots Lily pulls out one of the Omega Keys from the golem (the puzzle would be unfair if it let you choose which Omega Key to take without knowing what the boss will spawn next, so the order you get the Omega Keys back is predetermined), with a message "Keep going! You're making major progress!" or something like that appearing each time you get one (and your key counts reset each time, so each phase is its own mini-puzzle). As you get more Omega Keys, the spawned doors get harder and harder to work with, so you need to collect more Pure Keys in order to get more uses of the Terminal to recolor the doors correctly, especially since the boss probably resets those Salvage IDs after each phase. The Pure Omega Key is the second-last one you get, and for the final phase the boss throws a bunch of crazy doors at you, but now you can recolor them to your heart's content, and with that you can make it to the boss one more time, pulling out the Stone Omega Key. With all the Omega Keys pulled out, the golem goes inactive, and a dreamy mist sends Lily back to the Garden of Dreams, where now she can cross the Bridge uninterrupted and reach Star View.
• Ω-S's boss (which is unlocked after clearing enough World Ω levels, and you have to beat it before you can access Kina's Masterpiece) is the Gizmo Golem. This level is made of multiple math-y contraptions isolated from each other. Each contraption has a couple options for how you use it (and thus for what it does to your key counts), then near the end of each contraption there's a particular Lockless Door you have to hit, and when you do so, the boss teleports Lily into a different contraption. You have to use the contraptions in the sequence the boss forces on you in order to get your key counts to the right numbers, so that when the boss's attack list runs out and it ends by teleporting Lily to the middle, you can break the doors there and reach its Stone Key.