Perfect hints! Thank you! Got this one after it.
m3psi
Recent community posts
Thank you for this confirmation! I've started getting through some of the Variety levels; and now I know that there's nothing major that I'm missing or don't know yet (e.g., I shared Helperchamp's impression that Offset was impossible unless there's some mechanism we missed).
Again, fantastic work on the level design, they really explore the possibilities and limits of the mechanism.
I figured out the "turning the light off" mechanic, and a "ride the box" technique, but I feel like there's other major mechanics/techniques that I haven't found yet! Any help, please?
Level 3 (Snow): I have 6/7, but can't get
- The Wall
Level 4 (Catching): I have 4/7. I solved Trapped, Stay, Position, and Gap, but can't get:
- Offset
- Crossing
- Setup
Level 5 (Corners): I have 3/3!
Level 6 (Layers): I have 6/7. I got Across, Flight, Fragile, Canyon, Escape, and Slot, but can't get:
- Transfer
I gave up at Level 7 (Variety).
Fantastic game! I'm looking forward to enjoying the solutions once I get unstuck and make progress, and seeing the rest of the game.
Check out this OP build. Not as high damage as the Berserk Armor build that Hayden's Studio hypothesized (or maybe a Samurai Armor build with tons of sword leveling via spell), but since this is ranged damage, it's feasible and reliable.
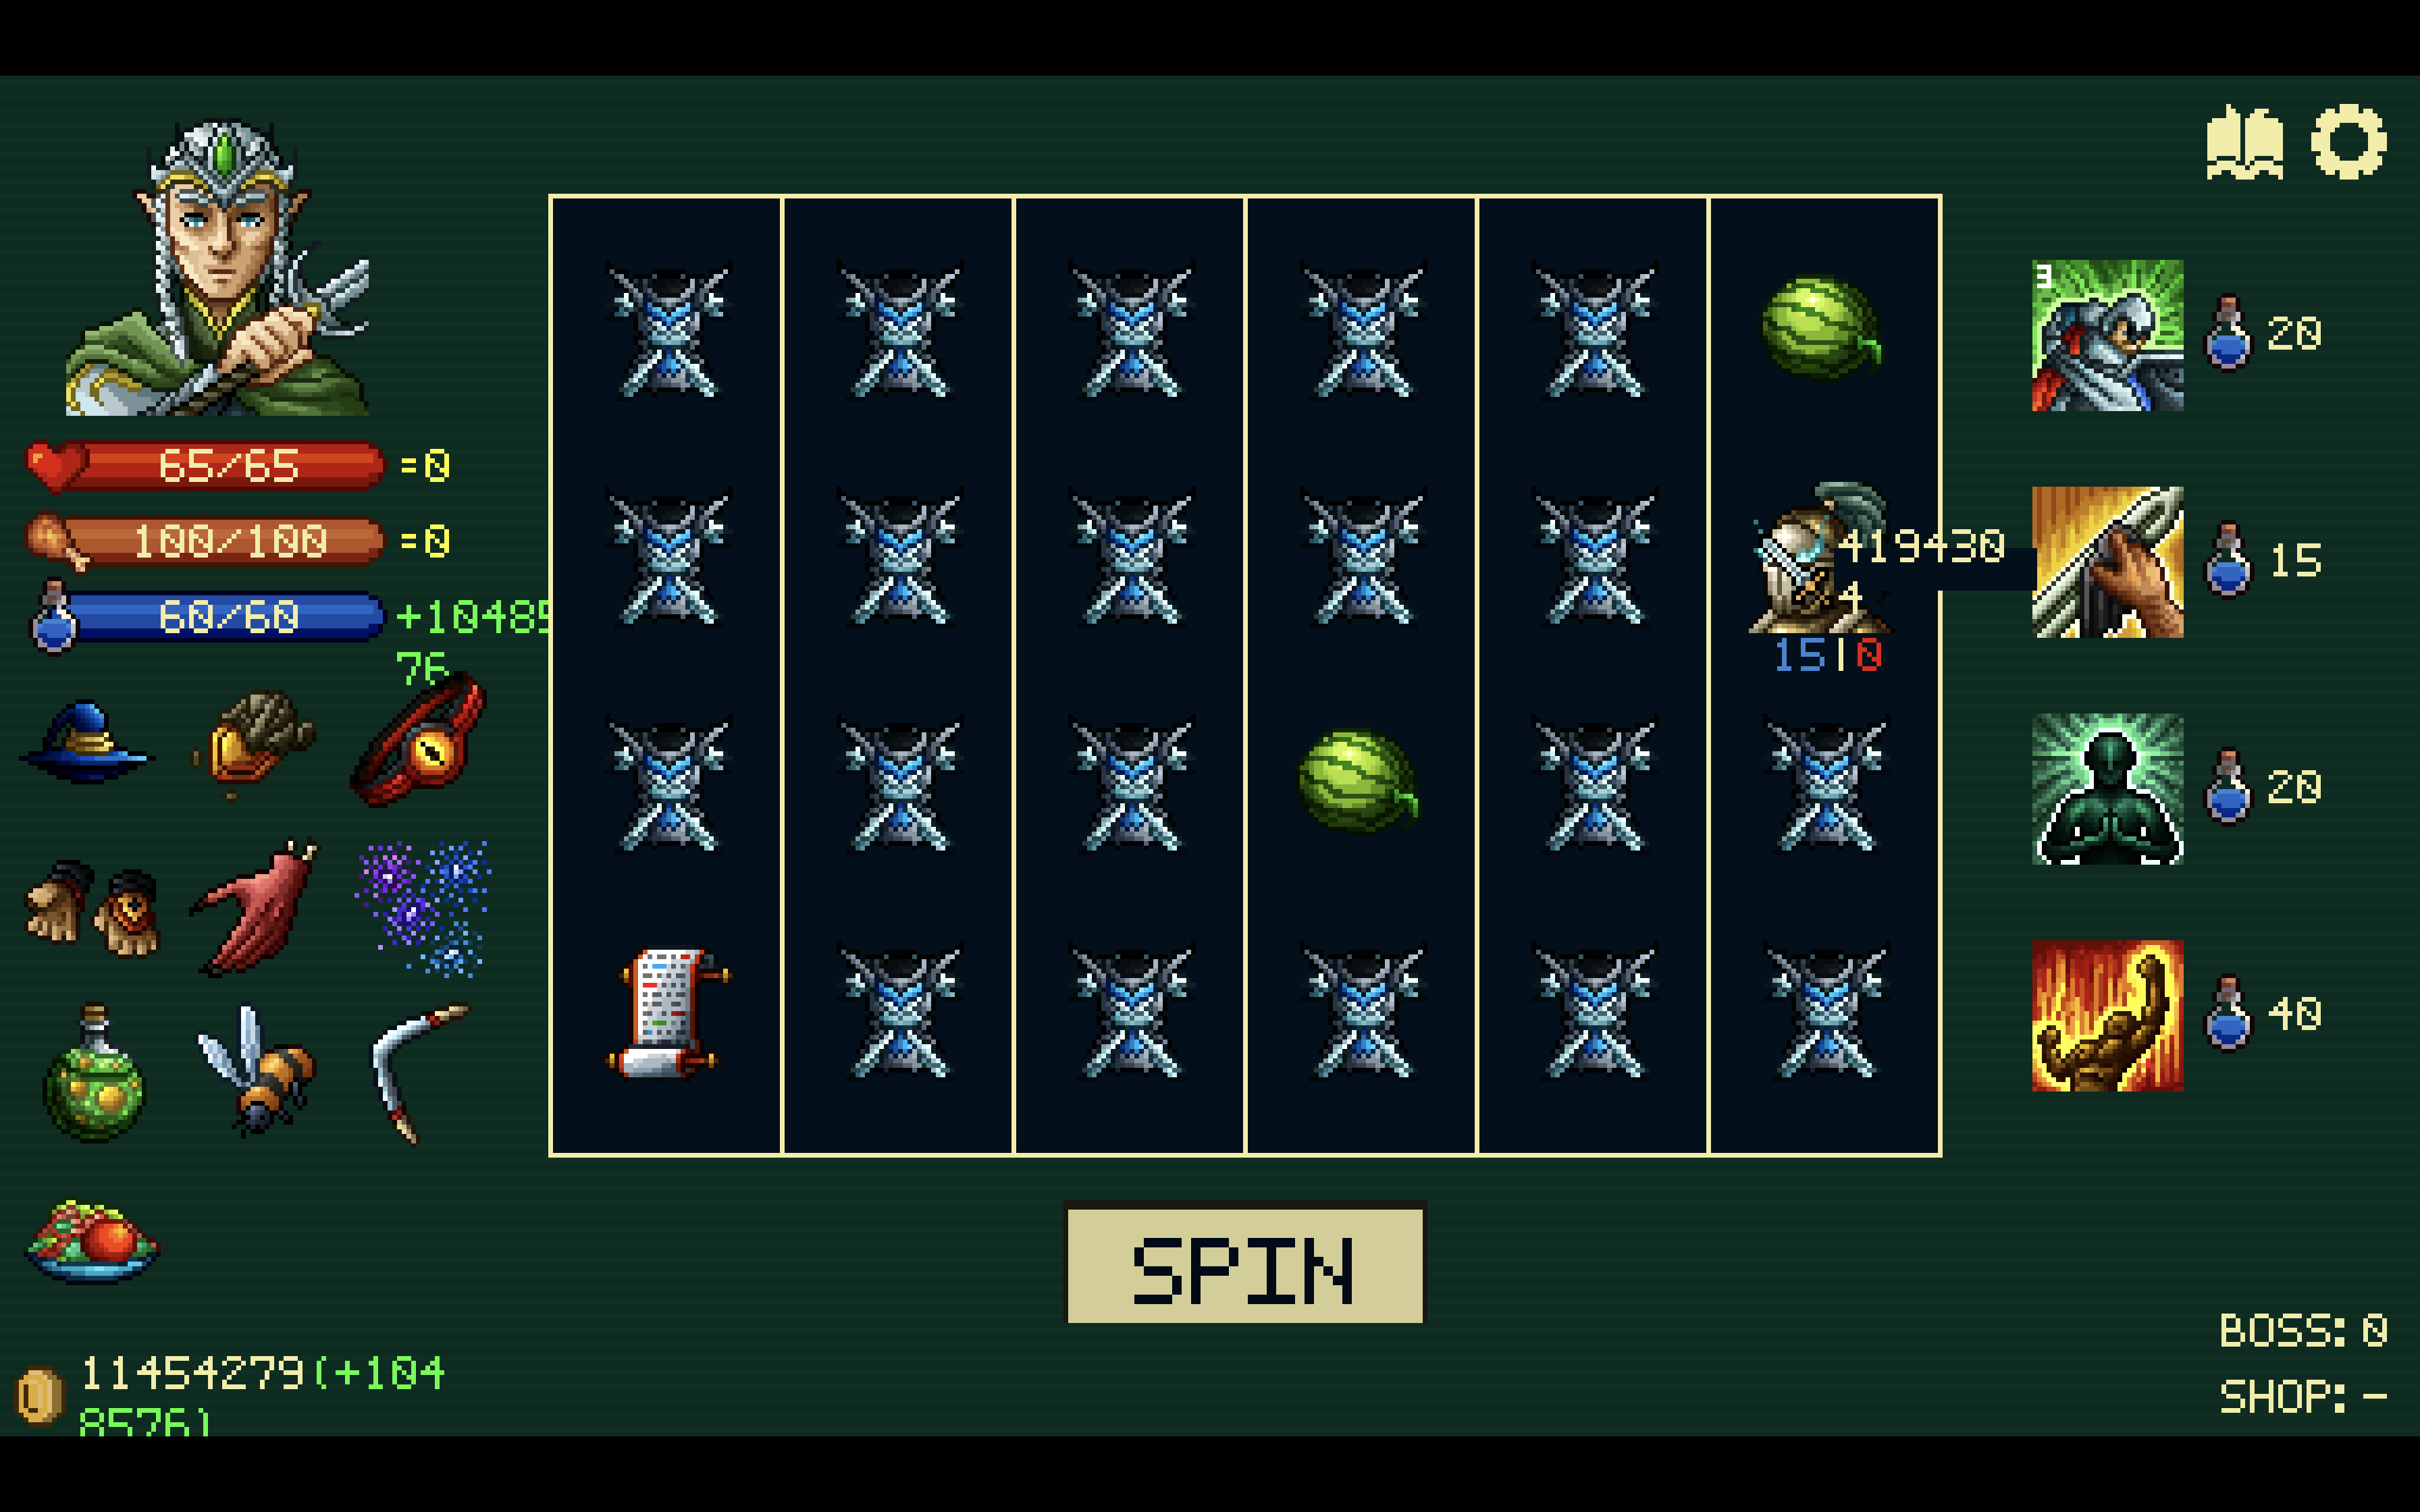
Scroll = +1 Mana
Mage Robe x20 = * 2^(20) Mana from scroll
Wizard Hat = 2^20 damage from scroll
Wasp = * 2 damage from scroll
Red Ring = + 2^20 damage from mana (first attack only)
Boomerang = * 2 damage from Red Ring
Total damage = 2^20 * 2 + 2^20 * 2 = 2^22 = 4,194,304
Wizard Hat is the core: then, all that's needed is even a single scroll, as many Mage Robes as possible, and food maintenance. The Robes give tons of mana via the scrolls, the Wizard Hat deals that mana as ranged damage, and the Philosopher's Stone (more than "Rich Mage, Poor Mage" with some books) collects that mana as gold. Tons of gold allows for removing no-longer needed Symbols, and tons of refreshing at the store to get the ideal mix of trinkets, and spamming Epic keys (buy, then delete, then refresh until it shows up again) to pick up more Mage Robes. Wasp gives a bonus doubling, although past 2^10, everything (except the one "Stubborn" foe) is a one-hit KO anyway. For the Stubborn foe, keep more scrolls at first.
Necromancer Hands is helpful for getting duplicate items, to get to this point. Goblin Hand in the beginning helps to get sufficient scrolls (and books, although ultimately they aren't needed) and Demon Hand later on helps get sufficient Watermelons and Mage Robes. Red Ring and Boomerang add an extra chunk of damage for the first hit only.
Contra Hayden's Studio's awesome analysis, I love the multiplicative scaling, and hope there's a way to keep it.
(Also note that a Berserk Armor build would have higher base damage, but still need food [two Watermelons plus Fruit Salad works] and some leftover space for enemies, so the max number of practically feasible Berserk Armor is, like the Mage Robes here, 20. But there would be a low probability on each turn of actually hitting.)
oh yes I did see that trivial alternative for 3-1, I meant nontrivial multiple solutions, but you got that :). Thank you for confirming!
Out of curiosity, do you have a backend system for verifying solvability and solutions? If so, is it brute force, or something more elegant, even heuristics that cut down on the size of the possible solution space?
I did find that solution for 4-2 when going as far back as possible to get to 6-3, but after trying to use that solution just for 5-1, I thought, "wow, this is useless, let me go back and use the normal solution." But it is actually possible to solve everything in 5 and 6 with that??
I was happy to just get the straightforward solution for 6-3, without having to keep all the contingent paths in my head… but I guess that's what makes the challenge!
Can you confirm, what the first stage with multiple solutions is? Does everything before 4-2 only have one solution? (4-2 is the first stage where I found more than one)
Wohoo! Finally got it. Fantastic game!
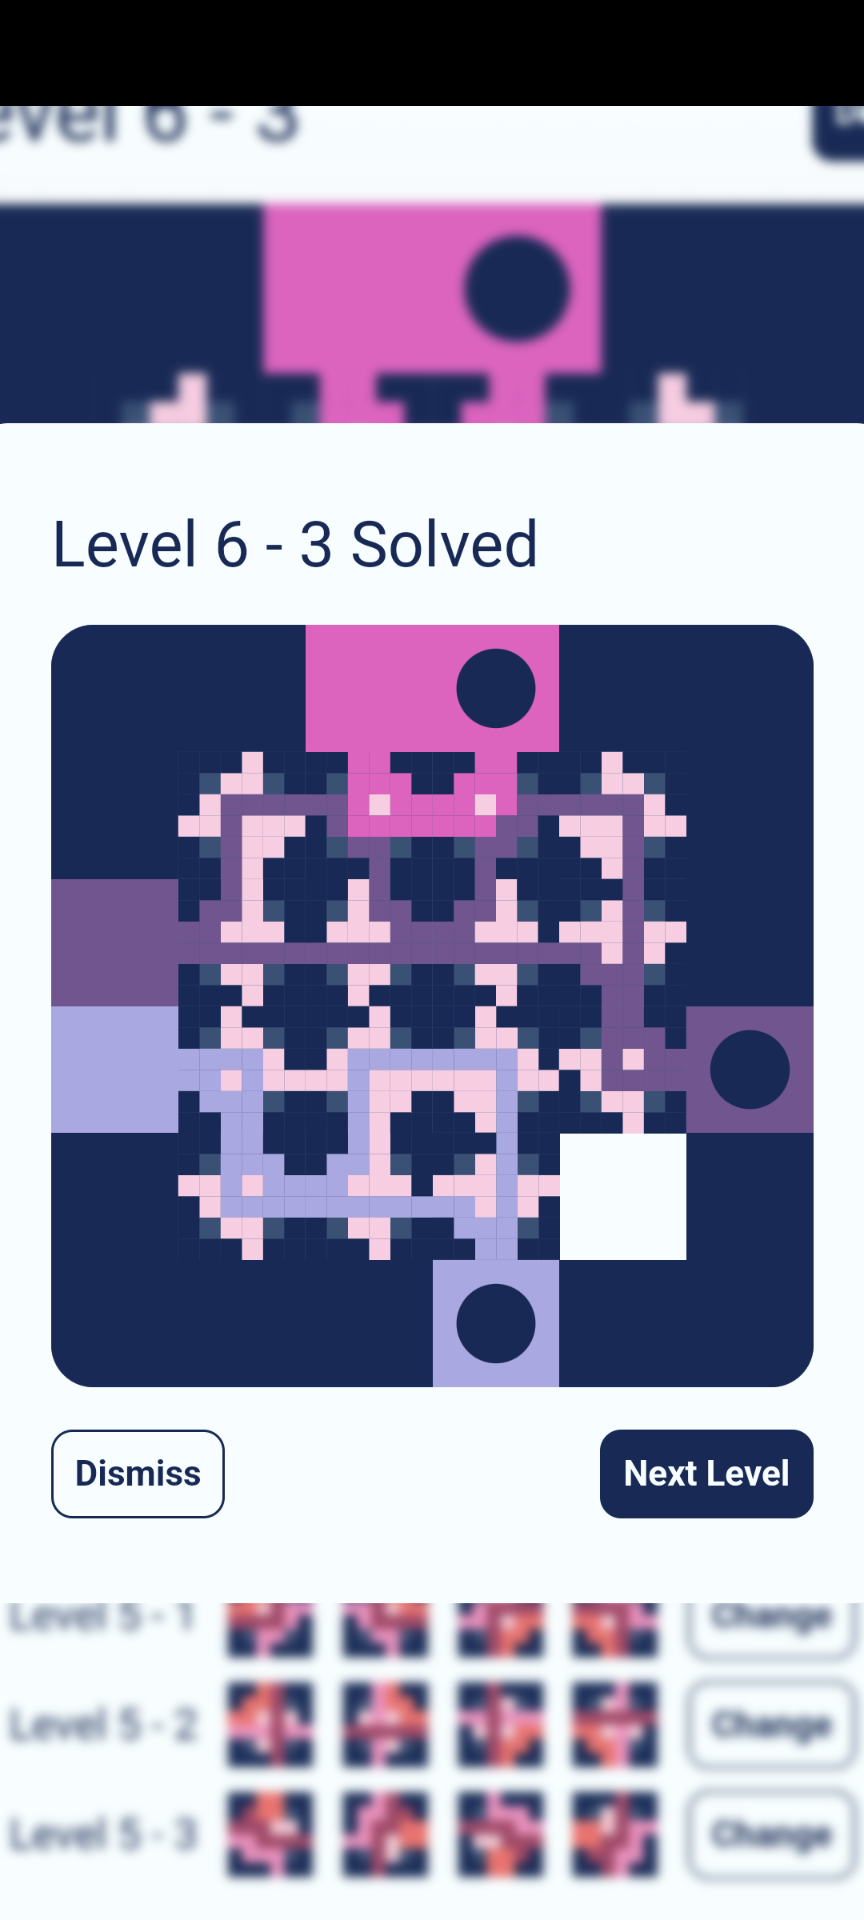
Note: 6-3 is the last level, there's nothing after it. Spoilers, hint and solution, below.
SPOILERS:
HINT: The key is 5-2. You want to get two "passthrough" paths in a right angle to each other, each that goes from one end to the opposite end, with the third path being at an "inner" right angle to the cross made by those two other paths. This, together with the straightforward "corners" solution to 5-1, will give you a lot of flexibility in making paths on the level 6 stages, but also making paths that are easy to keep track of. 5-3 has at least two solutions I found; but, if 5-2 is done appropriately, then neither of those 5-3 solutions are needed for 6-3.
SOLUTION:

So I think I know the mechanic in question, since I did solve level 8, and that was my thought as well but I couldn't figure out how to apply it to level 7. Specifically, I couldn't find a way that taking a "turn" could hit the trapped bed on the left side. But with that hint, I'll try and take another look!
I definitely got the RPS cyclic joke, and appreciated it :).
My only complaint is that the milk was deeply misleading when trying to get to the cheese.
Any plans for levels that feature currently unused objects? pillow, submarine, yacht… I got some others too but before I was keeping track.
Great game!
SPOILERS
I don't think I was consistent with the function names… feel free to clean up
Combine(straw, stick) = torch
Improve(straw) = stick
Improve(stick) = brick
Combine(straw, brick) = oven
Improve(oven) = microwave
Combine(stick, brick) = sledgehammer
Improve(sledgehammer) = jackhammer
Combine(brick, brick) = wall
Transmute(straw) = steel
Transmute(microwave) = fridge
Transmute(rubber band) = stick
Transmute(stick) = rubber band
Transmute(sledgehammer) = paintbrush
Combine(rubber band, rubber band) = ball
Combine(stick, stick) = raft
Transmute(raft) = anchor
Improve(raft) = yacht
Improve(anchor) = submarine
Transmute(wall) = window
Transmute(window) = wall
Combine(wall, wall) = house
Improve(torch) = flashlight
Transmute(flashlight) = solar panel
Split(house) = (wall, wall)
Split(wall) = (brick, brick)
Degrade(brick) = stick
Degrade(stick) = straw
Degrade(rock) = scissors
Degrade(scissors) = paper
Degrade(paper) = rock
Combine(paper, paper) = book
Detransmute(brick) = feather
Degrade(cooked meat) = raw meat
Combine(raw meat, feather) = chicken
Detransmute(chicken) = egg
Transmute(bull) = cow
Transmute(cow) = bull
Split(bull) = (raw meat, raw meat)
Split(cow) = (raw meat, milk)
Improve(raw meat) = cooked meat
Combine(bread, cooked meat) = hamburger
Improve(burger) = cheeseburger
Split(cheeseburger) = (cheese, burger)
Split(burger) = (cooked meat, bread)
Improve(bread) = breadboard
Split(breadboard) = (bread, board)
Transmute(breadboard) = chalkboard
Split(chalkboard) = (chalk, board)
Awesome game! Thanks to those building the wiki as well.
Feature requests/suggestions. I am betting many/most of these are too complicated to implement, and obv you have no obligation to do anything more with the game that is pretty simple and already fantastic, but just putting them out there as ideas.
1. Manual zoom. I am zooming via the trackpad, and Ctrl+Scroll doesn't give very good control. I also have no horizontal scroll which is super annoying if I want be zoomed in.
2. Related to the above: a minimap. For telling me how much of the map I am not currently showing, as I struggle with zoom. Being able to drag around on a minimap would also fix the problem of (trackpads not giving) horizontal zoom.
3. Being able to save maps. Sometimes I want to experiment, and this would help. I like the previously made suggestion of a sandbox; but having saved maps might be easier to implement than would a sandbox, since the best map (and the null map) is already saved and available to restore and this would just be the same but with additional slots. But, restoring the best map, and clearing, are super useful to have, thank you for those!!
4. Being able to store "motifs" and use them like stamps. E.g., save some 3x3 or 5x5 square set of tiles, and then being able to use that like a "stamp" to make repeated copies of it. This would probably be pretty hard, but super useful.
5. Plots. I would love to have some visualizations over dimensions of {map cost, income, # of reduce tile cost upgrades, number of tiles used}. Having plots over time is a common thing I see in resource-management games, but I don't think that is super useful in a game where the map can be easily cleared. Or, maybe raw data downloads so we can do our own summaries and make our own plots :).
SPOILERS FOR THE LAST TILES. And how to get Atlantis and a way to get Powerhouse. I have everything (17/18 tiles) except the top one in the disconnected leftmost column that shows up near the end. Help for that, please! Also, help for how to get Atomic, Scorched Earth, and Factory.
Disconnected, leftmost column tiles, from bottom to top:
1. Steam = Fire + Water
2. Causeway = Lava + Water
3. Ash = Forest + Fire + Fire
4. ??
Tiles past the fifth column:
Wheat = Ash + Ash + Plains
Village = Water + Wheat + Plains
Some achievements:
Atlantis: Village surrounded by 6 water
Powerhouse: Wheat surrounded by 4+ villages works
I tried combining the formless objects (well, formless object #1) with every other object, and tried using it on everything across all the rooms, all to no avail. Any other clue about what I need to do to make use of the objects, or what I should be expecting? Thank you!
One recommendation/request: since there's no save feature, I am doing repeated playthroughs, and the only really annoying point is the bones game. I know the way to always win, but it still takes a while to play through the multiple times. How about speeding it up? E.g., maybe make cut out one round (maybe start with 8 bones, for 3 rounds, and not 25 for 5 rounds? And/or round up from half of 3 to get 2 of the 3 bones, rather than 1 of the three and having another round)
Stuck at the very end. Got to and bribed the janitor/guard, I have all the formless objects, and I've used all objects except the rug piece, and no idea what to do next. Help?
Also, minor bug report; showing Rufus' owner the collar gives a biscuit each time. Which leads to being able to get the cheese multiple times, and the bronze orb multiple times. Only the first time should give a biscuit.
The gold orb requires a ladder. The ladder needs not only a hammer and nails, but multiple piles of wood.
One shake doesn't do anything; multiple shakes will loosen something.
The password requires one additional set of information, which you can find on the bookshelf. "Don't forget to remove the blue's middle" didn't really make sense, but I just made the word I got from the clues up to then into the closest proper English word and that was the password. (The note does say, "is that even right?")
Thank you for fixing! Came back and successfully played through completely---interesting rebalancing of the slugs and drones, I think I preferred the stronger slugs and weaker drones but not too much difference (but I did miss the slugfest in the one room that is now gone). Thanks also for arrow control options! I used those this time around.
Amazing, perfect game! Great mechanics and level design: keeping track of and navigating around where I am currently, alongside where I would teleport to (especially with moving teleport orbs) and how I would need to navigate after the teleport, chained up to three times in rapid succession, was just at the edge of being satisfying to nail without crossing over into being impossible to do. It is short but I think it was the perfect length for a Sunday afternoon, and the polish really shines.
I found 8 berries plus one on the bonus stage for a total of 9; is that all of them, or did I miss any?
I only have two yellow balls left! (and 16 red; but after trying and failing at some of the more acrobatic ones, I don't think I'll attempt it). I am really stuck on the yellow one at (1,1) (if, on the map, we mark the lower right room as (0,0)). I'm at the door up top, but I can't figure out any way to navigate through the gap. Any hints?
My record so far: 157 total! Here are the levels for which I beat the "par", and by how much:
8: -1
23: -1
32: -1
34: -1
35: -1
37: -3
40: -1
42: -1
44: -2
48: -1
49: -6
50: -3
I struggled a lot to meet the par of 37… and then found a way to smash it. And I didn't figure out how to beat the par in 34 until I was encouraged by @CoaLine's spoiler.
AMAZING! The last two major puzzles (the 2x2 "raft" puzzle, and the two pink blocks) had just the right amount of difficulty, and were really satisfying to get after slowly understanding their logic. Really nice execution of a single stage broken up into multiple puzzles, with a tiny bit of backtracking to make it feel connected but not so much as to add another layer of difficulty. In general, really great design, great balance, a good playthrough time, and nice extra mechanic at the end! This was a delight to play. Thank you!!
9: you are handicapped the whole level because you need to get back to that 1x1 in the upper left, and so you need to leave your initial portal open the whole time. You can only push the white blocks and not use portals. You need to get two white blocks into a configuration:
Block-Block-Water
Water-Block-Block
(or maybe it's flipped) by only pushing them. Use the yellow Ls to help push around the white blocks.
10: This is actually far simpler than it seems. It seems like there are a whole bunch of things you need to do, but if you just get to reconfiguring the long yellow blocks to be horizontal, then push them into the water, you can get around the map pretty easily to solve it. You don't need to be too conservative with the white 1x1s, but where you push them ends up being straightforward and pretty simple (there's a bit of portaling but it's not too complex). I think in the end I might not have even used one of them.
11: It's been a while and I'll need to reconstruct what I did :). I think you need to use the white block and the long L to push around the short L to get it into place, and as you may have guessed the white block needs to have a portal through which the long L block will protrude upwards into the 2x1 slot but that is the really tricky bit. I remember I spent a long time playing around with portaling at the two white slots at the top, as well as trying to get the player character above the midway river to manipulate things directly; I think that the solution ended up involving neither, but I don't remember for sure.