Indie game storeFree gamesFun gamesHorror games
Game developmentAssetsComics
SalesBundles
Jobs
Tags

Golden Fish Entertainment

63
Posts
15
Topics
57
Followers
20
Following
A member registered Mar 19, 2019 · View creator page →

Creator of

Recent community posts

Hello, and thanks for the question AND for playing VoltAge:Genesis!

To answer your question, the "winner" of the battle for Oca Rongo will open a shop, with each one stocking a different variety of supplies...the big "get" for the Scavver side is the Machete, which is a decently powerful 1H Tool which will open up some extra treasure opportunities and also works with several items that grant elemental "Blade" skills...the Deadhanders offer some decent gear, but nothing super rare or OP. Helping the Deadhanders, however, will also grant you a reputation boost with their faction, helping you to gain access to their home base of Ensenada (the abandoned air field north of New Panavinto. Even MORE interesting...
---SPOILER---
---SPOILER---
---SPOILER---
---SPOILER---
---SPOILER---
---SPOILER---
---SPOILER---
---SPOILER---
---SPOILER---
---SPOILER---
---SPOILER---
---SPOILER---
---SPOILER---
---SPOILER---
---SPOILER---
---SPOILER---
---SPOILER---
---SPOILER---
---SPOILER---
---SPOILER---
---SPOILER---
---SPOILER---
---SPOILER---
---SPOILER---
---SPOILER---
---SPOILER---
---SPOILER---
---SPOILER---

There's actually a "secret" resolution to the conflict where everyone gets what they want, and you get access to even better gear than normal from BOTH factions. Finding a peaceful resolution may take time, however...most people won't figure it out on their first playthrough :D

THANK YOUUUUU

Wow, that means a lot to hear...thank you so much :)

I had to pull this update down; there appears to be an issue with the version I used which caused some of the changes from version 7.2 to be lost. Will update ASAP.

Thank you for the heads up, I will definitely look into this and see if I can replicate the issue.

To be clear, you say you started the quest from Butler, but once you obtained more than four (4) Bony Plates they vanished from your inventory and Butler claims you do not have enough of them now. Some questions:

1) Are they still able to be dropped by the Male Shellbeasts? If so, do the new plates appear in your inventory until you gather 4, and then vanish? or do they accumulate normally?
2) Am I correct in assuming you did not receive the extended dialogue about the history of the Treehuggers from Butler? If not, then what does he say when you speak to him?

I am fairly certain I know what is causing the issue, and if I am right it is a simple fix; but unfortunately to progress with Butler's storyline in the current version it appears that the player will need to gather EXACTLY four Bony Plates before talking to Butler near the fountain in Pedregal Springs in order to complete the quest. If however you DID complete the quest (i.e. you were able to tear down the posting in the Hunter's Guild) then the lack of new dialogue from Butler is possibly caused by either A) not levelling him up enough to hit the next story point, or B) Not having enough Treehugger Lore points to obtain the Tree Coin from him, which is a required step on the way to completing his final storyline quest. Doing so will help you learn more about Butler, the Eloin, and even give some hints about where the next game in the series is heading, but will not affect the ending (though you can also get a pretty incredible sword and shield if you are paying attention).

I hate that this quest is not functioning right, and I will be starting work on a final (?) update for the game in January, so keep an eye out for more info on this in the future!

--------------------------SPOILER--------------------------

--------------------------SPOILER--------------------------

--------------------------SPOILER--------------------------

--------------------------SPOILER--------------------------

--------------------------SPOILER--------------------------

--------------------------SPOILER--------------------------

--------------------------SPOILER--------------------------

--------------------------SPOILER--------------------------

--------------------------SPOILER--------------------------

--------------------------SPOILER--------------------------

--------------------------SPOILER--------------------------

--------------------------SPOILER--------------------------

Medicinal Herbs can be purchased in the village on Mateyo Island or found growing in a few spots scattered throughout the game, while Bizarre Fruits can be bought from Nathan (Nyla's brother) at his pop-up store on the border of Loica (the SE checkpoint that they won't let you through). As always, keep an eye peeled for Nathan's pink hair, which is generally the only hint that you'll get when he's hiding somewhere.

You can't complete Nyla's final quest until after you have busted Nathan out of prison at the Trabunco Checkpoint; for Nyla's final quest, once she gives you the prompt to help her get permission for her family to sell Hunter gear, you just need to advance the Hunter's Guild storyline by doing quests for the captains in each of the Guilds (Coluna, Acclapata Fortress, New Panavinto, Pedregal Springs). Eventually, the Captain in Pedregal Springs will clue you in to a leader of the Hunter's Guild who is doing inspections of the Guild branches. Find him at the Acclapata Fortress branch, and talk to him. If you have completed enough "Bounty Board" quests (item fetch quests and rare monster hunts) throughout the country then he will grant you permission . Go back, talk to Nyla, and the quest is complete.

Hello, and thanks for the question...admittedly, VoltAge:Genesis can be a bit foggy in its directions (what can I say, I loved Rings of Power as a kid)...that being said, the best way to locate / recruit Eloin is by unlocking new characters for your party (and new townsfolk in general) and then following their storyline progression until they give you a hint about where to consider checking...in fact, the path to locating every Eloin in the game starts right in your hometown of Pedregal Springs. That being said, I can give a SPOILER-EY list below to help you track them down.

--------------------------SPOILER--------------------------

--------------------------SPOILER--------------------------

--------------------------SPOILER--------------------------

--------------------------SPOILER--------------------------

--------------------------SPOILER--------------------------

--------------------------SPOILER--------------------------

--------------------------SPOILER--------------------------

--------------------------SPOILER--------------------------

--------------------------SPOILER--------------------------

--------------------------SPOILER--------------------------

--------------------------SPOILER--------------------------

--------------------------SPOILER--------------------------

Pazuzu (Wind) - While there is one character that can put you on the path to meeting Pazuzu in Pedregal Springs, he's quasi-secret and not necessarily a guaranteed "get"...most people will start this quest when they speak to the old lady standing in the ruins in the NE corner of Accoro Village (the farming village north of the massive verdant plains area N of the road to the western mountains). Follow her instructions, progress through the caves, and get ready for a NASTY fight!

Yer Tanri (Earth) - Speak to the Gardener in Pedregal Springs (near the fountain), and track down each of the three types of produce he asks you for (Cave Mushrooms, Medicinal Herbs, and Bizarre Fruit) once all three quests have been completed, speak to him again. You should have little difficulty tracking down the Eloin of Earth with his assistance.

Nanshe (Water) - Once you start the quest to locate Eloin, examine the monument near the fountain in Pedregal Springs to start the quest (if Zach and Casey have moved to your town, they will give you hints to check out the area as well). Once you reach the temple in the mountains (which it sounds like you did), you need to go to the deepest section of the caverns under the temple...the dragon scales you refer to are at the top. Just keep following the glowing statues, and you should locate the Seed in no time...but, consider bringing some StealthGens to avoid those tough fights along the way!

Jack Frost (Ice) - Completing all of the quests from Nyla (the pink haired Scavver) will eventually end with her family's store having many of the best pieces of gear money can buy (including the Crowbar you asked about) at that point, she will suggest speaking to Amelia, back on Mateyo. Catch a ride from New Panavinto back to Mateyo, and complete the quests involving Boomer variants in the area, then use a Crowbar to pry open the broken elevator and descend into the sub-levels of the military base. When you get to the end, you will face off against Jack Frost, the Eloin of Ice. Incidentally, if you want to save some cash, there is a Crowbar hidden in the left-most storeroom of the Konolo Ruins base.

Azazel (Dark) - While you're on Mateyo, you may want to pay your old friend Azazel (the Eloin you met at the end of the first major storyline arc on the island of Mateyo) a visit back in St. Joseph's Road (the abandoned temple). Be sure to bring a strong light source, or you may be in trouble.

Taranis (Electric) - Once you have recruited several other Eloin, Taranis will automatically appear as soon as you enter Pedregal Springs and challenge you to a battle. Admittedly, this can be one of the nastier Eloin battles because you might get denied an opportunity to do much prep work, but I believe in you! Defeat Taranis to obtain his relic and (maybe) a powerful spear as well.

Ogoun (Fire) - Upon defeating Taranis, you will receive a hint as to where you should go to track down Ogoun, the Eloin of Fire...search for him in the ruins of Oca Ronga, the city where the southern portion is blocked off do to constant gunfire. Once you track him down, you'll have to fight Ogoun, but he is very similar in strength and tactics to Taranis, so he should present a minimal threat.

Poimandres (Holy) - Once you have completed all of the quests from Delphine (the monk trapped by the cave-in at Rieldara Valley) speak to her again at her usual hangout near the fountain in the center of Pedregal Springs. From there, it should be fairly easy to acquire the powers of Poimandres, the Holy Eloin.

--------------------------SPOILER--------------------------

--------------------------SPOILER--------------------------

--------------------------SPOILER--------------------------

--------------------------SPOILER--------------------------

--------------------------SPOILER--------------------------

--------------------------SPOILER--------------------------

--------------------------SPOILER--------------------------

--------------------------SPOILER--------------------------

And there you have it! To answer your other question, there is a mercenary in the the cave system just S across the lake from Estancia (the abandoned town NE of the starting area) who will sell you a Sledgehammer once you have returned from your first trip to Mateyo. Failing that, you may get it as a drop / steal from a Steel Legion Fighter, though not all variants of them will be carrying one. As was stated before, Nyal's father will sell a Crowbar once you get the final upgrade to their shop, or you can find one in the Kanolo Base.

Equipping the Eloin's relics will grant you the ability to use a powerful spell associated with their element while also granting you immunity to damage from that element; if you have recruited enough Eloin for them to feel like they have a chance, they will show up and deal a large amount of damage to the final boss to give you an edge.

Well, I'm just thankful that the issue was an easy fix...I was worried that I had messed something up :D

Well, I'm glad...I'm so sorry that it didn't click for me sooner that people might not realize what the ring was doing...I feel terrible (-__-)

iamdoodle, I know it's been awhile, but please see above...did your issue get resolved, or was this possibly your problem as well?

Yeah there's your problem, that item prevents any random encounters from occurring haha.

"A plain silver band used by the dev to avoid monsters. How did you get this, anyway?!"

Or something to that effect. :)

Are you by any chance wearing the Silver Band found during the Prologue?

Just an FYI (because I forgot for a second there as well): If you are playing on an older version of the game (or want to transfer your save file from the demo version), follow the instructions which appear near the start of the readme file.

Hello, and thanks for trying out VoltAge:Genesis!

Regarding the Cytoplasm bounty - Cytoplasm is a "common" drop from both Sludges and Barrel Sludges, both of which can be found in most "open" (i.e. not underground or inddors) areas of the game. Because some areas have larger spawn pools than others, they can be hard to find in some areas...if you go to the sandy area near New Panavinto (the town with the clean water west of where you start), they should be fairly common there.

Regarding levelling up - Fighting normal monsters in areas close to New Panavinto should be enough to get you a few levels fairly quickly; however just remember that enemies will not generally attack you on the roads. As a rule of thumb, the enemies to the west of the starting town are easier, while the ones to the east and south are harder. Stick close to New Panavinto, make short forays into Deadlands to earn money and exp, and be sure to talk to everyone for more quests and lore. If you are progressing through the game completing quests as they arise, you should not need to do any heavy levelling until just before / after you leave for the island of Mateyo. At that point, the difficulty of the game will jump up quite a bit.

Regarding the Antlion - Assuming you are referring to the "Scarred" Antlion that the Deadhanders at the Checkpoint send you to fight, I would recommend not tackling it until you are around level 12-15 (unless you are willing to spend lots of time and money getting lucky with Unstable Batteries)...to avoid the Checkpoint you can simply cut south through the dried lakebed near New Panavinto.

Rest assured, you are not doing anything wrong! Because of its open-world-lite setup (and my own level of experience with RPGs of this sort), VoltAge:Genesis has the potential to be pretty tough (or even downright merciless) in some areas. Keep at it, go slowly, and I am sure you will be fine...and if you need help or tips, I am always here to help!

https://golden-fish-entertainment.itch.io/volt-age-genesis

(2 edits)

Sorry for the delayed response, I never got a notification of your follow-up question...

I referred to them as "mods" in my previous message, but that's an older term used to refer to several "accessories" in the game that can only be worn while you have specific types of weapons equipped...if you have the correct type of weapon equipped, then you will be able to wear those accessories in order to gain access to powerful elemental attacks, or to gain bonuses to certain stats...here's a brief list of the "mods" you can find in the game:
 - Bullet Mods
- Previously referred to as "Bullet Mods", these mods can be used with most (not all) sidearms and rifles.
 --- 6.9-11 "Testify"
 --- 21.29 "Monomyth"
 --- 80.2-8 "Behold"
 - Blade Mods
- Previously referred to as "Grips", these mods can be used with most (not all) bladed weapons. (Also compatible with the "Machete" 1-Handed Tool)
 --- Templar Ring
 --- Marauder Ring
 --- Artificer Ring
 - Fist Mods
- Previously referred to as "Wrists", these mods can be used with most (not all) knuckle weapons. (Also compatible with the "Spiked Beads" Focus)
 --- Outlaw Ring
 --- Berserker Ring
 --- Corsair Ring

There are also a total of three different "UBM" Accessories (Universal Barrel Mods) that can be used to get additional "hidden attribute" bonuses while using most guns...they are called the UBM Stalker, UBM Specter, and UBM Shadow.

Finally , there are Accessories that will grant small attribute bonuses and allow the wearer to use additional 2-Handed Firearm types in battle...they are called the "Longshot" TAC, "Close Call" TAC, and "Steady" TAC, and can be equipped by the following characters:
 - Nolan
 - Carmen
 - Elam
 - Isaiah
 - Lucas
 - Stark

Note that if you do not have an appropriate weapon equipped, then the accessories listed above (other than the TACs) will not appear as options when equipping accessories. Hope that helps, and let me know if you have any more questions or comments! :D

Well, you're in luck! Once you get to Mateyo there's actually a "hidden" Crowbar accessible...other than that, you will be able to buy the Crowbar once you complete Nyla's final "Profit Margins" quest (the one where you unlock Hunters' Guild gear).

NOTE: While you're on Mateyo, be sure to grab a Machete as well! It's essential for getting around the jungle area, and it doubles as a decent (and blade mod compatible) 1-Handed weapon!

Hope you are enjoying the game, and if you are still having trouble (with this or anything else) just let me know!

Thank you for the kind words, and I'm glad you enjoyed the game!

On a related but also very self-serving note, if you DID enjoy the game please feel free to leave a rating / review on the game's page...maybe it'll help cancel out some of those lower ratings from people who gave zero feedback on their 3-star "reviews" -__-

If not, that's fine too...FYI the next project won't be directly linked to this game, but there will be a few common elements and it will be MUCH shorter, so definitely check back in the next few months as I start to work on getting things in order :D I DO already know what's gonna happen in Apotheosis (I had actually started working on it before Genesis); it's just that the game is easily twice as big as this one and I don't think I'm ready to dive into another 3-5 year project just yet.

This is a pretty spot on strategy, I have to admit! I was just explaining essentially the same thing to someone else the other day...use Isaiah to absorb Queensguard hits and just pile on the damage to prevent her from attacking...

In addition to the "Deteriorate" spell, the "Maalik" revolver and "Shepherd" 1-handed spear can cast "Consecrate", which is another 5% per turn automatically (though it can miss)

(1 edit)

Nope it's somewhere around there...according to the kids, they have to head south around the edge of "Meteor Lake" to find the Sword of Destiny.

In any given playthrough, two of them are not technically "recruited" because of what happens to them...so I think your numbers are right

(1 edit)

Broken Sword hints...hm...there are some in Coluna's Old City who refer to it as The Sword of Destiny, but they treasure it above all else, and will not divulge its location. Perhaps one of their number who has been "exiled" could help you? ;P 

Regarding the Eloin: Yep, looks like you missed a couple...
Nanshe - Inspect the Monument in Pedregal Springs. It's the stone that Gregory spends a good chunk of the game staring at (if you have Zach and Casey in your town, they will reference the park as a "hint" also)
Azazel - Return to St. Joseph's Road (the abandoned temple on Mateyo) a second time. (WARNING: This can be a tough one if you approach it like a normal boss fight!)
In addition, you can fight (but not recruit) Yggdrasill in the haunted forest and Aemit in Rieldara Valley.

And no, the Elder Bunyip is just an extra boss fight for people who want a challenge...

Additionally, did you get the Outcast Treehugger to move back to Pedregal Springs? Maybe I'll add a Broken Sword hint to his "Nolan" vision...


Stats

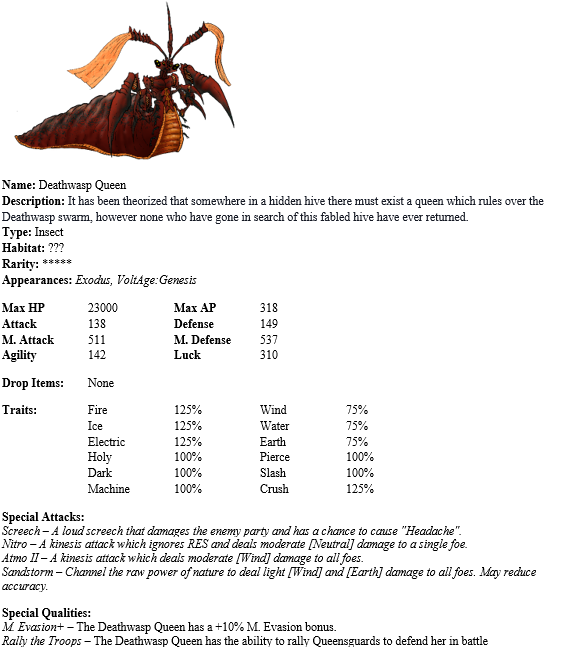
Okay, let’s get down to it…first up, yes, the DQ has a lot of hit points and enough AP to continue pounding your party with Kinesis attacks long after they’ve died…Her physical attack is very low (not relevant), and her physical defense is similarly lacking (very relevant). The thing that will REALLY hurt however is that absolute MOUNTAIN of M. Attack that she can drop down on the entire party’s head…the DQ has the highest M. Attack of any enemy in the game, beating out the second-place competitor by 70 points! Every time she uses one of her Kinesis attacks, your party is going to feel it. Note too that her M. Defense is quite high, meaning that while you may be able to take out her underlings with Allan’s Magma Burst or Butler’s Bronto II, she’s not gonna take nearly as much damage…Her Agility is also fairly low, though not nearly as low as we would like, and her Luck stat, while high, isn’t too much of an issue since none of her abilities can score crits (and she’s immune to most status effects anyway).

Resistances

At the end of the day, DQ is still a Deathwasp, so it makes sense that she’d have the same weaknesses we’ve been exploiting against her kids…Fire, Ice, Electric, and Crush damage all deal 25% more dame, while Wind, Water, and Earth will do 25% less…everything else is normal damage all the way down.

Special Attacks

True to her name, the DQ has a collection of nasty attacks to throw at you…to be honest, I’m not sure which one you should hope for her to use, since they can all be fairly devastating…you should recognize “Screech” from all those Giant Bat encounters, but when DQ uses it, it HURTS…Nitro and Atmo II are your basic “ridiculous damage” abilities, and Sandstorm deals a bit less damage than the others but carries the added danger of inflicting “Blind” on your entire party when she uses it…

Special Qualities

The Deathwasp Queen has two special qualities, the first of which (+10% M. Evasion) is annoying but pretty straightforward. It’s her second ability “Rally the Troops” that can cause you some real grief…when the DQ reaches 80%, 60% 40%, and 20% of her max health, she will fully restore her Queensguard attendants as well as granting herself and her bodyguards the “Phalanx Fighting” and “Call to Arms” buffs…that’s Attack, Defense, and Crit Rate up for everyone on the enemy team, with a little HP Regen thrown in for good measure.

And that's it for now! If I feel like people want them, I may share my personal strategies for taking down the Deathwasp Queen in a future edit...trust me, it CAN be done, and you don't need to be more than level 65-70 to claim victory if you go in forewarned...until next time, stay safe out there!

The Deadlands are a dangerous place, after all...

(1 edit)

#2 - I see...yeah, the Researcher's ID is used to activate the elevator on the first floor of the same building; it just allows you to snag some extra loot and a bit of lore. One part of my game design method (which may be good or bad) is that a lot of times I just put things / people / locations in the world to flesh it out, with no clear idea of whether it will ever have lasting relevance to the story...I designed that area fairly early, and it just never really developed into anything after that.

Also, glad you found the sword and shield! There's another similar bit on the first floor of the Goldspire / Sollcasteros area...if you run to the left or right before using the stairs there's a basement level containing the seventh and final tablet (which is fun and all, but makes things really interesting if you have the Broken Sword...)

Glad to hear that fixed it; as I said I have fixed the issue but I want to give myself a few days to look for other issues before forcing people to download the game a third time in two weeks :)

As always, I appreciate the feedback and help in identifying problems!

(2 edits)

I'm always happy to help out! I'll answer your questions in reverse order, just to avoid anyone else seeing mega spoilers for the last one...

Question #3 - You can buy the bizarre fruit from Nathan on the Loican border (the verdant area in the southeastern part of Marema). He's hiding behind a tree on the hill to the right, and returning the bizarre fruit to Dan will lead into another "quest" (using the term loosely) depending on your progress in the story. Note that Nathan stops appearing in all of his normal haunts while he is locked up due to the events stemming from the "Lost Prototypes" quest; you will have to get him freed in order to make him start showing up again.

Question #2 - It is not possible to get into the observatory. Originally, there was going to be another Eloin quest there, but it tied in with the robotic characters (Willard and Kay), which were removed from the game in an earlier update; I plan to resolve the issue of the Steel Legion rebels in the next game in the series. Similarly, the bot fights in Battler's Dungeon were featured in an early version of the game (the player could actually fight all the way up to the Gold Championship level at one point), but were also scrapped; I may do a community discussion or devlog in the future to highlight everything that was cut out. Other than that, entering Loica, and resolving the pitched battle inside Oca Rongo, all other areas should be accessible at one point or another (but then again, it's been a few years since I started on this, so something may have slipped through haha).

In regards to a keycard, the only Key Items referred to as "keycards" that you should be able to get are:

A) The Pecasta Keycard (used to open up certain pathways into and out of VolTech HQ in Estancia)
B) The Level 2 Keycard (used to complete the 1st mission from Eight of Spades in Monolito Weapons Factory), and
C) The Kanolo Keycard (used to access restricted areas in the basement under the military base on Mateyo, which you can enter if you have Nyla in your party and have found a certain tool)

SPOILERS AHEAD

SO, on to your main question:

Yes, it is possible not to fight Vance and Ione; choosing not to do so will have an impact on the story moving forward (but will not change the eventual outcome) and will allow the player to get additional lore regarding many of the historical events involving The Destroyer. Generally, anytime Gregory was...less than open...about certain aspects of the story, you will get some additional info. Having Delphine in your party will give even more lore (with both the main and alternate paths). Additionally, choosing this path will give Nolan a different "passive" skill than the one he gets when choosing to attack. In order to unlock this "alternate" path, you will need to be rather thorough in your exploration prior to starting the quest, and try to gather a few of the "missing pieces" to Nolan's backstory.

HUGE

MEGA

SPOILERS

ARE

AHEAD

In order to unlock the "alternate path" you will need to do the following things:

1) In Accoro Village, enter the house in the top left corner of the village. Doing so for the first time will start a short cutscene with the man who lives there. (You can also check out the photo on the desk in the room with the twin beds for another little teaser, but it's not necessary). You do not have to do this "first" but it is necessary to get the alternate path.
2) Attempt to use the Trabunco Checkpoint Tunnel (the shortcut through the mountains on the western side of the continent) from either direction, and you will see a short exhange in which it is revealed that Nolan has lost his passport.
3) In Coluna's Old City (i.e. "fancy") district, go to the Vital Records Office; it's the small brick building in the center-right area of town. Talk to the man working at the counter, and you will receive a Passport (but not before Bridget gets the chance to make fun of Nolan for being so forgetful).

Now, once you have gotten back from your first trip to Mateyo and returned to Pedregal Springs, you should see the flashback sequence as normal; however, because you now have more of the facts ahead of time when you travel to the underground temple ruins, you will have the choice of whether to attack them or not! Again, make sure you have Delphine in your party, because she starts having more to say right off the bat if you choose this path...

ONE LAST LITTLE SPOILER

So glad to see people are actually taking Zaindari's words to heart!!! Incidentally, this is not the only "relevant" point of free will in the protagonists' journey...but I don't want to give EVERYTHING away just yet...oh, okay, just one...right after Butler's encounter with the Eloin, head back into the tunnel a second time. If you look to the right of the last staircase heading towards the sanctum, you will notice an alternate route that loops around to where you are headed. Taking that path instead of the main one will prevent the entrance to the sanctum from being locked, allowing you to access the chest inside. It contains Zaindari's Sword and Zaindari's Shield, both very nice items that Butler (as well as several other characters) would greatly benefit from. Unfortunately, once you've "locked" the sanctum door, it stays that way forever, so you may wanna check that out in a second playthrough... This is just a little one, but there are several other points in the game where certain choices will lead to better or worse rewards for the player...sometimes it's just a matter of looking around for that hidden path, object, or ally...

Oof...can't believe this one slipped past me as well...I have implemented a fix, and will put out a patch next week (once I have had time to run some more tests). One of the joys (?) of being the designer AND the only play tester is that you can never quite think of all the ways to do everything...

Regarding your other question, it IS possible to complete the "Retaking Tocamllo" quest with a better outcome than the one I think you are getting...see below if you don't mind SPOILERS!

.

.

.

.

.

When you first enter Tocamllo with Elam, don't enter the office building right away. Instead, walk just past the building and look up near the outer wall of the city. There, you'll see a fallen Steel Legion Gunner. Talk to him, then head into the office. Next, check all of the bodies on the first floor of the office. One of the Steel Legion Specialists is still alive, and you will need to talk to him as well. Once both the Specialist in the office and the Gunner outside have been saved, head upstairs and talk to the sergeant as normal. He should make a comment to the effect that they don't have many men, but at least Elam has enough for a full squad.

Once you head back out to defeat the rebels, you should be able to find a total of four (4) rebels hiding in various spots around the ruins (stepping into their line of sight will cause them to attack you). In addition, there are two (2) non-hostile rebels in the ruins: one is talking to Nathan, partially obscured by a tree next to the large house across the street from the white office building, while the other is hiding behind a car in the bottom left corner of the ruins. Talking to each of them will cause them to leave the area quickly (find them again in Pedregal Springs for extra rewards).

Now, you're ready to face off against Felix and finish the mission! The aftermath of the quest should be quite different now...

.

.

.

.

.

SPOILERS END

Just wanted to drop in to let everyone know that the Dwearians' "Defend" ability no longer increases their defense against Kinesis attacks...they still have that nasty "reflect" chance, but hopefully this will help to make them ( and their buddies the Millipedes) a little more manageable!

Hey there guys! Today I'll be doing something a little different, and opening up the floor for anyone who has faced the Deathwasp Queen and lived to tell the tale! Big Mama (as Zaindari calls her) is an "optional" boss meant for very late-game parties, and is arguably the toughest boss in the entire game, to include the final boss fight!

So, let us know your level, builds, and party makeup so we can help our fellow Trailblazers survive their journey into The Hive!

I have just completed a hotfix that should address the issue...it looks like the "climbable" section of the wall on that floor was not correctly set as "walkable", even though the same walls on the other floors were...I have attached two pictures so everyone reading this is clear about the sections of wall I am referring to.

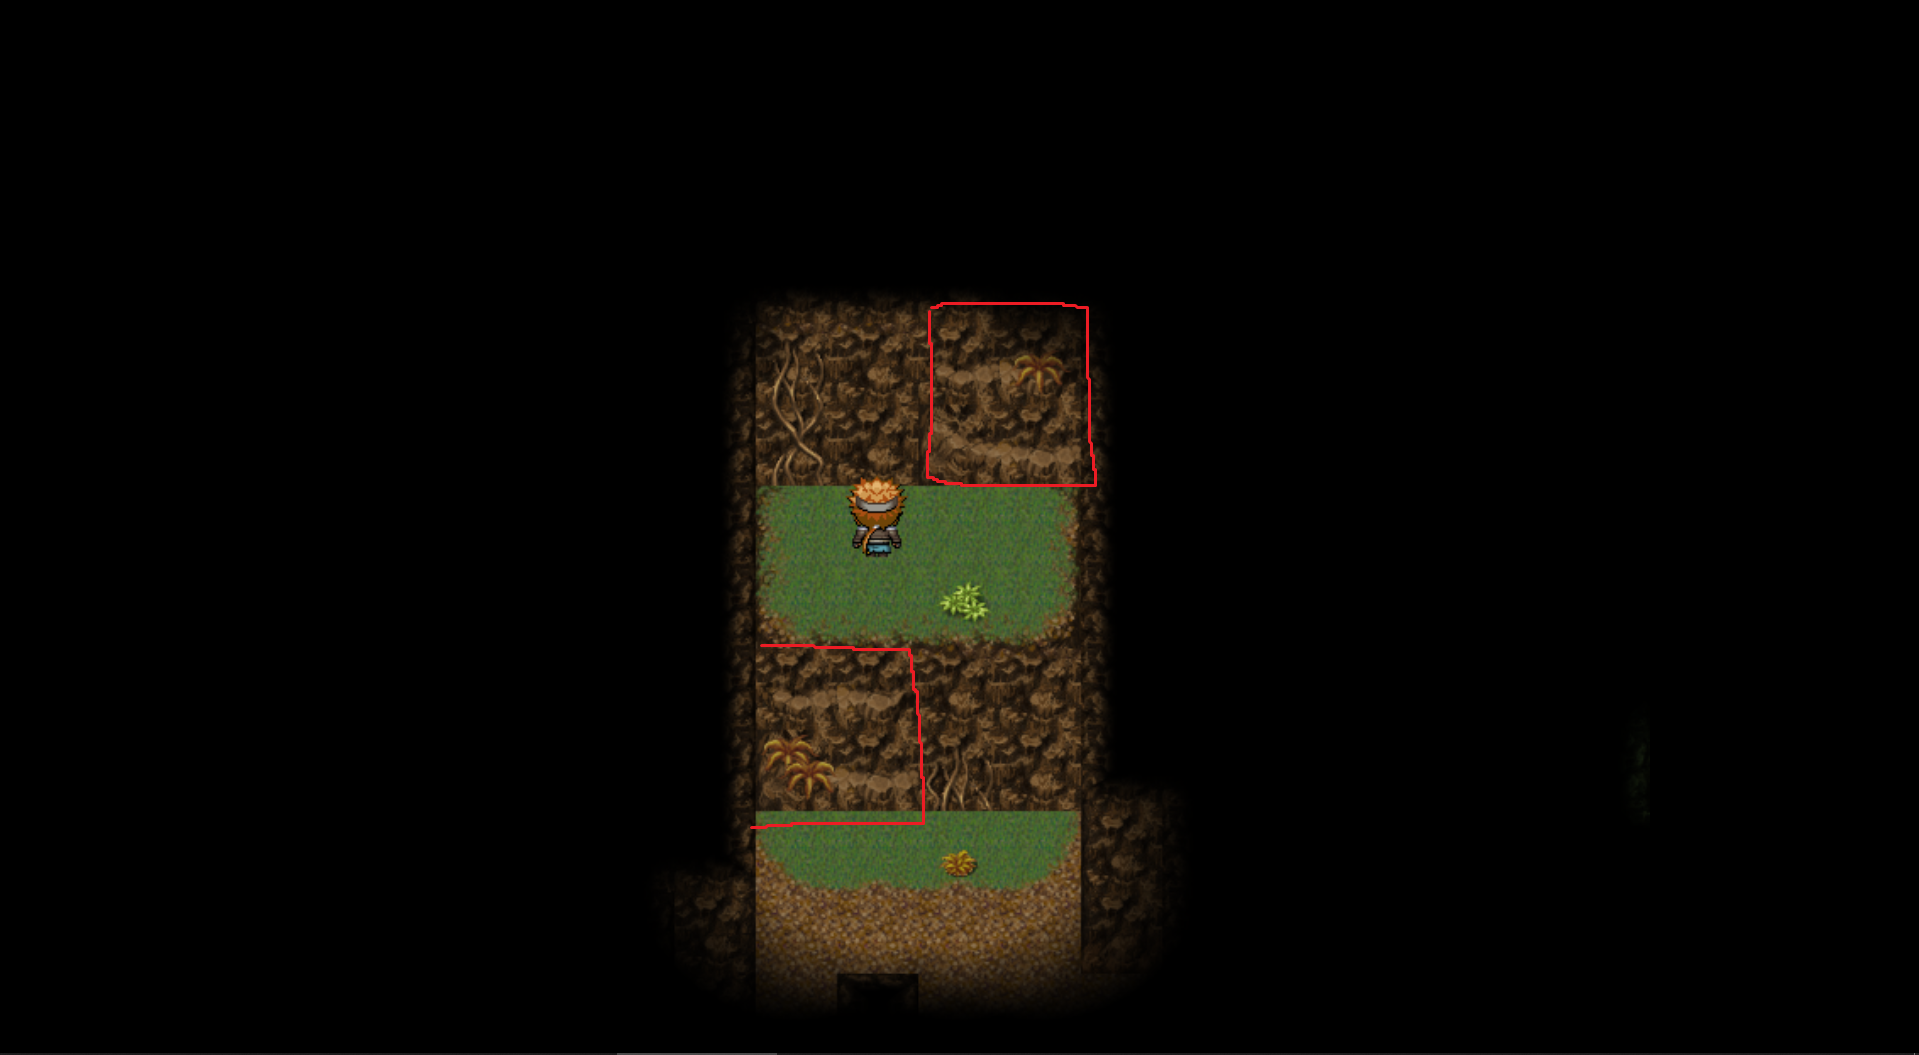
^^^Leaving the Hive on the top level


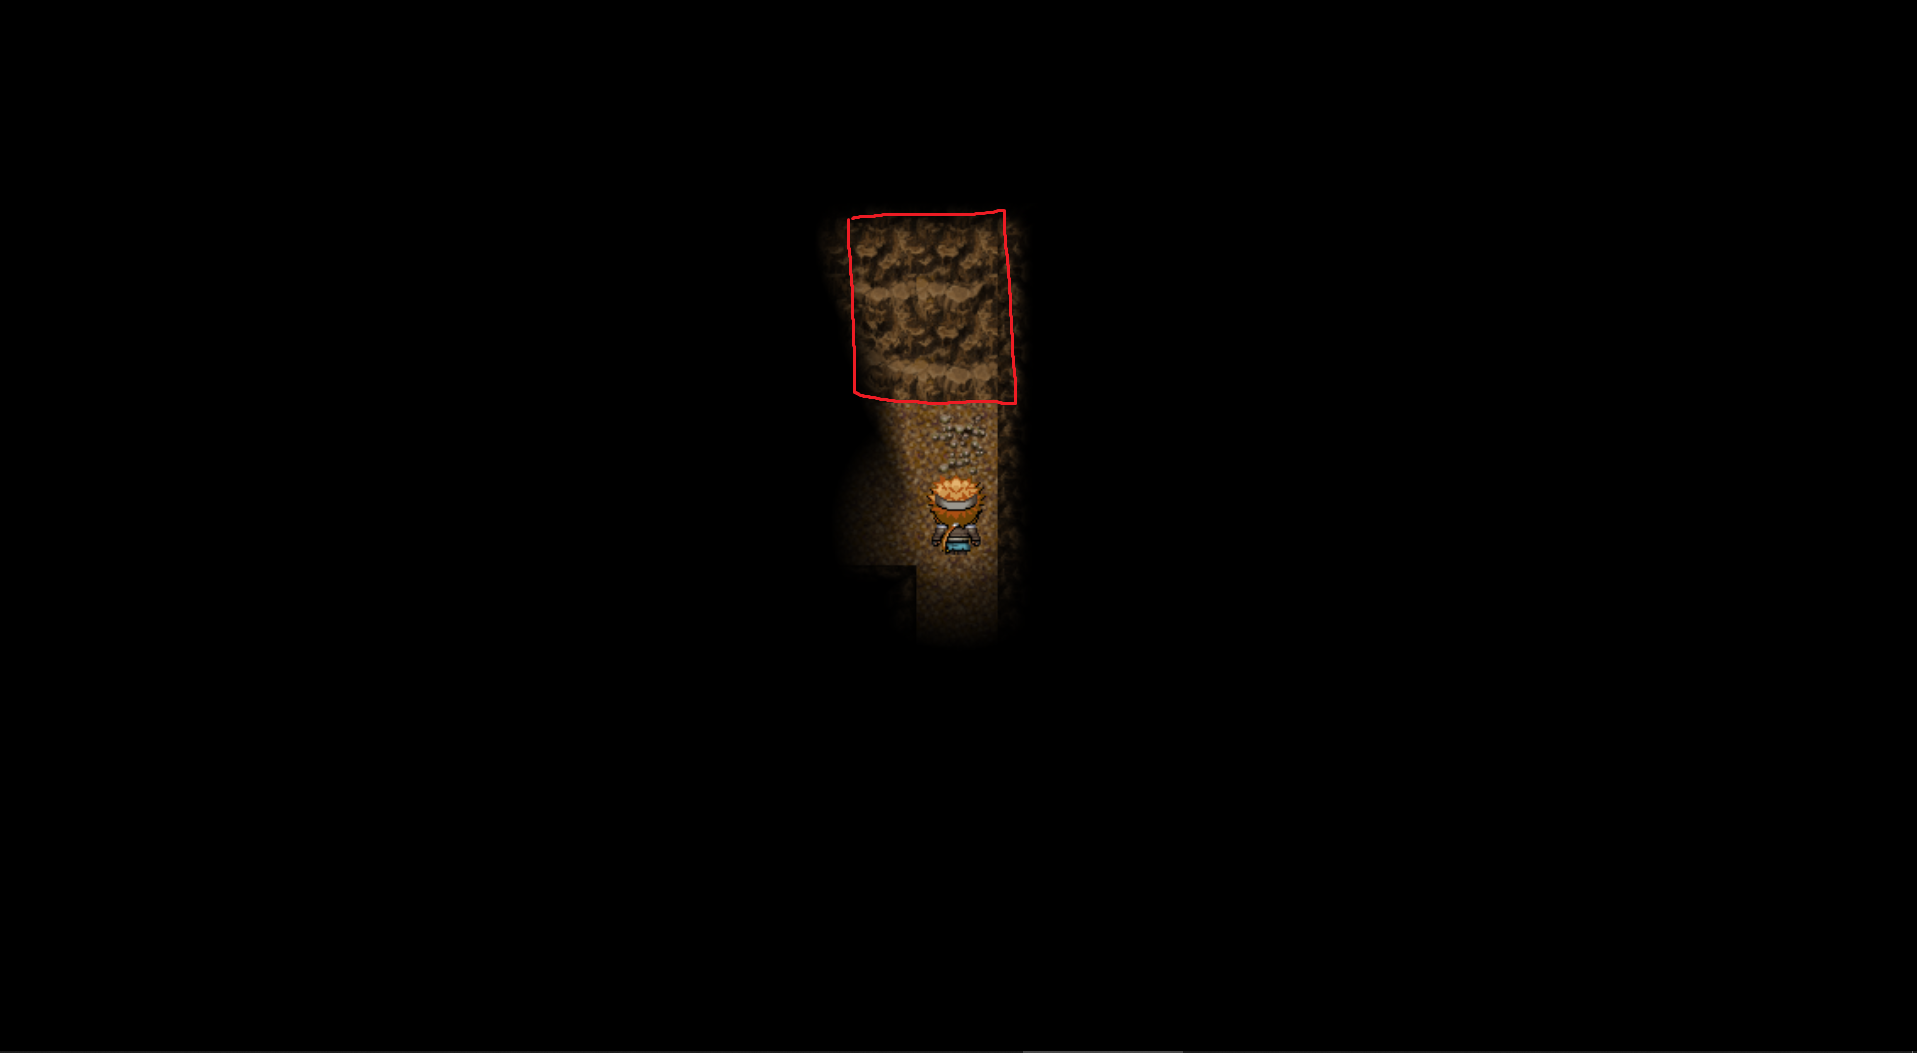
^^^Leaving the Hive (B3)

I'm terribly sorry about this, but incidentally, I WOULD like to start posting more on the community now that the major update work is behind me...to that end, I will be creating a new topic - FIGHTING THE DEATHWASP QUEEN so people can discuss their builds and strategies for beating THE hardest boss in the game!

Well, I'm hoping that it was the existential dread of being trapped in a video game IN GENERAL (and not this specific one) that made you so upset...as for the rest of it:

1) Once the next update comes out in a couple of weeks you will in fact be able to 100% the game (because it will be DONE)!
2) Nolan and his buddies will be much better company after the update, since I'm adding a lot more flavor text for them as they reach new areas and complete quests.
3) No spoilers, but don't worry too much about Gregory being manipulated.
AND
4) I'm glad you're comfy.

Hey everyone! It's time to talk about another enemy that has the potential to cause a great deal of misery in your visit to Mateyo: the Corpse Flower!


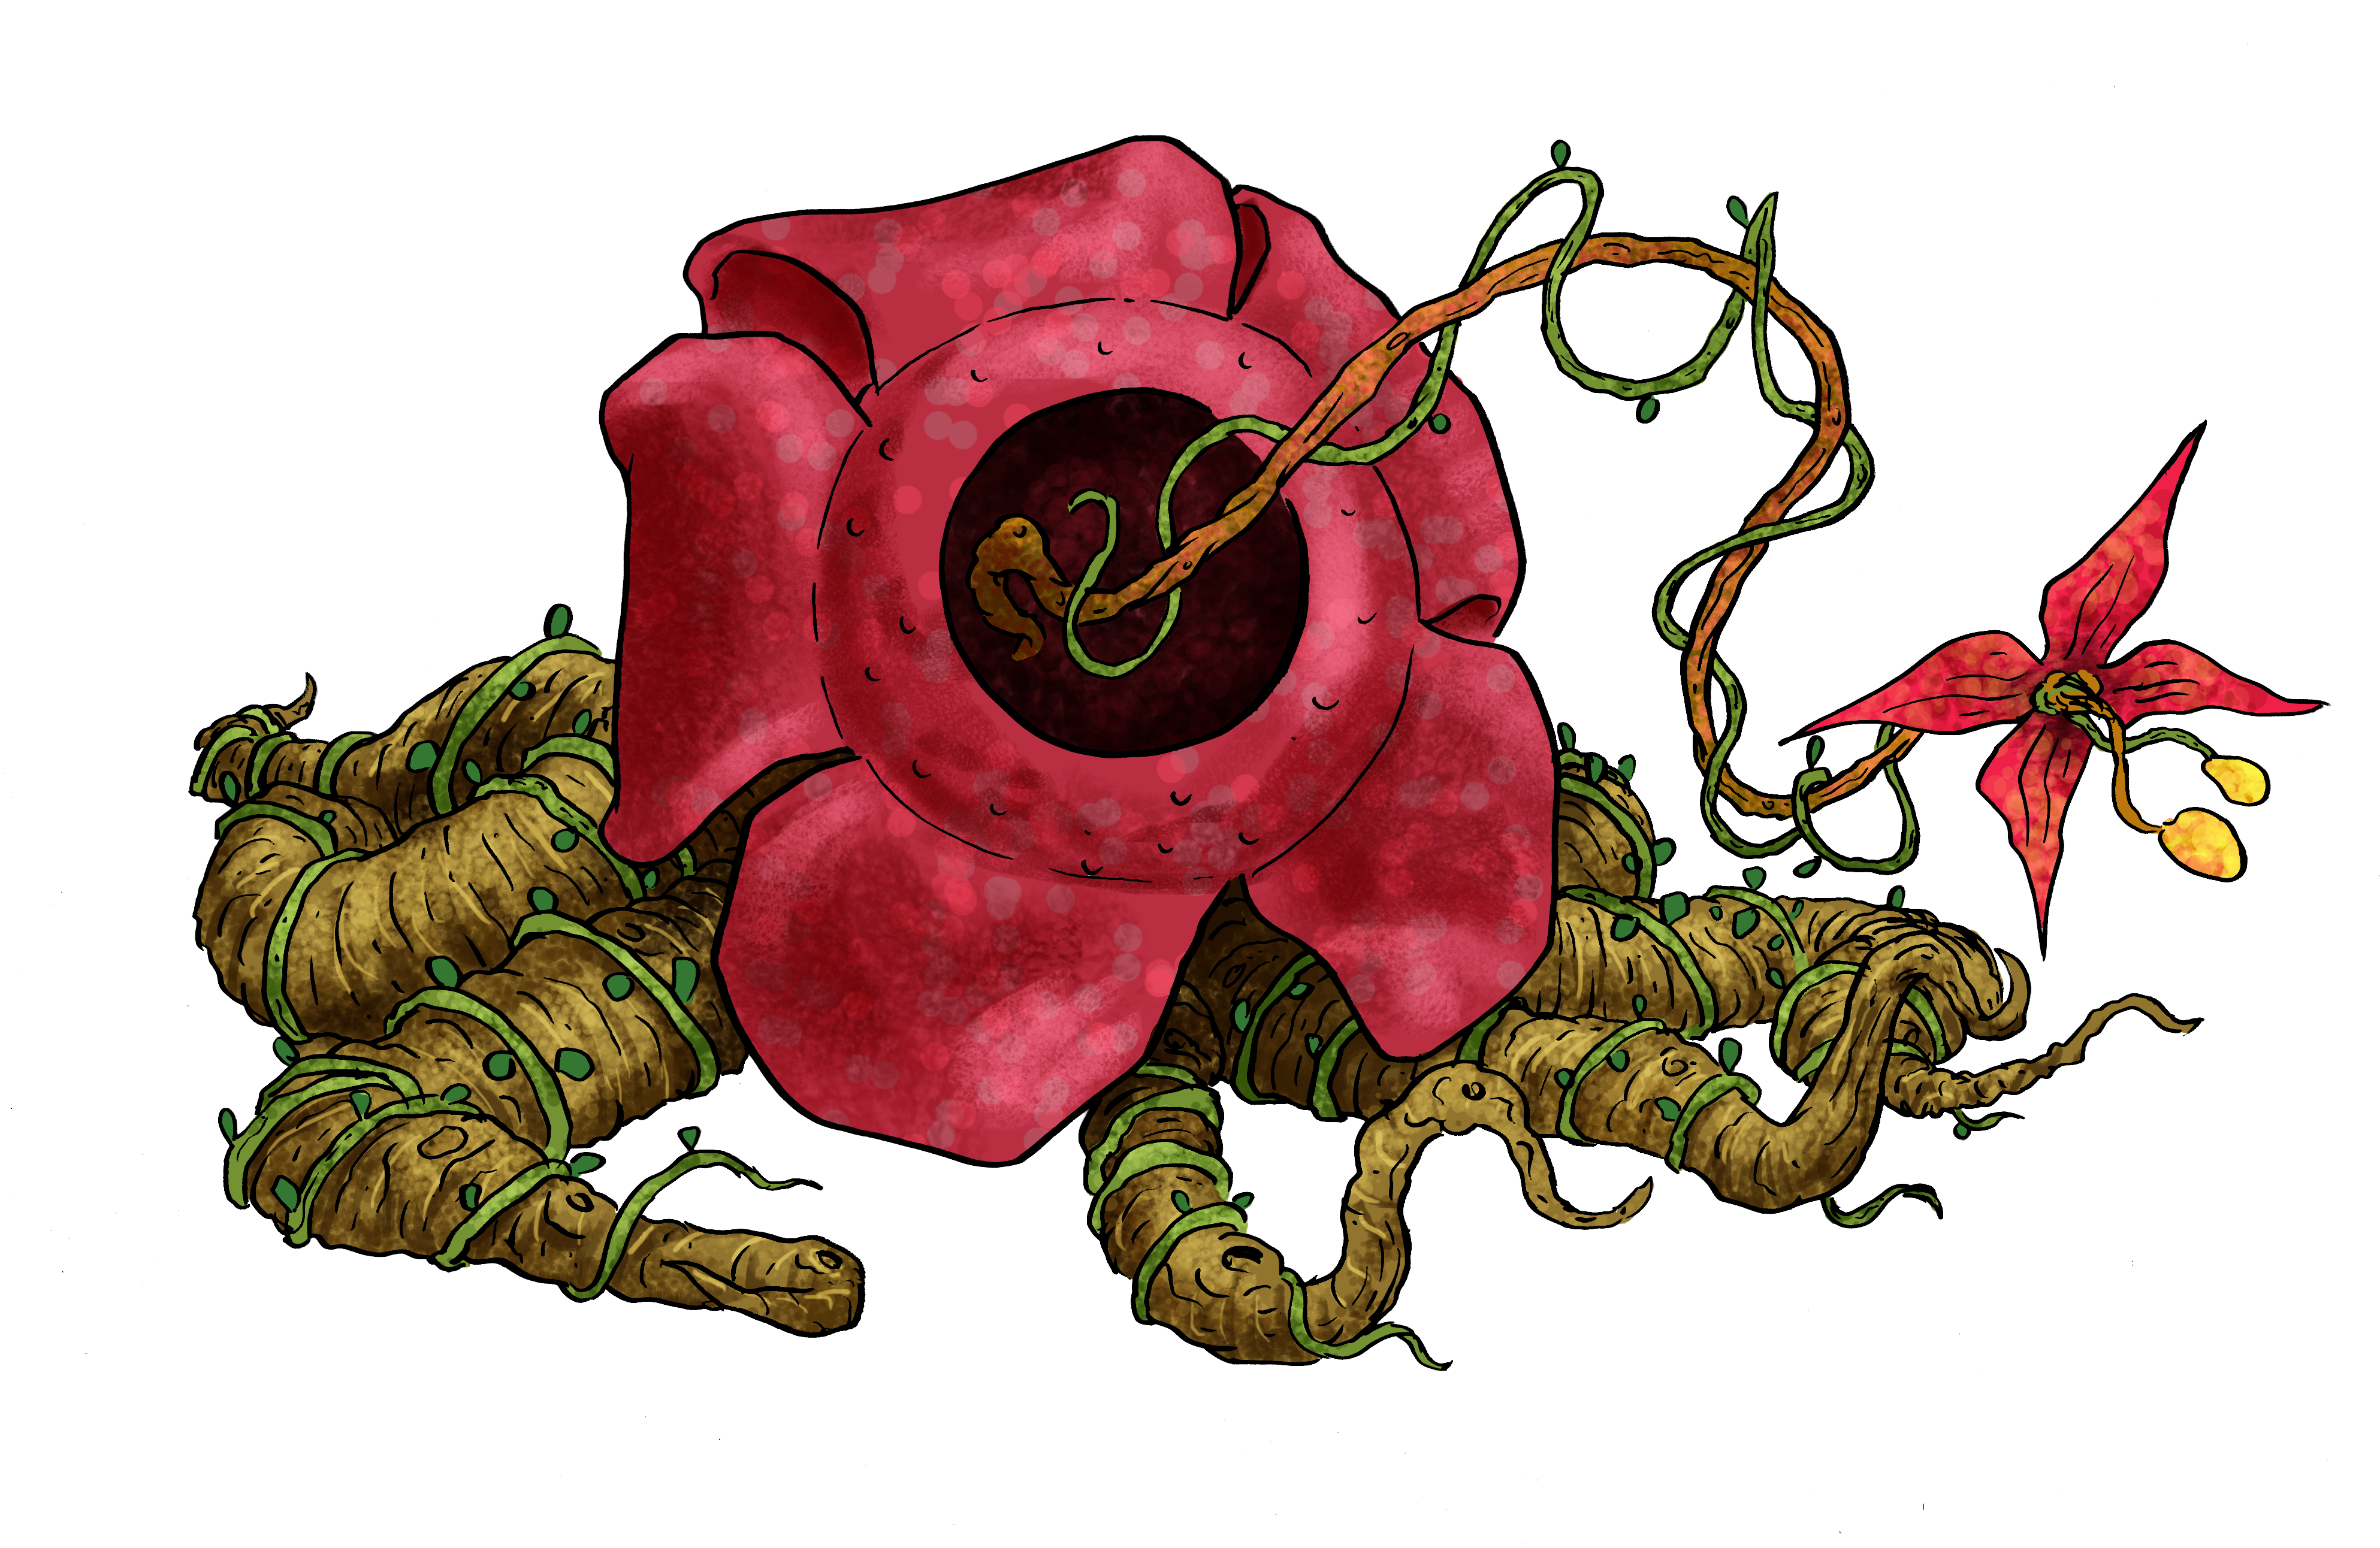
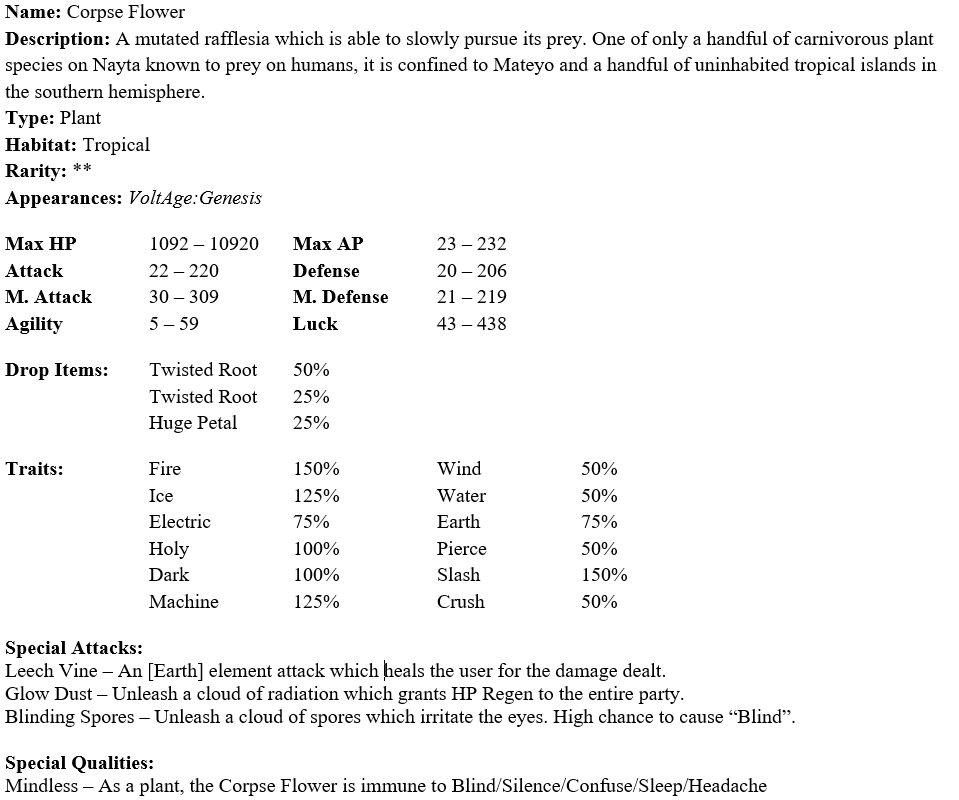
Starting off, we see that the Corpse Flower has A LOT of hit points. When taken with its solid Defense and M. Defense stats, this means that in spite of its abysmal Agility score you are highly unlikely to be able to kill it before it attacks. And speaking of: the Corpse Flower’s primary attack is based on M. Attack, so if you want to reduce its damage (and healing…more on that in a second) capabilities consider using abilities which reduce M. Attack. Also, note the extremely high luck statistic…as discussed previously, Luck affects a wide range of “hidden parameters” such as Evasion, Crit Rate, etc.…there’s not much you can do to counter this, but just keep in mind that there’s gonna be a little more to this enemy than meets the eye.

The Corpse Flower’s weaknesses are pretty straightforward: It takes 50% more damage from both [Fire] and [Slash] attacks, and 25% more damage from [Ice] and [Machine] attacks. [Holy] and [Dark] skills are neutral (boooo!) and every other damage type in the game does significantly less damage to these guys.

The Corpse Flower has three special attacks, and depending on how the fight progresses these abilities can make your life pretty miserable…the first, “Leech Vine”, is the Corpse Flower’s basic attack. It deals [Earth] damage and heals the flower for the amount of damage dealt; these guys hit very hard, so be sure to keep your HP up! Next up we have “Glow Dust” which grants HP Regen to the Corpse Flower and any allies. Normally this would fall under the “annoying” category, but since the flower’s basic attacks also heal it, you’ll need to really keep up the pressure on these guys just to cancel out the health they are regaining each turn! Finally, we have “Blinding Spores” which has a high (50%) chance to “Blind” your entire party.

So, how do we kill these guys? Not gonna lie, these are some of the nastiest “standard” enemies in the game…but it can be done! To cancel out some of its nastier stats, consider having Nolan use skills that reduce M. Attack, or possibly Defense / M. Defense to maximize the damage you can deal. If you snagged the Maalik revolver as you were heading through the Trabunco Mountains, the “Consecrate” skill will cancel out any possible health regained from Glow Dust and/or the Leech Vine ability…consider having it equipped on somebody for the entire time you are on Mateyo. Other good characters to bring along are Allan or Carmen for their selection of [Fire] element skills, but keep away from Allan’s “Magma Burst” ability: it’s a dual element [Fire/Earth] skill, so the bonus from the fire damage will be mostly cancelled out…Isaiah and Corbett both learn elemental blade skills which are extremely effective against these guys, and if you have Butler in your party he will have access to a whole suite of [Ice] abilities you can use to deal extra damage. Other than that, just try to focus on dealing a lot of damage and keeping your HP as close to full as possible…these guys are tough, but I believe in you!

(1 edit)

Hey everyone! Today we'll be talking about the Anidade, a cloud of ghostly entities that feed on the sanity of the living! But, don’t drive yourself crazy trying to fight them…just read on for all the inside details on these annoying (and horrifying) little buggers.

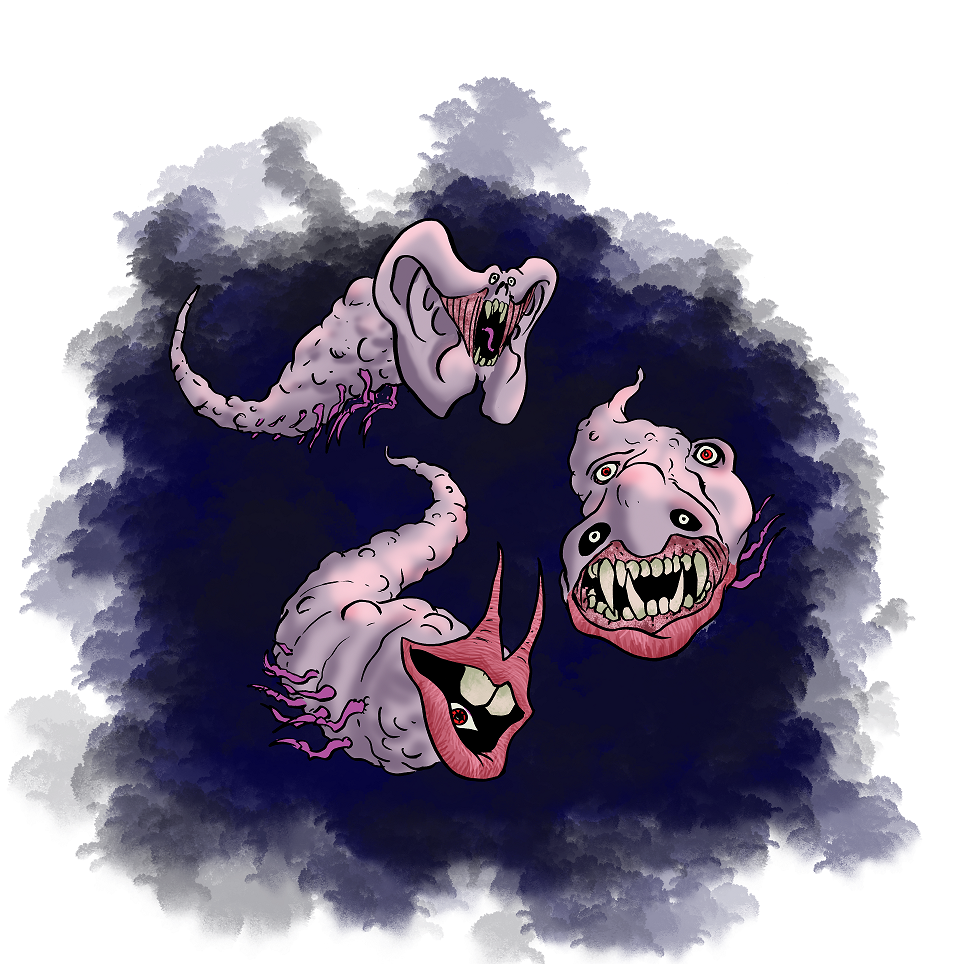
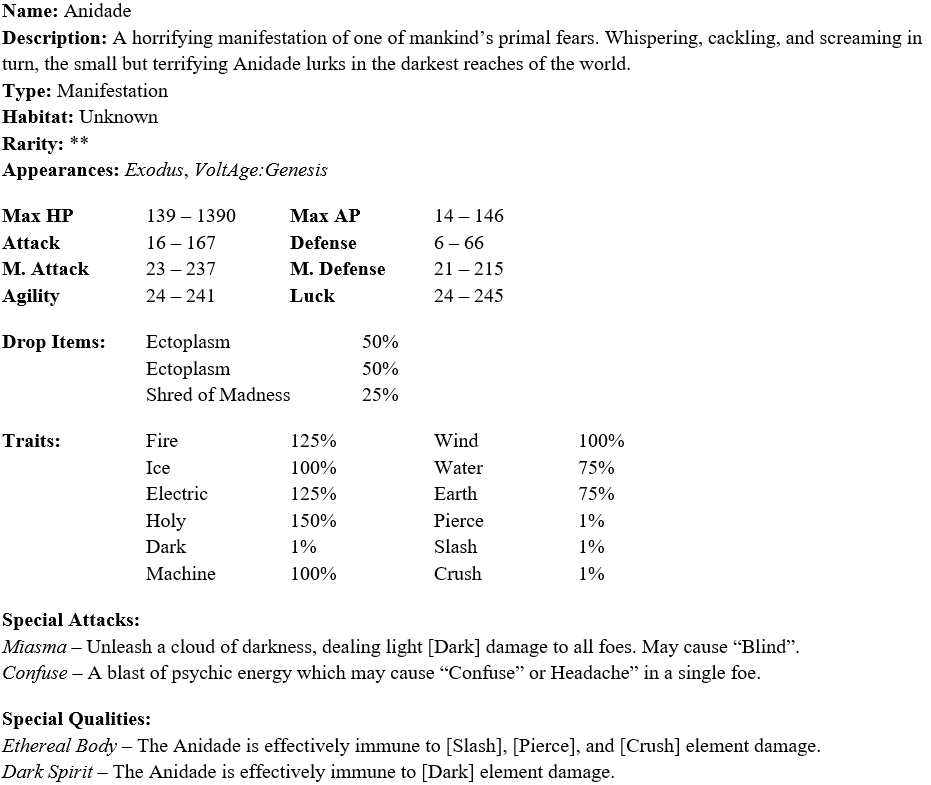
First up…stats! As a “swarm” type enemy the Anidade isn’t super intimidating stats-wise, but its M. Attack and Agility stats will let them get the drop on slower characters and ensure that their Miasma attack does respectable damage; while they also have a pretty decent M. Defense stat, their HP is so low that this shouldn’t matter too much as long as you are able to do a type of damage they aren’t immune to. Their Max AP is high enough to let them rely on their special attacks for several rounds in a row, and their Attack and Defense stats, while low, don’t really matter all that much to this enemy.

The Anidade’s special qualities, while annoying, are extremely straightforward…their special attacks however can cause problems, since the Anidade tend to attack in groups. One hit from Confuse may not bother you much, but when you start having multiple chances per turn to have characters attacking each other, the fight can quickly get out of hand. Their Miasma ability is capable of dealing respectable damage to the entire party, but (thankfully) the “Blind” chance shouldn’t be a problem, since you can’t deal physical damage against them anyway.

If you are unprepared the Anidade can really become a problem, since they start showing up at a point where you may not actually have access to any other strong Kinesis users besides Gregory. His only effective attack at lower levels is the basic Pyro ability, which means you may end up spending multiple rounds trying to kill them one at a time while their buddies whittle you down. If you have any Molotovs or Unstable Batteries, they should easily dispatch an entire group with a single toss; otherwise you better hope you have some elemental charms or weapons that add new Kinesis skills!

I'll be trying to get some more valuable monster info out soon, so try to stay out of trouble until then, alright? After all, the Deadlands are a dangerous place!

                                                                                                                                                                                                                                                             -Zach

Okay, So I've got it figured out (I think)...

1) When starting the quest in the updated version you will automatically be sent to the forest and Tony will join your party.
2) Players will not be able to leave the Woods until the quest is done, but based on a number of factors (progress in the game, Tony's level) this should not be a hardship for the party.
3) For players who have already started the quest in its old (i.e. unstable) version, Tony will join the party right before the bats attack. This will prevent the issue where the player is unable to "finish" the quest (since the cutscene will not begin if Tony is not listed as a party member).

4) For players who have already done the quest, never got Tony, and haven't been able to progress the cutscene, I THINK I have a fix...however, I am not 100% sure b/c I was not able to duplicate this specific sequence (since I can't be sure what version everyone is using, and there have been quite a few changes to this quest in the past). As near as I can tell, players who have followed this sequence will A) Have an unspeaking, unmoving Tony on the western edge of town, B) Still have the "Fresh Blood" quest active, and C) Will have the "Ghostly Wing" Key Item. If you meet these criteria, go to where Tony was previously standing and speak to the man in the suit. He will send you to the Hunters' Guild and SHOULD kick start the cutscene for you.

Thanks for letting me know about this issue...I am actually playtesting the latest update today so unless I find something game-breakingly bad the new version will be available by tomorrow evening! Keep an eye out for a new set of dev notes coming soon!

Oof...Tony causing problems again. This was one of the earliest quests I put in the game, and I have to say, I was not as adept as I am now...I actually made some changes to that quest already, but I wasn't aware of this...let me do some testing and I will try to fix it. Let me make sure I have the sequence of events correct:

1) You entered the Hunters' Guild and saw the exchange between Isiah and the Captain, leading to her asking you to recruit a new member.
2) You spoke to Tony, but he did not join your party.
3) You then proceeded into the Marecocha Woods as normal, and killed the Ghostly Bats. Tony then talked about how easy the fight was (lazy bum), and you were whisked back to the Hunters' Guild.
4) Nothing happened.

Is that correct?

Hello again! This week I'll be focusing on transferring and updating data about some of the monsters in VoltAge:Genesis, and I figured we'd start the week off right with a NASTY one: the Goni!


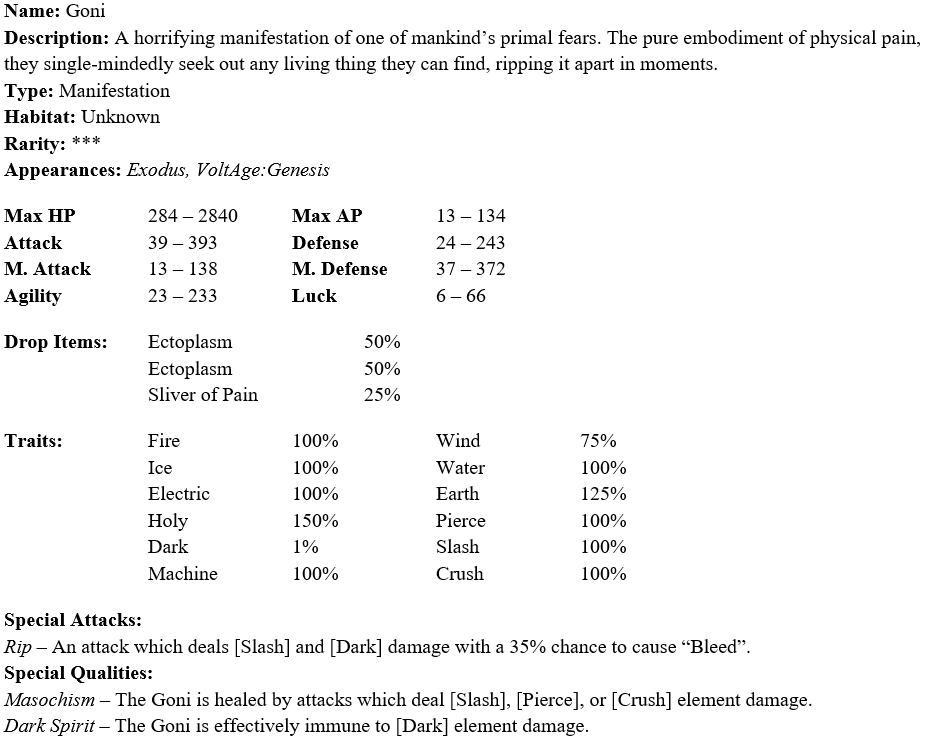
Alright, let’s run down the numbers here…The Goni has solid HP and Defense, but negligible Max AP and M. Attack scores. Their Luck is absolutely abysmal, which is great because that means they are far less likely to get critical hits…this is important, since they have a ridiculously high Attack stat for a standard enemy and the M.Defense to last a few rounds in battle. Their special qualities cause even more grief, since they are effectively immune to [Dark] damage (rendering your most powerful attack options when they first appear useless), and can actually be healed by any attacks which deal [Slash], [Pierce], or [Crush] element damage.

Thankfully (?), the Goni is a straightforward attacker whose only option in battle is Rip, a [Slash] and [Dark] element attack which deals decent damage and has a 35% chance to cause “Bleed”.

These guys are no joke alone, and with Anidade backup they can quickly tear apart an under-levelled party. Use any Molotovs, Nitrogen Canisters, or Unstable Batteries you may have, and if you’ve acquired a Heaven Charm, you can put it on Gregory to deal massive damage. If you don’t have one, he will probably need to be relegated to healing duty since his Umbra spells will be useless here. Players who spent extra time on the mainland will have a few more options, especially if you managed to get Allan into your party before heading to Mateyo. Otherwise, just avoid physical attacks at all costs and remember that Nolan’s Dread ability will work on these guys!

Hey there everyone! Today we’ll be talking about a sort of…energy field…that surrounds us, penetrates us, and binds the galaxy together…no I’m not talking about The Force, I’m talking about LUCK! And by association, I’ll also be telling you about the nine “hidden” attributes. Fans of the meta rejoice, because this is one post you’ll be glad to have read! So, what purpose does luck serve in VoltAge:Genesis? To understand that, we’re gonna have to talk a little bit about a screen we don’t see a lot of in my posts:


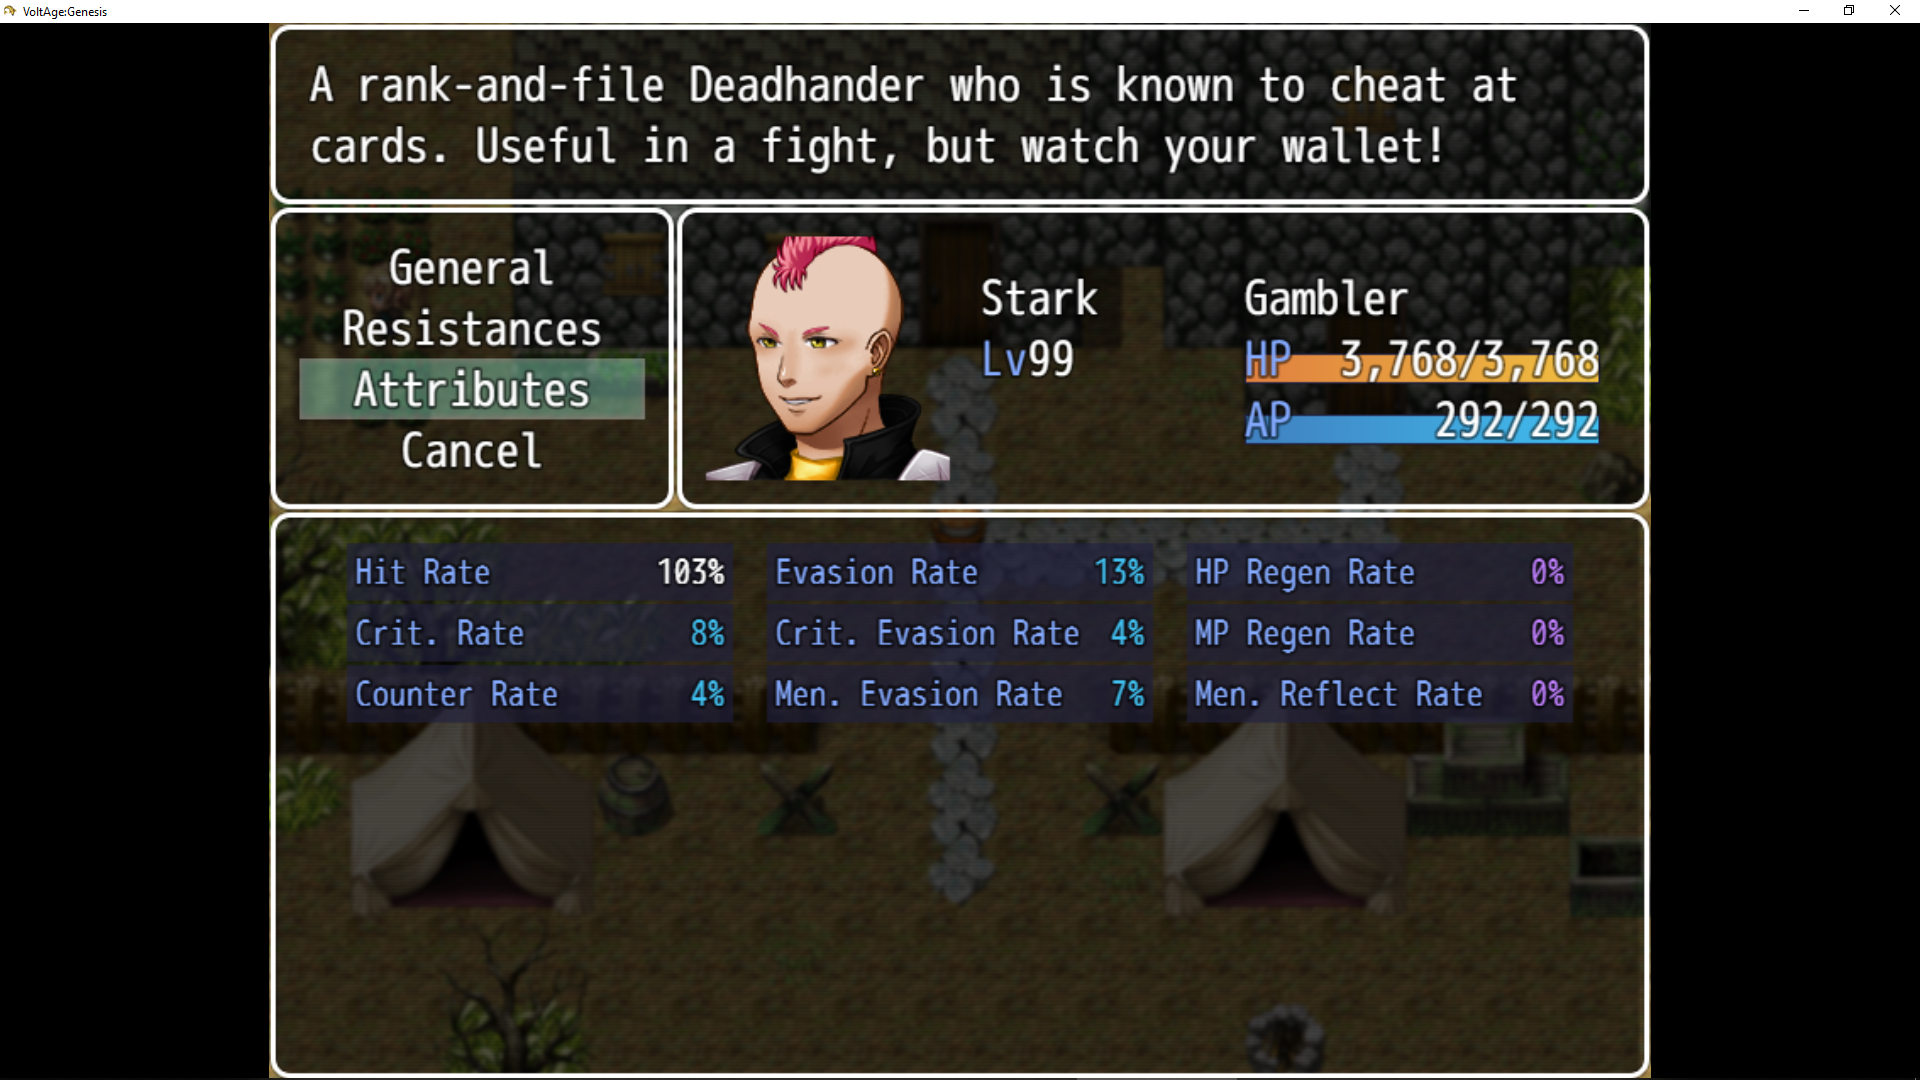
As you can see, there are a total of nine “attributes” presented…these are the stats a character has other than the traditional Strength, Agility, etc. that we generally talk about. While a lot of weapons, armor, and accessories can have an impact on these nine attributes, they aren’t really “advertised” in the way those other statistics are. These nine attributes are things you’ll just have to experiment with and check on frequently, and if you see a piece of gear that seems a LITTLE too valuable for what it does, check those attributes! You may be surprised at what you find.

SO: what do the attributes actually do? I’ll tell you!

Hit Rate Hit Rate affects how likely you are to successfully connect with an attack. The player character’s Hit Rate and the target’s Evasion (explored below) are calculated together to determine your “actual” chance to hit an opponent, and depending on their size enemies can have anywhere from a 2.5% to a 20% Evasion rate, so the higher your Hit Rate is, the better! While some gear does offer slight benefits to your Hit Rate, some weapons (such as SMGs) actually have a significant negative effect on your accuracy, so if you can’t seem to hit those smaller enemies (like the Deathwasp) in combat, check your Hit Rate! Please note that all party members have a “base” Hit Rate of 95%.

Crit. Rate A character’s Crit. Rate determines how likely they are to get a critical hit in combat; a critical hit ignores resistances and deals a massive amount of bonus damage, even against bosses. As such, weapons which offer even a slight (1-2%) bonus to a character’s Crit. Hit Rate should not be ignored. Keep in mind that most (but not all) Kinesis and Burst abilities are unable to get critical hits, no matter how high this stat is. Additionally, please note that all party members have a “base” Crit. Hit Rate of 4% (Corbett's passive ability "Dragonslayer" grants him an additional +4%, for a base of 8%).

Counter Rate When a character gets a “counter”, they negate all damage from an incoming physical attack and get a free hit on their opponent. While this can be a rare occurrence, it is always a welcome one. It should be noted that Delphine’s “passive” ability grants her a bonus +5% to her Counter Rate…all other party members have a “base” Counter Rate of 0%.

Evasion Rate Evasion Rate is how likely you are to avoid an attack. As was stated in the description of “Hit Rate” above, this attribute is directly affected by an attacker’s Hit Rate and vice versa. Take note that not all attacks and abilities can be evaded, however! All party members have a “base” Evasion Rate of 5%, however this stat can be heavily affected by the use of shields and certain weapon types.

Crit. Evasion Rate A character's Crit. Evasion Rate reflects how likely they are to be able to convert what would otherwise be a "critical" hit into a "normal" one. Therefore, if a character has a Crit. Evasion of 10%, there is a 10% chance that a confirmed critical hit will be reduced to a normal one...clearly, this is an important stat to boost, since a poorly timed critical hit can easily turn a battle against you.

Men. Evasion Rate Men. Evasion is probably one of the hardest attributes to increase, and with good reason…this stat allows you to completely avoid those highly damaging Kinesis attacks utilized by many of the toughest foes in the game.

So now that we’ve got THAT out of the way, let’s talk about LUCK! The first six attributes on the list above are affected directly by a character’s “Luck” stat…for every 100 points of Luck a character has, their Hit Rate, Crit. Hit Rate, Counter Rate, Evasion Rate, Crit. Evasion Rate, and Men. Evasion Rate will ALL be increased by 1%! This may not sound like much, but when you think about how low the “base” is for so many of these attributes, you quickly realize what an impact luck can have…for instance, Stark may not be the strongest fighter in the game, but at higher levels all of the aforementioned stats will be 3-5 percentage points higher for him than his less lucky allies. Keep this in mind when picking gear for certain characters…also, it's important to note that a character's "Luck" stat affects how likely they are to resist being affected by negative status effects in combat.

The three remaining attributes are normally set at 0%, and can only be increased using skills (in battle) or the rarest of equipment. For completeness however, we’ll discuss them briefly here.

HP Regen Rate HP Regen Rate indicates whether a character will automatically heal some lost HP at the end of each round. The % reflected is the amount of the character’s maximum HP that they will regain, so if a character has a +2% HP Regen rate, they will regain 2 HP for every 100 in their maximum. Note that if a character is unconscious this attribute will have no effect.

AP Regen Rate AP Regen Rate indicates whether a character will automatically heal some spent AP at the end of each round. The % reflected is the amount of the character’s maximum AP that they will regain, so if a character has a +2% AP Regen rate they will regain 2 AP for every 100 in their maximum. Note that if a character is unconscious this attribute will have no effect.

Men. Reflect Rate Men. Reflect Rate is a character’s chance of “bouncing” a damaging Kinesis or Burst attack back onto the user. Skills and equipment that boost this attribute are among the rarest in the game. Unfortunately, players will have an opportunity to experience the “flip” side of this attribute right from the start of the game…Dwearians and Deisols both have a passive “Men. Reflect” ability that can be a nasty surprise for parties which rely heavily on Kinesis abilities.

That’s all for now…thanks for reading, and STAY LUCKY OUT THERE…the Deadlands are a dangerous place, so you’ll need all the help you can get!

(1 edit)

Hey, hey, hey! Hope you're enjoying seeing all the fancy weapons out there, because I'm having a good time talking about them! Next up on the agenda we have the SPEARS category. Spears are primarily physical weapons which offer a universal 2% EVA bonus along with a nice mix of other hidden stat bonuses and special skills / features.

Despite the relatively small number of weapons in the category, there are quite a few characters who can use spears...Both Lucas and Butler can use every spear in the game, while Allan and Isaiah are limited to 1-Handed Spears only. Conversely, Nolan and Corbett can use 2-Handed (but not 1-Handed) spears effectively in combat. Nolan will benefit from the hidden stat bonuses and decent attack power of the spear category (especially early on), while Corbett will enjoy having weapons that do something other than [Slash] damage...For Isaiah, 1-Handed spears are a solid option that deal good damage while letting him still hold onto a shield, and Allan will enjoy having another physical damage option for his "Savage Focus" passive. As "Hybrid" characters, there are a number of spears with good ATT and MEN bonuses that Lucas or Butler could benefit from.

As always, I've laid out a few of the weapons from this category that I feel are worth a second look, along with explanations as to why. Keep in mind, these lists tend to focus more on weapons with special quirks or features that make them useful, rather than just highlighting the most powerful weapons out there.

1) Wasp Spear - As a Trailblazer (TrB) weapon, the Wasp Spear has slightly lower ATT power than the standard for a weapon of its tier; however because the 2-Handed Spears have such high natural ATT bonuses, this isn't as painful as with some other Trailblazer weapons. On top of that, it has a nice 6% chance to cause "poison" whenever you make a standard attack or use an attack skill that makes physical contact with the foe!

2) Obsidian Spear - The Obsidian Spear is a Deadhander (Dh) weapon that can be a little hard to track down (and is pretty expensive to boot), but it offers decent ATT power, a bit of extra MEN, and a whopping +30 Luck bonus to boot. It's the only 2-Handed Spear that deals pure [Slash] damage, and it also allows the wielder to use the very powerful "Flaying Wind" skill, a Kinesis attack that deals [Wind] and [Slash] damage to the entire enemy party. In short, this can be a useful weapon for anyone that uses 2-Handed Spears (for different reasons), and at the very least you should consider picking one up to give you a nice AoE option for characters that don't normally have access to such attacks.

3) Amarok's Fang - Like the Obsidian Spear, Amarok's Fang is a solid all-around weapon that has decent ATT power with a nice MEN bonus to boot...its [Ice] and [Pierce] damage combo is somewhat rare as well, and perhaps most important of all, it carries the "Cryo Spear" skill, which deals pure [Ice] damage while ignoring enemy defenses. Consider throwing this on Allan to give him access to a powerful attack option in an element he can't normally access.

4) Mystic Stick - The Mystic Stick is high-end Treehugger (Th) weapon that can only be found if dropped by (or stolen from) high-level Treehugger Chanters. It has an unusually low ATT bonus, but makes up for it by having the best MEN bonus in the spear family. It should also be noted that this weapon grants the wielder a +20 RES bonus (which is kind of rare) as well as a 5% MEV chance (which is very rare). It's not gonna be the best offensive option for any character, but the nice defensive boosts it offers (as well as its built in "Glow Dust" skill) can definitely help out in those battles where you need to prioritize survival over damage output.

And there you have it! Hopefully some of this information will prove useful, and until next time, stay safe out there! The Deadlands are a dangerous place, after all...

(1 edit)

AAAaaannnd I'm back! Now it's time to go over the second half of the sidearms category...as stated before, sidearms are small (generally one-handed) guns that usually deal [Pierce] damage and have solid (but not extraordinary) stats. One of their most useful features is their ability to use gun mods (with a few exceptions), giving wielders the option of branching out into various elemental damage types not normally available to them. That being said, the weapons we are looking at now (magic guns and SMGs) are quite a bit more varied than their more vanilla counterparts, so let's get down to it!

First off, let's look at who can use what in these subcategories...both Carmen and Stark can use magic guns and SMGs (making Stark the only character that can use every type of sidearm in the game), Nolan is limited to SMGs and Nyla is limited to magic guns. So what's the big deal about these weapon types? First off, let's look at the magic guns...these weapons all offer some sort of MEN bonus as well as some sort of bonus skill or stat effect (with the exception of the Toy Gun); however it's important to note that only two of these weapons (the 0.00 Absolute and the Aldaraia II) are compatible with gun mods. Now, for the SMGs...these are definitely the "black sheep" of the sidearm family for a number of reasons...they have very low ATK bonuses, the user gets a massive penalty to their HIT, and they are two-handed weapons, meaning you can't wear a shield while using one! However they make up for all of that for one simple reason...every SMG changes the normal "Attack" option to "Sweep", allowing the user to attack every enemy on the field at once! In effect, these babies act as a low-power AoE weapon that can wipe out whole groups of small enemies before the battle even starts. And as for that low HIT chance? All three of the characters who can use SMGs have a way to mitigate (high Luck, high Agility, or a passive HIT bonus).

Now for a look at (you guessed it) some of my favorite weapons from the subcategories we've looked at.

1) Stun Gun - Topping off the list is the Stun Gun...this weapon is available fairly early (just swap Nyla's Stun Gun for a different weapon during her first quest), and is unique because it is one of only two sidearms that does not deal [Pierce] damage, making it more effective against some heavily armored enemies (like Pugil Crabs or most robotic enemies) that have a built-in resistance to [Pierce]. In addition, being a Garen Military Industries (GMI) weapon means that it has a decent attack power and packs a 5% HIT bonus. The "stun"  / "overload" effects are nice too, but since you only have a 2% chance of each don't count on them.

2) Harumaru - As the top-tier magic gun, the Harumaru boasts an incredible +73 MEN bonus, but lacks the physical stopping power of other sidearms...to add insult to injury, it isn't compatible with any gun mods either (boo!). So what makes this weapon worthy of being on my list? Simple...its built in skill "Piercing Shot" deals damage as a normal attack, but ignores all enemy defenses! That's right...low ATK doesn't matter quite so much when you are breezing past shields and chitin shells like they aren't even there. If you can get your hands on this weapon, pretty much anyone who can use it will benefit from it immensely.

3) Uziel Gal - Another GMI weapon, the Uziel Gal can be obtained early on in the game by choosing the "Gun" option (instead of "Volts") when Carmen asks you how you want to split the loot from your first adventure with her. Because it's a GMI weapon, the Uziel Gal will only drop your HIT chance by 25% (instead of 30%) when equipped. This may not sound like a lot, but early on in the game when your stats are too low to give you much in the way of bonus accuracy it can be a big help.

4) HK-71a - Another top tier weapon, the HK-71a is one of only three Imperial Senate of Garen (ISG) weapons in the game, and boasts best-in-class ATK along with a 5% boost to HIT and EVA. Most importantly of all, it grants the wielder use of the devastating "Steel Rain" attack skill, which effectively doubles the potential damage to each opponent it strikes (compared to a normal SMG attack). The AP cost isn't cheap, but when you absolutely have to wipe out all of the mobs by the end of the turn there's no better option.

And there you have it! Another day, another weapon category down! At this rate, I'll have every single weapon on the forums before you know it! Until next time, stay safe out there...the Deadlands are a dangerous place.