Indie game storeFree gamesFun gamesHorror games
Game developmentAssetsComics
SalesBundles
Jobs
Tags

Citizen Pain | First Person Action Prototype in Unreal Engine 5

A topic by Alessandro "Ordnas" Capriolo created Mar 26, 2023 Views: 5,137 Replies: 154
Viewing posts 121 to 154 of 154 · Previous page · First page

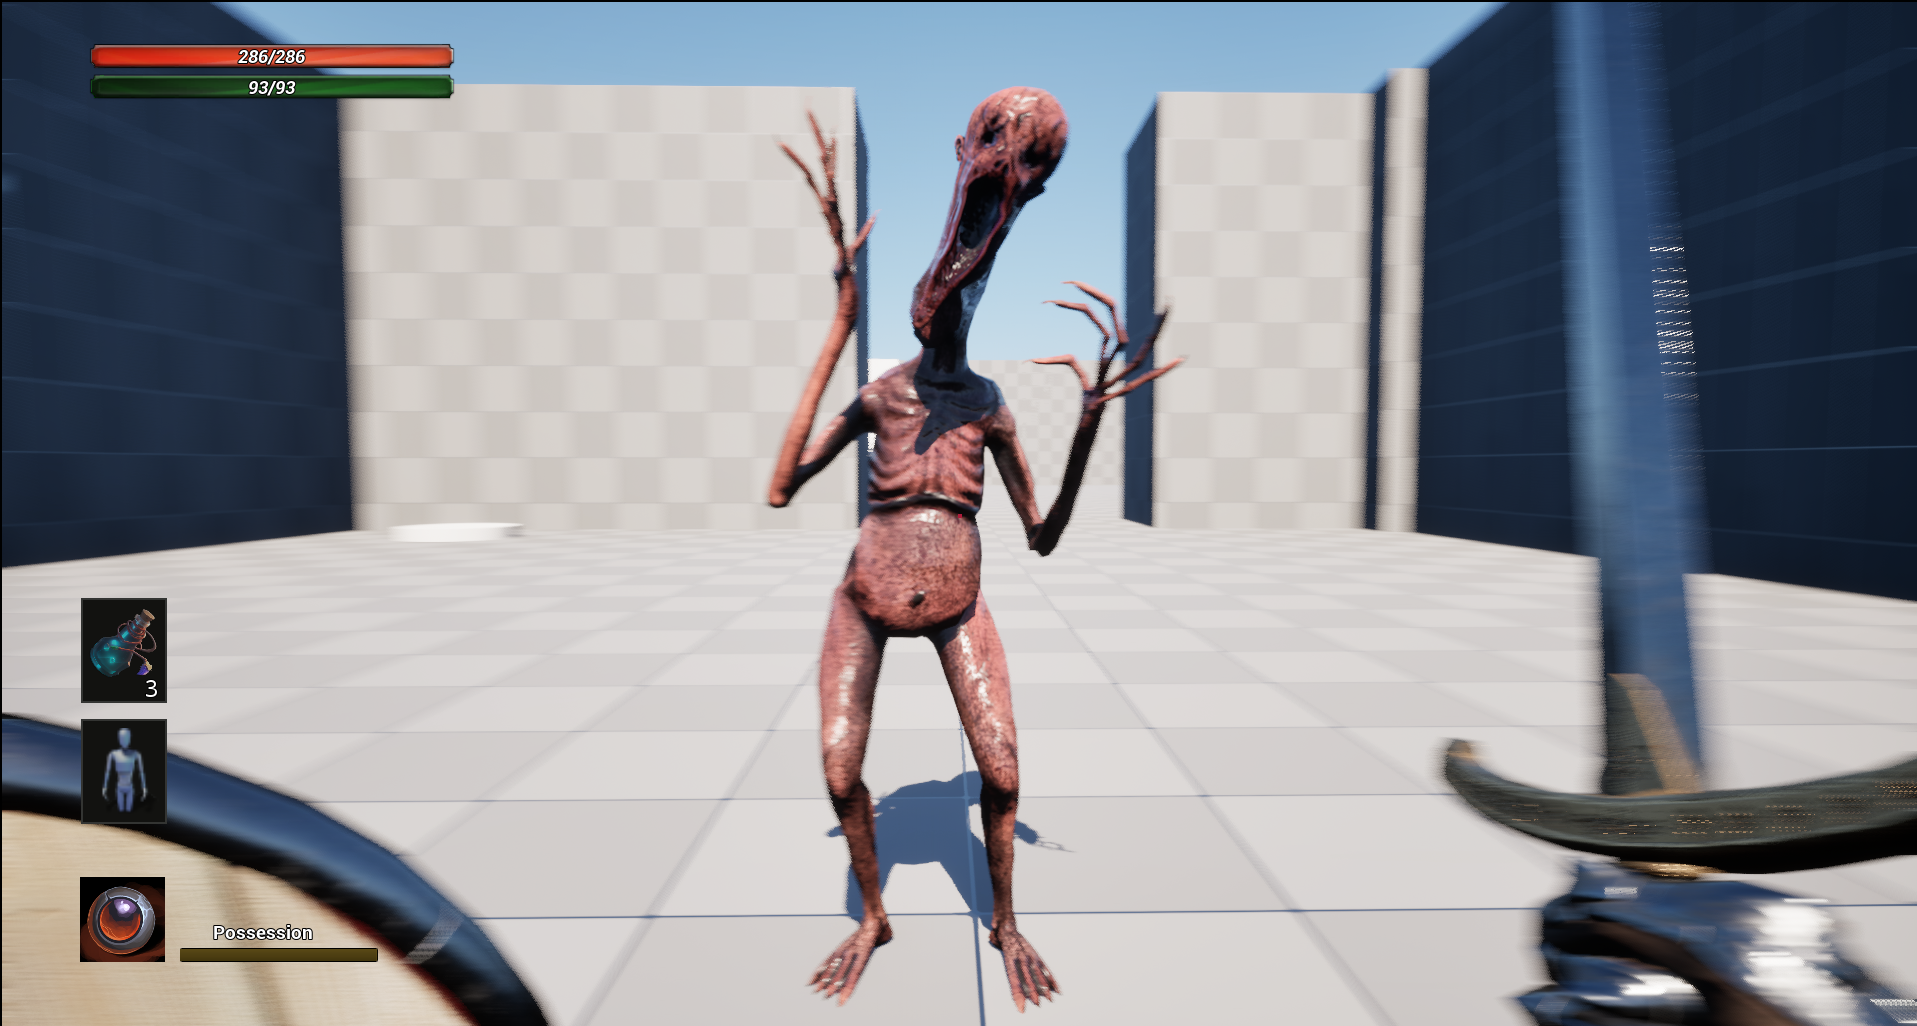
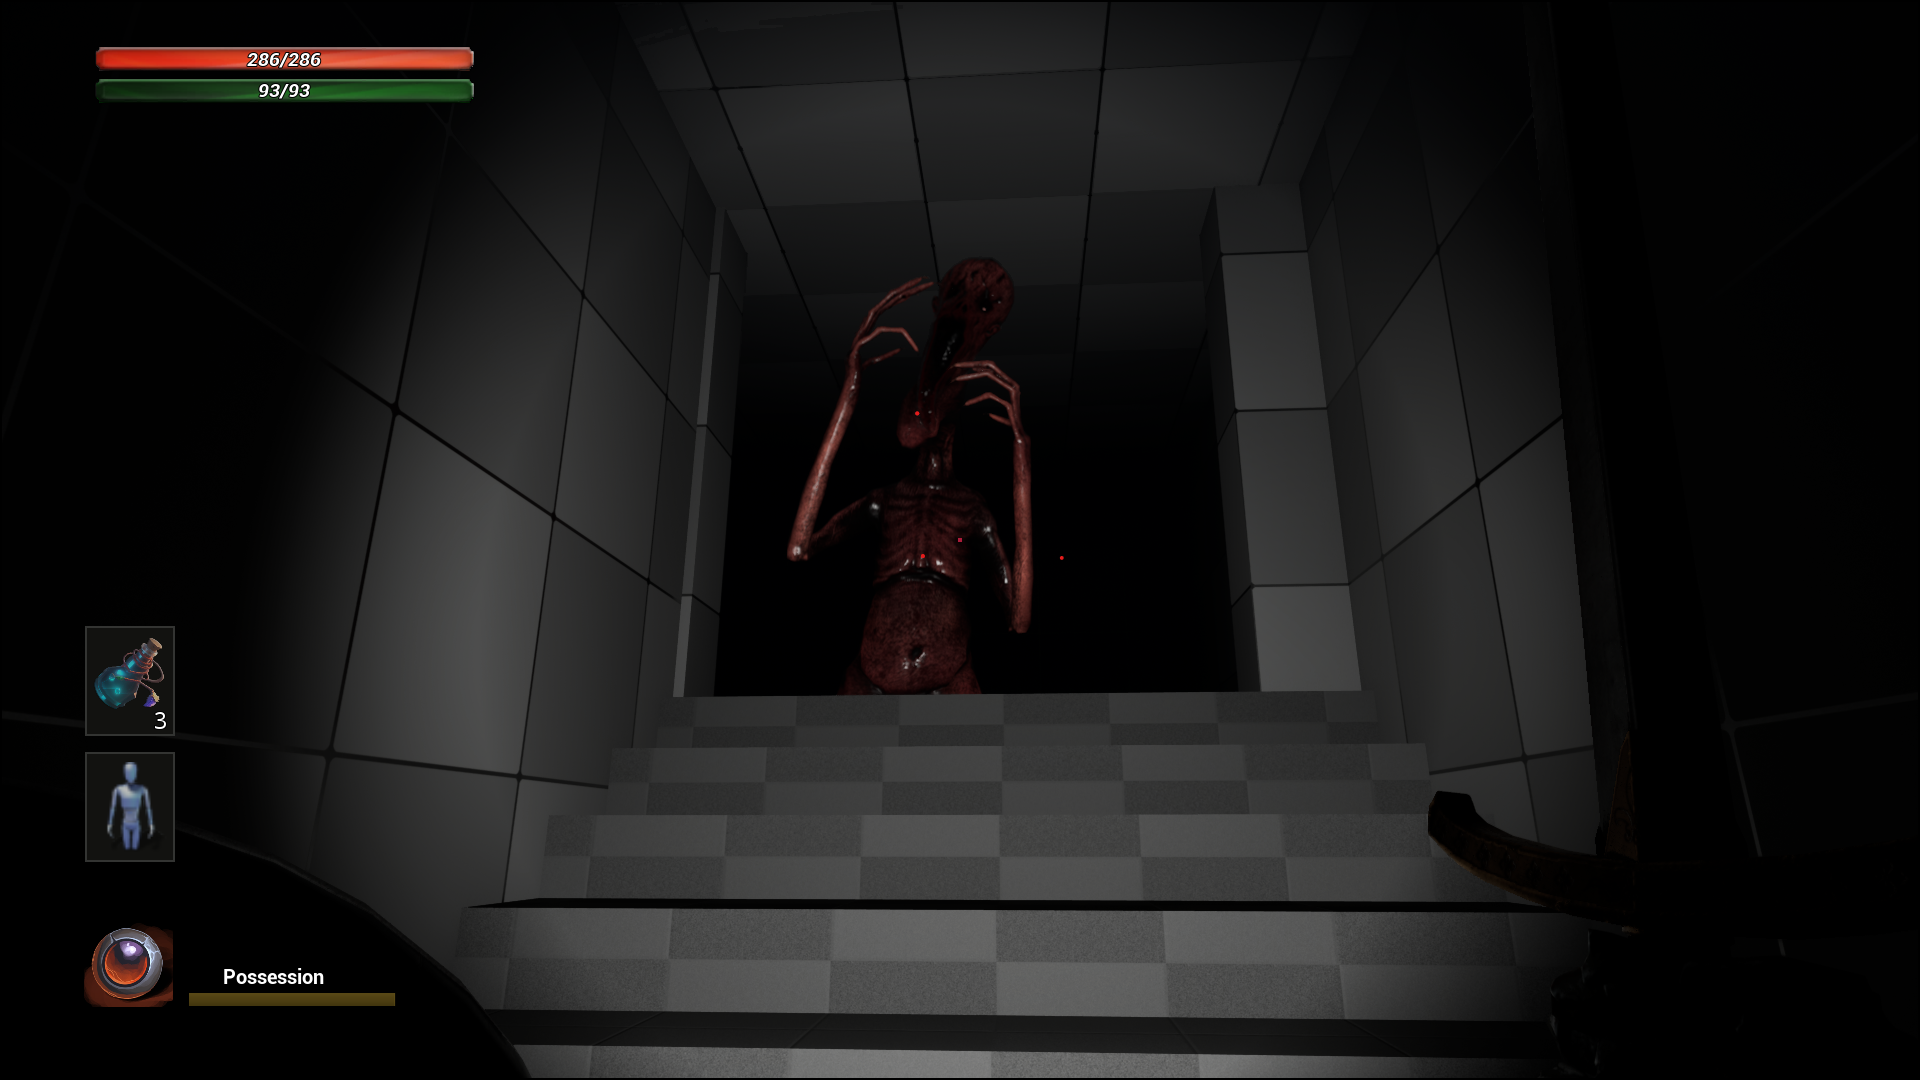
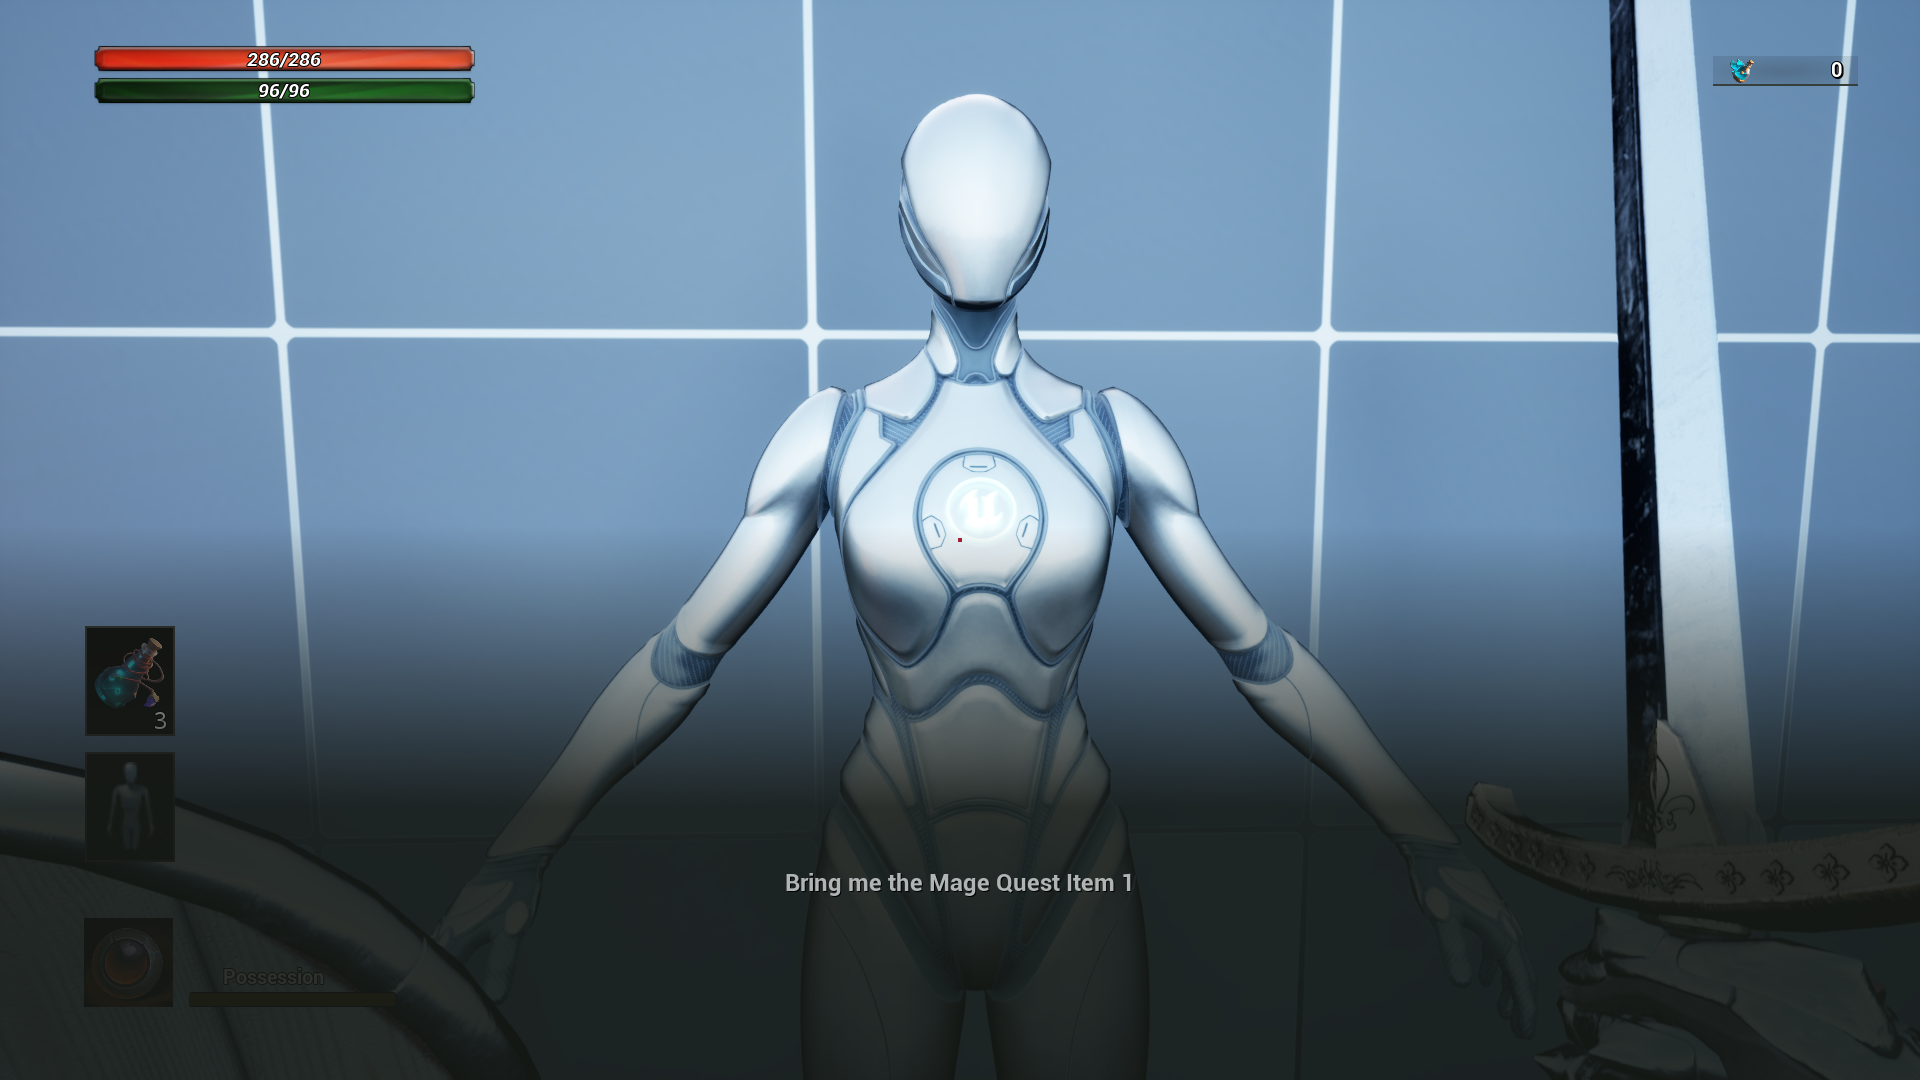
I put in camera effects when you have possessed the enemy: zoom in to the enemy, color desaturation, and a green tint, to make it clear that you are in the Possession state.

For now I’m done with Possession, tomorrow I’ll start implementing a new mechanic taken from horror games.

The creature that will be featured in the horror section of the game.
To unlock the shortcut, the player will have to get past a small horror section where without weapons will need to escape from a creature. The horror section will be very much inspired by the scarier parts of games like Resident Evil and Dead Space.

Layout of the small horror section, a simple go from point A to point B, where you have to pick up an object at point B and bring it back to point A. The creature will at some point appear in the middle of the level and follow the player. The goal is to activate the elevator to escape, without getting caught by the creature. Passing the level will unlock the shortcut.

I tweaked the lighting to make the atomosphere more horror. The main mechanic works (creature chasing you and the player has to reach the elevator without getting caught). I’m trying to wrap up the prototype horror section as quickly as possible, but the temptation to add more stuff is always around the corner.

Operating the lever opens the elevator door. The door opens very slowly as the creature will come closer and closer to the player. I am implementing this mechanic to increase the tension before the end of the horror section of the game.

I am implementing the Level Up UI screen (in the screenshot still work in progress).

Level Up is available as an option while resting at the hub area. When leveling up, one spends accumulated souls to invest points into one of 5 stats. They can be increased up to a level of 3.

I am continuing the implementation of the Upgrade Stats UI screen. I added buttons to increase parameters, various info about owned souls and costs, and animations to open and close the UI screen.

Linked the Player Stats UI screen to the Player Stats component, so that increased stats are saved in the Player. Also reiterated on the UI screen graphics (icons, text etc.). Next I need to implement the Player parameter level logic (so that if Vitality is at level 3 the player has more health).

I am implementing the Skill Tree UI screen, that features both passive and active abilities. Players can unlock abilities, but they must have enough Special Items to apply the ability. Each node enhances additional stats and grants various effects, such as increasing the maximum number of Potion uses, expanding the Possession ability and many more.

In the Skill Tree UI screen, I added a window in the lower left corner with skill information when selecting a Skill Tree node. Each node has an Ability ID, so you can easily find all the info about the ability (e.g. text description and texture image).

I have implemented side quests, these are given by NPCs. Sometimes the side quest will be collecting items, other times it will be killing a particular enemy. The NPCs have a friendship system, which increases with the completion of the side quest. If the friendship is high enough, the NPC can help you during a boss fight.

I implemented a small Dialogue Manager, when you talk to a character it shows the text of the current dialogue. During dialogue the controls are locked (as opposed to Souls-like where you can move the character freely), in first person in my opinion it’s preferable but I might change it. Initially I didn’t plan to implement any dialogues, but with the introduction of side quests it was almost obligatory (otherwise the player doesn’t understand what needs to be done).

I am implementing the Player Inventory screen. It has 2 rows, one for usable items, and one for important items for quests. Under it I’ll have to put a window with the name and description of the highlighted item.

In the inventory I added a description text on the highlighted item. In addition, the effect of consumables is briefly described (under Use Effect).

For now I am done with the UI, this week I will implement the last new mechanics of the game, it will be complicated but let’s see what comes out.

I am implementing a new gameplay mechanic: the character’s health affects the weather conditions and will have an impact on enemies. The lower the player’s health, the worse the weather conditions will be. For example, the player will be able to use traps that would only work if it is raining, and lightning could fall on enemies. This introduces a risk-reward mechanic, so that the player could be pushed to stay low on health and take advantage of the weather.

First prototype of Weather System linked to Player Health. The lower the Player Health, the worse the weather (up to heavy clouds and rain). Next step will be to add lightning that can strike enemies and hazards dynamically created by rain.

I am implementing the slippery puddle, a trap for enemies that appears if it rains. If an enemy runs over it, it goes into stagger. I’ll probably leave the testing blue mesh for now, as I have a lot of other prototypes to do (e.g. lightning falling on enemies).

I’m iterating on a new greybox level, which will replace the testing greybox I’ve been using so far. It’s a citadel, so there’s town surrounded by the castle walls and there is the fortress at the top of the hill. For the design of the streets and squares as references I am taking inspiration from games such as Bloodborne, Dragon’s Dogma and Lies of P.

I’m currently focus on the spatial communication of the Citadel, iterating on how to motivate player movement.

For example within the market square, exits aren’t immediately visible due to the maze of market stalls obstructing the view. Players are forced to navigate the space actively, uncovering more information as they explore and mentally chart the area.

As they walk to the other side of the square, a clear exit is revealed. This different perspective allows for strategic planning, enemy spotting, and anticipation of rewards, making exploration less boring and giving a reason for exploration.

The greybox reiteration of the new level continues. I completed the lower part of the citadel, consisting of the town. The player, starting from the main gate in the lower area, must make his way through the city streets to reach the castle in the upper area. The next step is to create the castle rooms.

Fight combat against 2 Skeleton enemies. Destructibles can be useful as obstacles against enemies and be able to manage spaces better. In the future I'll have to do a pass on the destructibles in the boxes, they don't always shatter completely.

Fight against Soldier enemy. Strong attack and parry followed by a front stab. I love parries in action games, so I'm glad I included it in my game.

I’m starting the level design of the castle, with the walls and the shortcut tower that takes you back to the bonfire.
As soon as the player starts the level, the castle is shown in the distance to give the player a clear objective. Weenies (in this case the castle) are little clues to tell the player where to go.

The level design of the castle is progressing quite fast, although it will take me all month. I’ve completed the left side of the castle, the garden area, where continuing will lead to a plaza where you’ll have the choice of climbing the walls or entering the dungeon.
Sometimes I waste a little too much time on the aesthetic details, I shouldn’t since it’s a greybox, there will be time for that when I put in the real environment.


The Green Knight is one of the strongest enemies in the game because of its high damage. This knight can be too strong to fight at the beginning, as will easily kill you in 1 -2 hits. However I will still have to reiterate on the enemy, movements are still a bit too predictable.

I’m doing the stairs going down into the dungeon. I like that they are narrow and go downward to give a feeling of tension as you go down (there will be torches on the wall since it will be dark).

In the second screenshot you can see how I placed the slanted ceiling, I tried to keep the same distance from the floor. I placed it a little quickly but it will be done more carefully when I put the models in.

I am continuing the level design of the castle greybox. I put up the section of the castle walls. I’m leaving out a few things (missing floors and walls), I will fix them when I put the environnement.


Fight against Soldier enemy. Destructibles can restrict player movement, in these cases breaking them (e.g., using a dash) is a good idea to get more space.

Almost finished the level design of the last rooms, the greybox is coming along quite well. I almost finished the main square of the castle and the section of the castle wall.

The heavy attack does a lot of damage but the startup is slower than a light attack. There is a small chance that the enemy get staggered, it is an opportunity to be able to make a front stab.

Fight against Skeleton enemy. Often the best strategy is to block the enemy’s attack and take advantage of its knockback recovery to do a back stab. I still need to finish adding and polishing the animations (so some enemy recovery animations are incomplete).

Using Possession Ability the player can take possession and control enemies. Enemies will attack possessed enemies, so we should be careful of other enemies around. I'll have to keep working on many of the enemies' animations, during Possession these come out a bit broken.

Today started the facade of the gate leading to the boss’s room. Also fixed some broken things in the level like the gate that unlocks the shortcut. I was a little tired today so I didn’t make much progress.


Fight against a Soldier enemy. After a Heavy Attack, I do a back dash to avoid its attack and then perform a Lunge Attack. On its last attack, I perform a parry and a front stab to finish it.

Viewing posts 121 to 154 of 154 · Previous page · First page