Indie game storeFree gamesFun gamesHorror games
Game developmentAssetsComics
SalesBundles
Jobs
Tags
(1 edit)

Thanks for the patronage! ^__^

To answer your questions:


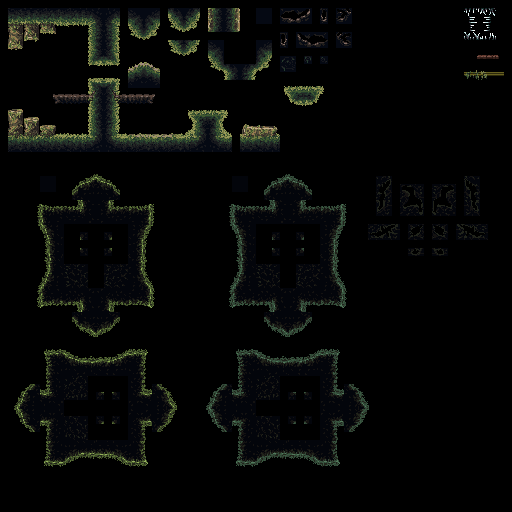
1: There's an example tileset called tileset_template which is a bit more readable than the normal tilesets, it's probably the best reference when making new tilesets.

Tiles are arranged in columns where only the tile's x coordinate matters, except that slopes are arranged in alternating rows of alternating floor/ceiling tiles with different collision checking, and autotiling using tiles from the rows you've currently selected in the tileset. The layout goes like this:

  • 1-block uphill (1 tile)
  • 1-block downhill (1 tile)
  • 2-block uphill (2 tiles)
  • 2-block downhill (2 tiles)
  • Solid blocks (5 tiles)
  • Decorative tiles without collision (5 tiles)

The exact coordinates for each type of tile are defined in the macros script, lines 100-105. They are checked in reverse order when collision checking (pixel_vacant script is the only place that handles collision checks, but the editor also uses the tile types), so setting all slope types to 0 and then also the solid type to 0 should remove collision checking from slopes entirely. (You might wanna remove them from pixel_vacant as well to save on processing power)


2: To start a completely new project, import the source file, then go to "included files" and delete the world map and level files:

When editing the world map and levels, files will be created in the game's AppData folder (the sandbox location where save files normally are created - this can be changed in the game's platform Preferences). This is convenient during development, but don't forget to add them as included files when you plan to make a release.


3: There are two autotile functions.

  • Press T to enter "Auto Floor/Ceiling" mode. Click to place points (you must do this from left to right). Press Enter to create a floor under the points, or Insert to create a ceiling above it. In both cases, all the space between the points you created and the edge of the room is filled with random tiles from the currently selected row of tiles, creating slopes to match the points as accurately as possible.
  • Press Shift+T to enter "Terrain Chunk" mode. This is similar to the "Auto Floor/Ceiling" mode, but instead of going to the edges of the room, it creates tiles around a center point (which is stored when you press Shift+T). You can create points both above and below the center point, and when you press Enter, the area delimited by these lines get filled with tiles.

The idea is that you draw a handful of lines and then the functions fill them up with random tiles, so you can design a level in just a few quick strokes (and the randomness looks more natural than human-placed tiles).


4: This is a bug, thanks for finding it! I'll try to upload a new version with this fixed as soon as feasible. In an existing project, you can fix it by changing the obj_editor_wmap Global Right Mouse event like this:


(1 edit)

Thanks again for the good explanations. A few last things i think :D

1: is it possible to use more than one texture set in the same room? (i think not its ok just want to be sure)

2: how do i set where the player starts? i dont seem to be able to find any player spawn object in the object list?

3: can i have more than one entry to the same room. Like in room A there is 2 exits both lead to room B, just in 2 diffrent locations? and how do i tie rooms togerther? i can see i need to place the door stuff from array(obj_door_sideways,obj_door_vertical,obj_door_background,NONE,  obj_door_bg_1way_front,obj_door_bg_1way_back,obj_lockeddoor_door,NONE,  obj_checkpoint_inactive))

4: How to remove or add classes? is it enought to edit "init_player_class" and "init_player_classes" ?

This is really awesome work though!

1: It's not possible. My idea was that it should be easy to reuse the same room layouts with a different tileset, so rooms are hardcoded to only use one tileset. (This is also why the tileset layout is forced to be the same for every tileset for collision checking purposes) I guess it might've been a mistake.


2: In the script config_quickclone_features, at the bottom. You provide the starting level, and the pixel X / Y coordinates.


3: The player will snap to whatever door is the closest to the edge of the screen you entered from, measured from the center of the map grid cell you moved to, so it's possible to have more than one sideways door from one room to another, but it's a bit finicky if they're placed too close to each other - as a rule of thumb you can only have one door per map cell of each type [=background, left, right, up, down].

(Map cells are indicated in the room editor, so hopefully this shouldn't be too hard to deal with.)

The world map data is used to connect levels - when you go through a door, the player is moved to whatever level is on the adjacent cell on the map. So rooms that are next to each other in the world map editor will be connected... but only if you place a door in them in the level editor. It's a bit disorienting at first, but the nice part is that the doors connect completely automatically.


4: Editing init_player_classes to add more lines of data should be everything you need, the character creation menu reads from this data when it is constructed. If you add/remove classes (instead of just changing the default classes) you also need to update the macro PLAYERCLASS_MAX to match the new value, since that is how many entries the menu reads. There's a handful of other places where the player class data is used (status and file select menu displays the name of the character's class) but these should also "just work" since they read from the same data array.

(5 edits)

i change these lines

//Quick starting position configuration
global.qccfg_starting_level                         = 0      //First level to load when starting a new file
global.qccfg_starting_direction                     = efd_LOADSAVE
global.qccfg_starting_pix_x                         = 230 //Pixel coords to start at (when using efd_LOADSAVE - others will snap you to a door)
global.qccfg_starting_pix_y                         = 100


but i seem to always start at some other cords, no matter what i set those to. Another bug or me that is doing it wrong?


on the character class i change this:

#macro PLAYERCLASS_MAX 1


and removed all classes but one from init_player_classes

but i throwns an error form script: gml_Script_minit_title_charactercustomization (line 13)

for(c = PLAYERCLASS_MAX - 1; c >= 0; c--){
    class_name_array[c] = global.player_class_data[c,pcd_NAME]
}


is the connecter biodome something special? the object args i can set on doors/ and obj sideways/up/down are they fore more advanced controls of connecting rooms? how is the door locked/unlocked controlled?`if i place the obj_door_background can that be connected to any rooms? i tried to place one, and add x and y args, but nothing happens when it opens?


one feature request would be able to load level without having to going out of the level editor and then back in.. nothing huge, would just be nice :)

The script player_load_starting_coordinates is called to load all the starting coordinates normally, if you changed the start flow (e.g. skipping the player creation menu) you might have removed that call so it won't happen. (Try adding a debug message to show global.saved_room_pos_x / global.saved_room_pos_y when loading - if they're different from the coordinates you defined something is wrong with reading them)


If you remove all classes, you should set the macro to 0. (It's better to have a placeholder class that has the default stats, though - they're used when finalizing the character customization)


The connector biome has a very neutral tileset and no music, it's inspired by the loading rooms from Symphony of the Night:


Only background doors can take arguments. These arguments are the map cell for the target room (you can see this in the world map editor). If the door doesn't do anything after opening, that means there's nothing in that cell on the world map. So basically these doors are teleporters.
One-way doors work the same way as normal background doors, but you need to open them from the back before they become usable from the front side.


(3 edits)

i hope its not to anoying i keep asking, hopefully others can use the answers aswell :)

when i change the players cord, to the image you can see here, i still spawn a completly diffrent place as you can see from the little movie i made https://imgur.com/a/2GjvfN2

if i change the classes to only allow the knight, it works fine, if i do anything else it crashes with:

https://imgur.com/a/oLU5fEh

ERROR in
action number 1
of Create Event
for object obj_charactercustomization_setup:

Variable obj_verticalmenu.class_name_array(102753, -2147483648) not set before reading it.
 at gml_Script_minit_title_charactercustomization (line 20) -        ggui_menu_add_option_multichoice(mev_adjustmultichoice,     "Class",            "Character profession. Has large impact on abilities.",     pcust_CLASS,        current_customization[pcust_CLASS],         class_name_array,                                 
############################################################################################
gml_Script_minit_title_charactercustomization (line 20)
gml_Object_obj_charactercustomization_setup_Create_0 (line 96) -     minit_title_charactercustomization()

also happens if i set #macro playerclass_MERCENARY 0 and KNIGHT to 3.

It seems the KNIGHT one is hardcoded to be used as a default in a lot of places? 

the enemy is calling script_execute(state) where is that state script? the search in gml does not seem to find it?

how is the animation set on player/enemies?

the light around the player what controls that? i want to implant night/day so having the light controled by an item would be nice. (light radius).

i can see some areas has 2 pictures for paralex, and some have 3? how is that controlled? 

Any way to expand the tileset to allow for more tiles? i an see i can easy extend it to allow for more background objects like trees? what if i want more tiles to paint levels with, that has collision? (the reason i asked is becaus i bought this tileset 

and i would like to keep some more of the tiles to paint levels with. it does not matter if the auto tile system does not use it, as long i can place it to fine tune the level with.

Oh, I think I can see what's wrong now: the x/y position displayed in the level editor is measured in TILES, but the position used for the starting coordinates is measured in PIXELS. If you change the starting coordinates to 33*TILESIZE for the x value and  147*TILESIZE for the y value it should work.


Knight isn't hardcoded to be the starting class specifically, the game defaults to the class with ID 0 (which happens to be the knight class).


You could probably remove that ggui_menu_add_option_multichoice line entirely (so the player can't change classes) but the default stats still will be read from the class data. Also there's a number of pcust_ macros (pcust_NAME for instance) which are used to refer to the different data in the character customization, these also needs to be adjusted if you remove anything from that menu.


Enemy state machine scripts are found in Scripts --> State Machine --> Enemy. (GM protip: you can middle-click asset names in code to instantly open them, use Ctrl + T to search by name, and Ctrl + Shift + F to search for text in the entire codebase)


Player animation is handled by the state machine, some states use a shared script like player_animate_ordinary, but some states just load an hardcoded animation with skelani_set_animation. Most enemies set their animation in their step / end step event with skelani_set_animation.


The light effect is controlled by an object called obj_darknesscontrol. Right now they're only spawned by the biome setup scripts (for cave, castle, forest, shrine and graveyard biomes) but nothing stops you from spawning them whenever you want, or copying the object to make special versions.


Backgrounds also are controlled by the biome, you can set this up in the level_init_biomes script. Right now it supports up to 3 backgrounds.


One way to extend the tile system to use pre-made tiles without having to get them into the system that's used in the engine now would be to add another case in pixel_vacant that checks if the tile's top position is >= 9*TILESIZE, and if so, treat it as a solid and abort early. (You'd place this before the check if the tile is in the DECO area). Now you can take the template (or the existing level tileset you want to use), resize the canvas so it's taller, and just paste the new "off-grid" tiles  at the bottom. (You can make it wider too if needed, of course)

(1 edit)

"Enemy state machine scripts are found in Scripts --> State Machine --> Enemy. (GM protip: you can middle-click asset names in code to instantly open them, use Ctrl + T to search by name, and Ctrl + Shift + F to search for text in the entire codebase)"

Did not see the enemy had a parrent, on that parrent object i could see the real name of the state script. Thanks!

"Backgrounds also are controlled by the biome, you can set this up in the level_init_biomes script. Right now it supports up to 3 backgrounds."
Thanks!

"One way to extend the tile system to use pre-made tiles without having to get them into the system that's used in the engine now would be to add another case in pixel_vacant that checks if the tile's top position is >= 9*TILESIZE, and if so, treat it as a solid and abort early. (You'd place this before the check if the tile is in the DECO area). Now you can take the template (or the existing level tileset you want to use), resize the canvas so it's taller, and just paste the new "off-grid" tiles  at the bottom. (You can make it wider too if needed, of course)"

Thanks, i just tried to add another row of 16 to the line #macro tstb_DECO 176 to 192, and it seems to be working, and it seems to be working with collision.


thanks for taking the time again. are there any special realation between the size off one room on the world map 1x1 vs how many pixels it is in the level editor. ? is that something that can be changed? 

One map cell is (by definition) a space of VIEW_W x VIEW_H pixels. (Those have default values 640 x 360, respectively). So changing VIEW_W and VIEW_H will change the size of map cells. (The cells aren't used for anything special in the level editor other than acting as a guide)

The views (and menu rooms' sizes) won't automatically adapt to this new size so if you change the view size you will need to change those as well.

(1 edit) (+1)

 Would changing those values also change the resolution of the game? say i want to run it as 1024/768 ?

If you ever want to build on this, add a way to add tiles in 2 layers, so you can have background tiles under the real tiles.