

Heads up for anyone who just want's to get going; simply scroll down and I have a section where I show how to change the font step by step.
Another heads up; if you have any issues; throw a comment at me and I'll answer asap.
I was messing around in the community, and saw a post by sunkinship. They were thinking about doing a fan translation to japanese, but there were two main problems:
- You have to go into the map files and change the text, which is horrible
- The font doesn't support japanese
The first one was easily solved: you use a tool made for translating rpgmaker games called translator++. We both found that solution pretty quickly.
The second one was more difficult. I'm know a fair bit about gamedevelopement, in unity at least, and I'm fantastic when it comes to fuck stuff up, so I decided to try and find a solution. It is somewhat simple. In the files for the game there is a folder called fonts, and in the folder there is a font. So the solution seem pretty simple, right, you change the font to something that supports japanese signs. Except the font in the fonts folder is not the font actually being used. The font actually used is the one in the folder Bitmap fonts, and it isn't made like a usual font. It is made from a tilemap, and a JSON script that defines where all the characters are placed on the tilemap. That's how deep I'll go into the technical stuff, don't be too scared.
HERE'S THE ACTUAL TUTORIAL:
The programs I'll be using are Visual Studio 2019 and Krita.
---PART ONE: INSTALL TRANSLATOR---
Start with installing translator++. I don't know how it works, and haven't downloaded or tried it, so you simply have to figure it out for yourself. You will use this to change the actual text. You can find it here: https://forums.rpgmakerweb.com/index.php?threads/translator-game-translation-tool.102706/
---PART TWO: WHAT IS GOING ON---
Now let's make the font support the characters you want to use, for this example I'll just get the basic hiragana (japanese characters) working.
Begin by making a copy of all the games files. This is to make shure that when you inevitibly mess something up, you don't have to download the game again.
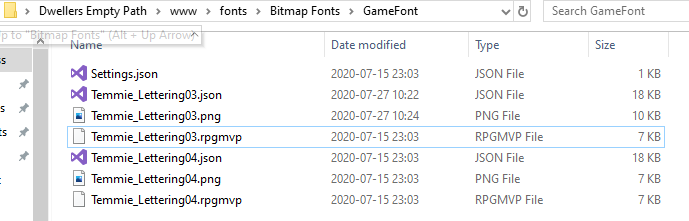
Open the copy and go "Dwellers Empty Path > www > fonts > Bitmap Fonts > GameFont". This is the folder where the used font is kept. This is how it should look:
Now let's look into the "Temmie_Lettering03.json" file. This is where data is stored about the font. Open it up in visual studio. Now things will get a bit heavy if you have no experience with programming or files like this. But don't worry, I'll guide you through it!
For each character there is a block of text looking somewhat like this:
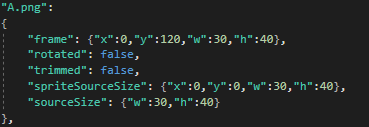
There are three lines we really care about. The one starting with frame, the one starting with spriteSourceSize and the one starting with sourceSize. The lines starting with frame is the most important one. It tells us where the image is located on the spritesheet (we'll get to that later) and also it's width and height. The position for this character is therefore x:0 and y:120. We change this when we begin adding our own characters later. The width is 30 and the height is 40 for all characters (except a few special cases), so let's keep it that way for all characters. This means the characters are on a 30 by 40 grid, which is important to remember later when we begin messing with the spritesheet.
If we scroll down as far as we can we will see this block. When we expand the tilesheet we will have to change the size here. Let's call this the meta block for future reference.

---PART THREE: MESSING WITH THE SPRITESHEET---
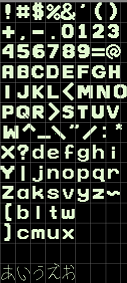
Now let's mess a bit with the spritesheet. Begin by opening the "Temmie_Lettering03.png" image in Krita. It looks like this when we open it up:
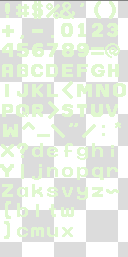
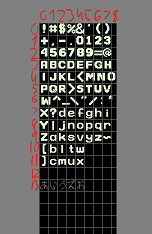
Can you see what is going on? I can't either. So let's give it a black background just for now. We will remove it later to keep the transparency as it should be. (I have renamed the layers so it's easier to figure out what is going on.
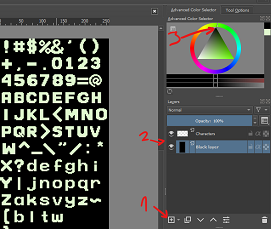
- Press the add layer button
- Move the new layer down so it is behind the characters
- Set the color to black
- Press "Shift+backspace" to fill the whole layer
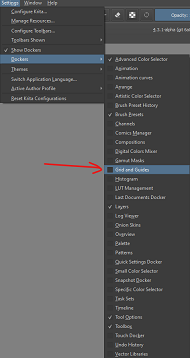
Now for some easier editing, let's show a grid. Open to grid docker and set the settings to what I have.
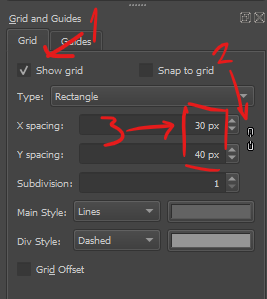
- Press the checkbox to show the grid.
- Press the chain to unlink the sizes. If the chain is together both values would change when we change one. Unlinking it makes shure we can change them independantly.
- Set the sizes to what the width and height we found out about in the json file.
Now it looks something like this (if some lines are dotted/dashed it is because your subdivision is not set to 1, you set it under the x and y spacing):

You see M and W. Those are the special cases I was talking about. They make all the other characters get offsetted from the grid, which makes them more difficult to define the characters in the json file, so let's avoid creating any of those special cases as much as possible (if you want to create one anyways then look by the extras).
Now, let's add a hiragana character to this. Although the size of the sheet is a little small, so let's make it longer. Krita has a great feature for this. Scroll down as far as you can and then press the big down arrow. (Remember that we did this for later, we will have to change the height in the meta block of the json file). (Also I'll be using gifs now, yay)
This messes up the black background though, so select the layer which has the black background and press "Shift+backspace" again. Perfect.
Alright, let's put in some hiragana characters! But before that (this is the last thing, we will do the characters right after this) let's pick the right brush, and pick the color of the other characters. The color isn't perfectly white, so this makes shure it all looks right.
NOW LET'S DO SOME CHARACTERS! YAY!
Let's start with those and do more later. It's time to define them in json file and also change the height in the meta block. When we are messing with the json file, don't save until I tell you to, ok? THAT IS IMPORTANT. I'll explain later.
---PART FOUR: JSON CODE---
For the meta block, set the height to 512 (the reason to set it to 512 is because it is the double of 256. When you use the big down arrow to expand the canvas the size is doubled in that direction):

Now comes the interesting part, the new characters. For each character we have to add a block and set the right position on the spritesheet. Now how do we figure out what the position is? Simple multiplication my friend.
We count the cells so we know which cell the character is in. The counting starts on zero, becuase that's just how it works in here. So for example; the ! character is at cell 0, 0. Let's take another example, the $ character is at 2, 0. The first digit is the x, and the second is the y.
Now for our new characters: あ for example. It is in the 0, 13 cell. Now it's time to convert that into pixel positions, because that is what is being used in the json file to determine the position. We know the width is 30 pixels, and the height is 40 pixels, so let's just multiply the cells x with the width and the cells y with the height. This is the mathy stuff:
0 * 30, 13 * 40 = 0, 520
So the pixel position for あ is 0, 520. Let's copy a block and put in the info:
Let's try if it actually works in the game now. So let's try saving the file. But we get this popup: 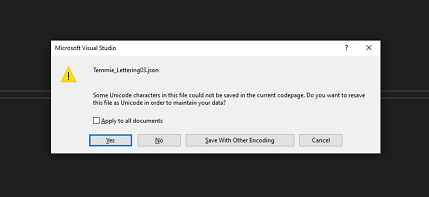
DO NOT PRESS YES. (If you pressed yes anyway, go down to the "If shit isn't working" section). Press "Save With Other Encoding", click on the Save With Other Encoding and select the "Unicode (UTF-8 without signature)" option. If you select any other unicode encoding rpgmaker will go mayham and throw errors at you, and if you use any other encoding I can't promise all characters will be supported. ( I can't really do that with unicode either, but it seems to work for hiragana at least)
---PART FIVE, TESTING IF IT WORKS---
Now we have saved the tilesheet, and the json code. Let's see if we can get it to work in game. To do that we have to make the あ appear in some ingame text. Let's try doing that. Go "Dwellers Empty Path > www > data" and open Map002.json. This is the map outside the house, and we can mess with a line here to see if the hiragana is working. This would be easier with translator++, but I haven't downloaded it, so I don't know how it works. Let's just open the Map002.json file and change the text. I'll change the text that appears when you speak with mr handsome demon. It is on line 24. When you save, you will get a popup like the one in the "Temmie_Lettering03.json" file. Same process here, save with the "Unicode (UTF-8 without signature)" encoding.

Moment of truth comes now. Is it actually working? Let's start the game and see (if there is no change you might have started the wrong exe, since you made a copy of the games files, and if you get an error chech the "If shit isn't working" section). Go outside to Zera and talk to him. The text will appear the second time you talk to him (I cut away most of the first time you talk to him):
No errors, it seems. Although since the black background is still there the selected button looks a tad wierd, and during the nightmare the characters has black boxes around it. All other text has black boxes around them too, but it isn't that noticable later. We can fix the black boxes by disabling the black background, saving it and then restarting the game.
All the hiragana characters are blank except for the あ though. That's because we haven't defined them in the json file yet. So let's finish this all up and add all of the characters.
---PART SIX: ADD MORE OF THE STUFF AND FINISH IT UP---
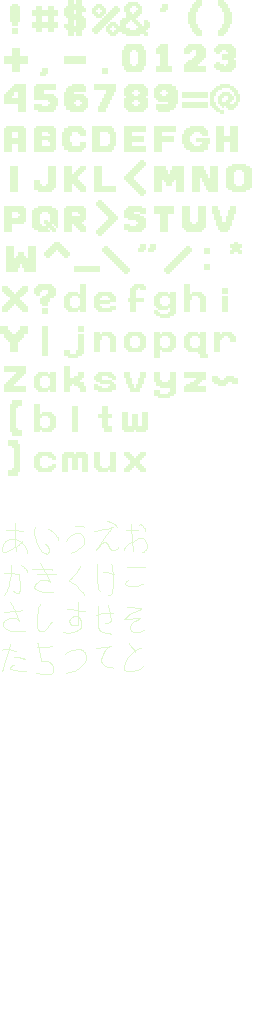
I added some more hiragana characters, and the tilesheet looks like this with and without the black background (this is like the actual tilesheet, not just a screenshot of it, so you can download this and use it):
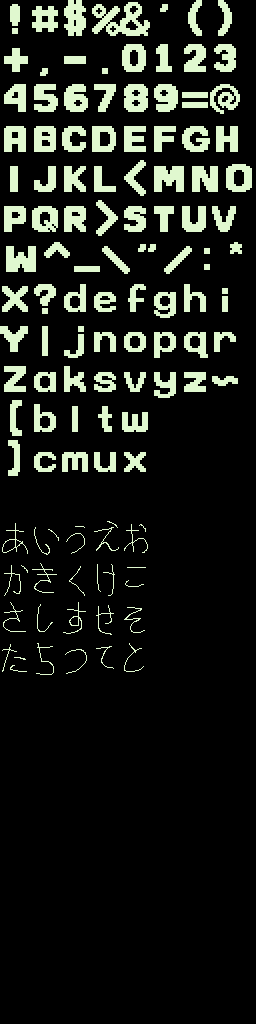
Does the characters I made look good? No. Of course not. I don't know japanese or how to actually write the characters, but, ya know I do the best I can.
Now here is the code added in the json file for all the hiragana characters:
"あ.png":
{
    "frame": {"x":0,"y":520,"w":30,"h":40},
    "rotated": false,
    "trimmed": false,
    "spriteSourceSize": {"x":0,"y":0,"w":30,"h":40},
    "sourceSize": {"w":30,"h":40}
},
"い.png":
{
    "frame": {"x":30,"y":520,"w":30,"h":40},
    "rotated": false,
    "trimmed": false,
    "spriteSourceSize": {"x":0,"y":0,"w":30,"h":40},
    "sourceSize": {"w":30,"h":40}
},
"う.png":
{
    "frame": {"x":60,"y":520,"w":30,"h":40},
    "rotated": false,
    "trimmed": false,
    "spriteSourceSize": {"x":0,"y":0,"w":30,"h":40},
    "sourceSize": {"w":30,"h":40}
},
"え.png":
{
    "frame": {"x":90,"y":520,"w":30,"h":40},
    "rotated": false,
    "trimmed": false,
    "spriteSourceSize": {"x":0,"y":0,"w":30,"h":40},
    "sourceSize": {"w":30,"h":40}
},
"お.png":
{
    "frame": {"x":120,"y":520,"w":30,"h":40},
    "rotated": false,
    "trimmed": false,
    "spriteSourceSize": {"x":0,"y":0,"w":30,"h":40},
    "sourceSize": {"w":30,"h":40}
},
"か.png":
{
    "frame": {"x":0,"y":560,"w":30,"h":40},
    "rotated": false,
    "trimmed": false,
    "spriteSourceSize": {"x":0,"y":0,"w":30,"h":40},
    "sourceSize": {"w":30,"h":40}
},
"き.png":
{
    "frame": {"x":30,"y":560,"w":30,"h":40},
    "rotated": false,
    "trimmed": false,
    "spriteSourceSize": {"x":0,"y":0,"w":30,"h":40},
    "sourceSize": {"w":30,"h":40}
},
"く.png":
{
    "frame": {"x":60,"y":560,"w":30,"h":40},
    "rotated": false,
    "trimmed": false,
    "spriteSourceSize": {"x":0,"y":0,"w":30,"h":40},
    "sourceSize": {"w":30,"h":40}
},
"け.png":
{
    "frame": {"x":90,"y":560,"w":30,"h":40},
    "rotated": false,
    "trimmed": false,
    "spriteSourceSize": {"x":0,"y":0,"w":30,"h":40},
    "sourceSize": {"w":30,"h":40}
},
"こ.png":
{
    "frame": {"x":120,"y":560,"w":30,"h":40},
    "rotated": false,
    "trimmed": false,
    "spriteSourceSize": {"x":0,"y":0,"w":30,"h":40},
    "sourceSize": {"w":30,"h":40}
},
"さ.png":
{
    "frame": {"x":0,"y":600,"w":30,"h":40},
    "rotated": false,
    "trimmed": false,
    "spriteSourceSize": {"x":0,"y":0,"w":30,"h":40},
    "sourceSize": {"w":30,"h":40}
},
"し.png":
{
    "frame": {"x":30,"y":600,"w":30,"h":40},
    "rotated": false,
    "trimmed": false,
    "spriteSourceSize": {"x":0,"y":0,"w":30,"h":40},
    "sourceSize": {"w":30,"h":40}
},
"す.png":
{
    "frame": {"x":60,"y":600,"w":30,"h":40},
    "rotated": false,
    "trimmed": false,
    "spriteSourceSize": {"x":0,"y":0,"w":30,"h":40},
    "sourceSize": {"w":30,"h":40}
},
"せ.png":
{
    "frame": {"x":90,"y":600,"w":30,"h":40},
    "rotated": false,
    "trimmed": false,
    "spriteSourceSize": {"x":0,"y":0,"w":30,"h":40},
    "sourceSize": {"w":30,"h":40}
},
"そ.png":
{
    "frame": {"x":120,"y":600,"w":30,"h":40},
    "rotated": false,
    "trimmed": false,
    "spriteSourceSize": {"x":0,"y":0,"w":30,"h":40},
    "sourceSize": {"w":30,"h":40}
},
"た.png":
{
    "frame": {"x":0,"y":640,"w":30,"h":40},
    "rotated": false,
    "trimmed": false,
    "spriteSourceSize": {"x":0,"y":0,"w":30,"h":40},
    "sourceSize": {"w":30,"h":40}
},
"ち.png":
{
    "frame": {"x":30,"y":640,"w":30,"h":40},
    "rotated": false,
    "trimmed": false,
    "spriteSourceSize": {"x":0,"y":0,"w":30,"h":40},
    "sourceSize": {"w":30,"h":40}
},
"つ.png":
{
    "frame": {"x":60,"y":640,"w":30,"h":40},
    "rotated": false,
    "trimmed": false,
    "spriteSourceSize": {"x":0,"y":0,"w":30,"h":40},
    "sourceSize": {"w":30,"h":40}
},
"て.png":
{
    "frame": {"x":90,"y":640,"w":30,"h":40},
    "rotated": false,
    "trimmed": false,
    "spriteSourceSize": {"x":0,"y":0,"w":30,"h":40},
    "sourceSize": {"w":30,"h":40}
},
"と.png":
{
    "frame": {"x":120,"y":640,"w":30,"h":40},
    "rotated": false,
    "trimmed": false,
    "spriteSourceSize": {"x":0,"y":0,"w":30,"h":40},
    "sourceSize": {"w":30,"h":40}
And here they are ingame (without the ugly black boxes):

And that's it! Kinda. You have to add all the characters you want to use to the spritesheet, and then define them in the json file. But now you know how to do it!
Extras:
Things might be added here as time goes on
Wide characters:
If a character is too wide to fit in one box, then you will have to do a special case.
Instead of taking one cell, make it take two cells, and set the size in the json file to double the width (or as wide as you want it to be, I don't really know what works, try things out. Don't forget to try starting up the game everytime you make a change though. That will make shure you don't have to spend hours tracking down a single issue).
If shit isn't working, then look here
Things might be added here as time goes on
If you get an error, it is most likely that you have encoded a json file wrong. To fix it, open the file in visual studio, then go to file and press "save file as". Then press the tiny arrow to the right of the save button, and there will be a dropdown saying saying "save with encoding". Then select "Unicode (UTF-8 without signature) and save.
If the letters seem to be cut at the wrong place, that is most likely due to the position of it being wrong in the json file. So if the character a is being cut then go into the json file with the characterblocks, and check the block for character a. Mess around with the position until it gets right, or just go into krita, check which cell it is in and redo the math.