This is what I learnt while developing Rogue Star Rescue, a 2D rogue-lite sci-fi shooter with defense elements.
For many roguelike (or rogue-lite) games, developers choose to handcraft their rooms. This creates a super polished feel and a generally more enjoyable play experience. In non-procedural games this takes less time since the number of rooms or scenes is typically less than a hundred.
But what about designing games with hundreds or thousands of unique rooms? Imagine carefully designing these large sets of rooms over the course of months, to find out that a key feature of each room needs to be changed (such as a collider or door structure). Or that we need to replace all the rooms with a completely different tileset. In Rogue Star Rescue we’ve developed a system that allows us to invest weeks of time in good room design, but without tying it to one set of rules.
Room Abstraction
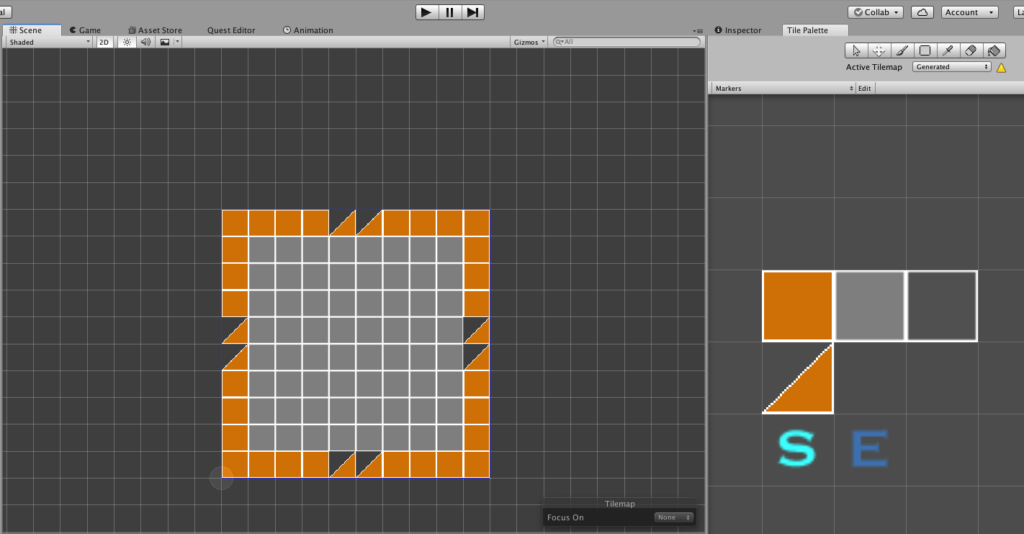
Instead of sitting down and designing each room directly. Let’s create an abstraction layer between the shape of the room and its stylized features. For this we create a MarkerSet. A MarkerSet is a simple tile set that defines the key features of a room, with no direct styling. Here’s an example of a simple marker tile set, and how it is used to design a room:

The logic for the markers is as follows:
Solid Orange Tile = Wall Marker
Light Gray Tile = Floor Marker
Dark Gray Tile = Pit Marker (not used in this example)
Diagonal Orange Tile = Door Marker
S and E Tiles = Special Start and End markers (not used in this example)

It’s good to solidify this logic by making a MarkerSet component class, in which each property holds a reference to the tile’s meaning.
TileSet Abstraction
To separate the sprite sheets from the room generation logic, we create a MyTileSet class that stores the information of what each tile *is*. As you can see below we define several fields in the class that dictate whether a tile is a north wall, pit, wall variant, floor etc. This is also very useful when working with artists and having to regularly update sprite sheets. This doesn’t lock our room logic to the positioning of a sprite in a sprite sheet.

To turn this into a finished room we will need unity editor scripts to transform our marker set. This can be done in many ways, but the basic idea is:
(MarkerTileMap + MarkerSet + MyTileSet) -> Editor Generation Logic -> Finished Room
The editor generation logic will use different logic to generate a finished room. A simple example of some logic will be for floors. The generation logic can search through each tile in the MarkerTileMap, check if it is a ‘floor’ tile. If so it can produce a floor tile in the same location on the finished room (with the value specified in MyTileSet).
Wall generation can get more complicated. When you detect a Wall Marker in your MarkerTileMap you will need to perform additional logic to check what type of wall will be placed. This is done by checking what other tiles are around the wall tile in question. For example, a wall tile in your MarkerTileMap may have a floor tile to the south of it, and no tile to the north of it. This would mean a NorthWall should be generated in the finished room. The logic for this type of generation can be very complicated, depending on your game style and view perspective. The main thing to remember here is that we want to keep the MarkerSet and MarkerTileMap as simple as possible so that we can generate rooms quickly. Let the editor generation logic do the hard math of what specific tile should be placed.
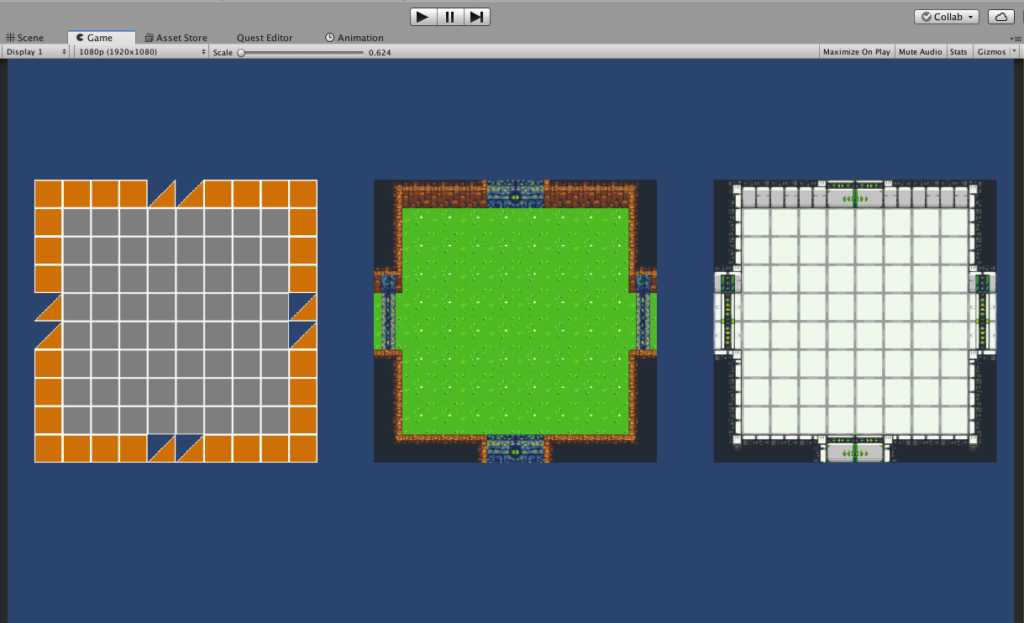
The beauty of this system is that if we want to change our room style to something completely different. We simply need to change the MyTileSet used for generation. Here is the above MarkerTileMap generated in two different styles:

This technique will save your sanity if you ever have to make major structural changes to your rooms. Use abstraction wisely and minimize your development risk.

