
Indie game storeFree gamesFun gamesHorror games
Game developmentAssetsComics
SalesBundles
Jobs
TagsGame Engines

Toxilisk

44
Posts
1
Topics
119
Followers
A member registered Jun 07, 2024 · View creator page →

Creator of

Recent community posts

(1 edit)

Yes. In the wings rig, there's a big bone in the middle of the character's back that controls that through its own scale but the bone has a constraint that will never let it go down to 0 scale so it's always visible in viewport.

Sorry for the late response.

There are plans to try.Actually I've been working on that and I'm getting okayish results with good looking and performance. The main issue is the expression range being to big and complex. The mouth hole has to be able to move around the mouth surface an also be able to do that big creepy smile without breaking in the process.

Another problem are creases (or at least that's how glitch called them), those are lines that form around the mouth caused by the topology. In my case that happens when I use simple geometry with not much loops to make rigging easy, something similar to the image you posted, where the mouth edges are directly conected to the muzzle eges with no loops in the middle and using a subdivion modifier to allow the shrinkwrap to work. Glitch solved that in post production rendering the same escene two times, one with mouth and other with no mouth so they can mask those creases. I guess this could be solved with a very high subdivision level but I'm still trying more optimized solutions.

About why I choosed using booleans. I didn't know how to make the original type but also booleans are very flexible in this case. I can give the mouths any shape I want in any part of the surface without having to deal with weightpaint, only with some shading issues that are solved with the data transfer. Booleans still have some glitches at times like flickering, but that can be solved with any slight transformation. It's a bit tedious if you do animation but I guess it's better than masking every single frame in post production.

This is where I got the information about how Glitch dealt with the creases: 

Check that the data transfer modifier is enabled in the mouth object. Also motion blur can cause weird visual glitches when using non destructive booleans (Real time booleans basically) even in static renders.

Have you done something previously? I just tested the file directly downloaded from here and it works normally.

I don't udnerstand what you mean with changing the rigs to default. About the blur, disable denoising in the ray tracing settings.

If that doesn't work, I just found a solution that honestly I have no idea why it works but it's working for me: Create a new file in a previous blender version like 3.6, it can be blank if you want, then open that file in your current Blender version, now disable the ray tracing denoising and every model you add to said file should look fine.

Tell me if it worked and if you had to do the extra file step.

This is the best approach I have right now, and it only works in Filmic display mode. Unfortunately, it also affects Doll's eyes, although the difference is still noticeable. You can play with the values until it looks the way you like.

(2 edits)

Select the tail and in the modifiers, go to this one called armature and in the object part select the rig, same with the waist. Apparently this got unlinked somehow, I'll update the files.

There is a layer whose bones start with "DEF", those are the deformation bones that work for weight painting.

(1 edit)

You can add more than one instance with the append option, in the manual I explain that further. Remember to select the colection you want the character to be stored in before doing that (if you don't have any just select the default escene collection), if you don't  do this then the new character collection may fuse with other's creating a mess. 

You have 2 options, the first one is directly deadctivate the wings collection (the checkmark box) and the other one is the bone at the center of the wing rig, you can downscale it to hide them, that bone in specific have a constraint that prevents it from dissapearing by downscaling unlike the rest of bones.

I guess you can. Just take in mind you can share the shader setup, not the whole model.

Sorry but I'm not doing commissions for now.

I think that's something I should have mentioned in the manual: the shoulders aren't really meant to be used. Drones don't have any parts that simulate human shoulder behavior. The bones are there because they're part of the Rigify rig, but they're not meant to be used.

I don't know how practical this is, but I just followed the anatomy of the drones.

Thanks for the cheers.

About your issue, I'm aware of it but unfortunately it is very hard to track but I hope to be able to solve it eventually.

Booleans are very much a blind system for me. When I made the models there were absolutely no reference on internet about how to do anything similar to what I needed, so after many trial and error I came with this use of booleans, the other option was using the black extruded plane other models use but that caused other types of problems.

I don't really know exactly how booleans work internaly or what makes them fail, the best I can do is reduce the problem as much as I can. I've been thinking about revamping or even re-doing the whole thing, I have some ideas in mind but I need to figure out how to implement them.

Sorry for the inconvenience, I'll try to find a solution once I'm done with the next update. If you find anything useful, don't hesitate to share it.

Can you explain a bit further? Also what Blender version you are using?

Eventuall

I usually use this setup

Sorry for the late reply. What was your problem exactly?

(1 edit)

Eventually, but it'll take time since I'm doing other stuff and also the materials for the solver parts are mostly organic which is something I'm not too used to.

What do you mean by shading?

Eventually I guess.

Go to pose mode and hit the following keys:
A to select every bone
Alt + R to reset rotations
Alt + S to reset scalings
Alt + G to reset translations

That way you can reset every pose so it ends as the default one which is T pose in this case.

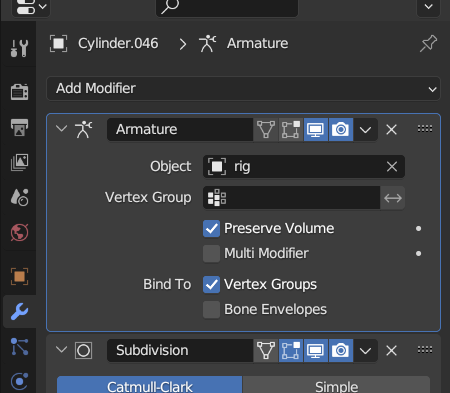
About Uzi and Doll's finger, enable the rig layer called "Fingers (Detail)" in the rigify UI. In Blender 4 you can also find it in this panel:

(1 edit)

Sound more like a problem with your Blender instance. I had saving problems with a modified Blender version but since it was modified I expect bugs, I solved that with the "save as" option but that was my specific case with said version.

I considered it at the time but decided against it because I wanted to keep the rig understandable, adding more elements would oversaturate everything. Things like that are meant to be added manually by the user depending on what they need. It's not hard to do, just create a new plane with the shape you need and copy the modifiers of any facial elements like the eyes or eyebrows.

The teeth are controled by a square shaped bone in front of the mouth. In its Properties you have a value that controls how open they are, you can also move, rotate and scale that bone to adjust them

(1 edit)

You can show the individual finger controls through the rigify UI, the manual says how to make it appear. In case it doesn't work (probably in blender 4.0+) just select the metarig from the objects list and look for the option to update metarig, after that use the option re-generate rig.

If it's too complicatyed don't worry soon I'll add 4.0 versions so people don't need to do this step.

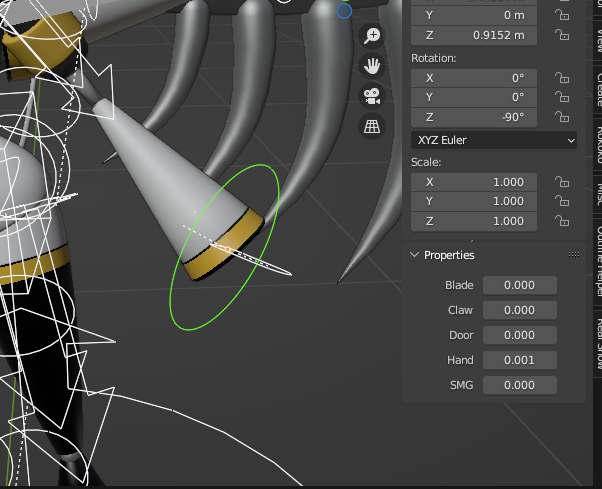
Each hand have a circle moving with them, those contain custom properties that allows you to hide/unhide the weapons. In my case I have those type of objects displayed as green, by default they are black.

What do you mean?

I can do that

(2 edits)

Apparently I forgot to reset the pose before uploading the file, just select the green circle (depending on your Blender configuration it may be black or other color, I've set it to green) that follows the hands position and open its Properties tab, there you can display or hide the hands and weapons. The reason the hands dissapear is because I accidentally left them at the minimun value. I'll fix that in the next update.

Lizzy is done already, just waiting for some general changes to the rest of the models.

Don't worry, it's not your fault (neither mine). The most recent versions of Blender use a new version of the EEVEE engine, which causes this problem, so far the only way I've found to solve this (not in all cases, I think) is disabling some ray tracing denoising options like "Spatial Reuse" or just disabling denoising completely.

I remember encountering this error many months ago and on a single frame, so I assume the conditions for it to happen are super specific. I don't remember being able to fix it, but as an alternative you can use the viewport render image/animation option since for some reason the error doesn't appear there, although you lose certain functionalities depending on what you want to do.

I apologize for the inconvenience, the best I can recommend for now is to play a bit with the mouth modifiers or its transformations (scale, rotation and translation) since some minimal changes to these can solve some problems with the booleans it uses.

(1 edit)

Open the Properties tab that appears when you select any object or bone in this case, by default its collapsed. Some face bones have values that controls things like what you mentioned


Uncheck the option with the X

It's a 3 lights setup with some contrast and a blueish tone added, pretty simple honestly.