
UPDATE:
Updated the game to patch a recently discovered critical Unity vulnerability — both Windows and Android versions are now secure and up to date.
A member registered Apr 10, 2021 · View creator page →
Creator of

Defend your kingdom with towers, units, and strategy in this medieval fantasy RPG defense game.
Role Playing

Defend your steampunk castle with clever towers and strategy — stop the horde before they break through
Strategy

Its a small Platformer game with Sky - runner type Implementation
Platformer

use mouse for hovering and 'a', 'd' or 'left arrow', 'right arrow' keys for side game
Recent community posts
itch.io Community » Game Development » General Development · Created a new topic Unity - Terrains || Creating a simple walking simulator
Hello Gamers. For this tutorial, we would be focusing on Terrains and we will create a simple walking simulator type game in Unity 3d.
COMPONENTS THAT WE WOULD USE
a) Terrains
b) Scripts
c) Asset Store
Scroll down to '==========' for tutorial.
--------------------------------------------------------------------------------------------------------------------------------------------------------------------------------
TERRAINS
terrains is type of 3d object in unity which allows user to create uneven land, mountains, hills etc....
to create a terrain, right click under hierarchy, go to 3d objects and click on terrain
default terrain needs texture so we can either create one or import some.
Terrain component offers 5 basic tools used for designing of terrain.

Play around with these 5 tools for better understanding of terrains
ASSET STORE
asset store is library of different assets created by both unity and community. There are free as well as commercial assets available for a developer to develop its game.
========================================================================================================
PREPARATION
Before main development, first, let us be ready with textures, materials and a 3d model (player) for our walking simulator.
Step 1 - Create a new unity project
step 2 - On top, click on 'Window' and click on 'Asset Store'.
Step 3 - in search bar, type 'Fantasy Forest Environment'. Download and import the asset.
Step 4 - in search bar , type 'Haruko'. Download and import the asset.
CREATING THE TERRAIN
Lets create and edit a terrain.
Step 1 - right click under 'Hierarchy' , go to 3d objects and click on 'Terrain'
For our game, we would be using only 1 square tile of terrain. We will add texture as needed.
Step 2 - Under Inspector, under a component called 'Terrain', there would be 5 tools. go to 2nd tool (Paint Terrain) and select the brush design and properties as per your choice and start modifying your terrain.
Step 3- When done with levelling of plane (i.e. creating mountains , hills etc.), Its time to add texture to our terrain
ADDING TEXTURES / TREES TO TERRAIN
Step 1 - under terrain's inspector, click on 2nd tool and from the drop down list, select 'Paint Texture'
Step 2 - To add a type of texture, click on 'Edit terrain layer',

Step 3 - Click on create layer and and select the type of texture you want. Then select the texture and use mouse click to apply at desired area.
The first texture might cover whole terrain. But after that, each texture you add and use will be applied in desired area,
Step 4 - To add trees, go to 3rd tool, click on edit trees ---> add trees, select the prefab and click add. Use sliders for different properties like density, height etc...
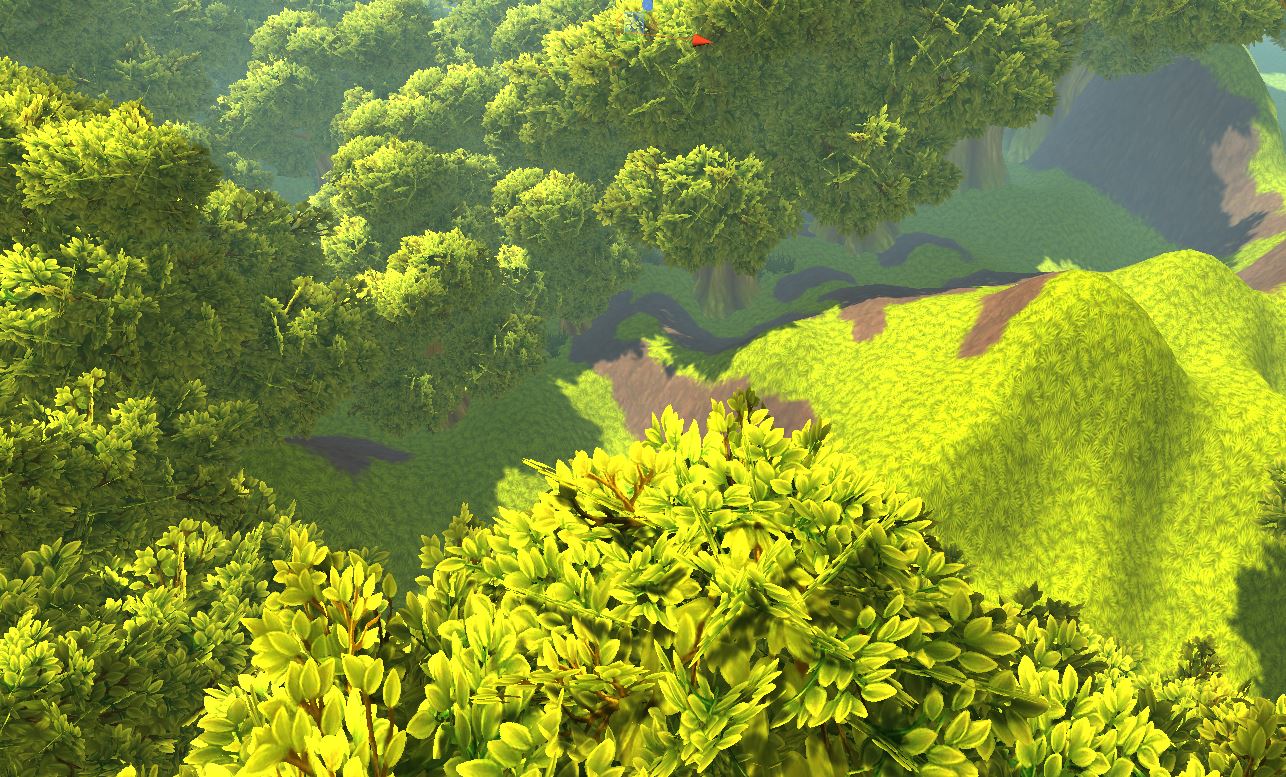
Play around with different terrain tools for making a better terrain as per your imagination. Below is a picture of how mine look:
So far, we have created our terrain, Now lets add 3d model and scripts.
SETTING UP 3D MODEL IN SCENE
step 1 - under projects, click on 'Haruko'. click on prefab folder and drag and drop the model onto the project. Adjust the transforms such that its is place at starting point where you want it.
step 2 - add a rigidbody component to 3d model.
Now, we need to take user input for movement and camera rotation.
Step 1 - equate main camera and 3d model's position and then make camera , child of 3d model. This way, our camera will follow player
Step 2 - Create a new scripe and name it CameraScript
SCRIPT
using System.Collections;
using System.Collections.Generic;
using UnityEngine;
public class CameraScript : MonoBehaviour
{
public float speedH = 2.0f;
public float speedV = 2.0f;
private float yaw = 0.0f;
private float pitch = 0.0f;
void update()
{
yaw += speedH + Input.GetAxis("Mouse X");
pitch -= speedV + Input.GetAxis("Mouse Y");
transform.eulerAngles = new Vector3(pitch, yaw, 0.0f);
}
}
Step 3 - Attach the script to camera.
Step 4 - Create another Script and name it PlayerMovement;
before writing script, check what direction is your model facing. ie. on pressing what key, what coordinate would be affected and how.
eg - For me, pressing 'd' of 'right arrow' will decrease x coordinate
SCRIPT
using System.Collections;
using System.Collections.Generic;
using UnityEngine;
public class PlayerMovement : MonoBehaviour
{
void Update()
{
if (Input.GetKeyDown(KeyCode.RightArrow) || Input.GetKeyDown(KeyCode.D))
{
Vector3 position = this.transform.position;
position.x = position.x - 0.1f;
this.transform.position = position;
}
if (Input.GetKeyDown(KeyCode.LeftArrow) || Input.GetKeyDown(KeyCode.A))
{
Vector3 position = this.transform.position;
position.x = position.x + 0.1f;
this.transform.position = position;
}
if (Input.GetKeyDown(KeyCode.UpArrow) || Input.GetKeyDown(KeyCode.W))
{
Vector3 position = this.transform.position;
position.y = position.y + 0.1f;
this.transform.position = position;
}
if (Input.GetKeyDown(KeyCode.DownArrow) || Input.GetKeyDown(KeyCode.S))
{
Vector3 position = this.transform.position;
position.y = position.y - 0.1f;
this.transform.position = position;
}
}
}
Step 5 - Attach the script on 3d model .
That's it. We have Successfully created a basic walking simulator.
--------------------------------------------------------------------------------------------------------------------------------------------------------------------------------
REFERENCE LINKS
https://www.udemy.com/course/learnunity3d/
THIS TUTORIAL IS BROUGHT TO YOU BY GAMING DEPARTMENT OF VIT BHOPAL (INDIA)
itch.io Community » Game Development » General Development · Created a new topic Unity - tutorial for simple game menu
Hello Gamers. This tutorial will be focused on how you can create simple game menu for your game in Unity. This Tutorial is brought to you by Gaming Department of VIT Bhopal (MP, India). Sources and credits at the bottom.

SCROLL DOWN TILL '====' FOR TUTORIAL.
FIRST LETS LEARN ABOUT SOME COMPONENTS THAT WE ARE ABOUT TO USE
- PANEL
Panels usually act as a 'Shortcut' to combine different UI elements. Mostly, Panels are used for inserting Images.
Panel's Inspector
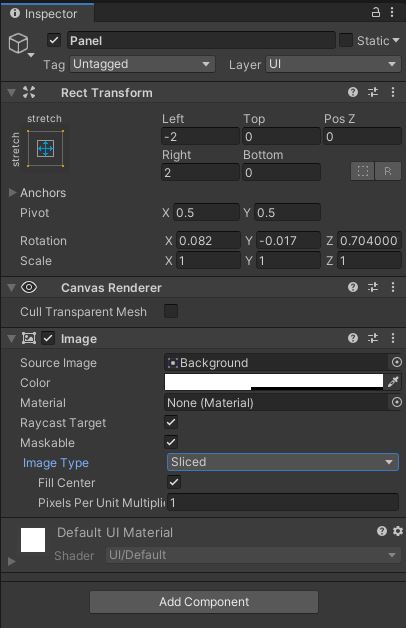
SOURCE IMAGE ----- We can use default background or an image as panel's background by selecting type of 'Sprite' in this option.
To add an image as background, simply drag and drop image on panel. Make s ure that image's Texture type is Sprite(2D and UI) which can be set under image's inspector.
Color - to adjust color of panel.
Material - To select type of material. (keep NONE if using an external image).
2. BUTTONS
Buttons are used when we need an event to happen when user clicks a button.
Buttons comes with text already as its sub branch.
There are tons of customization that could be done on buttons and texts.
=========================================================================================================
You can either create a new Scene in existing project or create a new project for this.
FOR NEW PROJECT USERS
Open Unity and create a new project. Then, Go to 'Assets' under Project(bottom) and open 'Scenes' folder. Right click on Scene and rename it to 'Scene0'.
FOR EXISTING PROJECT USERS
Open Unity project. Then, Go to 'Assets' under Project(bottom) and open 'Scenes' folder. Now, right click and create new Scene and name it 'Scene0'
Make sure to go to File--->Build Settings on top left of Application and click on 'Add Open Scene' for all existing scenes in Project.
NOW, LETS CREATE A PANEL
Step 1: Right Click under 'Hierarchy' (left) then go to UI ---> Panel. Rename panel to 'Background'
(As we already saw up( under Panel), we can add external image as Panel's background. For this tutorial, we are using default background.)
Step 2: select panel and click on 'Color' under inspector. Drag the alpha line (bottom line) all the way to right.

Keep everything else as default.
NOW LETS ADD BUTTONS TO PANEL
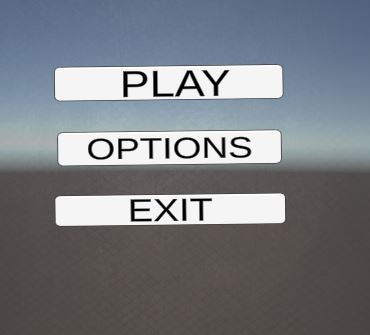
Step 1: under Hierarchy, select 'Background' and then right click and select 'UI' ----> 'Button-text Mesh Pro'. A box will open. click on 'import TMP essentials'
Step 2: Select Button and duplicate it 2 more times and arrange it as shown in top images.
Step 3: Select top button from game Scene and under inspector, rename it as PlayButton. Similarly, rename other 2 buttons as ExitButton and OptionButton.
Step 4: under Hierarchy, click on PlayButton and select 'text(TMP)'. Rename the text on button as Play. Do the same for other 2 buttons and rename text as Options and Pause.
NOTE - Don't forget to play around with sizes of buttons and text and align text on button as per need.
So far, we would have something like below.
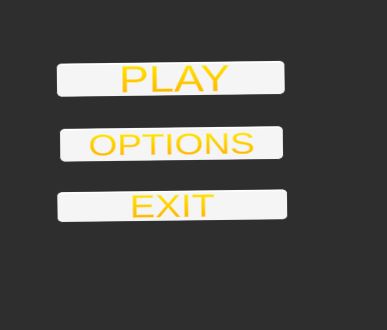
Now, let's create that golden yellow color to put on text.
Step 5: Right click under 'Assets'(Bottom) and click create ---> TextMeshPro ---> Color Gradient and rename it as old Gradient.
Step 6: select 'Gold Gradient' and under inspector, for top 2, copy paste the following --- #FFE400FF and for bottom 2, #FFB700FF
Step 7: Now, select the text on Buttons and drag and drop Gold Gradient under 'Color Preset' for each text.
So far, it would look something like this.
NOW, LET'S MAKE THE MENU FOR 'OPTIONS' BUTTON
Step 1: under Background in Hierarchy, right click and click on 'Create Empty'. Under Inspector, rename it as 'StartScreen'.
Step 2: Drag and drop all Buttons under StartScreen. Then, Duplicate 'StartScreen' and rename it as OptionScreen.
Step 3: Now, select 'StartScreen' and uncheck the box under inspector.
Now, we will work on Option Screen.
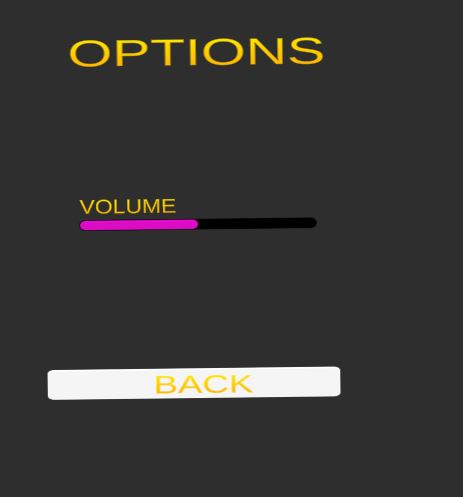
Step 1: Under 'OptionScreen', delete 'Option' Button and then Drag the text out of the 'Play' Button and then delete the 'Play' Button.
Step 2: rename the text as 'Header' and change the Text to 'OPTIONS'. (don't forget to play around with size)
Step 3: rename the text on 'ExitButton' as 'BACK' and rename button as 'BackButton'.
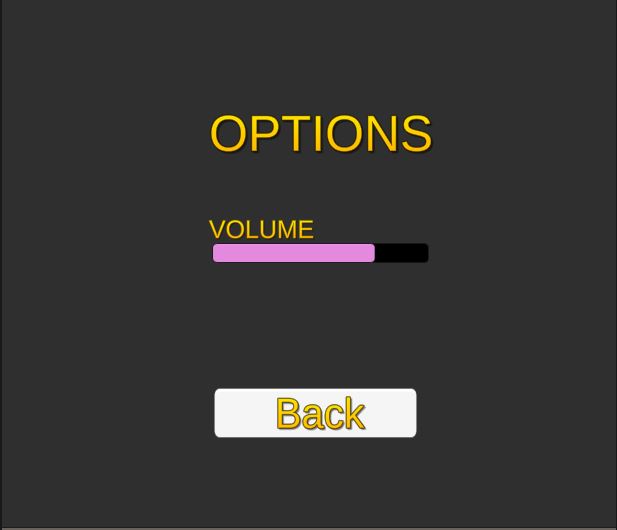
Step 4: right click on 'OptionScreen' in hierarchy and select UI ---> Slider. Drag the Slider Down the 'Volume' text. Rename slider as 'VolumeSlider'.
Step5: open 'volumeSlider' and delete 'Handle Slide Area'.
Now, you can see how slider looks by going in 'VolumeSlider' inspector and dragging 'value' bar. You can customize the bar as per your need.
To change color of filled bar , under Hierarchy, Go to Fill Area ---> Fill and under inspector, play around with color.
To change color of filled bar , under Hierarchy, Go to Background and under inspector, play around with color.
Step 6: copy text from 'BackButton' and past it under 'OptionScreen' and change text as 'Volume' and align it at top of slider.
So far, Image should look something like this.
Now, we must create and add Scripts for buttons to work.
LET'S MAKE SOME BUTTON WORK THAT DOES NOT REQUIRE EXTERNAL SCRIPTS
Step1: select 'OptionScreen' and uncheck it under inspector and then select 'StartScreen' and check it.
Step 2: go to 'Option' button's inspector. You will find a function called On Click() that looks something like this:
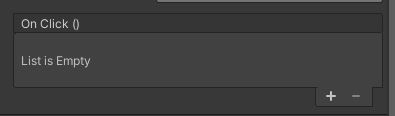
Step 3: Click on '+' and drag and drop 'StartScreen' under None(Object) and then click No Function ----> Game Object ---> SetActive(Bool).
Step 4: Click on '+' and drag and drop 'OptionScreen' under None(Object) and then click No Function ----> Game Object ---> SetActive(Bool) and then check the box next to 'optionScreen' under On Click().
Step 5: Follow step 3,4 for 'Backbutton' under OptionScreen.
NOW , LET'S MAKE SOME SCRIPTS FOR OTHER BUTTONS.
Step 1: right click and create new script under 'Assets' in Project tab. Rename Script as 'SceneLoader'.
Step 2: copy paste the following Script:
---------------------------------------------------------
using System.Collections;
using System.Collections.Generic;
using UnityEngine;
using UnityEngine.SceneManagement;
public class SceneLoader : MonoBehaviour
{
public void LoadGame()
{
SceneManager.LoadScene(SceneManager.GetActiveScene().buildIndex + 1); // see note
}
public void QuitGame()
{
Application.Quit();
Debug.Log("Quit!");
}
}
-----------------------------------------------------------------
Step 3: Create empty GameObject and drag and drop script on it. Rename GameObject as SceneLoader.
Step 4: Select 'PlayButton' under 'StartScreen' and go to On Click (). click on '+' and drag and drop GameObject with script in None(Object).
Step 5: click on No Function ---> SceneLoader ----> LoadGame().
Step 6: Follow Step 4,5 for 'ExitButton' but instead of LoadGame(), select QuitGame.
Note: In Script, Instead of SceneManager.LoadScene(SceneManager.GetActiveScene().buildIndex + 1); , see the id of your game scene in build settings and use SceneManager.LoadScene(*scene id*); . [eg - SceneManager.LoadScene(1) if id = 1].
That's It. We have Successfully created a simple Menu for Our game.
THANK YOU GUYS
--------------------------------------------------------------------------------------------------------------------------------------------------------------------------------
CREDITS
Whole content is developed by Me (Shivam Singhal).
INSPIRATION
I needed to create a simple game menu for my upcoming small game (will post in upcoming days).
SOURCES
a) Unity Manuals (https://docs.unity3d.com/Manual/index.html).
b) Button uses taught by my Teacher.
Video Link ---