
On Sale: GamesAssetsToolsTabletopComics
Indie game storeFree gamesFun gamesHorror games
Game developmentAssetsComics
SalesBundles
Jobs
TagsGame Engines

Jiggle Physics

6
Posts
5
Followers
4
Following
A member registered Feb 12, 2025 · View creator page →

Creator of

Recent community posts

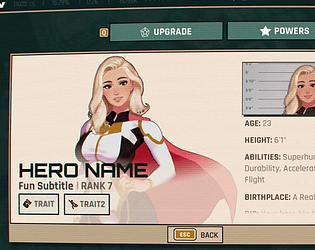
Hey! Yes, I never did the ‘powers’ screen. The icons and the layout was a lot and I had already spent way too much time fiddling with the details on the existing screens! If you have good photoshop knowledge you can probably use a bunch of the assets in the file to recreate it.

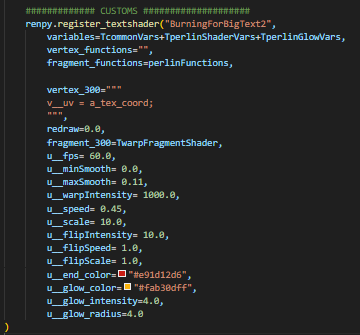
To recreate these screens I used screenshots from the game with the settings “additive FX” and “curved monitor effect” turned off (named something like that), so it gives you a nice flat image to use as a guide.

(1 edit)

Oh makes sense. So the entire text should be flames. Yes I was changing the ALT-F font explorer text to different colours to test. 

I quite like the flames 'behind' the text with the mix version, plus if you add semi transparent outlines the 'flames' also alpha out with them, giving a really nice cartoony effect especially when you set the warp intensity to something like 1000:


The custom burn settings (using the mix version I posted above):

There is a hard border on the left though which I have no idea how to fix (I'm using it on the name vbox). But it looks great for now.
Of course this would be tough to read in dialogue text cos it's quite over the top. (I'd love to have this effect on an image haha)
Really fun shaders!

Awesome! Very new to this so wasn't sure if it was me or not. Be interesting to see what the fix is. Would love to get into shaders but I'll start slow and just play with the parameters for now.

(1 edit)
  1. Copy the transform MVNVignette block from the MVNRomFXTemplates.rpy file and put it anywhere (a new file called MyRomFX.rpy makes it easy to find). 
  2. Change the name to
    transform MVNVignetteGreen
    or whatever.
  3. Change the u_vin_tint to whatever you like. eg:
    u_vint_tint (0.1, 0.8, 0.1)
    for a green.
  4. Then you can call it eg:
    camera at MVNVignetteGreen

You can change all the other parameters too. Everything is commented nicely so you can figure out stuff. 

If you check transform OtomeBrains that is a vignette with a different colour so you can see what is changed. 

You can do this for any of the other effects too to make custom ones. 

(2 edits)

Pulled latest version of MVNTSV1.rpy. There is zero difference from the one I had originally (using diff to check). Black text still creates black fire for me.
Happy to give any info about how I'm trying to use it in case I'm screwing something up. 

(3 edits)

These are great!
Is there a way for it to not pick up on the text colour when doing the effect? For instance BurningForBigText, the fire goes black if used on black text., green on green text etc. I think the TwarpFragmentShader is using the text colour to create the fire colour. 


I do not know a thing about shaders but Copilot (eventually...) provided a seeming fix in separating out the rgb and the alpha and using that to mix the final colour.  

This is what it changed:
    for (float x = 0.0; x <= MAX_LOOPS; x++) {
        if((u__glow_radius * 2.0) - (x*u__glow_radius*0.25) <= 0.0) break;
        for (float y = 0.0; y <= MAX_LOOPS; y++) {
            if((u__glow_radius * 2.0) - (y*u__glow_radius*0.25) <= 0.0) break;
            float offx = u__glow_radius - distance((u__glow_radius * 2.0), x*u__glow_radius*0.25);
            float offy = u__glow_radius - distance((u__glow_radius * 2.0), y*u__glow_radius*0.25);
            vec2 offset = vec2(offx, offy) / u_model_size;
//It added this bit here to separate out the rgb and alpha
            float glow_alpha = texture2D(tex0, distortedUV + offset).a;
            vec3 fire_color = mix(u__glow_color.rgb, u__end_color.rgb, 1.0 - v__uv.y);
            glow_color.rgb += fire_color * glow_alpha;
            glow_color.a += glow_alpha;
        }
    }

//final mix was here

    glow_color.rgb /= (4.0 * u__glow_radius * u__glow_radius);
    glow_color.a   /= (4.0 * u__glow_radius * u__glow_radius);
    vec4 final = mix(vec4(glow_color.rgb * u__glow_intensity, glow_color.a), text_color, text_color.a);
    gl_FragColor = final;

Resulting image above. It works with {color} tags in renpy!

The font browser is awesome also, but doesn't add font files in the base fonts folder, they have to be in a subfolder. It was throwing up an error (my font_list was empty even though I had fonts in my root font folder). It fixed by adding a single font into a folder. I know it may be best practice to put fonts in subfolders but just letting you know in case this error happens to anyone else!

These are simply amazing. Thank you!