Indie game storeFree gamesFun gamesHorror games
Game developmentAssetsComics
SalesBundles
Jobs
Tags

Documentation Sticky Locked

A topic by Sophie Houlden created May 24, 2018 Views: 2,998 Replies: 6
This topic was locked by Sophie Houlden May 31, 2018
Viewing posts 1 to 7
Developer (17 edits)

Hi, Here's the documentation for Sinput (version 2018_H).

If you prefer video documentation, most of this is covered in this youtube playlist: Sinput Introductory Tutorials.

Contents:

  • Setup
    • Import package
    • Fix unity inputs
    • Set up control scheme
    • UI Input Module
  • Usage
    • Basic Functions
    • Multiplayer Input
    • Menu Inputs
    • Toggle Controls
    • Sensitivity/Scaling
    • Axis Inversion
    • Framerate independent inputs
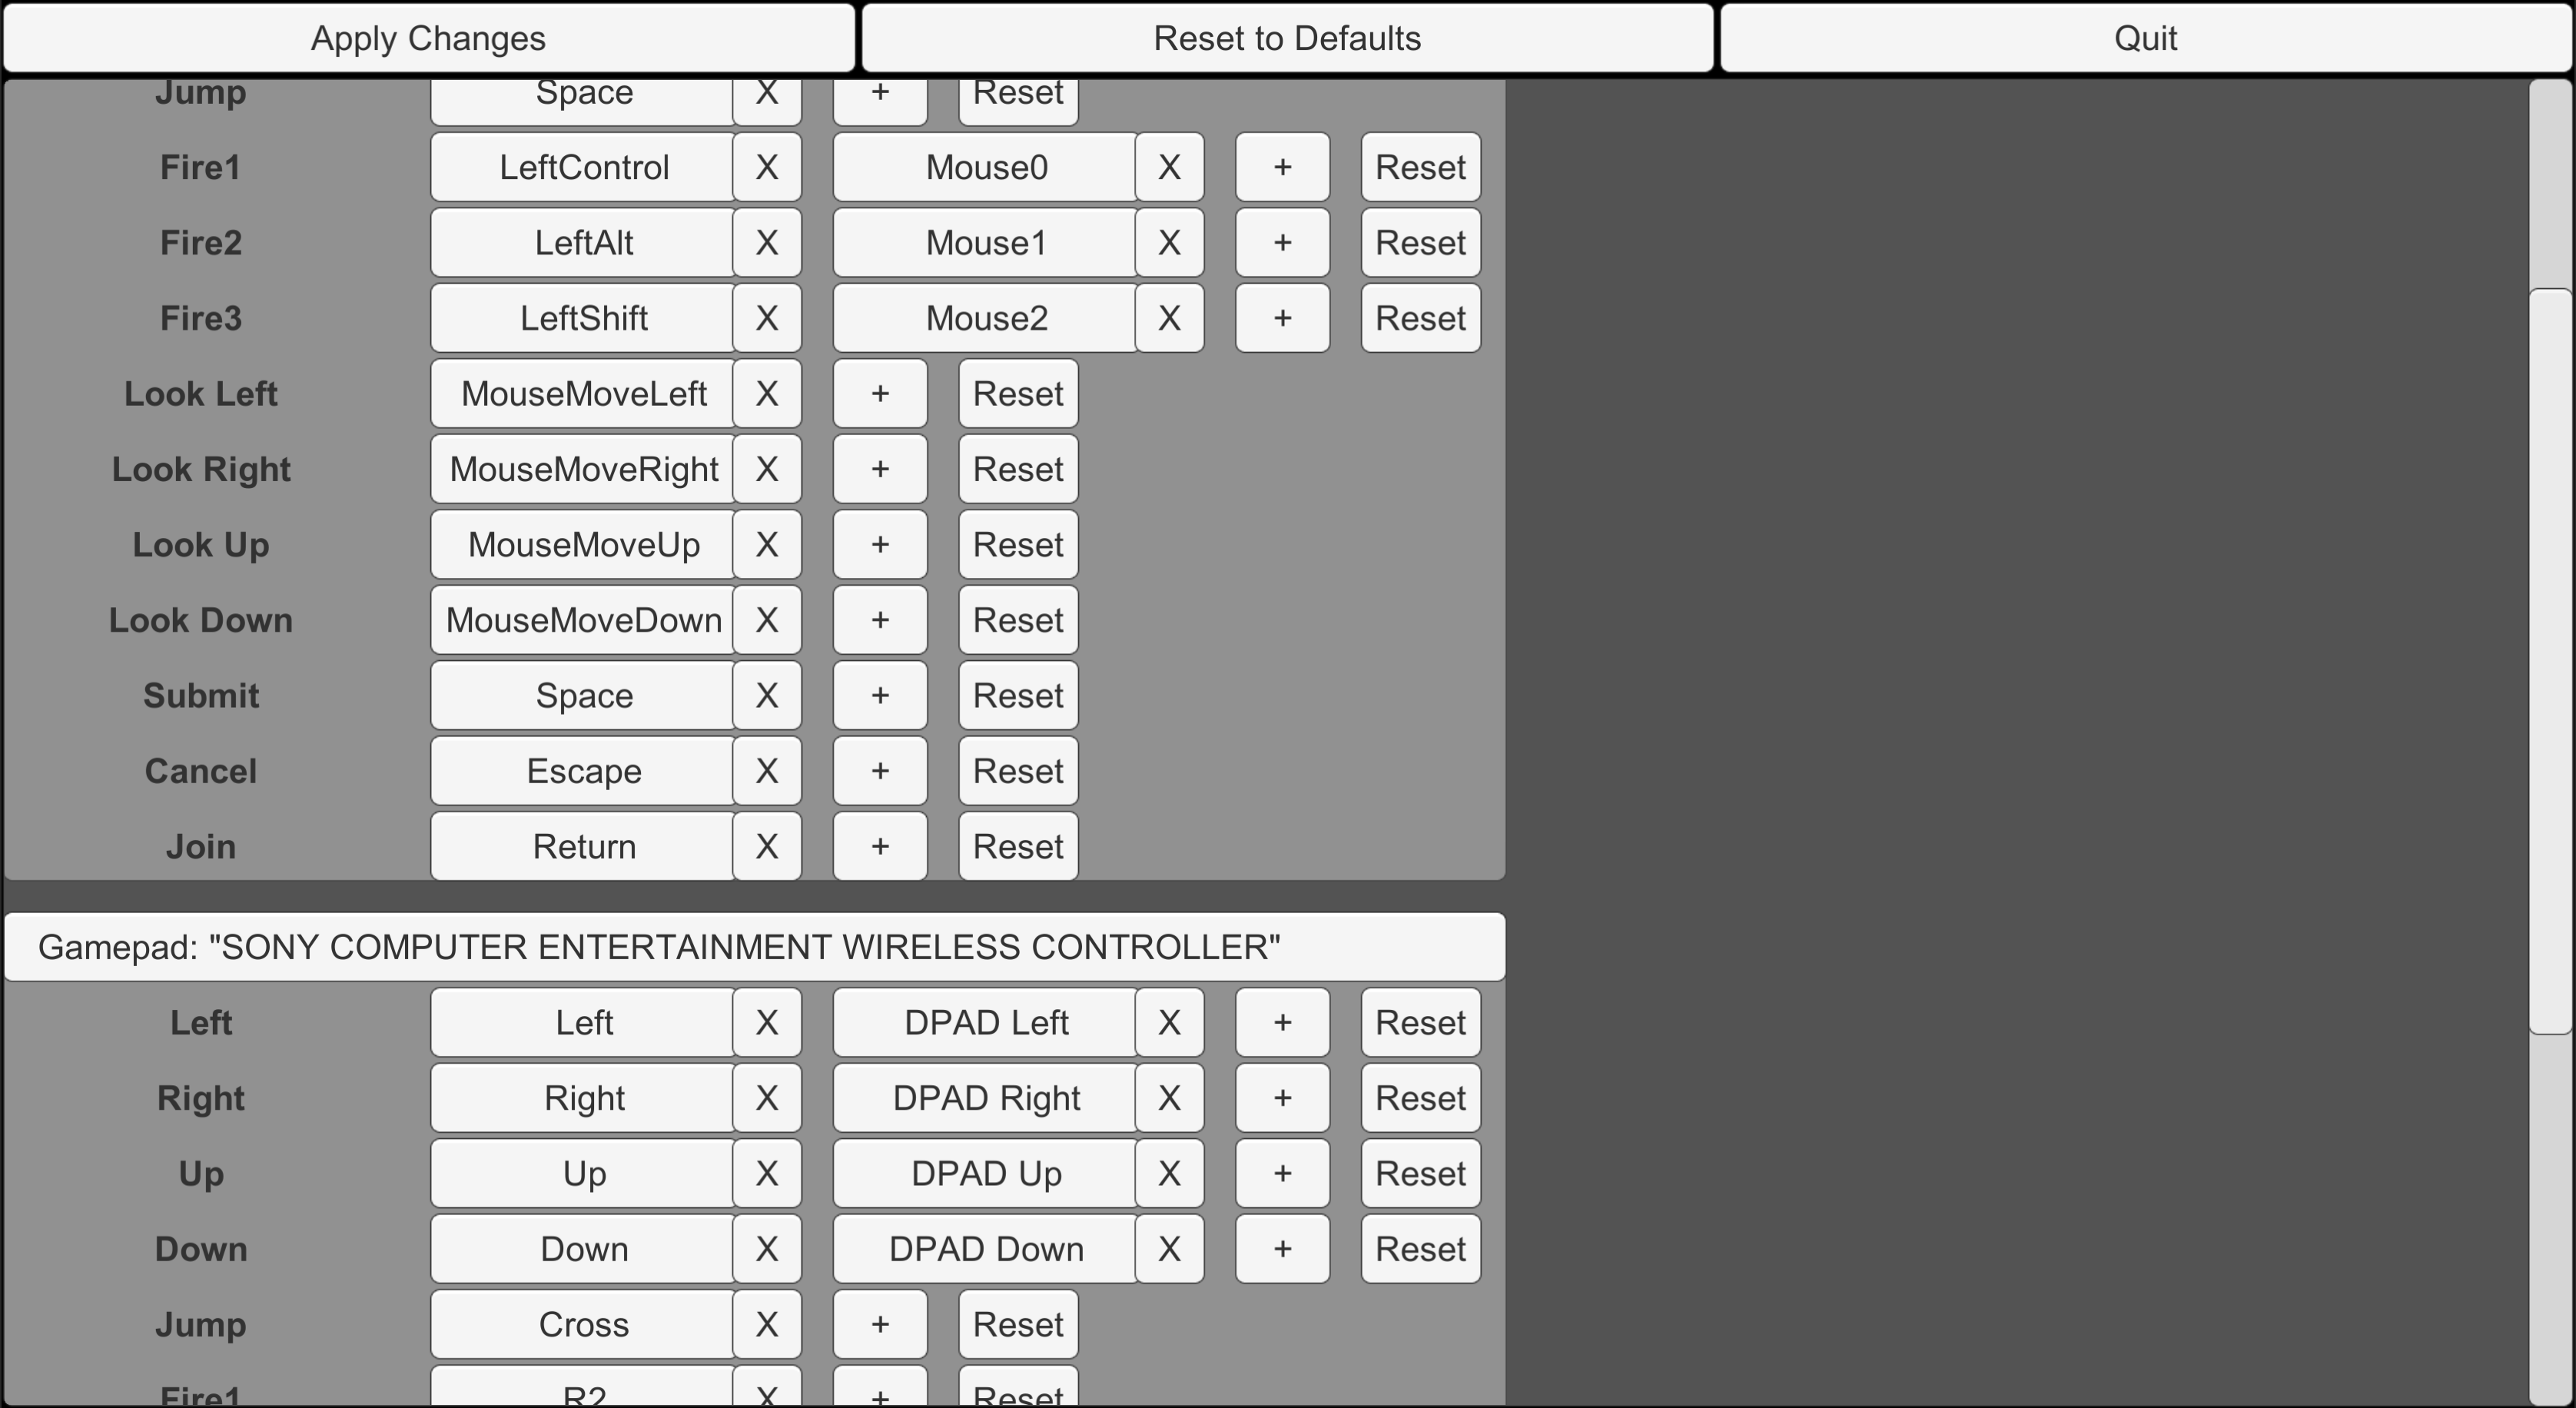
  • Rebinding
    • Rebinding scene explanation
    • Rebind Menu Settings
  • Virtual Inputs
    • Virtual Input Explanation
    • Touch Controls
  • Common Mappings
    • How common mappings work
    • Pad matching process
    • Button setup
    • Axis setup
    • Gamepad Debug scene
Developer (9 edits)

Setup

Import Package

The first step is to import the Sinput package into unity, do this by opening the package with your project open or going through the unity menu: [ Assets > Import Package > Custom Package... ]

Once you have opened the package, click Import. You can disable the Examples, Utilities, and TouchControls  folders if you want, Sinput will work fine without them.


Fix Unity Inputs

To work, Sinput expects Unity's own input manager to be set up a certain way, you can quickly do this by selecting [ Sinput > Generate Unity Inputs ] in the menu.


Set Up Control Scheme

Sinput's default control scheme largely mirrors Unity's default input axis setup, but if/when you need to set up your own controls, select [ Sinput > Select Control Scheme ] from the menu. If there is no default control scheme asset, selecting this will create one and select it.

Sinput controls can be thought of like unity input axis; each can have a several inputs, and a name that can be checked in code to get the status of those inputs.

The main differences are;

  1. You don't have to worry about slots
  2. You can have as many inputs as you want bound to a control
  3. When setting gamepad inputs, you set specific buttons and not ambiguous 'button 3' 'axis 5' etc
  4. Controls have no smoothing and their axis values are (ideally) in the range of 0 - 1 because,
  5. Smart Controls do input smoothing for you, and each takes a 'positive' and 'negative' control name

Smart Controls generally behave exactly the same as an Input manager axis with the same settings, so if you're used to setting up those then you should be alright with Sinput smart controls.

You might want to set up "Horizontal" or "Vertical" type controls instead of Smart Controls, but having distinct Up/Down/Left/Right Controls means that they can be rebound simply in whatever way a player prefers, so I'd advise sticking with this kind of set-up :)


UI Input Module

If you want Sinput to be able to navigate your canvas-based UI, replace and "Standalone Input Module" components in your scenes with "Standalone Sinput Module" from the Sinput/Scripts folder.

Developer (4 edits)

Usage

Basic Functions

GetButton(), GetButtonDown(), GetButtonUp()

These work just like the regular unity input button checks, but they can be used reliably for analogue inputs and not just buttons.

GetAxis(), GetAxisRaw()

Again, these work just like you would expect. And work for inputs with analogue or binary values.

GetVector()

Performs several GetAxis() checks returns the results in a vector. Just a time saver for you really

eg; movementInput = Sinput.GetVector("Horizontal", Vertical");


Multiplayer Input

For every input check, you can optionally pass an InputDeviceSlot value, by default this will be the 'any' slot which checks ALL devices, which is ideal for single player games. But if you want only input from the 2nd gamepad, or just the mouse, you use those slots to filter your input checks.

This means you can simply code multiplayer input by having a single player script, where the instances just have a different slot to check.

To get a player's slot, I recommend using:

GetSlotPress()

This works just like GetButtonDown() but instead of returning true or false, it will return the InputDeviceSlot of whichever player pressed the control. You can use this for things like a 'Press A to join!' screen. If there are no presses this frame, it will just return the 'any' slot.


Menu Inputs

Sinput has some functions to make quality menu navigation easier to code:

GetButtonDownRepeating()

This will return true when a button press is detected, and if the button remains held long enough, the function will begin to return true again periodically. This means you can make menus where players can hold a button down to keep scrolling, but it won't start scrolling too soon. You can set how long the wait before repeating and how long between each repeat is with Sinput.buttonRepeatWait and Sinput.buttonRepeat.


ResetInputs()

This will reset all controls (or just controls for a specified slot) for a time, and all Sinput checks will return false or 0 until that time has passed. You can pass 0 if you want to reset inputs for just the one frame like the usual Input.ResetInputs()

You should call this whenever you detect a menu item selection to prevent the player from unintentionally making more selections too quickly.


Toggle Controls

SetToggle(), GetToggle()

Any Sinput control can be set to have toggle behaviour, which makes it so GetButtonChecks will behave as though the control is pressed even after it is actually released, and until it is actually pressed again. You can use this to make it so controls that would otherwise need to be held down (eg crouch) can be instead toggled on/off by the player.

I would strongly advise you expose this option to your players for any control that might need holding for a prolonged period; some players can't press a lot of buttons at once, some may find it strenuous to hold a button, and most keyboards don't support too many buttons being held at once anyway so if you're porting gamepad code it's worth keeping in mind.


If you have a control that may or may not be a toogle and you need the actual value, you can use these functions;

GetButtonRaw(), GetButtonDownRaw(), GetButtonUpRaw()

GetButtonDownRepeating() doesn't have a 'Raw()' equivalent because it ignores a control's toggle setting (I can't think of a good reason it should, if you think adding this behaviour is worthwhile let me know!).


Sensitivity/Scaling

You can set the overall mouse sensitivity that Sinput uses simply by assigning it;

Sinput.mouseSensitivty = 0.5f; //makes mouse movement half as sensitive

In addition to that, you can use the following functions to set the scaling of smart controls (note: this won't work for regular controls).

SetScale(), GetScale()

It's worth keeping in mind, all axis values returned by a smart control will be multiplied buy it's scale, including mouse movement which may have already been scaled by the mouseSensitivity setting. (I'm not sure if this is ideal and I'm still thinking on a better system)


Axis inversion

Smart controls (again, not regular controls) can have their axis values inverted simply using;

SetInverted(), GetInverted()


Framerate Independent Inputs

This one is a little tricky to explain, but put simply, some GetAxis() values you might want to multiply by Time.deltaTime (eg buttons, gamepad sticks), but others you do not (mouse movement).

As an example, think of aiming in first person, an analogue stick in one place will return a constant value every frame - you can multiply this value by deltaTime and turn the first-person view by that much. It doesn't matter if the framerate (and therefore, the deltaTime) fluctuate.

But if you try to do this with mouse input it could be significantly less precise depending on how consistent the framerate is - you will want to turn the first-person view by exactly how much the mouse was moved without the framerate being an influence.

For the most-part, you should be able to get by without worrying, just use Sinput to check a control and you won't have to worry if the value is coming from a mouse, a gamepad, or a keyboard - but for important things like first-person aiming or moving an in-game mouse pointer you will notice (or at least, you'll feel) that the controls are a little off if you don't have separate behaviour in your scripts for these different types of controls.

For that purpose;

PrefersDeltaUse()

If this function returns false for a control, that means any GetAxis() value for that control should NOT be multiplied by Time.deltaTime this frame. (I specify this frame, because the player might switch to gamepad control the next, or maybe they are using both. Sinput is hecka versatile you know ;p)

Developer (3 edits)

Rebinding

Rebinding scene explanation

Sinput includes a scene that can be included in your game to let players rebind their controls, You will need to handle loading the scene from your game, and deciding what happens when the 'Quit' button is used.

Honestly, this is system kind of a mess behind the scenes so if you want to study it in order to make your own rebinding interface you might have trouble if you aren't familiar with how Sinput works internally. I'm working on simplifying it but for now, this is it (sorry).


If you have any feedback on this scene or what it's like to integrate, please let me know! I think every game should let players rebind their controls so if I can do anything to make it easier for you to include this I'd love to know :)


Rebind Menu Settings

You can specify extra settings which appear at the top of the rebind menu with the RebindMenuSettings asset (select via the menu with Sinput > Rebind Menu Settings). You can use this to expose overall mouse sensitivity, which controls can be set as toggling, which smart controls can be inverted, and create sensitivities for groups of smart controls (e.g; You can create a "Look" sensitivity which effects both "Look Vertical" and "Look Horizontal").

You can also just disable these settings entirely if they are not applicable to your game (but I would strongly recommend you consider what might be useful to your players, these features can make a difference for how accessible your game is to play).

Developer (5 edits)

Virtual Inputs

Virtual Input Explanation

Virtual inputs are for anything that isn’t a keyboard, mouse or a gamepad that you want Sinput to check. Just add a virtual input to a control, and then you can set it’s values from inside your scripts using these SinputSystems.VirtualInputs functions;

SetVirtualAxis(), SetVirtualButton(), SetDeltaPreference()

Setting an axis value will automatically set the virtual input’s button state, and vice-versa.


Touch Controls

Sinput includes prefabs for touchscreen buttons and analogue sticks, you can find these in the TouchControls folder.

The touch control prefabs require minimal setup; just specify which virtual inputs they effect, and make sure you have listed those virtual inputs in your control scheme.

Developer (4 edits)

Common Mappings

How common mappings work

Common mappingsare located at Sinput/Resources/CommonMappings in your project, and for the most part, you can ignore them.

Common mappings are assets that describe button/axis mapping for various gamepads on various operating systems. Sinput will try to check all of these for matches with connected gamepads to maximise the possibility of a gamepad working without a player having to set up custom binding. This is going to fail sometimes, but so long as you give players the opportunity to rebind their controls they will still be able to use any gamepad that unity can detect to play your game.

You can make new common mappings for gamepads that sinput does not yet support so that those gamepads will work out-of-the-box with your game.

If you do make new common mappings, please consider sending them to me so I can include them in future versions of Sinput :)


Pad matching process

Pad matching is determined by operating system, gamepad name, partial name, and whether the common mapping is a default.

A common mapping is used for a gamepad if they match, the priority for matching is determined by;

  1. An exact name match from the names list.
  2. The gamepad name contains a match from the partial names list.
  3. The common mapping is marked as default.

It will never match if the operating system running the game doesn't match the common mapping.


Button setup

In this tab, you match up common gamepad inputs to the button indices that unity detects, and provide a display name. 


Axis setup

In this tab you match each of the gamepads axis to common gamepad inputs, and specify how the gamepad axis behaves (clamping, inverting, how far the axis value needs to go to count as a 'press' when treated like a button).

Generally, for most axis you are going to want a setting that will give a value of 0 when resting, and goes to 1 when fully pressed/moved. And for inputs like LSTICK_LEFT where the value for the full left stick's X range is -1 to 1, you will want to clamp it.


Gamepad Debug scene

Included in the project at Sinput/Utilities is a scene to help debug gamepads, it uses displays the full state of all connected gamepads, I use this when building the common mapping for a gamepad - you can identify which buttons/axis are which, and the value ranges of different axis.

Honestly it's pretty confusing to set up mappings from this, but you'll know if you get it right if your gamepad works to play the game without having to set any custom binding in-game.

Developer

That's all!

If you have any questions, suggestions, requests, or anything at all to say:

And if you just want to tell me I'm awesome, consider doing it with money on my patreon ;) <3