
Okay! Let's do it. It's mostly a matter of understanding how to use what Wigglypaint already does and then we'll add a few more colors to it.
Part 1: Editing the Options card
Hopefully you're comfortable going into Widget mode to select, make and move widgets. (If not... please ask!)
The fields that exist on the card already for editing the colors are all plain text fields with names corresponding to their default color or role within Wigglypaint: foreground, background, pink, cyan, and yellow.
So let's make new fields for your new colors using the menu. [Widgets > New Field ]
We'll need to open up each new field's Properties Window by double-clicking on them and edit each one's Name to be to anything that's easy for you to remember while you're setting up the next thing. It'll be easiest if these names don't have any spaces or unusual characters.
If you open the properties menu for the Apply button on the options card and click on [Script] you'll see the script which currently looks like this:
on click do
 f:"%06H"
 patterns[32]:f parse background.text
 patterns[47]:f parse foreground.text
 patterns[36]:f parse pink      .text
 patterns[39]:f parse cyan      .text
 patterns[33]:f parse yellow    .text
end
f:"%06H" is there to tell Decker that the format we're parsing is 6 digits of uppercase hexadecimal.
The next line makes the pattern in slot 32 become the color of the hex code contained in the text of the field named background.
And then every line until the end does the same thing: it sets the hex codes in the text of each of the other fields to be the new colors of the other pattern slots Wiggypaint uses.
You'll have to pick some slots to put your new colors in so we're going to take a quick look at Decker's pattern index. It looks like this:
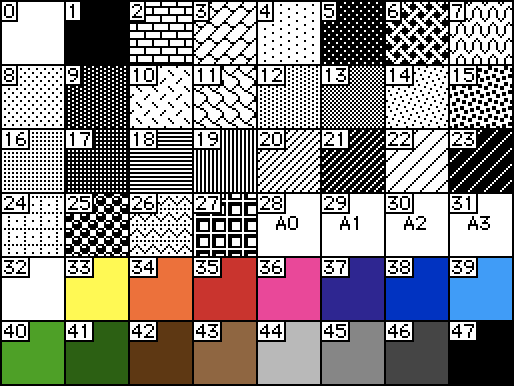
Slots 1 through 27 only support 1-bit patterns. They may not be what you want right now....
28 through 31 are "animated patterns" which are 1-bit unless you edit them so we'll also ignore them unless you're into that.
(You're able to use all of these in Wigglypaint too if you like them!)
32, 33, 36, 39 and 47 are already in use by Wigglypaint. We saw them being used in the script inside the current Apply button.
So that means you're free to use any or all of these pattern slots for new colors:
34, 35, 37, 38 and 40 to 46.
So let's do this.
After you make your new fields (and give them each a name you can remember) you can add more lines to the Apply button's existing script (under the others but before the 'end' ) that look like this:
patterns[34]:f parse mynewfield.text
Make sure you're writing your new fields' names and using one of the unused pattern slot numbers!
(This is optional but I'd also recommend painting a little swatch of each color next to it's corresponding field, so you can see which color will be changed when you edit that field.)
Part 2: Editing the Drawing card
I'm not sure how you want your new color selection options to be arranged on the card, or even how many colors you want to add so this is just a technical explanation for now. But the good news is that the technical part of this is very simple because Wigglypaint was made in a very clever Decker-y way.
This is the script inside of all of the tools:
on click do
 others:me drop extract value where value..def.name="popOut" from card.widgets
 others..value:1
 if !me.value play["pick"] end
 me.value:0
 target.brush:me.name
 changetool[me.name]
end
You don't actually need to understand this one! It's doing a couple of different things like telling the other tools to stop poking out because they're not active anymore. The cool part is that all of the tools look at their own name (me.name) to set the active drawing tool on the big wigglypaint canvas.
The existing highlighters are named hi33, hi36, and hi39 -- the number after the "hi" relates to the pattern slot that they use when you're drawing.
If you put this exact same script inside of a new button (or a new pop-out highlighter pen if you'd like me to explain how those work) then all you need to do is give the new button the right name.
If your new color was set to patterns[35] then you can make a button named hi35. If it has this script in it then it'll change your highlighter color to that pattern 35 when it's clicked.
Once you've made one button you can copy and paste it until you have enough of them and then rename each one to match a pattern slot you're using.
Part 3: ???
That's it, hopefully! Except for the creative work of making it all look nice....
A lot of unlabeled color-changing buttons would probably be hard to use while drawing... and there's so many ways to set this up visually that are nicer that a bunch of buttons. But I'm not sure what you'd like your personal modified wigglypaint to look like, so I don't know what to advise (yet).
I'm happy to clarify anything here (I'm sorry if it's confusing) or to help you make your custom wigglypaint look how you want it to. :)