

I would recommend giving the game a couple of blind playthroughs before reading too much of this, but for those who need some assistance, here is a guide for the demo. I will try not to spoil much, just give you locations and a general idea of where to go at times.
Here is a crude layout of the Demo Map, use as a reference for locations below: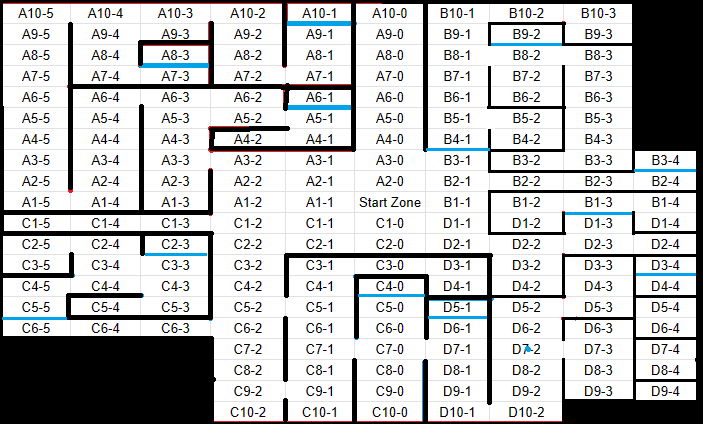
- Blue Lines are Locked Doors, which Require a Small Key to unlock.
- Black Lines are Walls
- Start Zone is the area you begin the game at.
Important NPC Locations:
NPC | Location | Job
Maev | A4-0 | "Innkeeper" Buy/Sell items, Rest, Eat
Kieran | A4-0 | "Weaponsmith" Creates Weapons (Armor next update) in exchange for Weapon Scraps and Armor Scraps.
Fylk | A4-0 | "Maev's Chef" Cooks the meals that Maev sells, can also make Food for you if you bring the ingredients.
Gretta | A4-0 | "Gossip" Provides some valuable rumors, along with a bit of lore. Ol' Gossiping Gretta.
Lily | A4-0 | "Codemaster" Codes found hidden in the dungeon and given away on my socials can be used to get free items, gold, etc.
Madison | A3-0 | "Bandage Vendor" Crafts Field Bandages in exchange for Tattered Cloth, also sells Field Bandages.
Maddox | C1-3 | "Powderman" Crafts explosives in exchange for Gunpowder. [Grenade, Dynamite, Bomb, Excalibur Bomb]
Main Character Locations:
Marcus | A3-0 | Priest - Joins your party if you bring him an Elixir to recover with.
Morgana | B1-2 | Mage
- Note: Main Characters are recruits that offer new storyline elements, usually don't cost money to hire, instead usually relying on quests to gain their assistance.
- Note: There will be more as the game expands, but right now there are only 2 "Main Characters" to add to the party for the demo. You'll have to choose between them, as you find out they hate each other after an incident in a previous group they were in, where Marcus accidentally killed (and revived) Morgana. You must make a tough choice the Power of the Mage, or the Aid of the Priest.
Mercenary Locations:
Archer | A4-0 | Hire for 500 Gold
Dragoon | A5-2 | Hire for 750 Gold
- Note: Mercs will simply offer assistance in battle, they will generally have no lines and no random storyline element will be gained from them. They are simply as the name implies, a mercenary for hire.
Battle Pet Locations:
Pet Tamer | A3-3 | Currently sells Water Slime (250 Gold) and Hornet (250 Gold)
- Note: Battle Pets can only be trained to Level 5 and have no equipment, which is why they are cheaper than the Mercs. They are good to use as filler or an early ally in the game.
Items Used for Crafting:
Item | Ingredients | Location
Field Bandages | Req: 1 Tattered Cloth | A3-0
Grenades | Req: 1 Gunpowder | C1-3
Dynamite | Req: 2 Gunpowder | C1-3
Bomb | Req: 3 Gunpowder | C1-3
Excalibur Bomb | Req: 5 Gunpowder | C1-3
Food | Req: 1 Giant Rat Meat, 1 Slime Gel, 1 Jar of Spices, 1 Mushroom | A4-0
Revive Potion | 1 Poison Gland, 1 Slime Gel, 1 Enchanted Bone Meal | B2-5
- Its best to save these items when selling off at Maev's, they can be more useful to craft with.
-Weapon Scrap, Armor Scrap, and Leather Scrap will be used to craft weapons and armor, currently only Weapons can be crafted from 5 Scrap.
Where to Begin:
- To start, equip your short sword and begin searching areas surrounding the Start Zone for chests, then head up North to A4-0
- At A3-0 you will meet the Priest, which will join your party for an Elixir, which you can find around the Starting Zone (C1-1)
- At A4-0 you will meet Maev who you can sell off items, buy items, rest, eat & drink. There are also a few other important NPCs like Gretta who will tell you various rumors, Kieran who can craft in exchange for scraps, A Mercenary Archer for hire.
- I would advise getting the Priest in your party before heading to the Gnoll Camp, but it can be solo'd
- Go to A3-3 and you will find the entrance to the Gnoll Base, which is a great place to get loot and level up to start.
- When you make it to A10-1 you will unlock the first Waypoint, from there you can travel back to the Start Zone and return as you wish.
- After completing the Gnoll Base, sell off items to Maev, rest, eat, maybe craft some Field Bandages
- Next Go to D1-3 before going to the next Base. You will find some good loot and a Mage who you can ditch the Priest for if you wish.
- After Clearing that area out, you are ready to go to B3-1 the 2nd base. Find the 2nd Waypoint and clear out all the chests in the area
- The last Base is located at C9-2, but you can hit up the "Crypt of Acknowledgement at C6-5 first for some extra loot and leveling.
- When you are searching the last base, you will find a Dragon guarding a Gate Key at the end D3-3, just before that you will find the last Waypoint, so you can make sure to sell off items, and make final preparations for the battle. I would recommend being at least Level 4 with a party of 3 or 4, otherwise I wouldn't attempt it until you're level 6 if you have less than 3 in your party.
Tips:
- Equip your short sword before you do anything, you are worthless in battle with no weapon equipped.
- This is not a game meant to sit around grinding your characters. You need to be searching chests, finding food, gear, and healing potions to start. The loot you get from chests and enemies can be sold to pay for your Rest and Food from Maev. If you want to grind, this is how. Stick around Maev's area and kill enemies for their drops to sell. You should have enough to keep paying Maev to heal and fill your hunger/thirst bars. That way you can save your food and water for when you venture out to the deeper areas.