Hello! Thanks for your interest in this plugin! No AI was used in the making of this plugin. Some of my plugins have been touched by AI though, so be sure to check more information on the store pages before purchase, I disclose whenever AI has touched anything.
A member registered May 22, 2020 · View creator page →
Creator of
Organize chaotic RPG Maker spawn maps into clean, labeled groups and export beautiful PNG layouts.

Adds random pitch variation to specific sound effects to reduce audio fatigue.
Change Title Screen Background and Foreground Images & BGM with plugin commands! Uses Global Persistent Data!
Toggle through, and use, items on the game map!
A Fun Challenging Math Exercise Game for Kids! -- and Fully Grown-Up Kids!
Educational
Play in browser
Easily Change the tiles on your game map! All Layers! Regionids! Shadows!
Change your maps tiles on the fly! Change regionIds! Swap an area of tiles from one map to another! And more!
A Modern Cinematic Title Screen System for RPG Maker MV & MZ
Enabling Modern Event Streaming Inside RPG Maker MV & MZ

Event Spawner which recycles unspawned events to eliminate performance loss over time.
Toggle through and use items on the game map in ABS games!

Add levels and exp to each stat parameter!
Recent community posts
Ritter Ultimate Event Spawner RPG Maker MV & MZ community » Support · Created a new topic Need support?
Ritter Ultimate Event Spawner RPG Maker MV & MZ community » Guides · Created a new topic Boundary System Script Calls and Plugin Commands!
(This section will be updated soon to include a new method of preloading events into boundary saved data, to allow for much more accurate and predictable spawning of events)
Boundary System Plugin Commands and Script Calls:
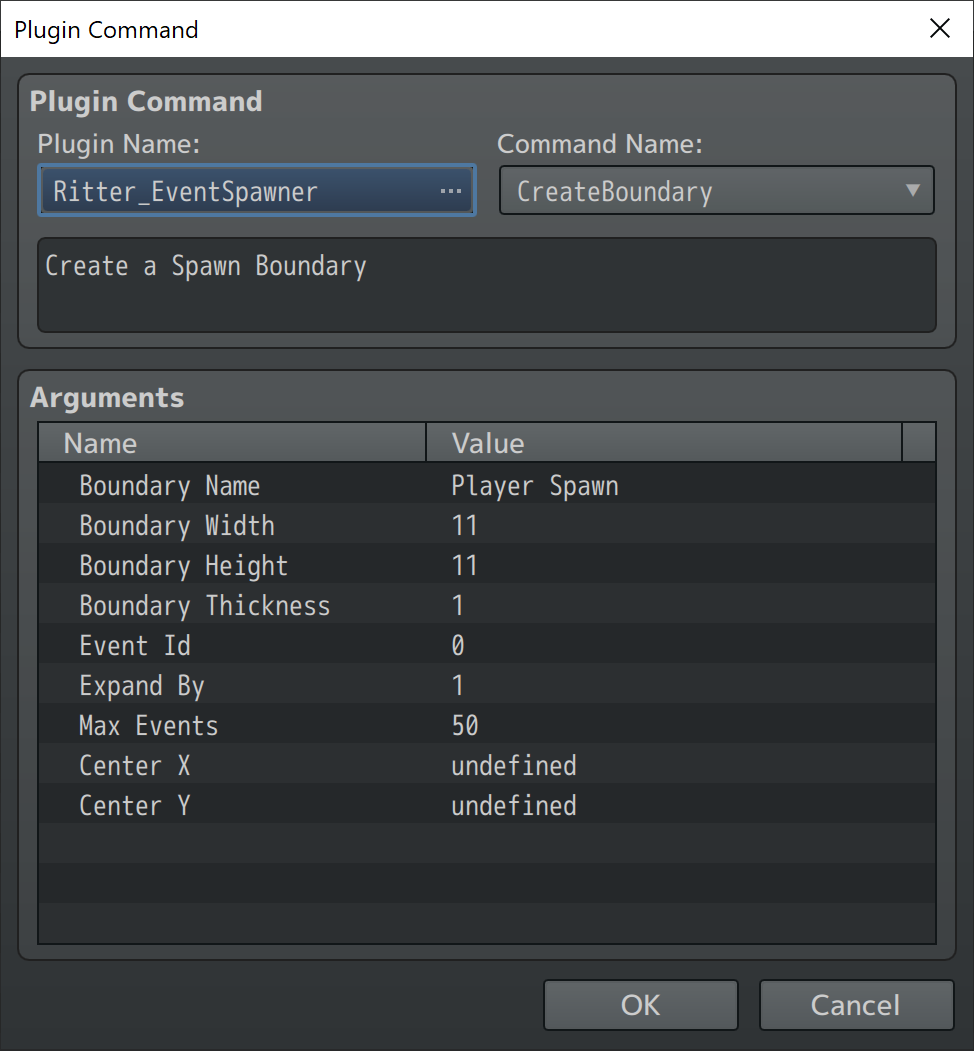
Ritter.Boundary.createSpawnerBoundary(width, height, thickness, name, eventId, expandBy, maxEvents, centerx, centery)
This is the script call to create your boundary, or boundaries.
width = the number of tiles wide your boundary is.
height = the number of tiles high your boundary is.
thickness = the number of tiles thick your boundary is.
name = the "name" of your boundary to be used later when spawning/unspawning on this boundary.
eventId = use 0 if creating a boundary around player, use an eventId if creating a boundary around an event, or use -1 if creating a boundary around an x,y location, and set the x, y location as shown below.
expandBy = the number of tiles the boundary expands its thickness by in the direction of the players movement. This helps increase the odds that events will spawn in front of the player while the player is moving as opposed to the sides and back, helping to ensure that the player has higher odds of encountering enemies in the direction the player is moving.
maxEvents = the number of events the boundary is allowed to spawn, use this to manage the total events on the map to prevent event clutter and performance loss.
centerx = only use centerx if spawning on an x,y location. centerx = the x location of the center of the boundary. leave out of the script call completely if spawning on player or event.
centery = only use centery if spawning on an x,y location. centery = the y location of the center of the boundary. leave out of the script call completely if spawning on player or event.
Example Script calls: Ritter.Boundary.createSpawnerBoundary(11, 11, 1, "spawn", 0, 2, 30)
This would create a boundary of 11 tiles width and height around the game player with 1 thickness which is named "spawn", the boundary will expand by 2 tiles in the direction the player is moving and have a maximum of 30 events it can spawn.
Ritter.Boundary.createSpawnerBoundary(15, 15, 1, "unspawn", 0, 0, 0) This would create a boundary of 15 tiles width and height around the game player with 1 thickness which is named "unspawn", the boundary will not expand in the direction the player is moving and will not be able to spawn any events.
Ritter.Boundary.createSpawnerBoundary(5, 5, 2, "eventBoundary", 50, 0, 5) This would create a boundary of 5 tiles width and height around event 50 with 2 thickness which is named "eventBoundary", the boundary will not expand and is limited to spawning 5 events maximum at a time.
Ritter.Boundary.createBoundary(5, 5, 1, "xyBoundary", -1, 0, 20, 50, 50) This would create a boundary of 5 tiles width and height around coordinates 50,50 on the game map which is named "xyBoundary", the boundary will not expand and is limited to spawning 20 events at a time.
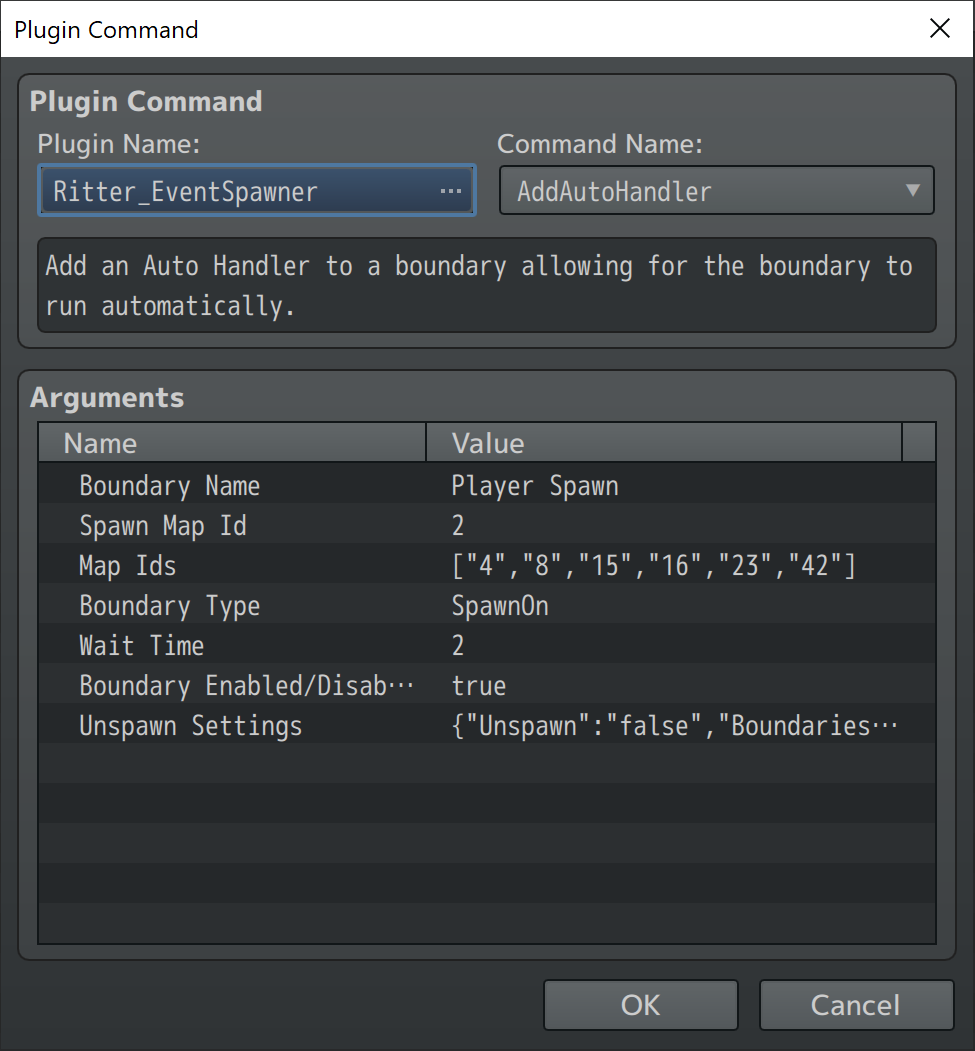
Ritter.Boundary.addAutoHandler(name, spawnMap, maps, type, wait, enabled, boundaries)
This new Feature allows the developer to abandon manually calling the spawn/unspawn boundaries and instead allows the developer to run them automatically! Simply Create your boundary and add an Auto Handler to it. Then set up your spawn events as explained in the next section. Easily Enable/Disable each Boundary with a plugin command or script call!
- name = The "Name" of the boundary you wish to run on auto mode.
- spawnMap = The Id of a SpawnMap to pull events from.
- type = The Type of Boundary you wish to run.
- "SpawnOn" = Spawn Events on the Boundary Edge.
- "SpawnIn" = Spawn Events within a Boundary.
- "FillOn" = Spawn Events on every tile along the edge of a Boundary.
- "FillIn" = Spawn Events on Every tile within a Boundary.
- "UnspawnOn" = Unspawn Events on the Boundary Edge.
- "UnspawnIn" = Unspawn Events within a Boudnary.
- wait = The number of frames to wait between boundary actions. Spawn/Unspawn calls.
- enabled = Whether the Boundary is Enabled by Default or Not.
- boundary = [Array] of "Strings"- Only required for Unspawn Boundaries. This tells the Unspawn Boundary which Spawn Boundaries it is allowed to unspawn events from. It will check this array of "Boundary Name" strings against the events parentBoundary.
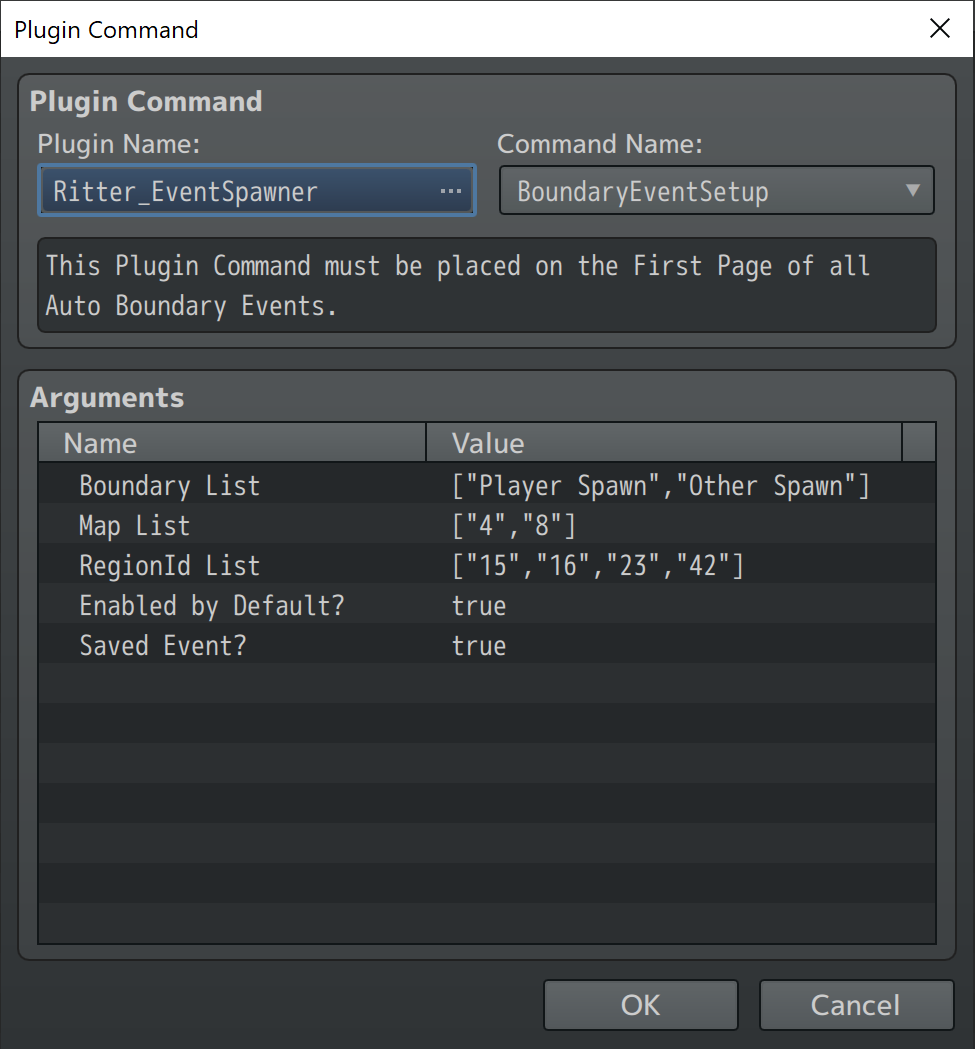
Boundary Event Setup
No Script Call for this Plugin Command as it is only parsed by Spawner Boundary System Code for Data.
This Plugin Command must be placed on the first page of every Event on a Spawn Map which is used for Auto Boundaries. It executes no code and is essentially the same as a Comment.
- Boundary List = A List of Strings containing Boundary Names 'this' event may spawn on.
- Map List = A List of MapIds 'this' event may spawn on.
- RegionId List = A List of RegionIds 'this' event may spawn on.
- Enabled By Default? = Whether spawning this Event is Enabled or Disabled by default. Can be toggled on/off with a plugin command.
- Saved Event? = Whether the event is saved or not. Will respawn if tile passes through a valid spawn boundary (The Boundary which spawned 'this' event).
- Saved Events work differently for Boundary Events than they do for Regular Spawned Events. The only difference would be the eventId does not remain the same for Saved Boundary Events, everything else will remain exactly as it was on Unspawn or Map Change. If Saved Boundary Events are allowed to retain EventIds this would allow for too many events to stack up on the map and cause performance loss, therefor we Recycle those Unspawned Saved Boundary Events while they're not being used. If you must retain the same eventId ,for some reason, then that specific event should be spawned regular and not by boundary.
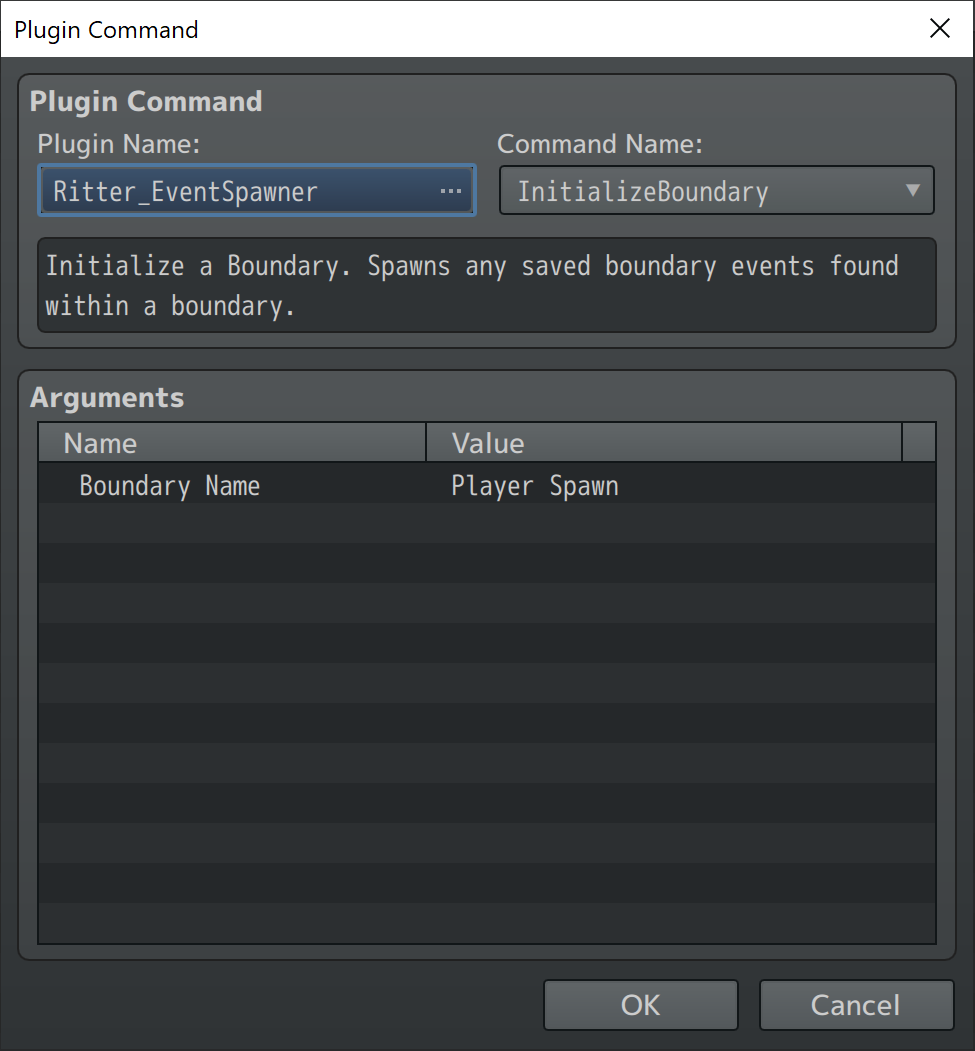
Ritter.Boundary.initBoundaryEvents(boundaryName)
- boundaryName = The "Name" of the boundary you wish to initialize.
Initializing a boundary is only required if you wish to Pre-Load all events within a boundary on map load. If your boundary type is "SpawnIn" or "FillIn" this plugin command does not need to be applied.
If you use "SpawnOn" or "FillOn" boundaries you may wish to initialize all nearby saved events so they are loaded when the player loads into the map. To accomplish this simply place this Plugin Command on an AutoRun event that erases itself after running its commands.
This method may be deprecated in the future if I can find a proper spot in MZ code to call this which doesn't crash the game xD
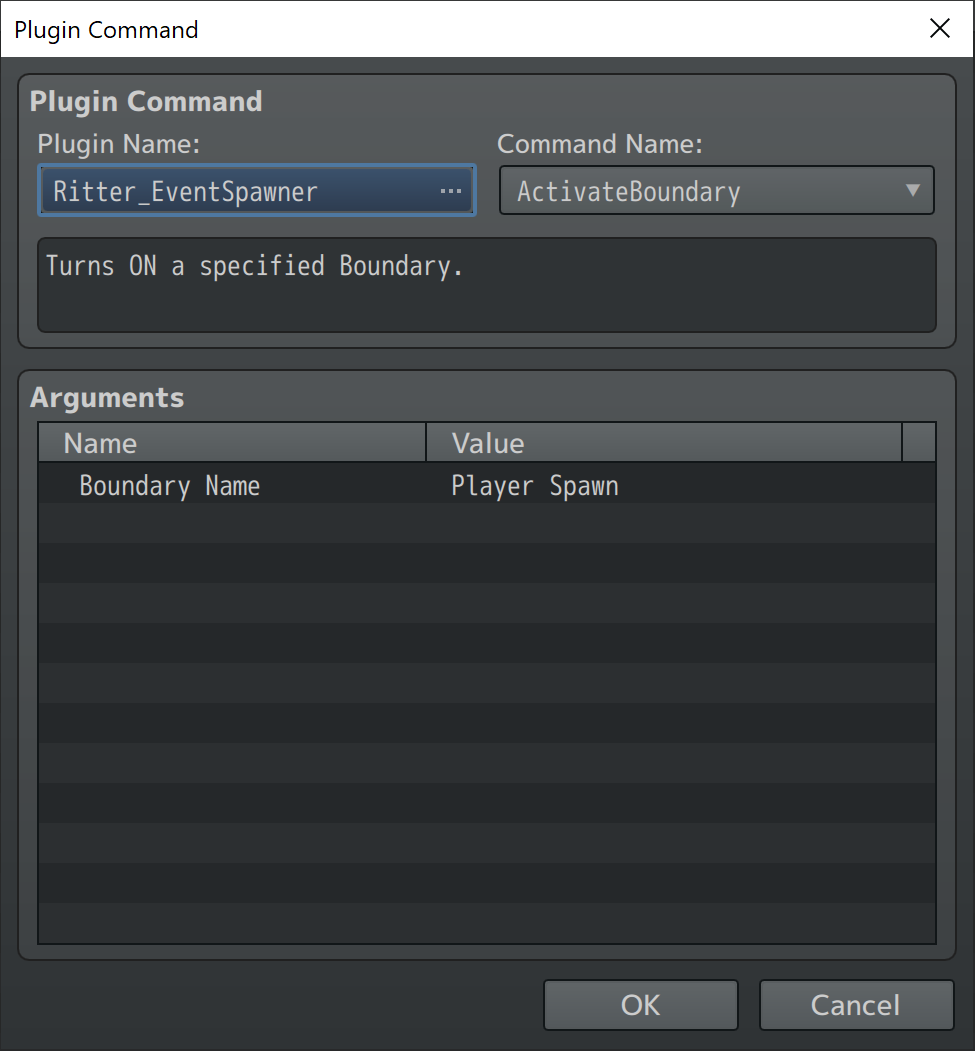
Ritter.Boundary.activate(boundaryName)
- boundaryName = The "Name" of the boundary you wish to activate.
This command turns on a specified boundary. By turning on a boundary it allows the boundary to Spawn or Unspawn events as long as the conditions are met which allow this boundary to Spawn or Unspawn events.
Conditions such as: Player is on proper map. A valid RegionId is within/on a boundary. There are enabled events for a nearby valid tile with.
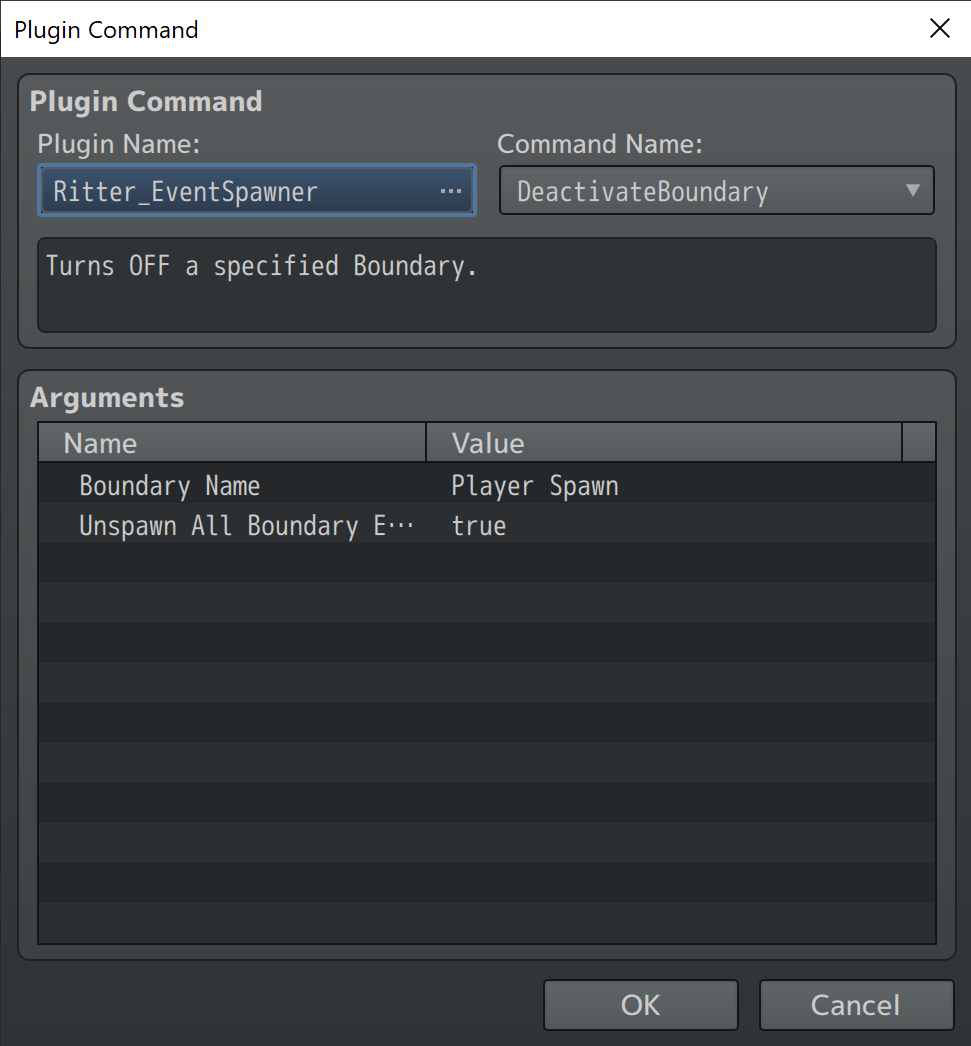
Ritter.Boundary.deactivate(boundaryName, unspawnAll)
- boundaryName = The "Name" of the boundary you wish to activate.
- unspawnAll = true/false - Whether or not all events spawned by this boundary are unspawned when boundary is deactivated. (Turned OFF).
This command turns off a specified boundary. By turning off a boundary it stops running entirely. It will not spawn or unspawn any more events on any map until it is activated again.
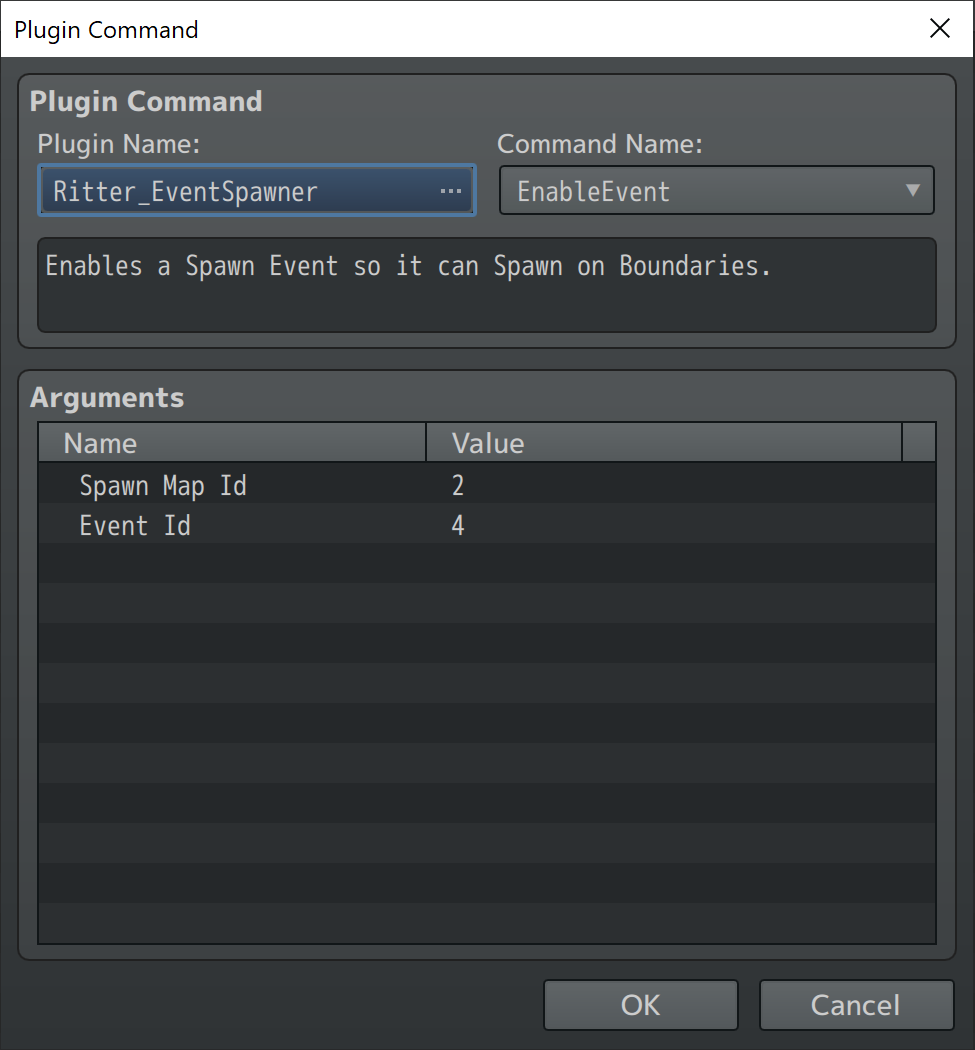
Ritter.Boundary.enableEvent(spawnMap, eventId)
- spawnMap = The MapId of a SpawnMap.
- eventId = The EventId of an Event on a Spawn Map which you want to Enable.
Enabling an event allows the event to be spawned by the Auto Boundary system. If you set an event to be disabled by default and want the event to be later turned on somewhere in your game then this is the command you'll need to call when that spawn event should be enabled. Only Enabled events may be spawned by the auto boundaries.

Ritter.Boundary.disableEvent(spawnMap, eventId)
- spawnMap = The MapId of a SpawnMap.
- eventId = The EventId of an Event on a Spawn Map which you want to Disable.
Disabling an event will make it no longer be spawned by any boundaries. Be advised that any saved events made from this event will still be restored despite being deactivated. No new spawns.
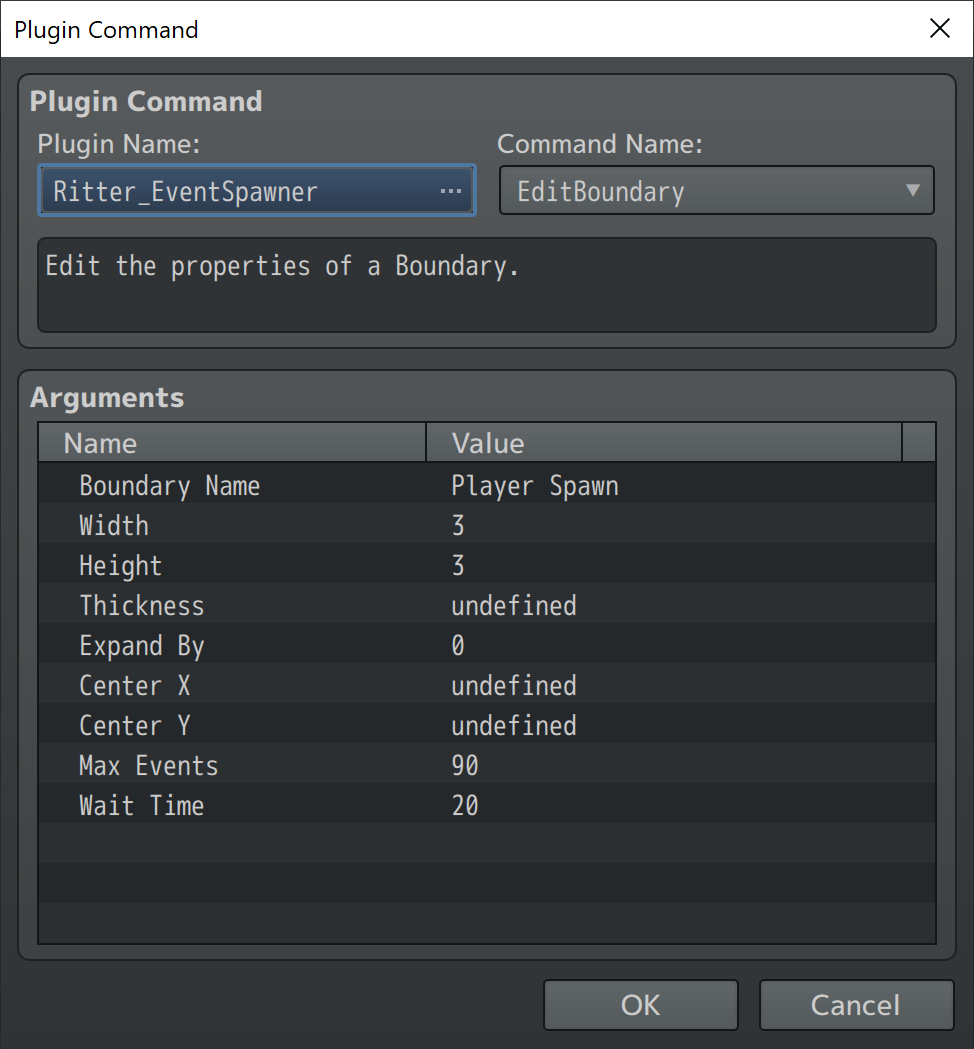
Ritter.Boundary.editSpawnerBoundary(boundaryName, param, value)
- boundaryName = The "Name" of the boundary you wish to edit.
- param = the property you wish to edit.
- value = the value you wish to set the property to.
When editing the properties of a Boundary using the Plugin Command leave the properties you wish untouched as 'undefined'. If you set a value for any property that value will be applied. 'undefined' values are ignored.
Please be advised that changing the width/height of unspawn boundaries may cause some boundary events to remain outside of the unspawn boundary. (Unspawn boundary can miss some events if shrunk, leaving events on the map that aren't unspawned. Be careful when resizing Unspawn boundaries)
Param list:
*When using Script Call Use "strings" as param value.*
"width" - sets new width property for the boundary.
"height" - sets new height property for the boundary.
"thickness" - sets new thickness property for the boundary.
"expandby" - sets new expandBy property for the boundary.
"centerx" - sets new centerx property for the boundary.
"centery" - sets new centery property for the boundary.
"maxevents" - sets new maxEvents property for the boundary.
"waittime" - sets new wait time for automatic boundary.
Example script calls:
Ritter.Boundary.editSpawnerBoundary("spawn", "width", 25)
Ritter.Boundary.editSpawnerBoundary("spawn", "height", 17)
These calls would set the width of "spawn" to 25, and the height of "spawn" to 17.
Ritter.spawnEventOnBoundary(mapId, eventId, regions, boundaryName)
- mapId = The mapId of the spawn map which holds your template/source event to be copied to game map.
- eventId = The eventId of the template/source event to be copied to the game map.
- regions = The region Ids to use for spawning events on. List as an array to use multiple regionIds. [1, 2, 3]
- boundaryName = The "name" you gave your boundary that you wish to spawn on.
Example Script call using boundary created above: Ritter.spawnEventOnBoundary(4, 8, [15, 16], "spawn")
This would spawn event 8 from map 4 on a random tile marked with regionIds 15 or 16 that pass through the boundary named "spawn".
Ritter.spawnFillOnBoundary(mapId, eventId, regions, boundaryName)
- mapId = The mapId of the spawn map which holds your template/source event to be copied to game map.
- eventId = The eventId of the template/source event to be copied to the game map.
- regions = The region Ids to use for spawning events on. List as an array to use multiple regionIds. [1, 2, 3]
- boundaryName = The "name" you gave your boundary that you wish to spawn on.
Example Script call using boundary created above: Ritter.spawnFillOnBoundary(4, 8, [15, 16], "spawn")
This would spawn event 8 from map 4 on every tile marked with regionIds 15 or 16 that are along the edge of the boundary named "spawn".
Ritter.spawnEventInBoundary(mapId, eventId, regions, boundaryName)
- mapId = The mapId of the spawn map which holds your template/source event to be copied to game map.
- eventId = The eventId of the template/source event to be copied to the game map.
- regions = The region Ids to use for spawning events on. List as an array to use multiple regionIds. [1, 2, 3]
- boundaryName = the "name" you gave your boundary that you wish to spawn on.
Example Script call using boundary created above: Ritter.spawnEventInBoundary(4, 8, [15, 16], "spawn")
This would spawn event 8 from map 4 on a random tile marked with regionIds 15 or 16 that is within the boundary named "spawn".
Ritter.spawnFillInBoundary(mapId, eventId, regions, boundaryName)
- mapId = The mapId of the spawn map which holds your template/source event to be copied to game map.
- eventId = The eventId of the template/source event to be copied to the game map.
- regions = The region Ids to use for spawning events on. List as an array to use multiple regionIds. [1, 2, 3]
- boundaryName = the "name" you gave your boundary that you wish to spawn on.
Example Script call using boundary created above: Ritter.spawnFillInBoundary(4, 8, [15, 16], "spawn")
This would spawn event 8 from map 4 on all tiles marked with regionIds 15 or 16 that are within the boundary named "spawn".
Ritter.unspawnEventOnBoundary(boundaryName)
- boundaryName = the "name" you assigned to the boundary you wish to use for unspawnEventOnBoundary.
Example Script call using boundary created above: Ritter.unspawnEventOnBoundary("unspawn")
This would unspawn any events located on the boundary "unspawn".
Ritter.unspawnEventInBoundary(boundaryName)
- boundaryName = the "name" you assigned to the boundary you wish to use for unspawnEventOnBoundary.
Example Script call using boundary created above: Ritter.unspawnEventInBoundary("unspawn")
This would unspawn any events located within the boundary "unspawn".
Ritter Ultimate Event Spawner RPG Maker MV & MZ community » Guides · Created a new topic Boundary Creation Guide!
(Note: This guide will soon be updated to include new boundary type, for now you can read about Auto Boundaries which fire every x frames; based on your set wait time)
Automatic Boundaries Setup!
Automatic Boundaries takes what was once a complicated task which required you to learn a lot of parameters in script calls and place them inside common events or whatever method you went for and spam the script call with a wait timer. That method is history! (But still works)
Setting up Boundaries, getting them to run, and setting up the events to be spawned on boundaries has been simplified!
Follow the instructions below for quick setup! See the Help Section below this section for further information on plugin commands.
First lets set up an odd-ball boundary. We'll go for a 3x3 Spawn Boundary around the player with a 5x5 Unspawn Boundary around the player. This will make it so as the player moves from tile to tile the player will always be surrounded by events which unspawn as the player moves away from them. Combining boundaries like these with saved boundary events would allow you to do a lot of different things as you can theoretically have an event on every/any valid passable tile, no matter the size of your map.
Lets take a look at the new method of setting up boundaries!
First we Create a Boundary and Add an AutoHandler to it.
Lets start with the 3x3 'FillIn' Boundary:

Now we have a Boundary Named "Player FillIn" that is 3x3 around the player (Event Id 0) which can spawn 11 events. I like to give a little extra room here than a 3x3 requires to ensure proper wiggle room.
Now that we have our Boundary Created lets add an Auto Handler to it! We'll use the Boundary Name we just created above for this plugin command as shown below.
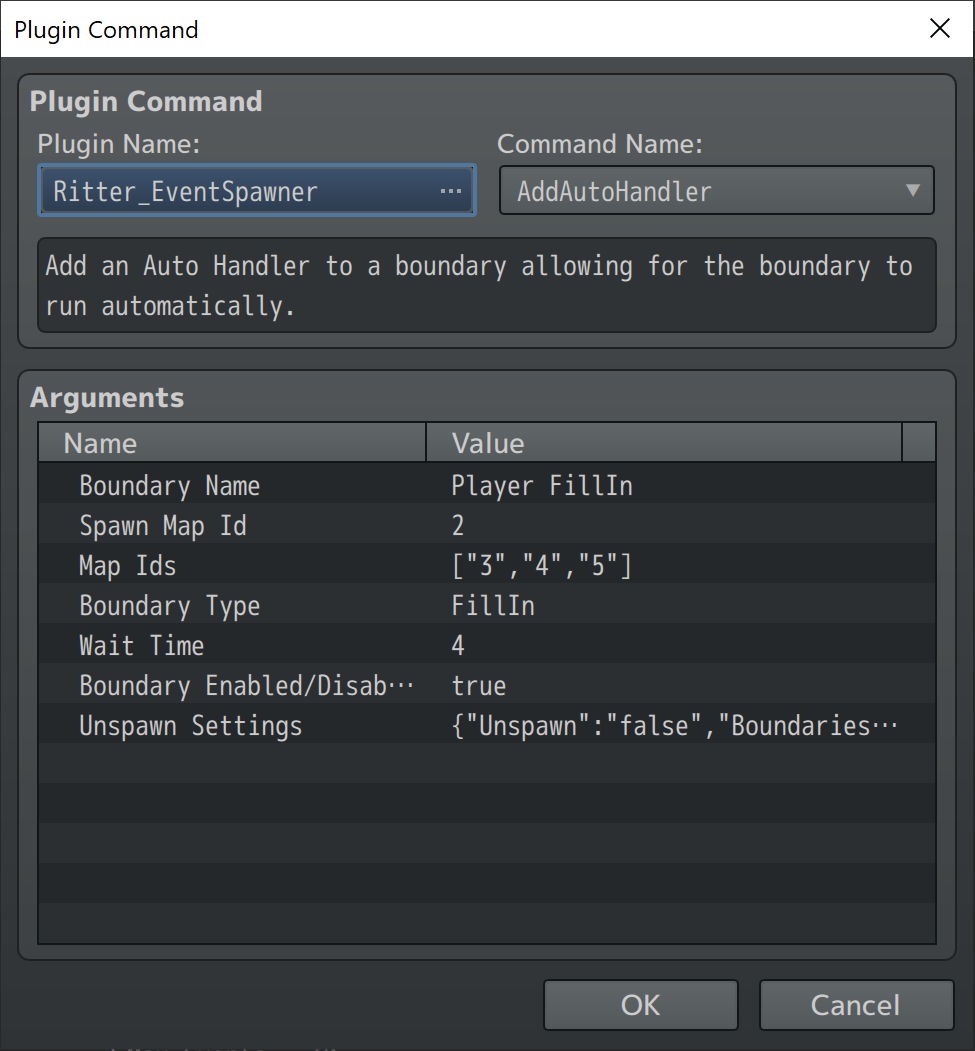
Now our Boundary will run automatically when on maps 3, 4, and 5. The boundary will attempt to spawn an event on every open tile within the 3x3 Boundary every 4 frames and it's enabled by default.
Next lets set up an Unspawn Boundary which can unspawn events on a boundary 1 tile outside of our spawn boundary. So as the player walks the events he/she walks away from will unspawn.
For this we'll go with a 5x5 "UnspawnOn" Boundary around the player.

You may notice Max Events 30 is set, 30 is the default and max events is not used by unspawn boundaries so any value there is fine.
Now lets add our Auto Handler for the 'Player UnspawnOn' Boundary.

Spawn Map Id is not needed here but I typically provide any preloaded spawn map just to be proper.
Before we get into a summary of what we did there's the Unspawn Settings to look into for Auto Handler.
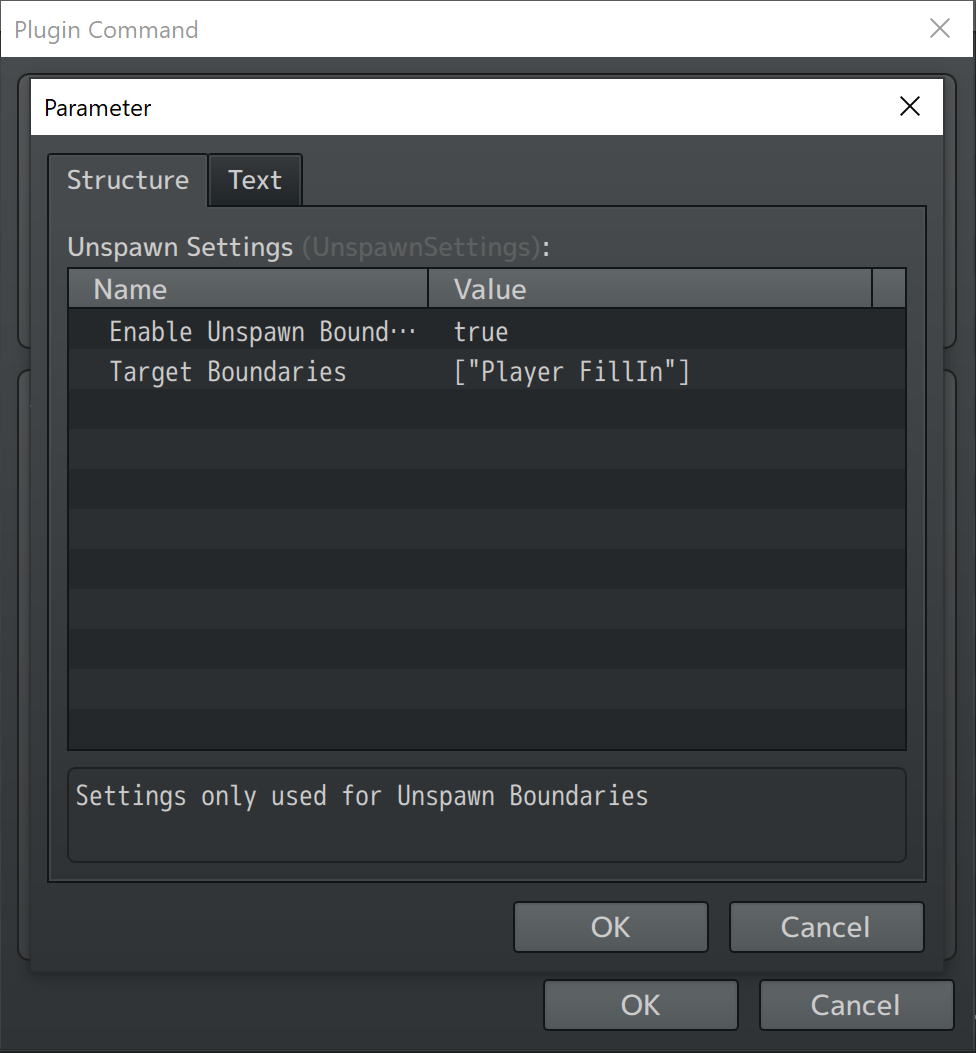
In unspawn settings if the boundary is to be enabled as an Unspawn Boundary just Enable it in the settings then specify target boundaries this unspawn boundary is allowed to unspawn events from. If you spawn events on a boundary named "Player FillIn" then you must include "Player FillIn" on this list for unspawns if you want the boundary to unspawn events from that boundary.
Now we have a boundary which spawns events in a 3x3 boundary around the player named "Player FillIn" and a 5x5 Unspawn Boundary around the player which unspawns any event which was spawned by boundary "Player FillIn" that passes into a tile on the boundary.
Now that we have our boundaries set up it's time to set up events to spawn on the boundary!
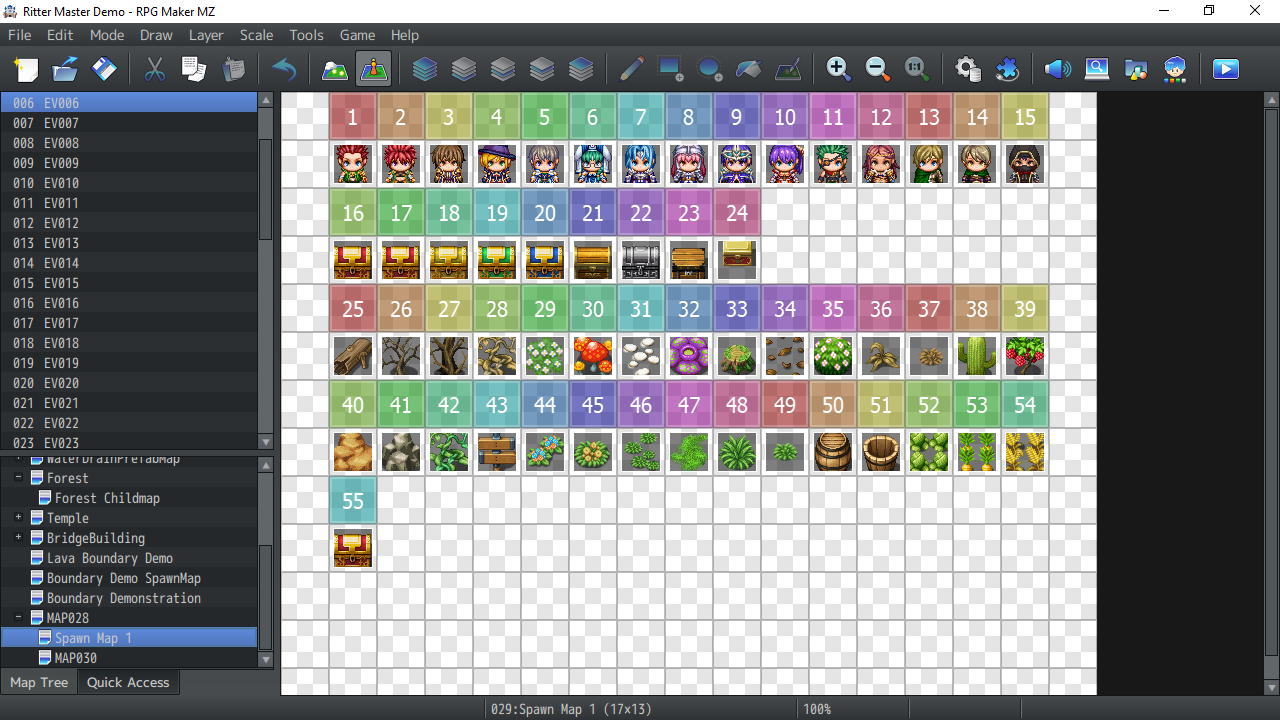
Lets go to our spawn map and create an event with the Plugin Command 'BoundaryEventSetup' on its first page.
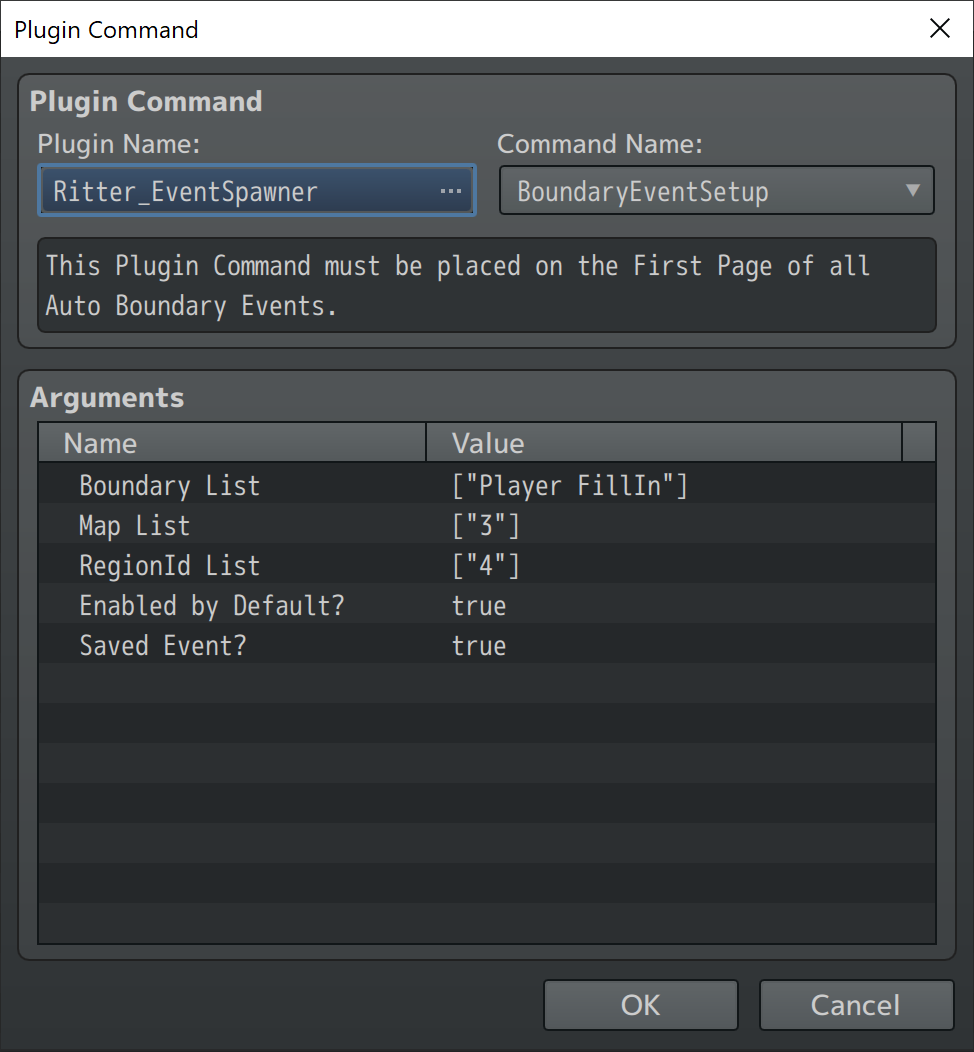
Now that we have this plugin command on the first page of an event on Spawn Map 2 (The Spawn Map we specified when we created our spawn boundary). Our boundary will be able to see it and spawn it if it's enabled and a valid tile is found.
For more information on this plugin command see the Help Section below.
*Note: This plugin command does not run any code so it will not interfere with your event. This plugin command is parsed by the spawners boundary system code for data. It functions about the same as a Comment*
After you set up your Boundary Events on the Spawn Map you should be good to go.
Simply test your game and run the event which creates the boundaries and adds the auto handlers. If your boundaries are enabled by default, you are on a valid mapId, you have valid RegionIds nearby, and if your events you created are enabled by default, then you should see your events spawning around the player and unspawning as you walk away from them.
Events are visible so you can see what's happening. For a boundary like this you may want them invisible but allow player to interact in some way with them. The sky's the limit!
Ritter Ultimate Event Spawner RPG Maker MV & MZ community » Guides · Created a new topic Boundary System Introduction!
Ritter Boundary System – Introduction
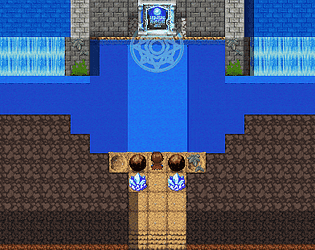
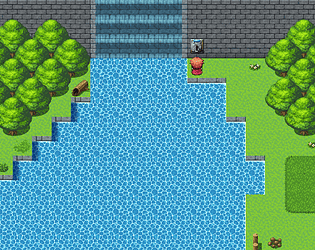
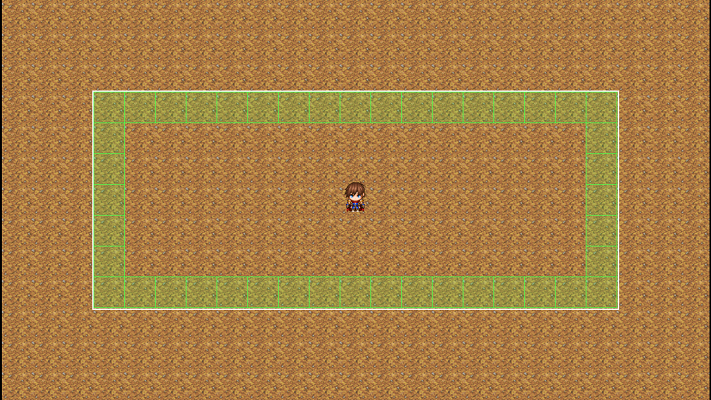
*Boundaries visualized using the new Ritter_BoundaryVisualizer.js Developer Extension Plugin*
2 Thickness "FillOn" Boundary shown as Green
2 Thickness "UnspawnOn" Boundary shown as Red
Done on screen to demonstrate, this can all be done off screen with larger boundaries.
The Ritter Boundary System allows you to dynamically spawn and unspawn events based on the player’s location, the position of any event, or any point you choose on the map.
Boundaries are created using a simple script call or plugin command and stored under a name you define, allowing you to reference, move, or modify them at any time. You can create as many boundaries as you need, each with its own shape, size, and rules.
What a Boundary Actually Is
A boundary is an invisible zone that your game responds to.
As its anchor moves, the boundary moves with it and automatically handles the spawning and unspawning of events on the tiles it covers.
You can anchor a boundary to:
- The player
- Any event
- A specific (x, y) position
This gives you fine-grained control over when events are active and when they should be removed from the map.
What Boundaries Are Used For
Since the Boundary System can spawn and unspawn any type of event, it becomes an incredibly flexible tool for creating dynamic, high-performance maps. Common uses include:
-
Spawning enemies just outside the player’s view for endless combat encounters
-
Loading NPCs, animals, or gathering nodes only when the player approaches
-
Adding environmental objects such as debris, interactables, or obstacles on demand
-
Creating temporary triggers or transfer events
-
Building “living” maps where only the relevant events exist at any moment
Preload Events into the Boundary Saved Events Database for complete control!
The general principle is simple:
If an event doesn’t need to exist 100% of the time, it’s a candidate for boundary-based spawning.
Any event that has no required external references to its eventId can safely be spawned, unspawned, and recycled.
This lets you build large, event-rich maps while keeping performance smooth and stable.
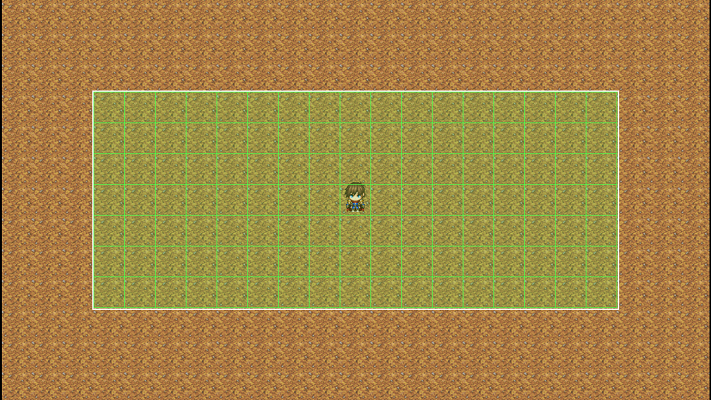
Boundary Types
'Fill On' Spawn Boundary
Type: FillOn
Width: 17
Height: 7
Thickness: 1
'Fill On' boundary type will try to spawn an event on every tile which is 'On' the boundary edge.
It will check saved event data for the tile and restore any saved events it finds for every tile it checks.
It will spawn any events that meet the conditions set during BoundaryEventSetup (if using legacy method).
*Thickness extends that edge outward, which will be shown in an example below.
'Fill In' Spawn Boundary
Type: FillIn
Width: 17
Height: 7
Thickness: 1
'Fill In' boundary type will try to spawn an event on every tile which is 'In'/inside the boundary.
It will check saved event data for the tile and restore any saved events it finds for every tile it checks.
It will spawn any events that meet the conditions set during BoundaryEventSetup (if using legacy method).
*Thickness extends that edge outward, which will be shown in an example below.
'Spawn On' Spawn Boundary
Type: FillIn
Width: 17
Height: 7
Thickness: 1
'Fill In' boundary type will try to spawn an event on every tile which is 'In'/inside the boundary. It will check saved event data for the tile and restore any saved events it finds for every tile it checks. It will spawn any events that meet the conditions set during BoundaryEventSetup (if using legacy method). *Thickness extends that edge outward, which will be shown in an example below.
Automatic Recycling and Event Limits
To prevent your maps from becoming overloaded, each boundary can be assigned a maximum number of active events.
For example, a boundary set to a limit of 40 will:
-
Spawn events only until the limit is reached
-
Automatically unspawn events when they leave the unspawn boundary
-
Recycle those event slots for new spawns
This ensures:
-
Predictable and stable performance
-
No buildup of unused events
-
Efficient, self-maintaining boundaries
Your event population stays controlled with no extra work from you.
How It Fits Into Your Workflow
The Boundary System integrates directly with the Ritter Event Spawner, giving you full control over when, where, and how events appear.
With a basic setup, such as a spawn boundary 1–2 tiles outside the player’s screen and an unspawn boundary a few tiles beyond, you can create fully automated event streaming:
-
Automated boundaries that spawn/unspawn events as the player moves
-
Persistent events that reappear with their saved data intact
-
Combined spawn/unspawn boundaries for clean population cycling
-
Scalable open worlds without needing permanent event clutter
-
Preloaded events saved into a boundary’s database via x,y or regionId
Every permanent event on the map costs performance, even erased events.
Boundary-based spawning solves this by ensuring that only the events currently needed actually exist on the map.
Instead of having hundreds or thousands of static events, you may only ever have 40, 60, or 100 active at once, regardless of how large or complex your world is.
A Simple Tool With Massive Impact
The Ritter Boundary System brings clean event loading, automatic recycling, dynamic population management, and persistent event behavior into your project with minimal setup.
It unlocks:
-
Higher performance
-
Larger maps
-
More dynamic gameplay
-
Cleaner event design
-
A scalable world structure
It’s a powerful system designed to keep your event count to a minimum while allowing your game to feel full of life.
Ritter Ultimate Event Spawner RPG Maker MV & MZ community » Guides · Created a new topic Script Calls & Plugin Commands Documentation
⚠️ Some features shown are for the upcoming 2.1 update. If you don’t see these features in your version, they will be included shortly in the next update.
Spawn Event

Ritter.spawnEvent(mapId, eventId, x, y, save, spawnOnEvents)
- mapId = the Id or "Name" of the map which holds the event you want to spawn.
- eventId = the Id or "Name" of the event on the map specified in mapId.
- x = x coordinate to place the event on the game map.
- y = y coordinate to place the event on the game map.
- save = true to save event and restore it when you re-enter map.
- save = false to use the event as a temporary event which goes away on map change. You can leave out save from script call to not save the event.
- spawnOnEvents = true to allow spawning on top of other events.
- spawnOnEvents = false to disallow spawning on top of other events.
- EventId -> Game Variable = ID Number of Game Variable to store Event Id into.
- Setter Type = The method of storing the EventId of the Spawned Event to a Game Variable.
- Set Value As Integer: Sets the value of the $gameVariable to the EventId as an integer.
- Push Value As Array: Pushes the EventId into the $gameVariable as an Array.
Example script call one:
Ritter.spawnEvent(42, 15, 8, 16, true)
Spawn event 15 from map 42 on the game map at 8,16 coordinates and save the event data to automatically be restored upon re-entering the map, retaining all data.
Example script call two:
Ritter.spawnEvent(42, 15, 8, 16)
Spawn event 15 from map 42 on the game map at 8,16 coordinates as a temporary event that goes away on map change.
Example script call three:
Ritter.spawnEvent("SpawnMap", "Slime", 8, 16);
Spawn the event named "Slime" from the map named "SpawnMap" onto the game map at 8,16 coordinates as a temporary event that goes away on map change.
If duplicate names are found only the first one will ever be used, avoid duplicating names for spawn maps and spawn template events.
Example script call four:
let spawnEvent = Ritter.spawnEvent(42, 15, 8, 16, true, true);
This would store the spawned Game_Event object to the spawnEvent variable.
This allows you to access it's eventId and any other properties immediately after spawning the event.
Learn how to find the event you just spawned using script here!
For Example:
let spawnEvent = Ritter.spawnEvent(42, 15, 8, 16, true, true);
let eventId = spawnEvent._eventId;
$gameVariables.setValue(1, eventId);
Spawn Event Region
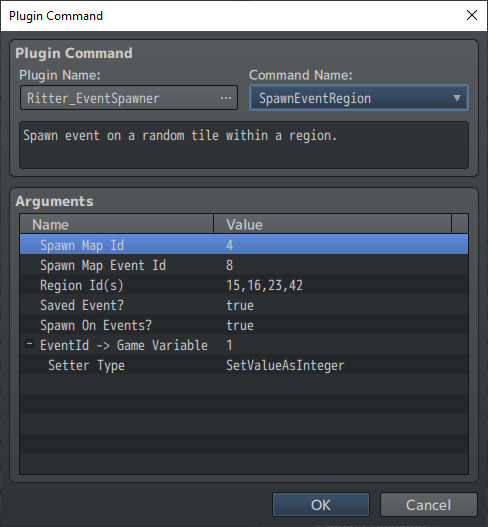
Ritter.spawnEventRegion(mapId, eventId, regions, save, spawnOnEvents)
- mapId = the Id of the map which holds the event you want to spawn.
- eventId = the Id of the event on the map specified in mapId.
- regions = regionId(s) to place the spawned event on randomly. To use multiple regionIds to randomly pick from list them like this [4,8,15,16,23,42]
- save = true to save event and restore it when you re-enter map.
- save = false to use the event as a temporary event which goes away on map change.
- spawnOnEvents = true to allow spawning on top of other events.
- spawnOnEvents = false to disallow spawning on top of other events.
- EventId -> Game Variable = ID Number of Game Variable to store Event Id into.
- Setter Type = The method of storing the EventId of the Spawned Event to a Game Variable.
- Set Value As Integer: Sets the value of the $gameVariable to the EventId as an integer.
- Push Value As Array: Pushes the EventId into the $gameVariable as an Array.
Example script call one:
Ritter.spawnEventRegion(4, 8, 15, true)
Spawn event 8 from map 4 on a random tile marked with regionId 15 and save the events data to be automatically restored upon re-entering the map.
Example script call two:
Ritter.spawnEventRegion(4, 8, [15,16,23,42])
Spawn event 8 from map 4 on a random tile marked with any of the regionIds 15,16,23,42 as a temporary event that isn't saved.
Example script call three:
let spawnEvent = Ritter.spawnEventRegion(42, 15, [8,4], true, true);
This would store the spawned Game_Event object to the spawnEvent variable.
This allows you to access it's eventId and any other properties immediately after spawning the event.
Learn how to find the event you just spawned using script here!
For Example:
let spawnEvent = Ritter.spawnEventRegion(42, 15, [8,4], true, true);
let eventId = spawnEvent._eventId;
$gameVariables.setValue(1, eventId);
Spawn Event Terrain Tag
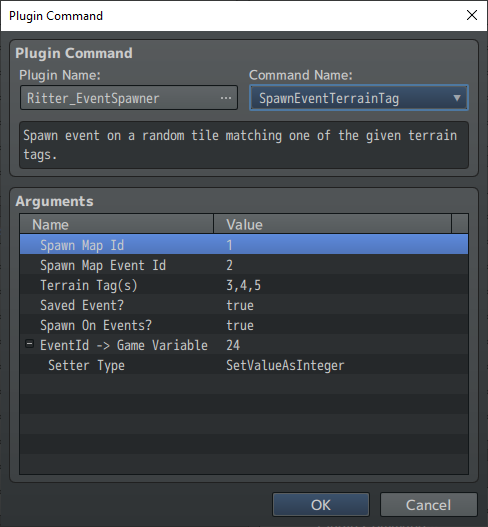
Ritter.spawnEventTerrainTag (mapId, eventId, tags, save, spawnOnEvents)
- mapId = the Id of the map which holds the event you want to spawn.
- eventId = the Id of the event on the map specified in mapId.
- tags= Terrain Tag(s) to place the spawned event on randomly. To use multiple Terrain Tags to randomly pick from, list them like this [4,8,15,16,23,42]
- save = true to save event and restore it when you re-enter map.
- save = false to use the event as a temporary event which goes away on map change.
- spawnOnEvents = true to allow spawning on top of other events.
- spawnOnEvents = false to disallow spawning on top of other events.
- EventId -> Game Variable = ID Number of Game Variable to store Event Id into.
- Setter Type = The method of storing the EventId of the Spawned Event to a Game Variable.
- Set Value As Integer: Sets the value of the $gameVariable to the EventId as an integer.
- Push Value As Array: Pushes the EventId into the $gameVariable as an Array.
Example script call one:
Ritter.spawnEventTerrainTag(4, 8, 2, true)
Spawn event 8 from map 4 on a random tile marked with Terrain Tag 2 and save the events data to be automatically restore upon re-entering the map.
Example script call two:
Ritter.spawnEventTerrainTag(4, 8, [1,2,3,4])
Spawn event 8 from map 4 on a random tile marked with any of the Terrain Tags 1,2,3,4 as a temporary event that isn't saved.
Transform Event
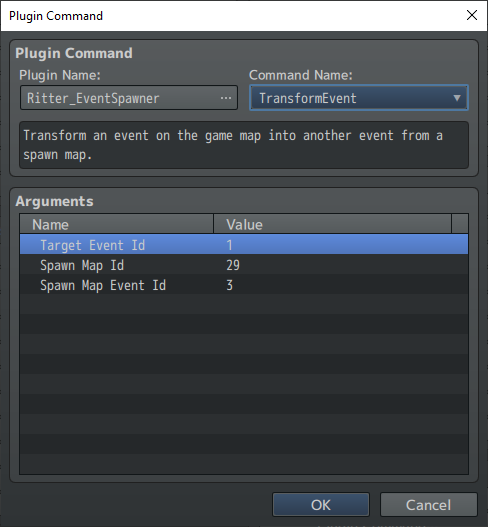
Ritter.transformEvent(eventId, mapId, spawnId)
- eventId = id of the event on game map to transform.
- mapId = spawn map id that has template event.
- spawnId = id of event on spawn map to use as template.
Example script call:
Ritter.transformEvent(1010, 4, 8)
Transform event 1010 into event 8 from map 4.
Unspawn Event
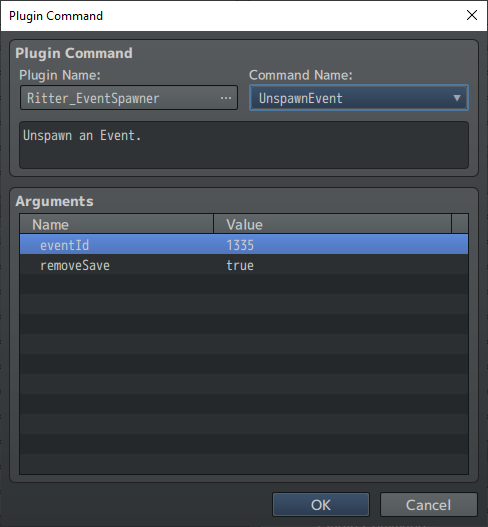
Ritter.unspawnEvent(eventId, removeSave)
- eventId = the Id of the event on the map to unspawn.
- removeSave = true to remove the event from saved events.
- removeSave = false to keep the event on save list to restore upon re-entering the map. Leave removeSave empty to keep saved event.
Example script call one:
Ritter.unspawnEvent(1000, true)
Unspawn event 1000 from the game map and delete the saved event data.
Example script call two:
Ritter.unspawnEvent(1000)
Unspawn event 1000 from the game map.
Unspawn Event XY
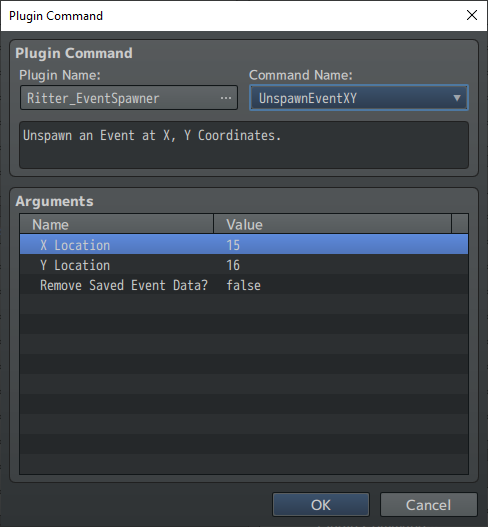
Ritter.unspawnEvent(x, y, removeSave)
- x = x location to check for an event to unspawn.
- y = y location to check for an event to unspawn.
- removeSave = true to remove the event from saved events.
- removeSave = false to keep the event on save list to restore upon re-entering the map. Leave removeSave empty to keep saved event.
Example script call one:
Ritter.unspawnEvent(15, 16, true)
Unspawn event found at 15, 16 from the game map and delete the saved event data.
Example script call two:
Ritter.unspawnEvent(4, 8)
Unspawn event found at 4, 8 from the game map.
Unspawn All

Ritter.unspawnAll(removeSave)
- removeSave = true to delete saved event data.
- leave empty to retain saved event data.
Example script call one:
Ritter.unspawnAll()
Unspawns all spawned events on the map, which includes both temporary and saved events.
Ritter.unspawnAll(true)
Unspawns all spawned events on the map, and removes saved event data for all spawned events.
$gameMap._lastSpawnEventId
Returns the Id of the most recently spawned event. (Obsolete, remains for backward compatibility, use new method linked below to find the event you spawn)
Learn how to find the event you just spawned using script here!
Ritter Ultimate Event Spawner RPG Maker MV & MZ community » Guides · Created a new topic Event Recycling! A Technical Breakdown!
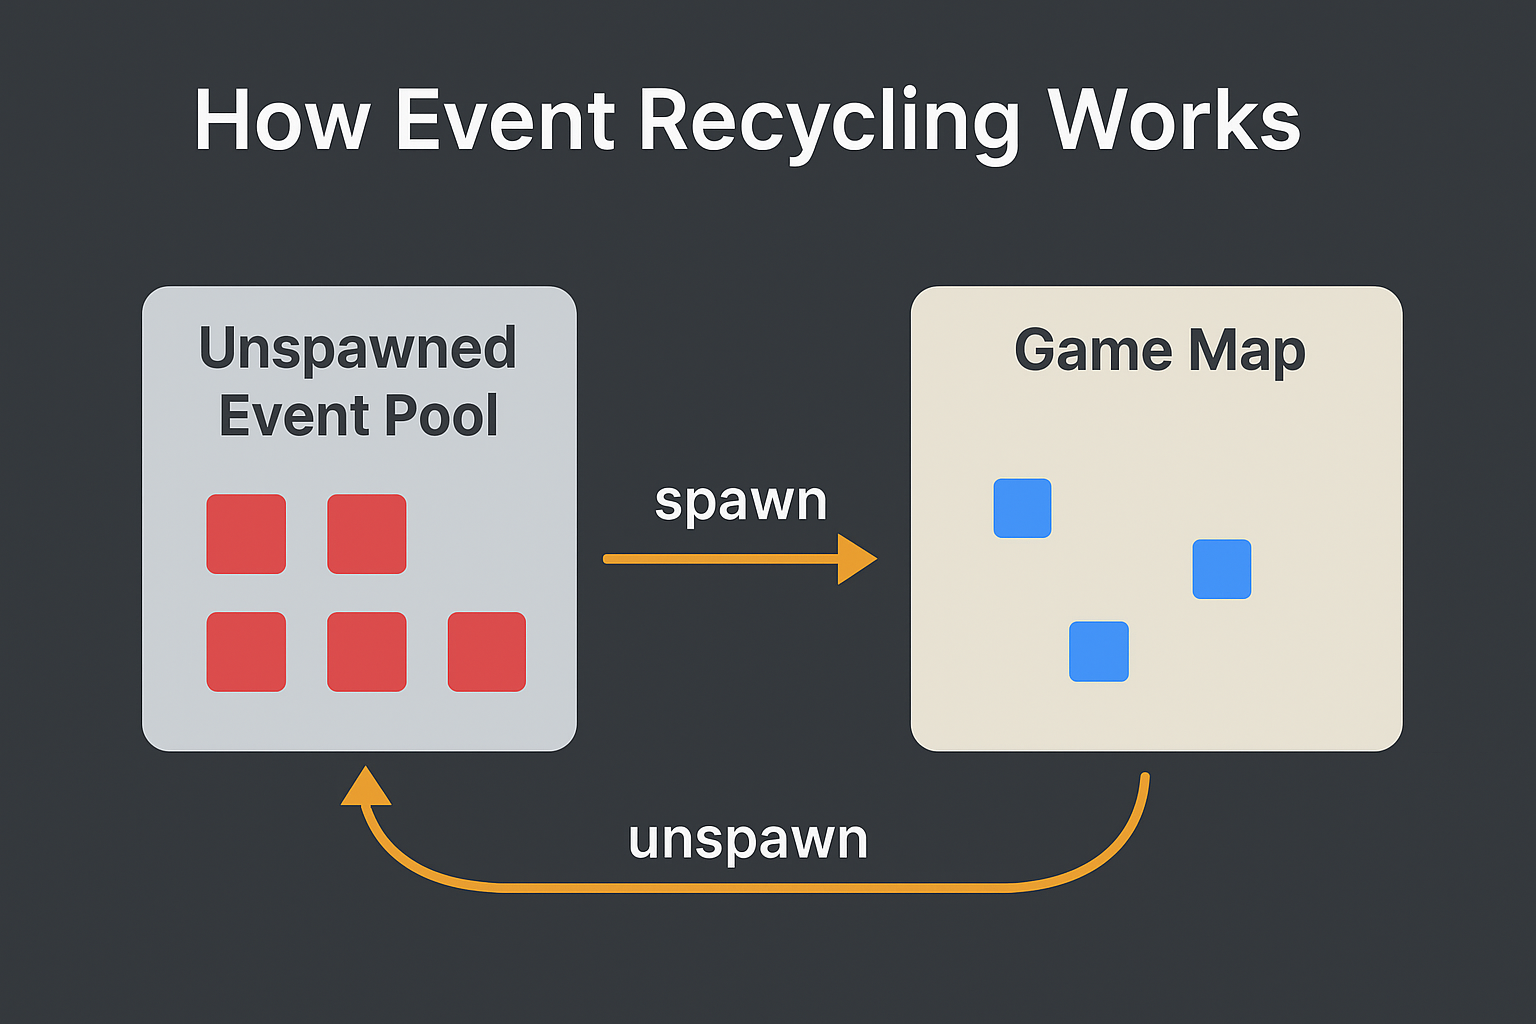
Event recycling is one of the core features that makes the Ultimate Event Spawner fast, scalable, and safe to use even on large, event-dense maps. Instead of continually creating new Game_Event objects, which slowly bloats memory and tanks performance, this spawner reuses events you’ve previously unspawned.
Here’s how it works:
1. When an event is unspawned, it isn't wasted. It’s stored in a pool.
Normally, unspawning an event in RPG Maker means “erase it and forget it.” With recycling enabled, the system does something smarter:
- The event’s
Game_Eventinstance is moved off-map to(-1, -1) - It is stored in an internal unspawn pool (Ritter.
_unspawnList) - The event is safely erased and rendered inactive.
- Saved-event data is preserved if needed (depending on your settings)
At this stage, the event is no longer active, visible, or interactable, but the actual Game_Event object remains available for reuse inside the pool.
2. When a new event is spawned, the system checks the pool first.
Instead of generating a brand-new event object:
- The spawner checks the unspawn pool
- If an unused event is available:
- The next available recycled event is selected and transformed into the spawn event.
- If no recycled events are available:
- A brand-new
Game_Eventis created normally
- A brand-new
This means your project rarely creates new events at runtime. Most of the time, it's simply reassigning existing, inactive ones.
3. The result is consistent performance over time.
Because events are reused instead of repeatedly constructed and destroyed:
- No event clutter accumulates in memory
- Frame rate stays stable even after hours of spawning & unspawning
- Large-scale spawns become viable
- The engine doesn’t get bogged down by hundreds of inactive event objects on the map
This is how I've been able to spawn and unspawn tens of millions of events while stress testing the spawner without ever leaving the map with absolutely no performance loss over time.
4. Why this matters for developers
Event recycling makes this spawner ideal for:
- Open-world maps
- Random encounter systems
- Dynamic NPC populations
- Survival games with constantly changing objects
- Tower defense waves
- Action Battle System Enemies and Interactable Events
- Farming games
- Endless Runners
- Any game that needs to spawn and unspawn events endlessly!
Instead of worrying about events stacking up over time, you get a predictable, stable system that performs the same at 2 hours of gameplay as it did at 2 minutes.
Ritter Ultimate Event Spawner RPG Maker MV & MZ community » Guides · Created a new topic Know your events! Identify the event you spawned! Scripting Guide!
With 2.0 comes a new method of accessing the event you just spawned, it's quite simple too!
If you need to know the eventId, or access the event you just spawned in other ways, it's as simple as following these steps.
When spawning an event use the following script:
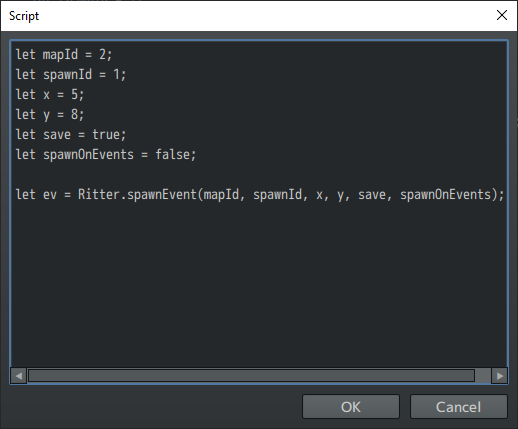
(To be clear, the let ev = Ritter.spawnEvent(...); line is what spawns the event onto the game map, it also lets you access it directly using the ev variable)
The code above would spawn the event as well as store the Game_Event ($gameMap.event) object it created to a variable, so it allows you to access the Game_Event using the variable you just created when spawning the event. So you can follow up like this:
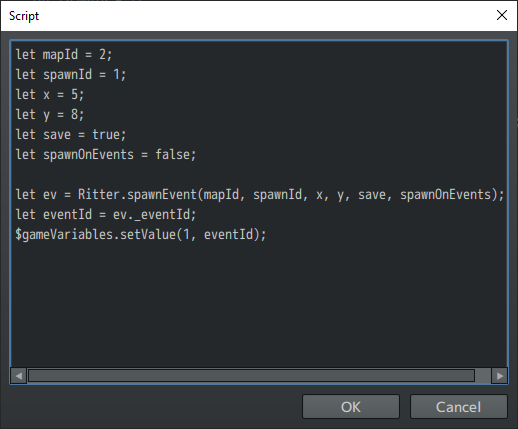
You can do a lot more than just access the eventId, you have the whole Game_Event object you just spawned available to you.
This same trick works with other spawner API commands too, like spawnEventRegion. The intent is to render the $gameMap._lastSpawnEventId flag obsolete, this is much more reliable.
I hope this makes things easier for all of you!
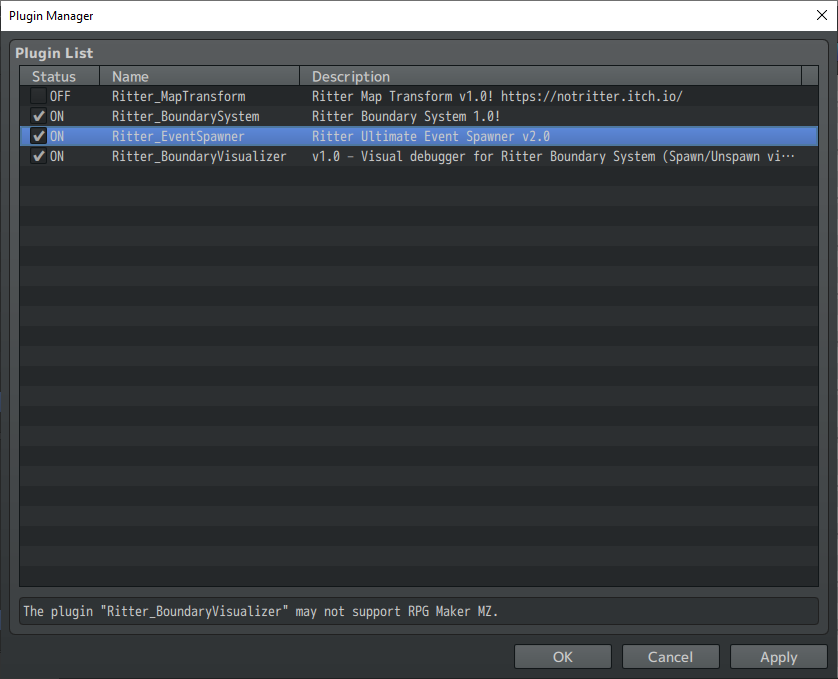
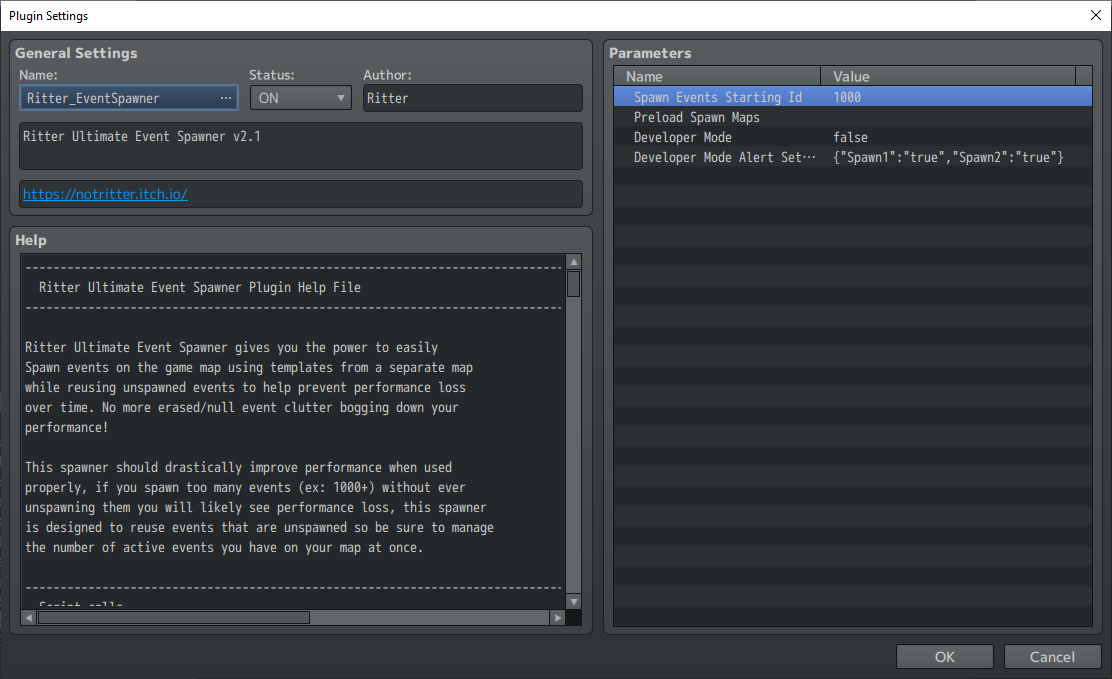
Ritter Ultimate Event Spawner RPG Maker MV & MZ community » Guides · Created a new topic Plugin Setup & Install Instructions