Like many in this hobby, I've started to pick up some coding here and there by learning to use Ren'py. However, programming is not my field, and whenever the discussion starts to get more technical then "How to use Word", I start to feel out of my depth and like a boomer. As I am part of a community of fellow FVNs creators, those that actually have programming training never tire to stress to the rest of us the importance of using "version control". Frustratingly, however, they never bother to stop and explain what it means to you, who don't even know what version control is. If you try to learn on your own, you will have to face such delightful and obscure language such as "commit", "branches", "detached heads" (yes, really)...
This finally changed for me when my fellow FVN creator Akiba took the time to teach me the basics. This little session, however, was not meant to benefit just me: our idea was that I would then pass on what I have learned, from the perspective of an absolute noob, for those out there who were in the same situation as me. This is what you are now reading: this is my guide on how to use GitHub.
If this is a familiar topic for you, please be ready to forgive the mistakes I will inevitably be making in the following guide. While I am doing my best, the whole premise of this exercise was to let a layman write this guide for better accessibility (otherwise, I'm sure Akiba could have done this by himself)!
So, without further ado, let's start with some basics. While there are other options for version control, I chose to learn GitHub because it seemed to be the easiest.
WHAT IS GITHUB FOR?
So, you are an aspiring or current game dev. Why should you give me 10 minutes of your time and learn how to use GitHub? What can it do for you?
The main benefits are as follow:
SO, ABOUT THAT DEMONIC TERMINOLOGY
In the next session of the guide, I will go step-by-step about setting your project in GitHub. However, I think the most important thing when approaching GitHub for the first time is understanding the simple logic of how it operates and what perverse version of English it uses.
The easiest way to visualize how this all operates is to imagine that your project exists in three different places at the same time:
If everything so far is clear, then don't worry: we're almost halfway there already!
STEP-BY-STEP GUIDE
Ok now, let's get started with the nitty gritty. First things first, you want to create your GitHub account. Go to https://github.com/ , click Sign up, and follow the steps.
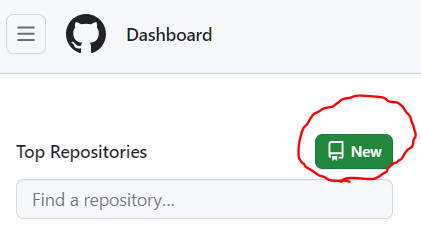
Now that you are on your GitHub profile, go to your dashboard on the GitHub website and create a new repository. Like we said above, "repositories" are like folders where you will save the backups of your project. Create one repository per project.
When setting up your repository, the only things you will have to choose is the name and whether it's a public or private repository. Everything else you can ignore for now: we will come back to the .gitignore file, since there isn't a premade template for Ren'py. If you are not using Ren'py, but something else, you can check out the available templates.
You will now want to download the GitHub desktop app to be able to work on your repository locally, by going here: https://desktop.github.com/
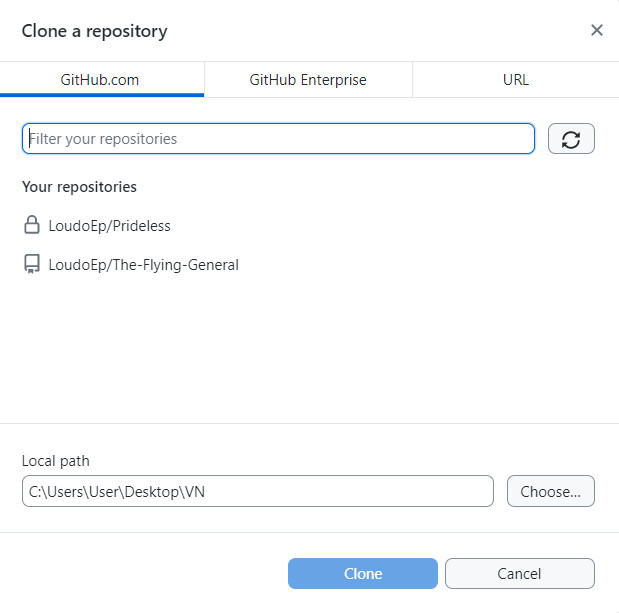
Here I have two repositories for my two projects.
Now that you have created your repository, you want to create your project folder on your computer (the one that will be synchronized with your repository). To do so, you basically have to download your repository to your computer (even if, at this point, your repository is still empty). Doing so is called *cloning* your repository (=download your backup).
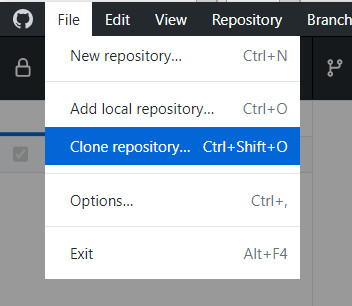
Click your repository, go to File, and Clone it, choosing your file path. This will create a folder on your computer, which will be your project folder from now.
If you had already started working on your project before, no sweat. Just transfer all of your files to this new folder!
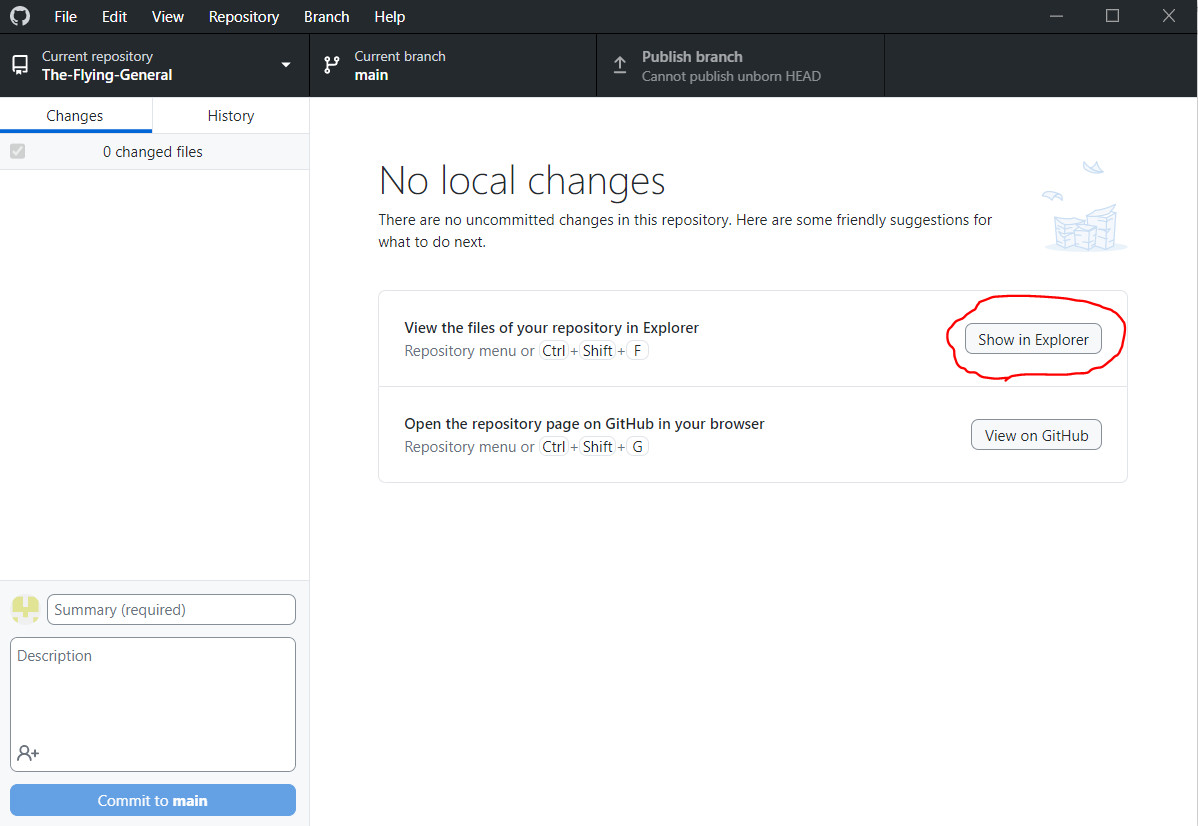
While you are on the GitHub desktop app, you can at any time click on "Show in Explorer" to go to your local project folder and "View on GitHub" to go to your repository on the cloud.
So, what happens now that you have your synchronized project folder? Every time you change something in this folder, on the GitHub app you will be able to see all changes from your last commit ("save state"). For example:
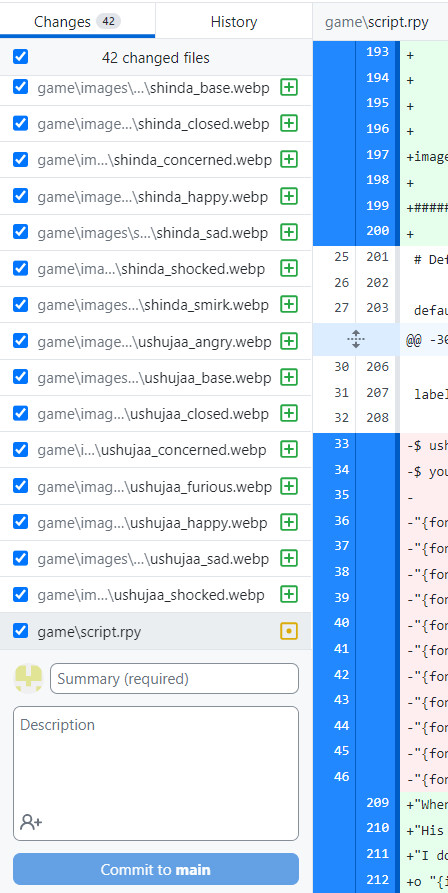
Here you can see a bunch of files with a green plus: this are all new files that I added to the project folder since my last "save". The last file (script.rpy) is instead marked with a yellow dot: this means that this is not a new file, but a file to which changes were made. By clicking on it, you can see all the changes from the previous version (see on the right all lines of code in red with a minus, which were removed, and all lines in green with a plus, which were added). If I had removed a file from the folder, this would have appeard up here with a red minus.
The GitHub will constantly track your changes to your project folder. However, *until you have committed your changes, nothing has been saved yet*.
Before we do that though, let's now go back to that .gitignore file we skipped earlier. This is a file that basically tells GitHub what files to ignore when you are creating a backup. This file needs to have a .gitignore extension and should be in your root folder of your game (as it will not apply to folders of a higher level. Here is what Akiba kindly provided as a good base .gitignore file if you are working on Ren'py. For example, this will tell GitHub to ignore all files with a .keystore extension (those are meant to be kept secret!) or .rpyc extension (you don't need these if you are already have the .rpy files). You can open .gitignore with any text editor.
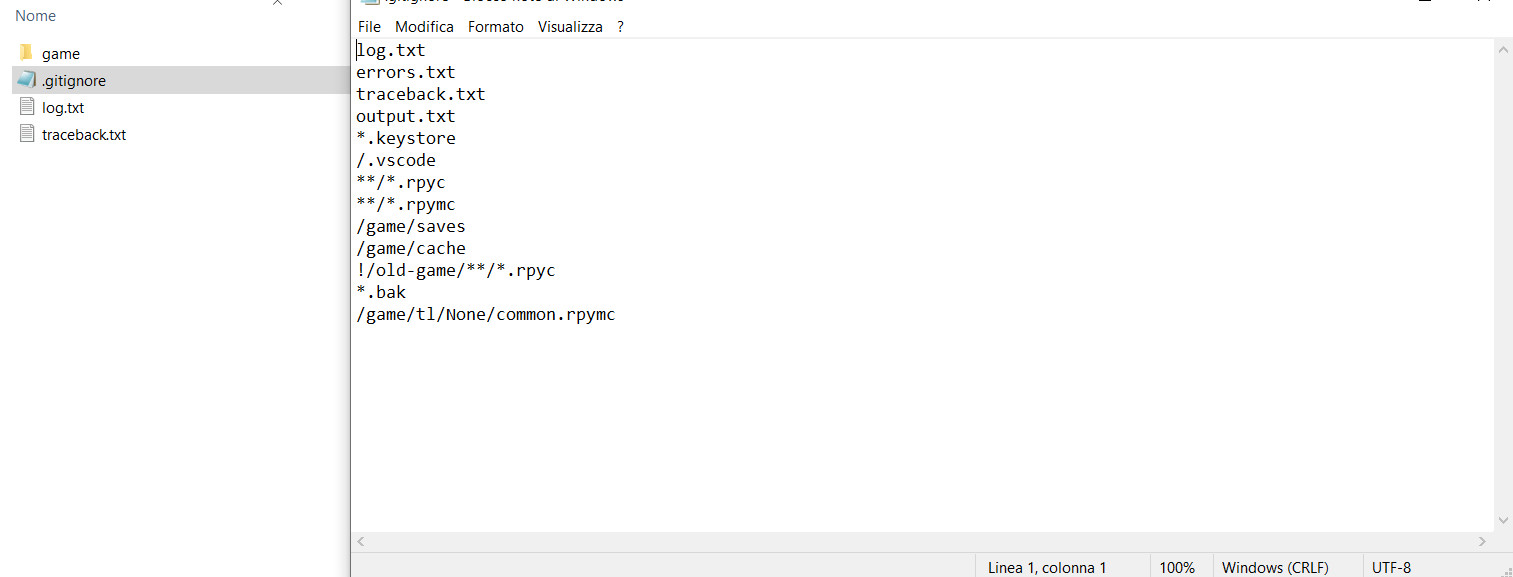
Feel free to copy my .gitignore from my directory: https://github.com/LoudoEp/The-Flying-General/blob/main/.gitignore
In order to commit, you must first type a name for your commit in the "Summary" bar (you can also add a longer description, but that's optional). Then you will be able to click on "Commit to main". (Main being the main branch. As we discussed above, it is possible to create and commit changes to separate branches too.)

Look at all those sprites I added: better save all that hard work.
Now that you have committed your changes, you will see that the app will tell you there are no more changes to your project: this is now your last "save state", only new changes compared to this version will be tracked.
However, as we discussed above, these changes have only been saved *locally*. You now want to create a backup on your GitHub cloud. To do so, you have to *push* your commit.
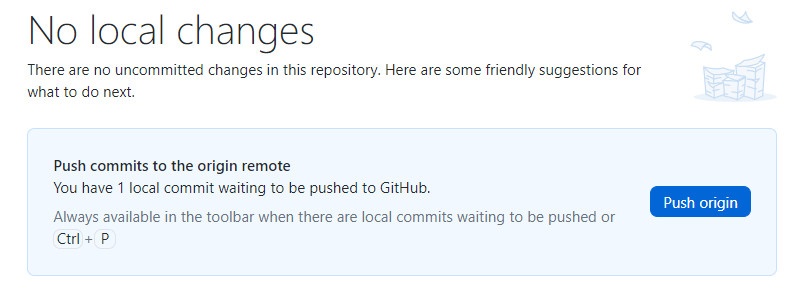
Push ma'am! Push! I can almost see the head.
Congratulations, you have successfully created a backup of your project on GitHub!
But what about this fabled "version control" I keep hearing about? You said it's even possible to go *gulp* back? Yes, indeed!
You will have noticed that on your GitHub app, there is a second tab in your repository: History. By going there, you can see the list of all your commits, and all the changes to the project associated with every commit.
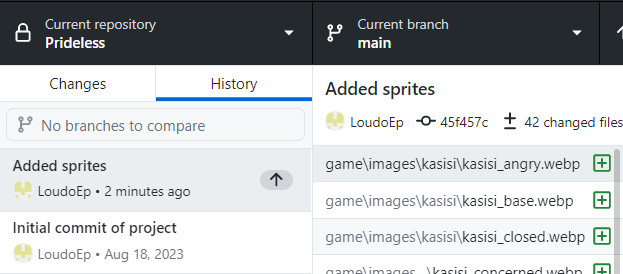
Oh, yeah, "Added sprites" did contain a lot of new sprites.
If you right click on one of your past commits, you have some options that will allow you to go back. In particular, I want to highlight the first option, "Checkout commit".
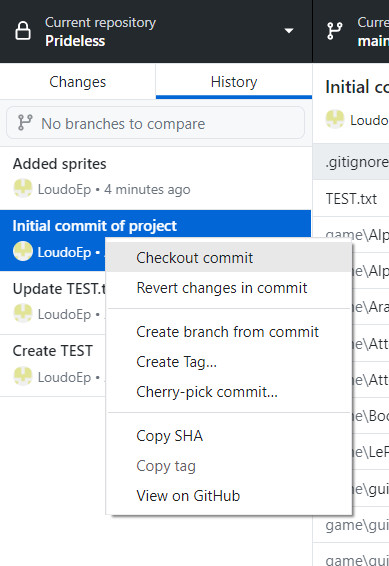
This will temporarily revert your project to that "save state": GitHub has a delightful name for this, a detached head of your project.
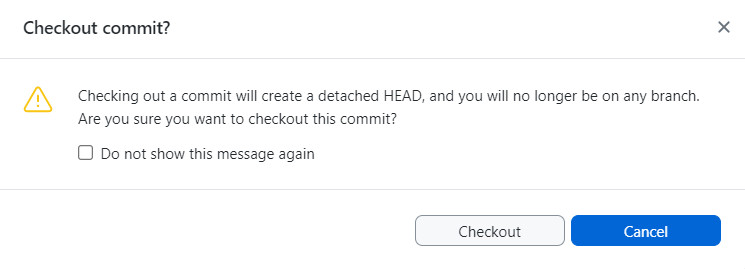
Don't worry, it's not as worrying as it sounds.
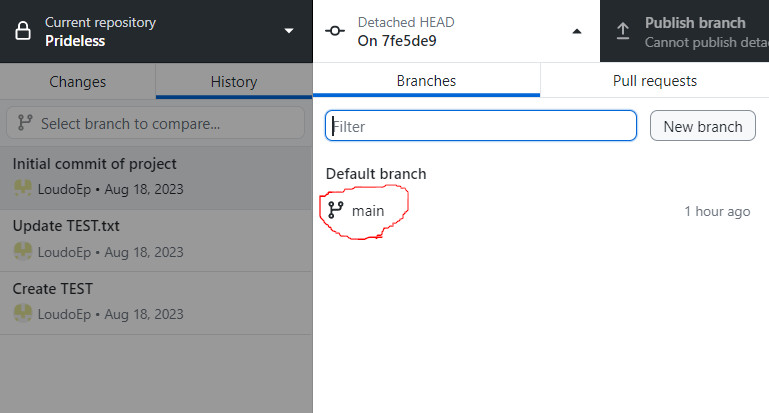
To go back from the detached head to your main branch, simply click on the branch button and select main.
This is all for now. I am exhausted and I realize this guide is really basic, but I hope it will be useful for those like me who had no idea about how to us
Did you like this post? Tell us

Leave a comment
Log in with your itch.io account to leave a comment.
This is great! I do have a question regarding this statement: "If you had already started working on your project before, no sweat. Just transfer all of your files to this new folder!"
Are you saying to copy my Renpy project into the git folders? If so, I'll then need to change Renpy's "Projects Directory" so that it will know where to find it. Do I have that correct?
Yes, another way around that is to just create your git folders in the same directory you already use for your Renpy projects. :-)
I ended up doing exactly what you recommended. And it works great.
Although I did have a minor setback. I read somewhere to move your game folder into the git directory. Since renpy has a folder named "game" containing most of the content, that's what I moved. That doesn't work.
When I realized it needed the parent directory, everything works great.
I was also worried about setting the renpy directory as my game directory, which would cause future games to get land inside the first game's file structure. Others had run into that.
But choosing a folder upstream worked just fine.
Thank you for the reply!
Sorry, maybe I should have been a bit clearer in my response, but glad you've already addressed the issues you encountered. And thank you for taking the time to spell them out, other people in the same situation as you might find your comment useful. :-)
This is fantastic! Very informative, awesome job!
Thank you, glad it was helpful :-)
Hey! Thank you very much for this post, it's very informative!
I've messed with GitHub and managed to make it work just... clicking at random... so knowing how to, you know, actually set it up is pretty nice!
You're welcome, glad this was helpful! ^^