
Update Time!
I was hoping to have the next build up by now but it's taking a little longer than expected. What I'm focusing on at the moment is UI and adding extra options.
The Options panel is going to be split in to 3 tabs, Graphics, Audio and Controls.
I'm close to finishing the upgraded audio panel. First off I added a separated effects from master volume, I've been meaning to do this for a while now but I decided to save it for when I overhaul the audio system.
Next I decided to implement a sound test like you often got on classic Mega Drive games. This is the first time I've used dropdown boxes. I spent ages trying to figure out how to pass the dropdown text to my sound manager script before realising I could simply call another script which reads the label.
I knew I was going to add more music and wanted players to be able to chose their track so I've made a miniature music player. Because I'm a glutton for punishment though I couldn't just leave it there, I decided it would be really cool to make a visualiser for it as well. After about 6 hours work and learning about fast fourier transform and other stuff my feable brain had never heard of before I finally got a line renderer displaying the frequency data currently playing. Then I added sepperate lines for left and right and did the same thing for the raw sound output. This was then split off to another layer which is invisible to the main camera and rendered separately to a render texture placed inside the player. Another hour of trial and error and I finally got something I'm happy with (see video below). There are so many things I want to try with the visualiser but I'm going to have to restrain myself and wait for another project.
If anyone wants to implement a visualiser themselves this is the basic code to generate the data:
public float[] _leftS = new float[256];
public float[] _rightS = new float[256];
public float[] _leftO = new float[256];
public float[] _rightO = new float[256];
public int outputOffset = 64
public int outputMulti= 40
public LineRenderer rightOutput; //LineRenderer used in the example
void Update(){
GetSpectrumAudio();
for (int x = 0; x <= 256; x++){
//Actual visualisation code goes here!
// You will probably want to add variables and experiment with multipliers, offsets etc.
//example:
Vector3 rOutput = new Vector3(x / 2, (_rightO[x] * offsetMulti) + (outputOffset), 0);
rightOutput.SetPosition(x, rOutput);
// use similar code for everything else you want to visualise.
//Doesn't have to be a LineRenderer, you could use GameObject[], particles, terrains, spawn enemies, whatever you want!
}
}
void GetSpectrumAudio(){
AudioListener.GetSpectrumData(_leftS, 0, FFTWindow.Blackman); //Applies currently playing spectrum data from the left channel to a float[]
AudioListener.GetSpectrumData(_rightS, 1, FFTWindow.Blackman); ////Applies currently playing spectrum data from the right channel to a float[]
AudioListener.GetOutputData(_leftO, 0); //Applies currently playing raw output from the left channel
AudioListener.GetOutputData(_rightO, 1);//Applies currently playing raw output from the right channel
// You don't need to use all of these if you don't want to.
}
I've still got to add track and artist information to each music clip but apart from that it's pretty much done.
As for the graphics options, I haven't started, I've never done this before but it seems simple enough. I really want to replace Unity's default resolution dialogue box with something less ugly. It'll do everything Unity does and perhaps in the future I'll add motion blur, LOD and that kind of thing.
The controls menu could be done in 5 minutes but while I'm doing it I might as well shuffle around some code and add new options so I don't need to go back over it again when split screen is implemented.
Once all that is done the options menu will become a prefab so you can see exactly the same thing when you click setting on the pause menu (below) rather than having all the options cluttering it like it currently does. So far I've just created a button with a cog which animates when you hover over it to access the settings. It uses another render texture as well, I think it will take up slightly less memory than an animated gif image but really I just wanted more practice with render textures.
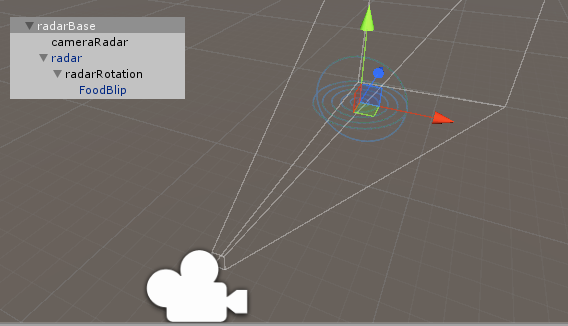
I've also turned the radar in to a render texture as well which should always display nicely no matter what resolution you play in. I suppose this would be a good opportunity to talk about how the radar actually works. Ideally I'd like to use code to figure out where to place the food blip on the radar but I'm pretty sure I need to understand quaternion mathematics which I just cannot get my head around at the moment. I'm not sure if my solution is beautiful or ugly but it works by effectively turning a bunch of game objects in to what is effectually a mechanical device. Here's the method I used:
- The radar rotates so it's facing the same way as the snake head with it's camera rotating with it so you always see the same side.
- The snake head has a "looker" object which always faces the fruit
- The "looker" acts as a control for the "radarRotation" object and turns to give the same relative angle as the looker does to the snake head.
- The FoodBlip is moved along the radarRotation object from the centre of the radar proportionally to the food's distance to the snake head.
- The whole system is outside the map and on a layer which is only visible to the radar camera. What the camera sees is then rendered to a render texture which is placed in to a raw image on the gameplay canvas.
I've removed a bit of screen clutter from the UI too. There were a bunch of buttons I put in so I could port to mobile but there is absolutely no need for it on PC since this can all be accessed more easily via keyboard shortcuts. I'll worry about putting them back in if and when I decide to make a mobile port.
Finally I've changed all the text in the game to Roboto Black and Roboto Regular rather than the ugly Ariel which is Unity's default. Maybe there's a quicker way I'm not aware of but I went through every single textbox in the game replacing fonts which took about an hour.
Man I really hate doing UI work, I'll be so glad when this part of development is over so I can concentrate on more fun aspects of development.