
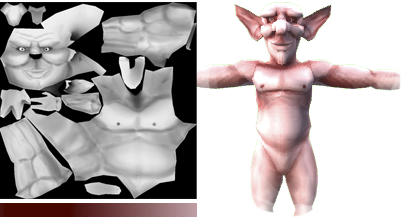
Part 3: there is more than one way to skin an imp
In the kingdom of textures, a good cost/benefit variation will usually come from colors. Biggest problem is, if you simply tint, you will probably lose a lot of color information - because usually tinting is done via multiplication, your whites will become 100% the tinted color, so you lose the non-metallic highlights.
Ok, so, let's focus on those two things: multiplications and percentages. As I've said before, all the cool stuff that computers do are a just a bunch of numbers in black boxes. There's a lot of ways to represent a color:RGB, HSL, HSV… but in all of them, you can always extract a 0 to 1 value, which is basically a percentage from "none" to "full value" in a color channel. Whatever that represents in the end, it's still a [0,1] that you can play around with.
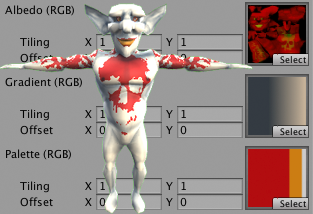
There's a tool that you can use to texture stuff which is gradient mapping. Basically what you do is provide a gradient and sample it based on a value from 0 to 1. You can do a lot of cool stuff with it, including… texturing your characters!
Granted, that's pretty easy to do in Photoshop, but how to do that in runtime? Shaders to the rescue! There's another thing that goes from 0 to 1, and that's UV coordinates. This means we can directly translate a color channel value to the UV coordinate of a ramp texture, sampling the pixel in the secondary (ramp) texture based on the value of the main (diffuse) one. If you're not familiar with the concept, go see this awesome explanation from @simonschreibt in his article analyzing a Fallout 4 explosion effect.
In your shader, you'll have something like
float greyscale = tex2D(_MainTex, IN.uv_MainTex).r;
float3 colored = tex2D(_Gradient, float2(greyscale, 0.5)).rgb;
Which roughly means "let's read the red channel of the main diffuse texture into a float using the UV coordinates from the input, then let's use that value to create a 'fake' UV coordinate to read out the ramp texture and get our final color".
Neat! We have a color tint and we don't necessarily lose our white highlight areas. But… that still looks kind of bland. That's because we have a monochromatic palette, and no colors that complement it. This is the point where I really started missing the old school graphics, where you could have 50 ninjas in Mortal Kombat by simply switching their palettes. So this is where I got kind of experimental: how could we have palettes in our 3d texture?
It would be easy if I just wanted to have 1 extra color: creating a mask texture and tinting the pixels using that mask would suffice. But what if we wanted to have several different colors? So far we have 1 diffuse texture and 1 for the ramp - would we then have to add 1 extra texture for each mask?
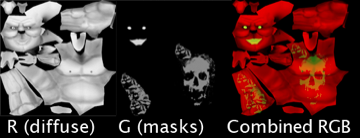
What I did in the end was having a multi-mask within one single channel: each area would have a different shade of gray, and that would also be used to read from a ramp texture. Since there's filtering going on, we can't really have all different 256 values, because the graphics card will blend neighboring pixels, but we could have more than 1. I tested with 3 and it looked decent, although it did contain some leaking, so I have to look a bit more into it.
So we're down to 1 diffuse, 1 mask and 2 ramps (4 against 6 if we had 3 different masks), right? Wrong. Remember: we're talking a single channel, so this means we can actually write both the diffuse AND the masks into 1 RGBA texture, simply using 1 channel for each. And that even leaves us 1 extra channel to play with, if we want to keep Alpha for transparency! This means if we wanted to only have 2 masked parts, we could even ditch the second ramp texture, the same if we had no transparency and wanted 3 masks.
Ok, we have a shader that we can cram stuff into, so all we must do is make sure we have enough ramps to create variety. This means either having a bunch of pre-made ramp textures or…
Part 4: gotta bake 'em all!
Unity has a very nice Gradient class, which is also serializable. This leaves us the option of actually generating our gradients in runtime as well, also randomizing them. Then we simply have to bake a ramp texture from the Gradient, which is quite simple:
private Texture2D GetTextureFromGradient(Gradient gradient) {
   Texture2D tex = new Texture2D((int)FinalTexSize.x, (int)FinalTexSize.y);
   tex.filterMode = FilterMode.Bilinear;
   Color32[] rampColors = new Color32[(int)FinalTexSize.x];

   float increment = 1 / FinalTexSize.x;
   for (int i = 0; i < FinalTexSize.x; i++) {
      rampColors[i] = gradient.Evaluate(increment * i);
   }

   tex.SetPixels32(rampColors);
   tex.Apply();
   return tex;
}
Here's where I had to make a decision of where to go next: researching procedural palettes, or simply getting a bunch of samples from somewhere. For the purpose of this prototype, I just needed good palettes to test my shader, so I wondered where I could find tons of character palettes.
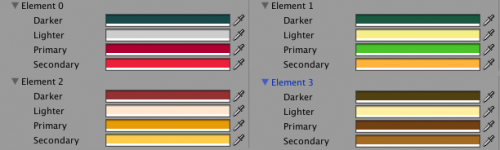
Even though I'm a SEGA kid, there's no discussion about Nintendo being great at character color palettes. Luckily, right about the time I was doing the prototype, someone at work sent a link to pokeslack.xyz, where you can get Slack themes from Pokémon. Even better: the page actually created the palettes on the fly based on the ~600 Pokémon PNGs it used as source.
I wrote a Python script that downloaded a bunch of PNGs from that site and ported the palette creation code to C#, then made a little Unity Editor to extract the palettes and make them into gradients I could use to create ramp textures. Ta-da! Hundreds of palettes for me to randomize from!
The result to all of this is the Invocation prototype, so make sure you check it out and tell me what you think!
Prologue
If you read all the way here, I hope some part of this wall of text and the links within it were interesting or of are of any use to you! In case you have any questions and/or suggestions (especially regarding properly welding vertices at runtime without ruining everything in the mesh), hit me up in the comments section or on twitter @yankooliveira!
I'll keep doing experiments with Bestiarium for now, let me know if you want to keep hearing about it. Who knows, maybe this is a creature I'm supposed to invoke.