This article will help you create a 2D top down game in Unity using the power of the State Machine pattern. After following this tutorial you will have something like this:
Create a Player GameObject in the Hierarchy. Attach a Rigidbody2D and a Collider2D to it (I’m using a BoxCollider2D but you can use any other that fits your sprite’s shape). You can create a child object and name it Sprites. This one will be the container of all player sprites.
Now it’s time to start coding. Go to your code editor of choice. Create a folder for this core classes. Called it “Core” or something.
We will create an abstract State class and another abstract StateMachine class that will handle the logic of switching states.
using UnityEngine;

namespace BerserkPixel.StateMachine
{
    public abstract class State<T> : ScriptableObject where T : MonoBehaviour
    {
        protected T _runner;

        // called whenever we enter this state. Good for setting up variables
        public virtual void Enter(T parent)
        {
            _runner = parent;
        }

	// similar to Update
        public abstract void Tick(float deltaTime);

	// similar to FixedUpdate
        public abstract void FixedTick(float fixedDeltaTime);

	// here we put the conditions to change to another state if needed
        public abstract void ChangeState();

	// this one can be called from the animation timeline
        public virtual void AnimationTriggerEvent(AnimationTriggerType triggerType)
        {
        }

        public virtual void Exit()
        {
        }
    }
}
using System;
using System.Collections.Generic;
using System.Linq;
using UnityEngine;

namespace BerserkPixel.StateMachine
{
    public abstract class StateMachine<T> : MonoBehaviour where T : MonoBehaviour
    {
        [SerializeField] private List<State<T>> _states;

        [Header("DEBUG")]
        [SerializeField] private bool _debug = true;

        private State<T> _activeState;

        private T _parent;

        protected virtual void Awake()
        {
            _parent = GetComponent<T>();
        }

        protected virtual void Start()
        {
            if (_states.Count <= 0) return;

            SetState(_states[0]);
        }

        public void SetState(State<T> newStateType)
        {
            _activeState?.Exit();
            _activeState = newStateType;
            _activeState?.Enter(_parent);
        }

        public void SetState(Type newStateType)
        {
            var newState = _states.FirstOrDefault(s => s.GetType() == newStateType);
            if (newState)
            {
                SetState(newState);
            }
        }

        protected virtual void Update()
        {
            _activeState?.Tick(Time.deltaTime);
            _activeState?.ChangeState();
        }

        /// <summary>
        /// Can be called from the Animation Timeline. This will propagate the AnimationTriggerType
        /// to the current active state.
        /// </summary>
        /// <param name="triggerType"></param>
        private void SetAnimationTriggerEvent(AnimationTriggerType triggerType)
        {
            _activeState?.AnimationTriggerEvent(triggerType);
        }

        private void FixedUpdate()
        {
            _activeState?.FixedTick(Time.fixedDeltaTime);
        }

        private void OnGUI()
        {
            if (!_debug) return;

            var content = _activeState != null ? _activeState.name : "(no active state)";
            GUILayout.Label($"<color='black'><size=40>{content}</size></color>");
        }
    }
}
Then we will create an enum for different types of triggers or events that could happen during an animation, like for example, play footsteps sounds or check to perform some raycast somewhere.
namespace BerserkPixel.StateMachine
{
    // whatever could be called from the animation timeline
    public enum AnimationTriggerType
    {
        EnemyDamaged,
        PlayFootstepSound
    }
}
Now we are done with the core classes. Next we will need to write concrete classes that uses this ones. Let’s write some player code.
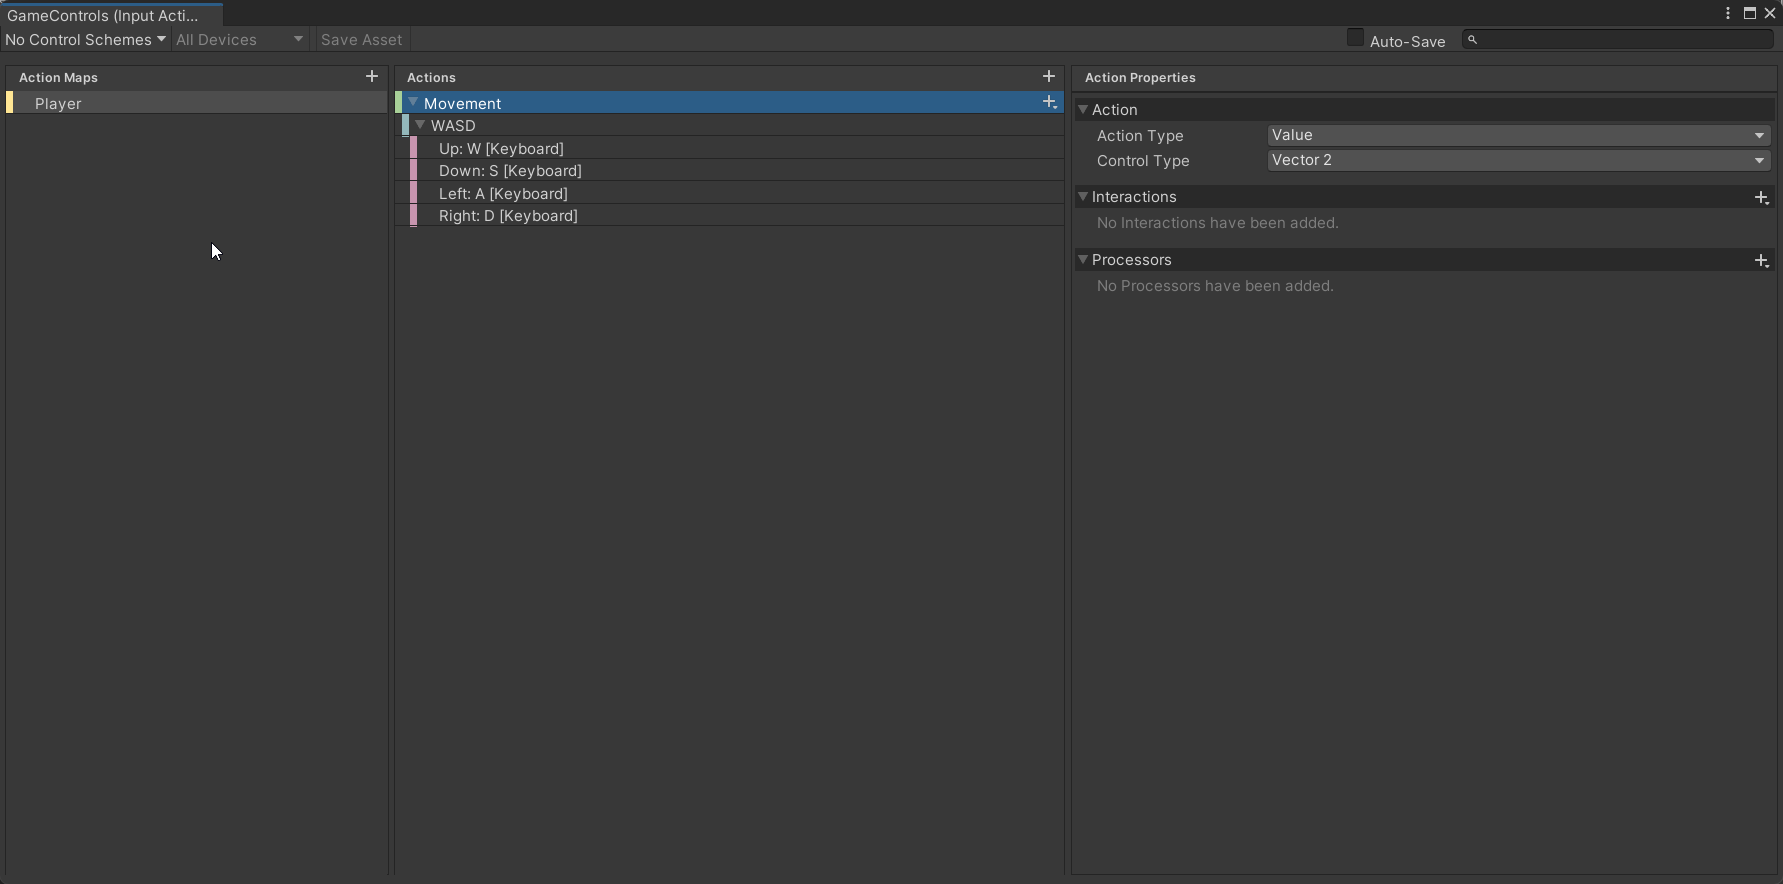
For this project we are using the new Input System. I created a Input asset, called it “GameControls”. Double click to open it and create a binding like in this picture.
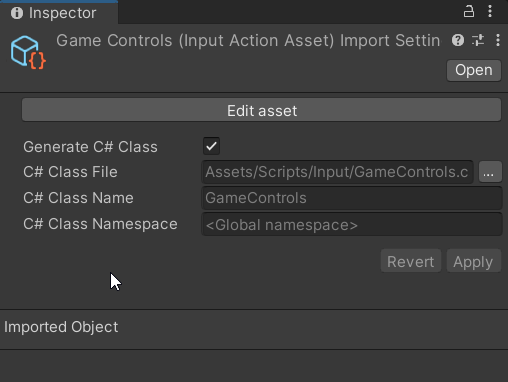
 Save the asset and close this window. Then, with the new asset selected, go to the Inspector and check the “Generate C# Class” and the Apply.
Go back to your code Editor and create a new class. Name it “PlayerInput”. This is an extra layer for the input that propagates the input actions into events that can be used on other scripts. This is useful if we have different Action Maps. For example in our script we can Enable/Disable a UI action map and disable the players one and viceversa. Super helpful if we open a menu for example.
using UnityEngine;
using UnityEngine.Events;
using UnityEngine.InputSystem;

namespace Player.Input
{
    public class PlayerInput : MonoBehaviour, GameControls.IPlayerActions
    {
        public event UnityAction<Vector2> MovementEvent = delegate { };

        private GameControls _playerActions;

        private void OnEnable()
        {
            if (_playerActions == null)
            {
                _playerActions = new GameControls();
                _playerActions.Player.SetCallbacks(this);
		// _playerActions.UI.SetCallbacks(this);
            }

            EnableGameplayInput();
        }

        private void OnDisable()
        {
            DisableAllInput();
        }

        public void DisableAllInput()
        {
            _playerActions.Player.Disable();
        }

        public void EnableGameplayInput()
        {
            if (_playerActions.Player.enabled) return;

            // _playerActions.UI.Disable();
            _playerActions.Player.Enable();
        }

        public void OnMovement(InputAction.CallbackContext context)
        {
            MovementEvent?.Invoke(context.ReadValue<Vector2>());
        }
    }
}
Note that we are implementing the generated class GameControls.IPlayerActions. This will force us to have public void OnMovement(InputAction.CallbackContext context) implemented. When implementing the generated class, Unity will generate all the methods for each Action is setted up with appending OnXxx(InputAction.CallbackContext context). So if for example we add a button for dashing and the Action is called Dash, it will generate OnDash(InputAction.CallbackContext context).
Now it’s time to create a concrete PlayerStateMachine class. This will be in charge of listening to the PlayerInput events, and respond to it.
using BerserkPixel.StateMachine;
using Player.Input;
using UnityEngine;

namespace Player
{
    public class PlayerStateMachine : StateMachine<PlayerStateMachine>
    {
        [SerializeField] private PlayerInput _playerInput;
	// this is the Transform we want to rotate on the Y axis when changing directions
        [SerializeField] private Transform _spriteTransform;
        [SerializeField] private Rigidbody2D _rigidbody;

	// this Vector2 can be used on each State to determine any change
        public Vector2 Movement { get; private set; }

	// since our sprite is facing right, we set it to true
        private bool _isFacingRight = true;

        private void OnEnable()
        {
            _playerInput.MovementEvent += HandleMove;
        }

        private void OnDisable()
        {
            _playerInput.MovementEvent -= HandleMove;
        }

        private void HandleMove(Vector2 movement)
        {
            Movement = movement;
            CheckFlipSprite(movement);
        }

        private void CheckFlipSprite(Vector2 velocity)
        {
            if ((!(velocity.x > 0f) || _isFacingRight) && (!(velocity.x < 0f) || !_isFacingRight)) return;

            _isFacingRight = !_isFacingRight;
            _spriteTransform.Rotate(_spriteTransform.rotation.x, 180f, _spriteTransform.rotation.z);
        }

	// just  a simple implementation of movement by setting the velocity of the Rigidbody
        public void Move(Vector2 velocity)
        {
            _rigidbody.velocity = velocity;
        }
    }
}
Please notice that the changing states logic is handled by the abstract StateMachine class so there’s no need to do that here.
After that, we need some states for the player. Let’s create an Idle and Move state. We will need to inherit from the abstract State class that we wrote before.
What we will need on the idle state is that we ensure we are not moving the player. Also check if there is any key pressed and if so, change to the proper state (in our case Move state)
using BerserkPixel.StateMachine;
using UnityEngine;

namespace Player.States
{
    [CreateAssetMenu(menuName = "States/Player/Idle")]
    public class PlayerIdleState : State<PlayerStateMachine>
    {
        public override void Enter(PlayerStateMachine parent)
        {
            base.Enter(parent);
            _runner.Move(Vector2.zero);
        }

        public override void Tick(float deltaTime)
        {
        }

        public override void FixedTick(float fixedDeltaTime)
        {
        }

        public override void ChangeState()
        {
            if (_runner.Movement.sqrMagnitude != 0)
            {
                _runner.SetState(typeof(PlayerMoveState));
            }
        }
    }
}
For movement, we create a SerializeField to control the speed of the movement. On each Tick (Update from the StateMachine) we check the user’s input. Since we are moving the player using Rigidbody2D, we perform the movement on the FixedTick call (performed in the FixedUpdate). Finally, we check on which conditions we change state. In our case if our user’s input is small enough we change back to PlayerIdleState. Here one can also check for other user’s input, like a dash button pressed for example. Any state that makes sense while it’s moving.
using BerserkPixel.StateMachine;
using UnityEngine;

namespace Player.States
{
    [CreateAssetMenu(menuName = "States/Player/Move")]
    public class PlayerMoveState : State<PlayerStateMachine>
    {
        [SerializeField, Range(0f, 50f)] private float _speed = 25f;

        private Vector2 _playerInput;

        public override void Tick(float deltaTime)
        {
            _playerInput = _runner.Movement;
        }

        public override void FixedTick(float fixedDeltaTime)
        {
	    // we need a multiplier since we don't want the _speed to be seen like a big
	    // number in the inspector. We can also do [SerializeField, Range(250f, 500f)]
            var speedMultiplier = 10;
            _runner.Move(_playerInput * (_speed * speedMultiplier * fixedDeltaTime));
        }

        public override void ChangeState()
        {
            if (_playerInput.sqrMagnitude <= .1f)
            {
                _runner.SetState(typeof(PlayerIdleState));
            }
        }
    }
}
Note that this implementation is for a top down type of game, since we consider the player input for “x” and “y”. If you want a platformer type of game you can change in the Tick to just use the “x” value and then apply gravity on the “y” value.
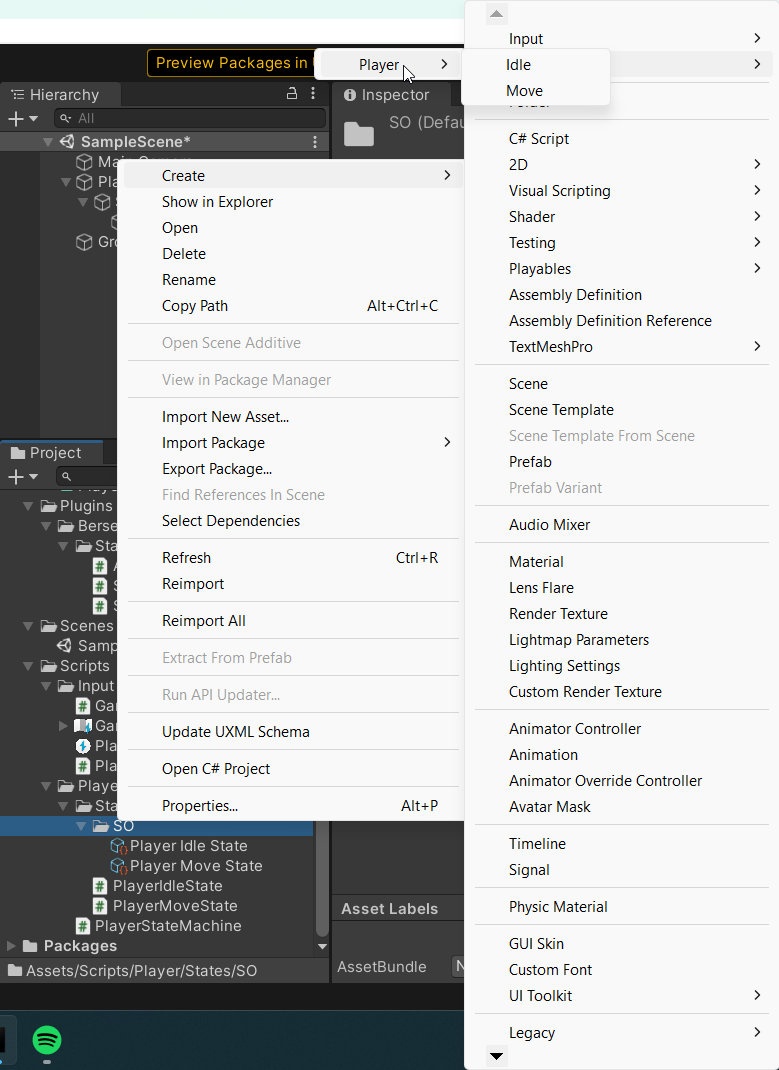
After writing this scripts, go back to the Editor and now you are able to create an Idle and Movement Scriptable Object for the player. You can have a Walk scriptable object and a Run scriptable object for example, with different speed values.
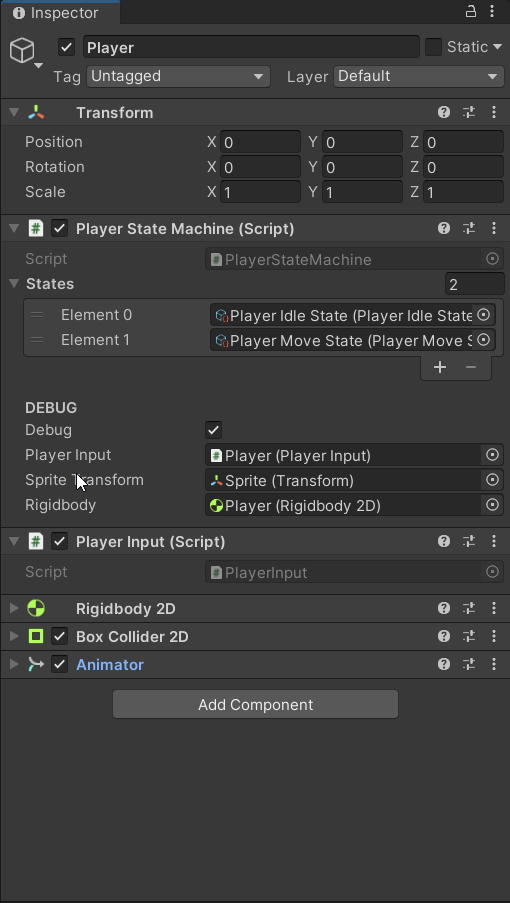
 Once you create the scriptable objects for Idle and Movement, select your Player GameObject. Add a PlayerStateMachine component. Drag the scriptable objects on the “States” field. Aso drag the other required fields like so:
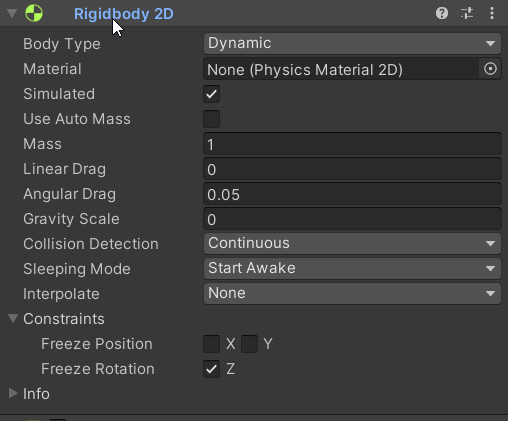
 Make sure that your Rigidbody2D is set to Dynamic, has a 0 as a gravity scale and can’t be rotated on the z axis:
Now you are ready to test! Press the play button and play around with the WASD keys to see the changes of states on your player!
Did you like this post? Tell us

Leave a comment
Log in with your itch.io account to leave a comment.
Loved the article!! FYI I notice the images are all broken now
Thanks! And I’m sorry about the images. Now it’s fixed. It was a rookie mistake hahaha