This tutorial shows how to create a view cone effect as shown below. Works only with URP's Universal Renderer. Used Unity version is 2021.3.0.

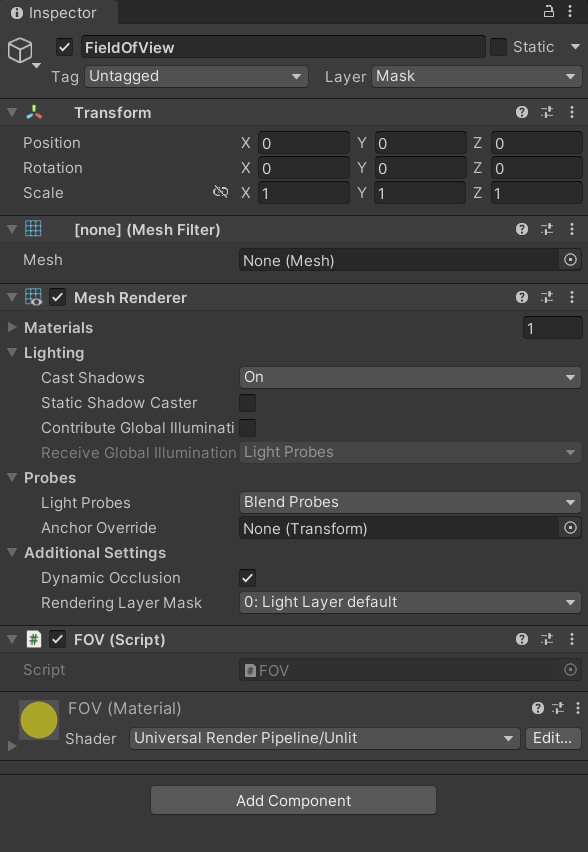
We'll be adding only one GameObject to the Scene hierarchy. It will be responsible for generating the view cone (as a mesh with a material) - it will need to have the following components:
This object will be a child of our player GameObject so it gets rotated and moved around with the player (looking like it's coming out from his head or flashlight).
We'll also need to set up the Forward Renderer so pixels of certain objects (enemies) are visible only while there are pixels of the view cone in the same position. We'll put the view cone in one layer, the enemies in a different one and add two renderer features, one for each, so the layers follow correct rendering rules.
That's all.
Like i said above:
Create a new material. Select a shader for it called "Universal Render Pipeline/Unlit" and change the surface type to transparent - we want it to be transparent cuz it's light and you need to be able to see through it! Don't forget to set a color for the material as well😊
After that add this material to the FOV GameObject.
Set up your project to use URP if you didn't do it yet - create a URP Asset with a Universal Renderer and assign this asset to the "Scriptable Render Pipeline Settings" under Project Settings -> Graphics.

By doing that we didn't really achieve anything - the rendering should be working exactly the same - but we now have access to different options in the renderer. We gained access to the renderer's settings.
We're gonna set up 3 layers to separate objects:
In the Universal Renderer Data we're gonna disable the default rendering of the "BehindMask" and the "Mask" layers (1) and then set up a custom rendering of these two layers by a Renderer Feature each (2).
(1) Change both Opaque and Transparent Layer Mask to Nothing - you should see that nothing in your scene is being rendered. Now enable only the layers that you do need (in either a transparent or an opaque mask or both depending on what materials objects in the layer use), everything that you use aside from the "BehindMask" and "Mask" layers. For me it was only 2 transparent layers: "Default" and "ViewBlocker".
(2) Create 2 Renderer Features by clicking "Add Renderer Feature -> Render Objects (Experimental)". Call them Mask and BehindMask. Set the Event field to "AfterRenderingTransparents", Queue to "Transparent" and the Layer Mask to the corresponding layer name. We're basically saying that after drawing all the normally-rendered layers (for me "Default" and "ViewBlocker") we wanna draw the Mask layer and then the BehindMask layer.
Check off both of the Stencil checkboxes and set Values to 1. Set up Compare Function, Pass, Fail and Z Fail in the following way:
(3) End of the rendering part. Yay!
Stencil buffer is actually a texture where for each pixel we can assign an int from 0 to 255. Default value for each pixel is 0.
So we start with a texture full of 0s, then while rendering the Mask layer we do a stencil test for each pixel using Always as the Compare Function which results in all the pixels always passing the test - Fail and Z Fail will be never triggered. So for all the pixels in the Mask layer (these are only the pixels creating the view cone) we're passing the stencil test - triggering the Replace functionality so replacing the 0s with the value we provided which is 1.
After the Mask pass we have a texture filled with 1s wherever the view cone is visible and 0s everywhere else.
Now while rendering the BehindMask layer we're gonna check using the Equal function if each BehindMask layer pixel has a stencil buffer value of 1. If it does (so if it's inside of the view cone) we pass the test and if not we fail it. It's a default functionality in unity that pixels using the stencil buffer are rendered only when passing the stencil test (that's why the default Compare Function value is Always).
We end up rendering only the pixels of the BehindMask that are inside of the view cone which is the result we wanted.
1. Let's start with creating an empty mesh and assign it to the MeshFilter:

2. Next we wanna create a simple triangle mesh - we'll assign 1 triangle to the triangles property of the mesh and 3 vertices to the vertices property. First one of the vertices will be a Vector3.zero, and for the other 2 we'll write a simple method (i called it GetVectorFromAngle) that returns a normalized Vector3 based on an angle from the X Axis.
We also call _mesh.RecalculateBounds() to update the bounding box of our mesh e.g. so the unity built in frustum culling doesn't bug.

I ended up with something like this (notice that we can already see our rendering rules at work - yay!):

3. You can make the view cone bigger by just multiplying all the end-vertices by some constant (all the vertices but the origin one which is Vector3.zero in my case either way but it doesn't have to be).

4. Now we're gonna make the end of the view cone rounded.
Our script is set up in such a way that the only thing we actually need to do to get there is increase the number of rays from the current 2 to some larger number, like 50. We'll try to make the script a bit more abstract and change things up so the number of rays is passed in as a variable (well a constant in my case but you get what i mean).
We'll start with creating the constant RAY_COUNT and modifying the way we write to the _triangles array - we can be still doing it in the Start() method because the _triangles array consists of just ordered vertices where the 3 first ones are the vertices of the first triangle, 3 next ones the vertices of the second triangle etc. The order of the vertices creating the triangles is always the same for a specific number of rays. It depends only on that and the number of rays is constant so we set it up only once.

Length of the _vertices array is the number of rays plus the origin Vector3.zero one. We calculate the number of triangles in our mesh by thinking about how every ray but the last one (so [RAY_COUNT - 1] of rays) is creating a new triangle. Then the length of the _triangles array is this number of triangles multiplied by 3 cuz each triangle consists of 3 ints (vertices).
We apply a similar way of thinking about rays creating triangles for using the for-loop. This time around we start with the vertex of index 1 which creates the first ray pretty much and go through all the following vertices but the last one - so we loop through all the triangles. For each triangle we calculate the trianglesArrayIndex which is just the index of the first vertex of the triangle - formula is the index of the triangle multiplied by 3 being the number of vertices each triangle consists of. Then for each triangle the first vertex is our origin Vector3.zero, second vertex is the vertex creating the triangle and the third one is just a vertex after this one.
Now the only thing we need is to set up the vertices:

We manually set up the first origin vertex and then calculate each next one. In the formula for the vertex the only thing that actually changes is the angle that we're passing to the GetVectorFromAngle method. We divide our whole view angle (fovAngle) by the number of triangles so we know by how much to increase the angle after being done with each ray (angleBetweenTwoRays). I also changed the starting angle from 0 to negative half of the whole view angle so the view cone isn't drawn from the mouse position but rather symmetrically with the mouse position in the middle.
You should end up with something like this:
And our script after some cleanup:

5. Final step🥳 - View Blockers!!!
You should already have all of the view blockers in a separate layer called ViewBlocker. The only thing we're gonna change in our script is to, after calculating a vertex, do a raycast from the origin Vector3.zero point to our new vertex (the order's important). The raycast is gonna be checking for the colliders only in the ViewBlocker layer and if the ray intersects with any - we're gonna override our new vertex with the collision point. That will create that cool effect of the view line being blocked by an obstacle.

In the inspector you just need to select the correct layer for the _viewBlockers property and you should be set.
Oh... one last thing. We're using the Transform.TransformPoint, Direction and InverseTransformPoint because sadly there is no way in unity to raycast in the local space and so we need to pass in the global origin and direction and also the output we're getting (the collision point) is gonna be in the world space. Changing these reference points isn't difficult so it's not a big deal but it does look a bit more messy😕
But yeah, that's pretty much it. If you have any questions feel free to hmu😊
Used resources:
Did you like this post? Tell us

Leave a comment
Log in with your itch.io account to leave a comment.
Do you have a tutorial available for 3D too? More on the lines of Commandos with sections for crouching and shadows formed by the view cone.
Don't have one, i've seen some people use projectors and custom shaders for that so it seems a bit more complex but let me know if you come up with something cool.