Do you want to add some vehicles to your videogame? Maybe just a simple car, you probably found some kind of implementation in your selected engine, at least Unity has its wheel collider and Unreal has chaos vehicles in its last version. And don't get me wrong, I think these are pretty robust implementations, but they lean towards the simulation of a car, so you might find that making an arcade style driving will be more difficult with these tools.
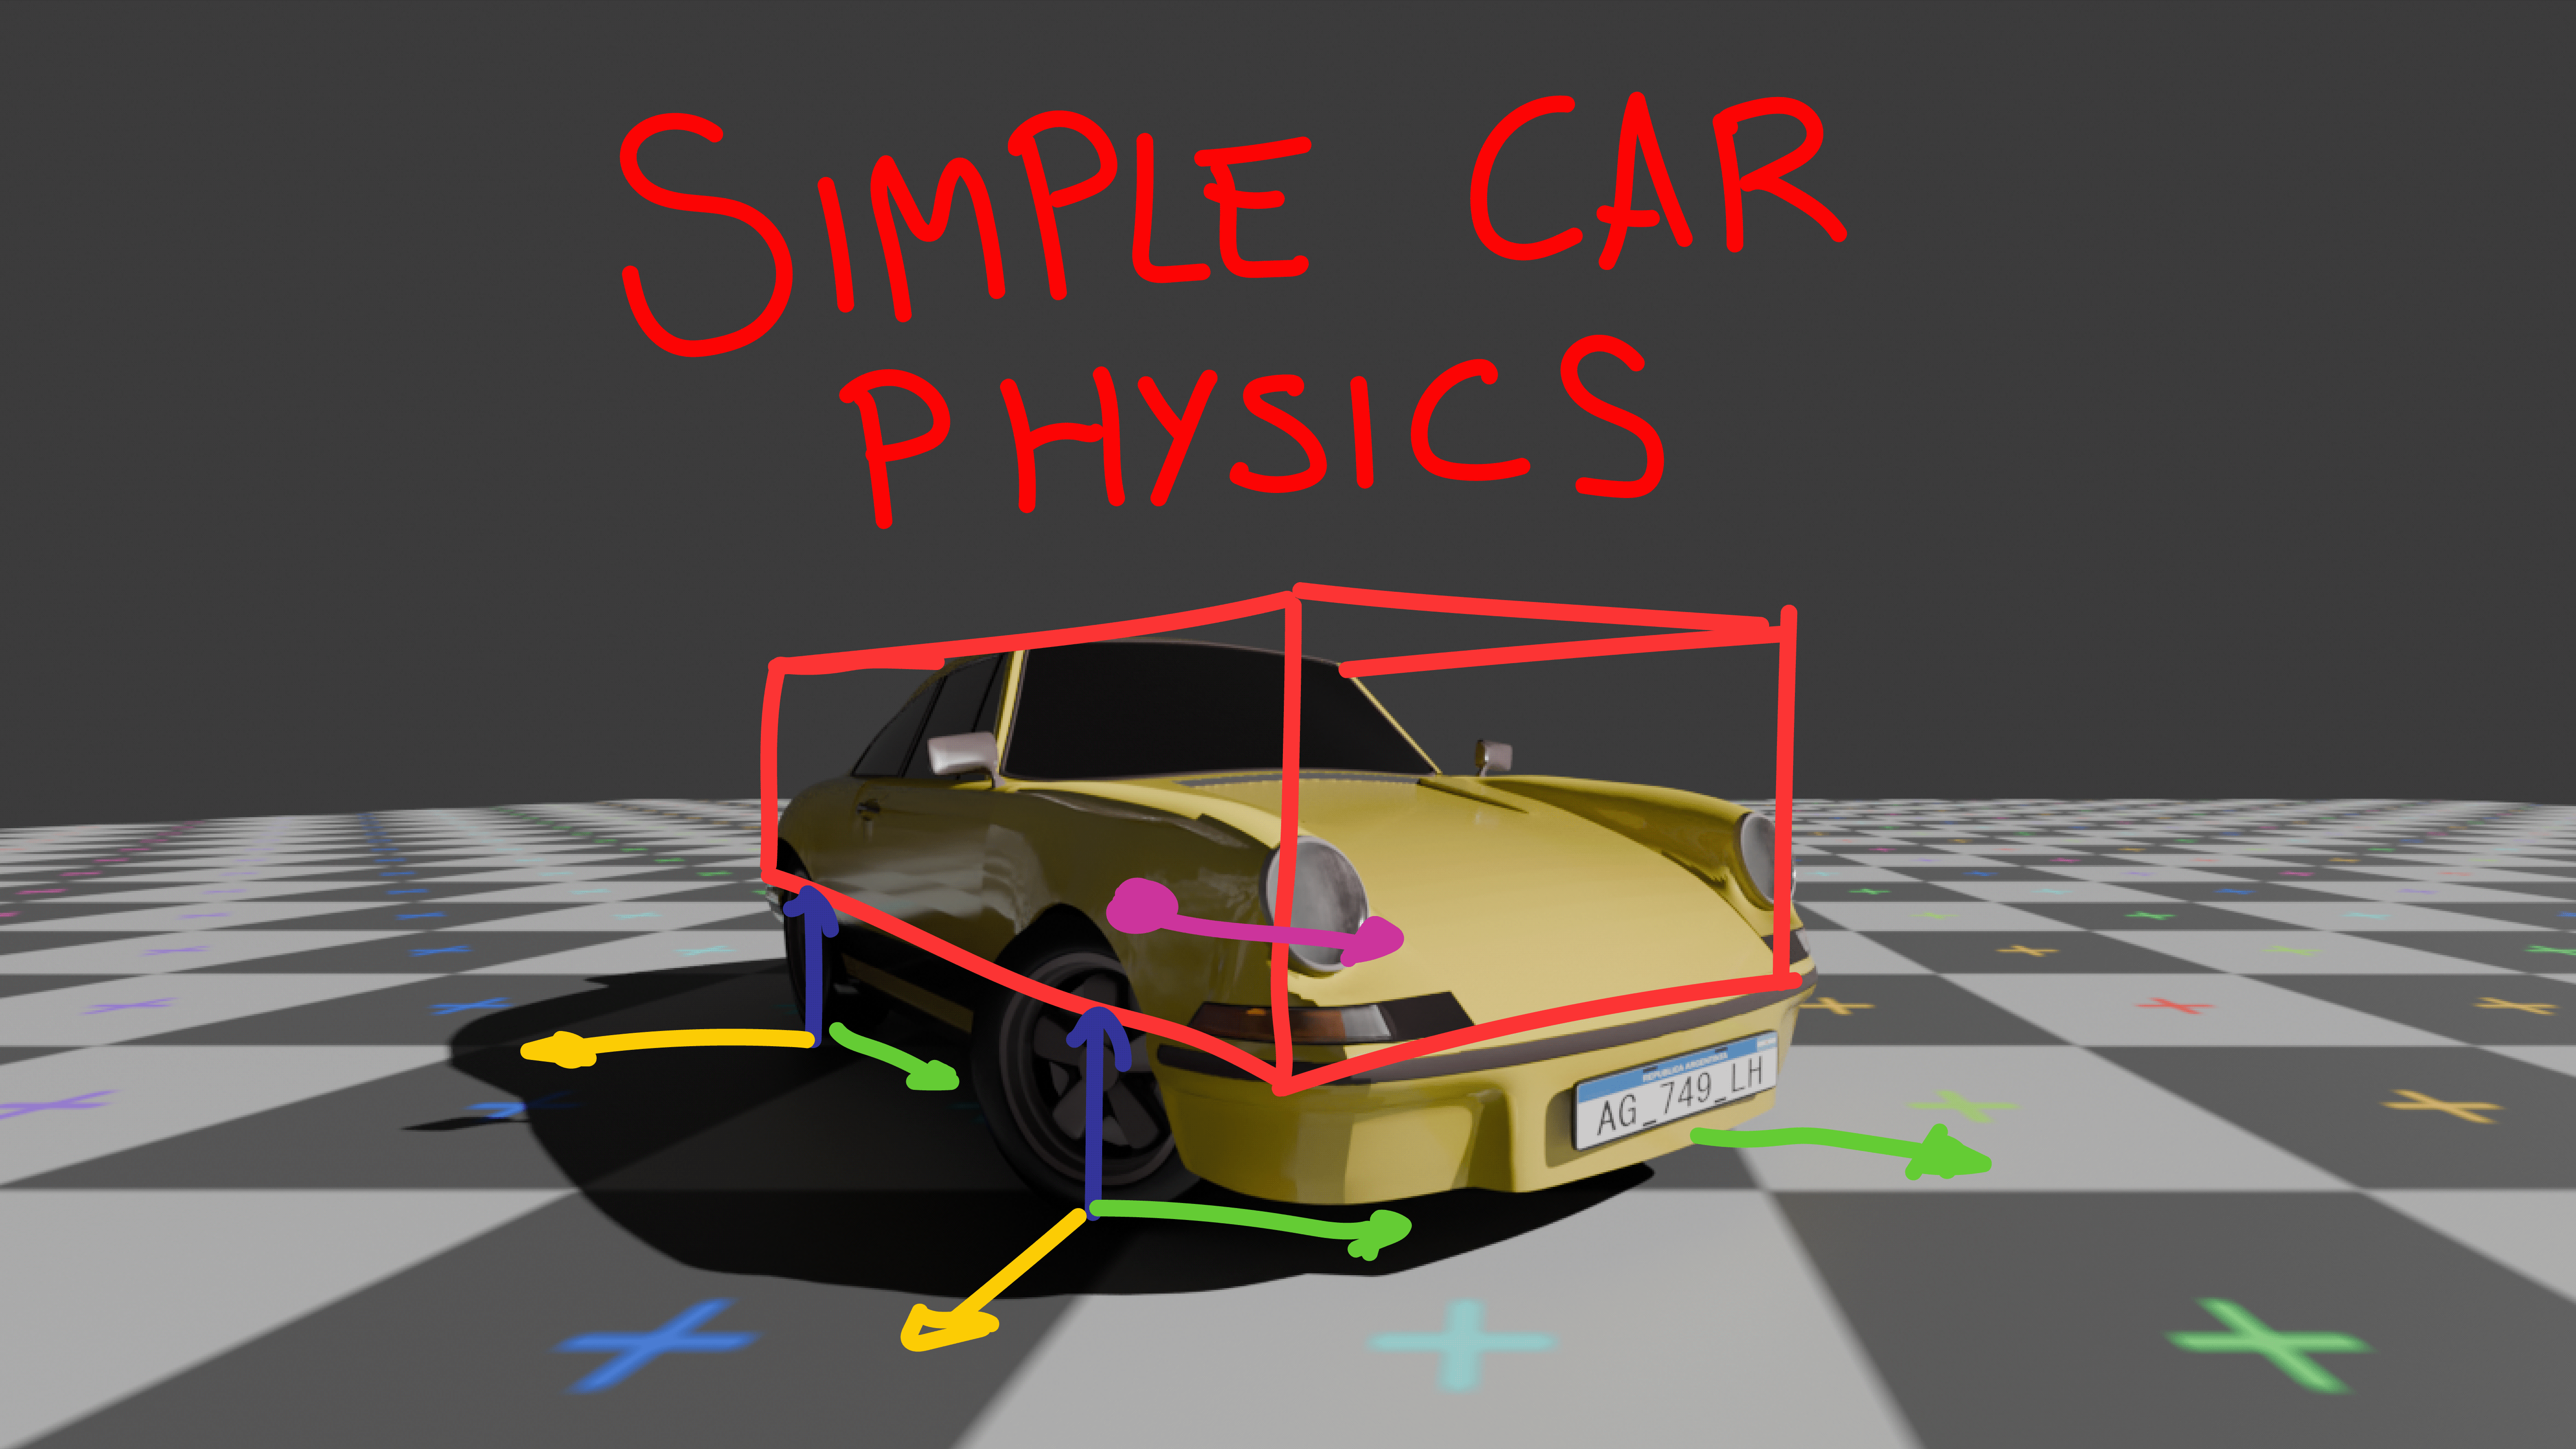
I ask this myself, and at the time I thought that was really hard, so I stuck with the engine solutions. But fear no more, creating your own car physics system is not that hard at a basic level, and is an amazing opportunity to better understand the use of physics on any 3d engine, so come with me, I would try to guide step by step in how you can implement a basic physics system for a four wheel car, and the best part of doing this is that you will end up with a code you know and understand, and that will make adding more stuff to it easier, possibilities are endless.
I will be doing this in Unreal Engine, but you should be able to replicate it on your selected engine as I will explain each step independently of the engine.
I will be posting pieces of the code on the guide, but the full implementation is completely open source. You can get it on GitHub and do whatever you want https://github.com/FexotheFCO/Simple_Car_Physics_UE
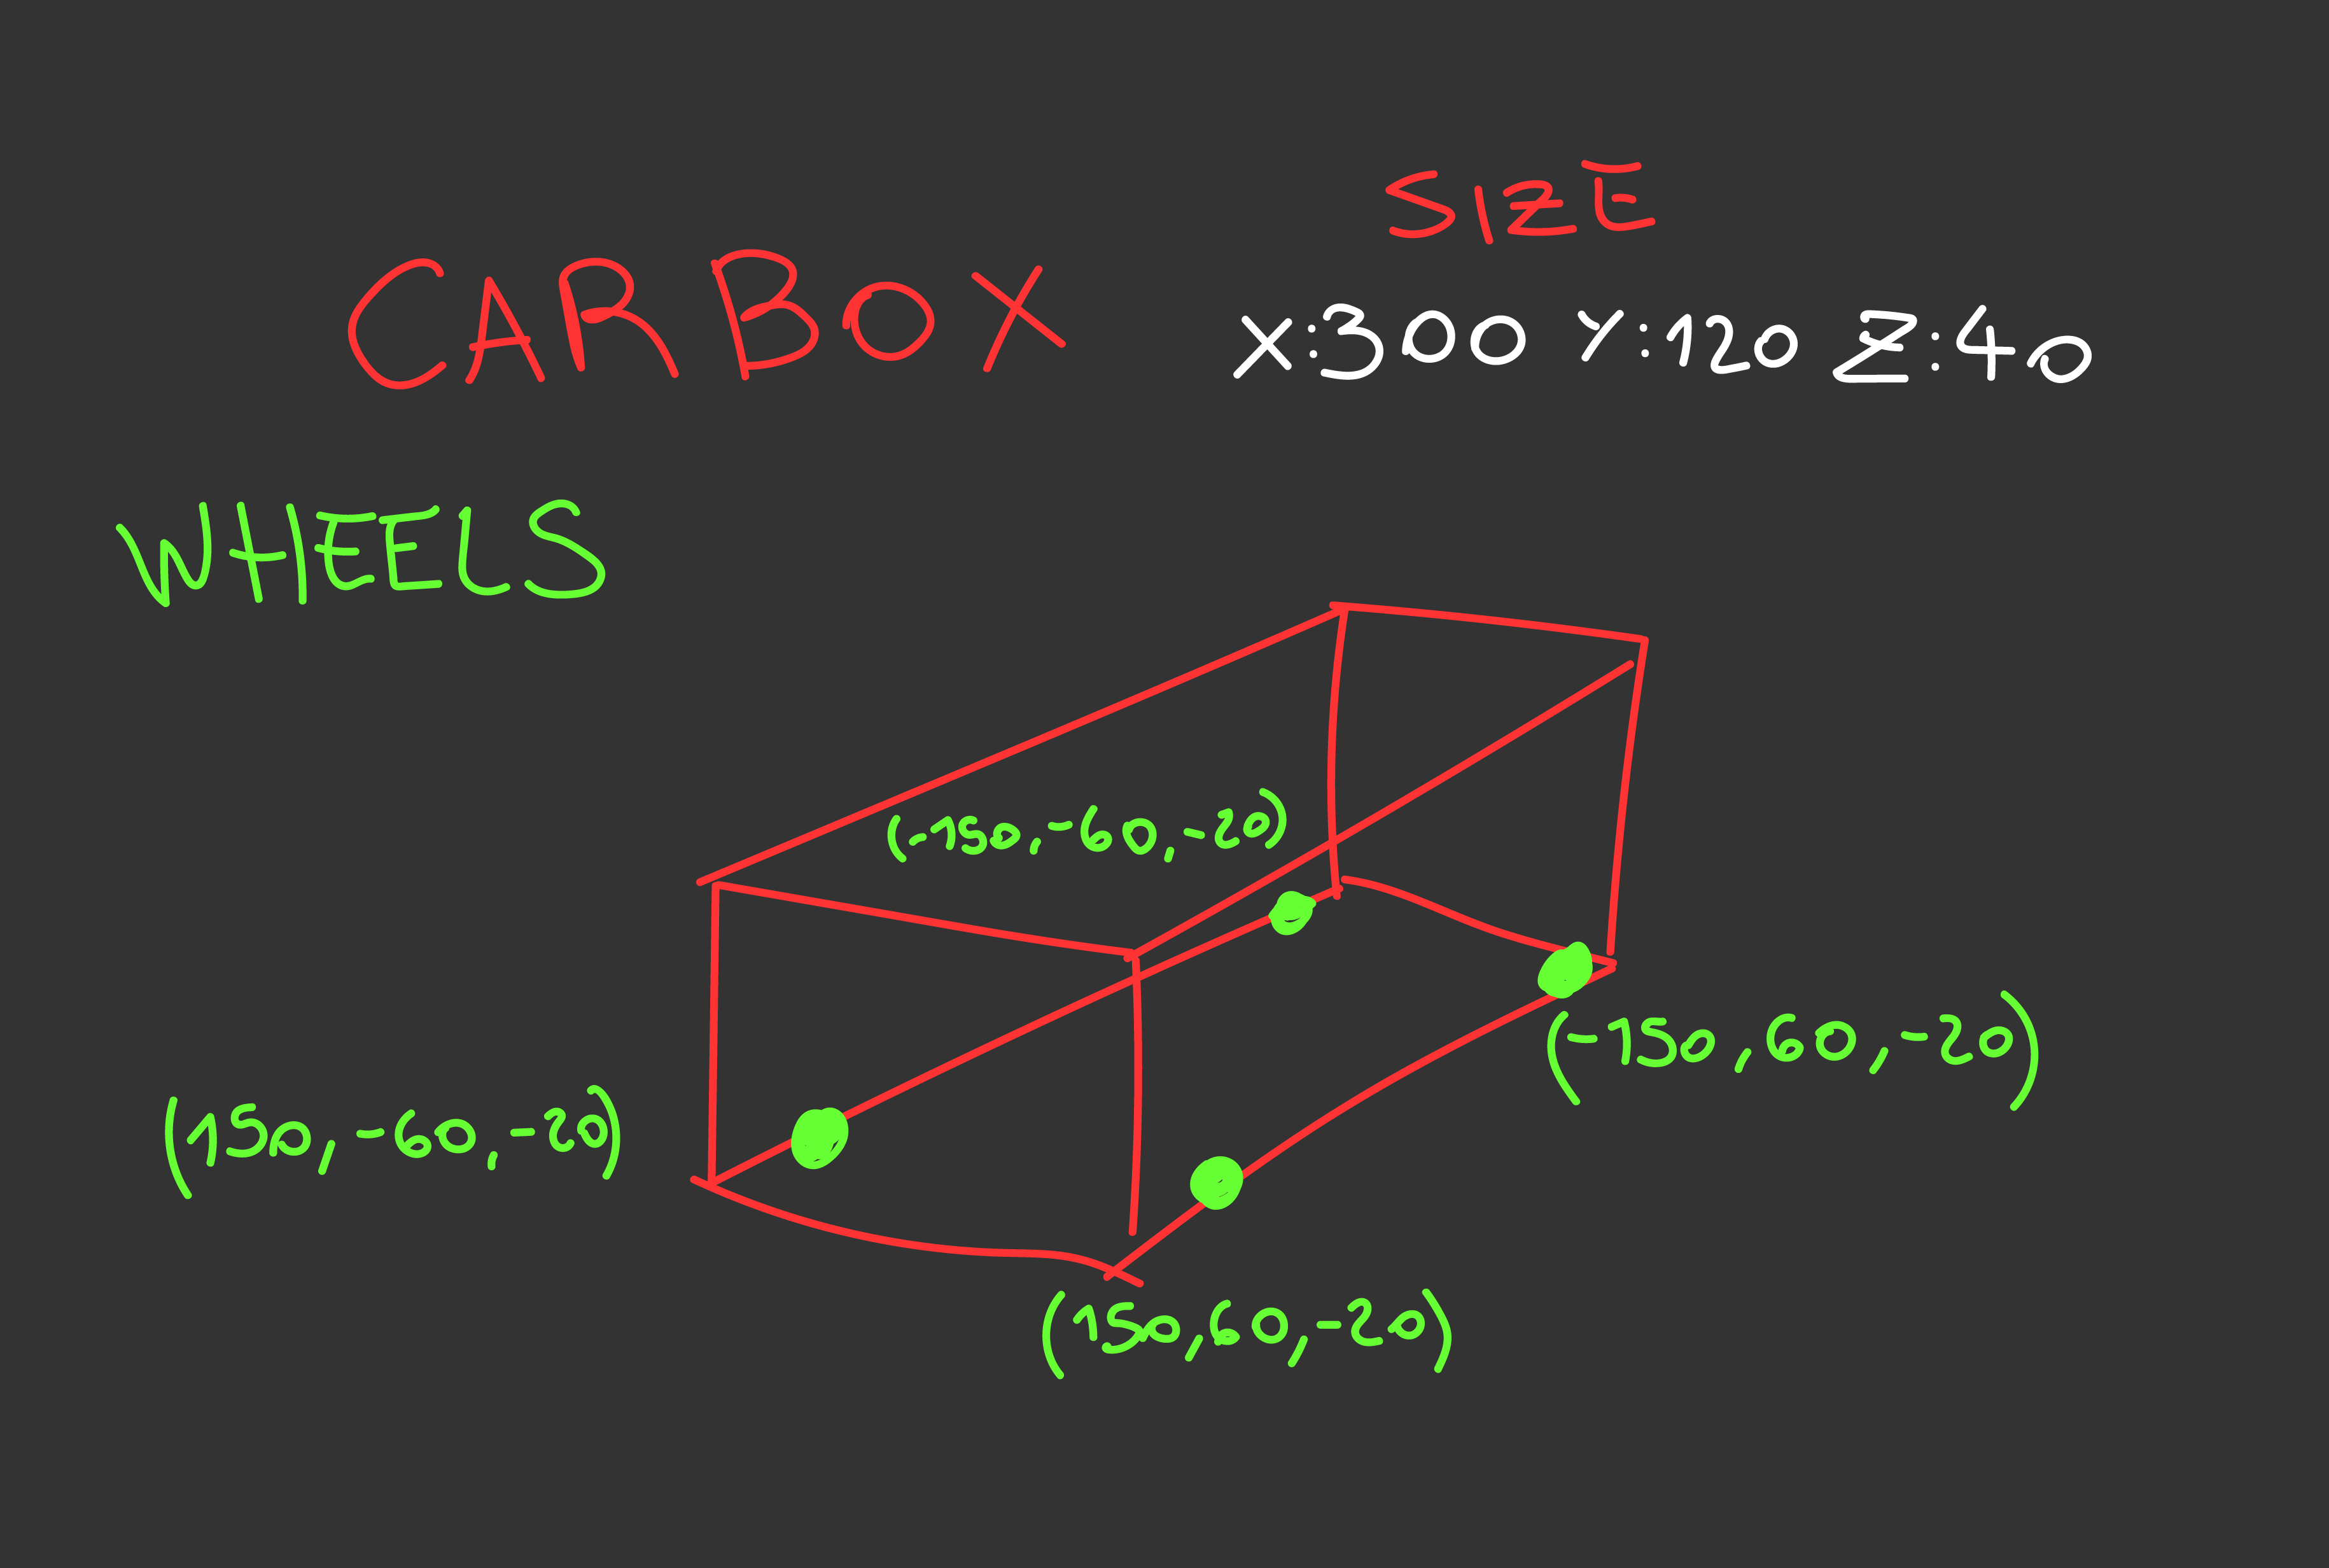
First of all, we want to simplify the simulation, that is to say, we need to take only the most important parts for the car to work, so we are going to separate the car into two primary things, a CarBox and Wheels. The CarBox will be simply a cube collider that will resemble the body of the car, to this CarBox we want to add all the forces, so its important that this CarBox has physics enabled on it.
The other important part of the simulation are the Wheels, and I would recommend you to take a look at the different ways you can simulate these wheels (this video show three different methods to do it, but there are more https://www.youtube.com/watch?v=-XB7wvTPprU), we’ll use the most basic one, which is simply a Ray Cast (Line Trace in Unreal), I prefer this method as is the most simple and it has only a few drawbacks.
As we are not going to add any physics to the wheels but to the CarBox, we can simplify our wheels to a simple local position, from where the Ray will begin. At this point, we should have a CarBox and four different local positions, important note, since the wheels positions are in local space, we are going to use the CarBox Transform to convert the positions from local to world later on.
If you are wondering how to get the position for each wheel, you can get the CarBox extent and with this we can say the positions for the wheels are:
| Wheel | Local Position |
|---|---|
| Front Left (FL) | Vector(boxExtent.X, -boxExtent.Y, -boxExtent.Z) |
| Front Right (FR) | Vector(boxExtent.X, boxExtent.Y, -boxExtent.Z) |
| Rear Left (RL) | Vector(-boxExtent.X, -boxExtent.Y, -boxExtent.Z) |
| Rear Right (RR) | Vector(-boxExtent.X, boxExtent.Y, -boxExtent.Z) |
Now, let's break down the forces we need to apply to the CarBox to simulate a believable car. These forces can be divided into three categories: Suspension, Acceleration, and Steering.
Lets start with the Suspension, In simple terms each wheel of a car has a Spring and a Damper attached to it, this will suspend the car and work as a shock-absorber.
To simulate the spring we would need a few variables, lets start with the SuspensionLength, this will be the maximum length that the suspension can reach, in other words, this will be the length of the Ray, with this we can calculate an offset, this will be the delta between the SuspensionLength and the current spring position, this current position will be the length of the Ray Hit, once we have the Offset we can calculate the force of the spring, we need to create a SuspensionStrength variable and simply multiply the offset by it.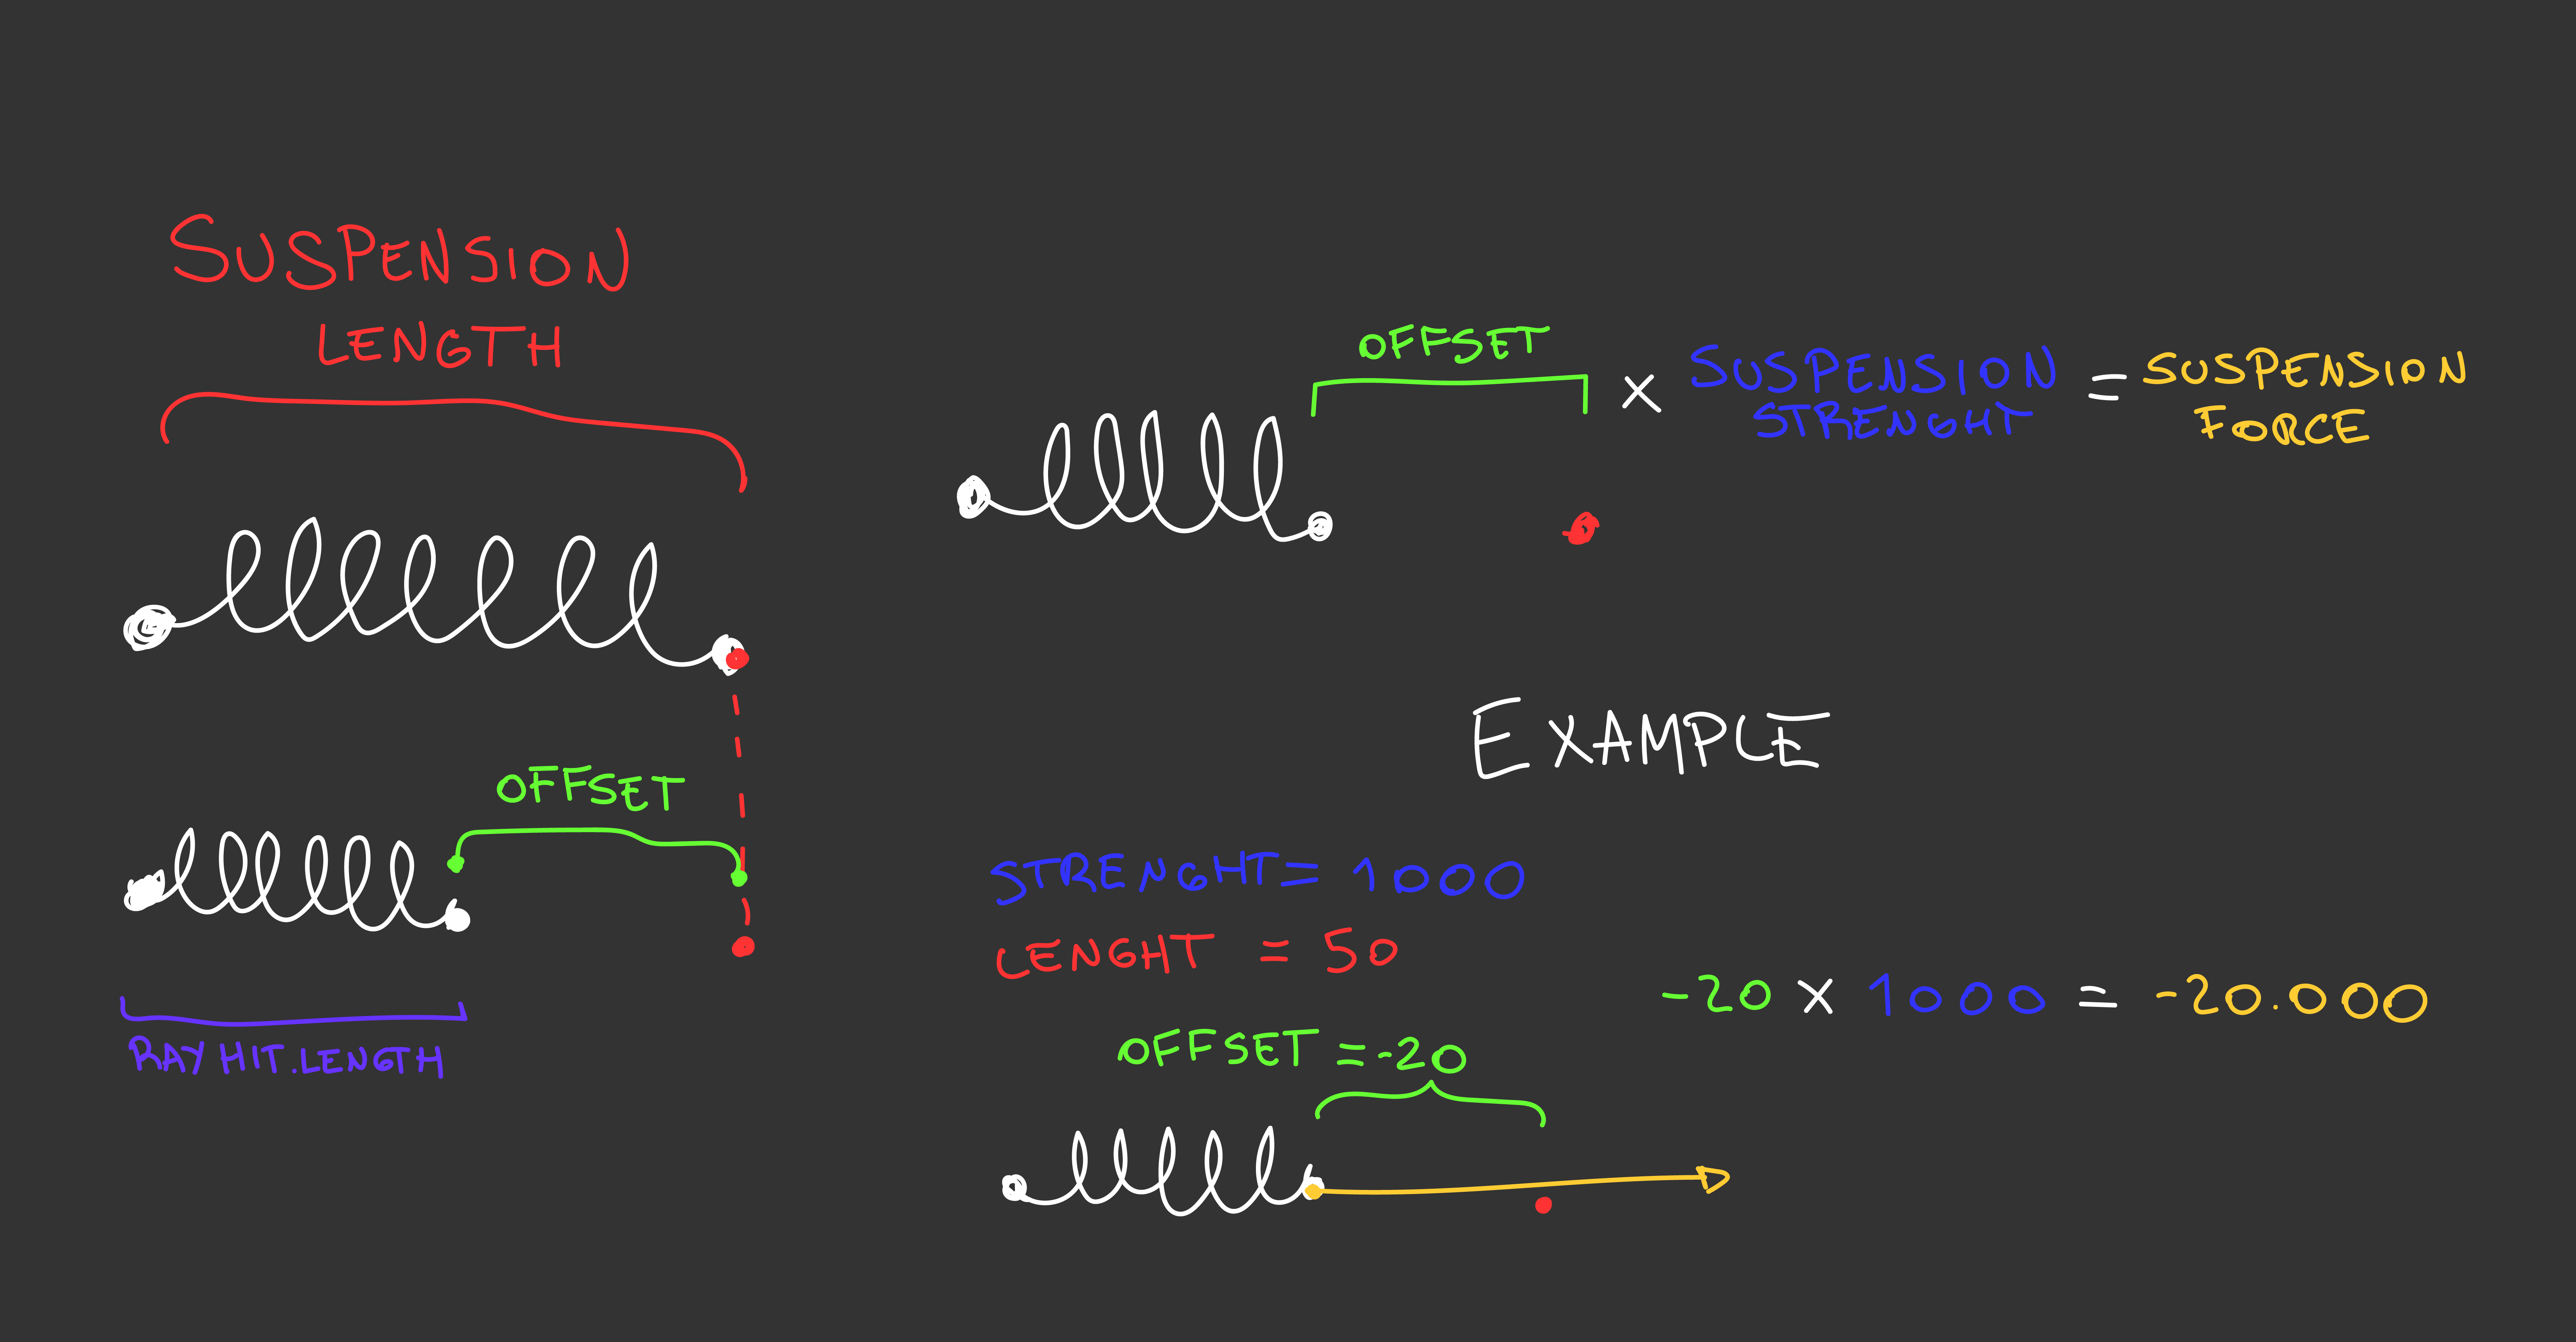
This offset has a small problem as it is right now, as it will be higher with longer suspension and vice versa, so what we really want to get is a ratio of compression, in simple terms if the suspension is fully compress we want to have a value of 1, and if it is fully uncompressed, we want a value of 0. To get this, we should simply divide the Offset by the SuspensionLength.
float compressRatio = (SuspensionLength - hitResult.Distance) / SuspensionLength;
With this, we have a functional Spring, but if you test it this spring will oscillate infinitely. What we need to implement now is a Damper, this device is used to add resistance to the spring force and will help to reach an equilibrium.
To implement the damper we would need to create a variable Damping, and we want to multiply this by the velocity of spring, this will create more resistance when the spring is moving fast, so our damping force will be like
DampingForce = - (Velocity * Damping);
Now we have the two forces, we need to combine them into one and voila we have our spring and damping force ready.
SuspensionForce = (compressRatio * SuspensionStrength) - (Velocity * Damping);
Now we need to calculate this force for each wheel, and apply the force to the CarBox, this is the code in Unreal Engine:
for (FCarWheel& wheel : Springs)
{
    FVector worldLocation = CarBox->GetComponentTransform().TransformPosition(wheel.LocalPosition);
    FVector endPoint = CarBox->GetComponentTransform().TransformVector(FVector::DownVector * SuspensionLength) + worldLocation;
    FHitResult hitResult;
    TArray<AActor*> ignoredActors;
    ignoredActors.Add(this);

    wheel.IsGrounded = UKismetSystemLibrary::LineTraceSingleByProfile(GetWorld(), worldLocation, endPoint, "Vehicle", false, ignoredActors, EDrawDebugTrace::ForOneFrame, hitResult, true);
    if (wheel.IsGrounded)
    {
        float compressRatio = (SuspensionLength - hitResult.Distance) / SuspensionLength;
        float totalForce = (compressRatio * SuspensionStrength) - (SuspensionDamping * CarBox->GetPhysicsLinearVelocityAtPoint(worldLocation).Z);

        CarBox->AddForceAtLocation(CarBox->GetComponentTransform().TransformVector(FVector::UpVector) * totalForce, worldLocation);
        DrawDebugLine(GetWorld(), worldLocation, worldLocation + CarBox->GetComponentTransform().TransformVector(FVector::UpVector) * totalForce / SuspensionForce, FColor::Blue, false, -1, 0U, 10);
    }
}
Congrats! with this, you should have a nice CarBox that simply levitates into the air, you can play with the SuspensionLength, SuspensionStrength, and Damping variables to find what suits you better.
That was not that hard, right? now you have a little bit more confidence, lets do the Steering force, which is a least for me, the most difficult one, but chill, nothing is impossible here.
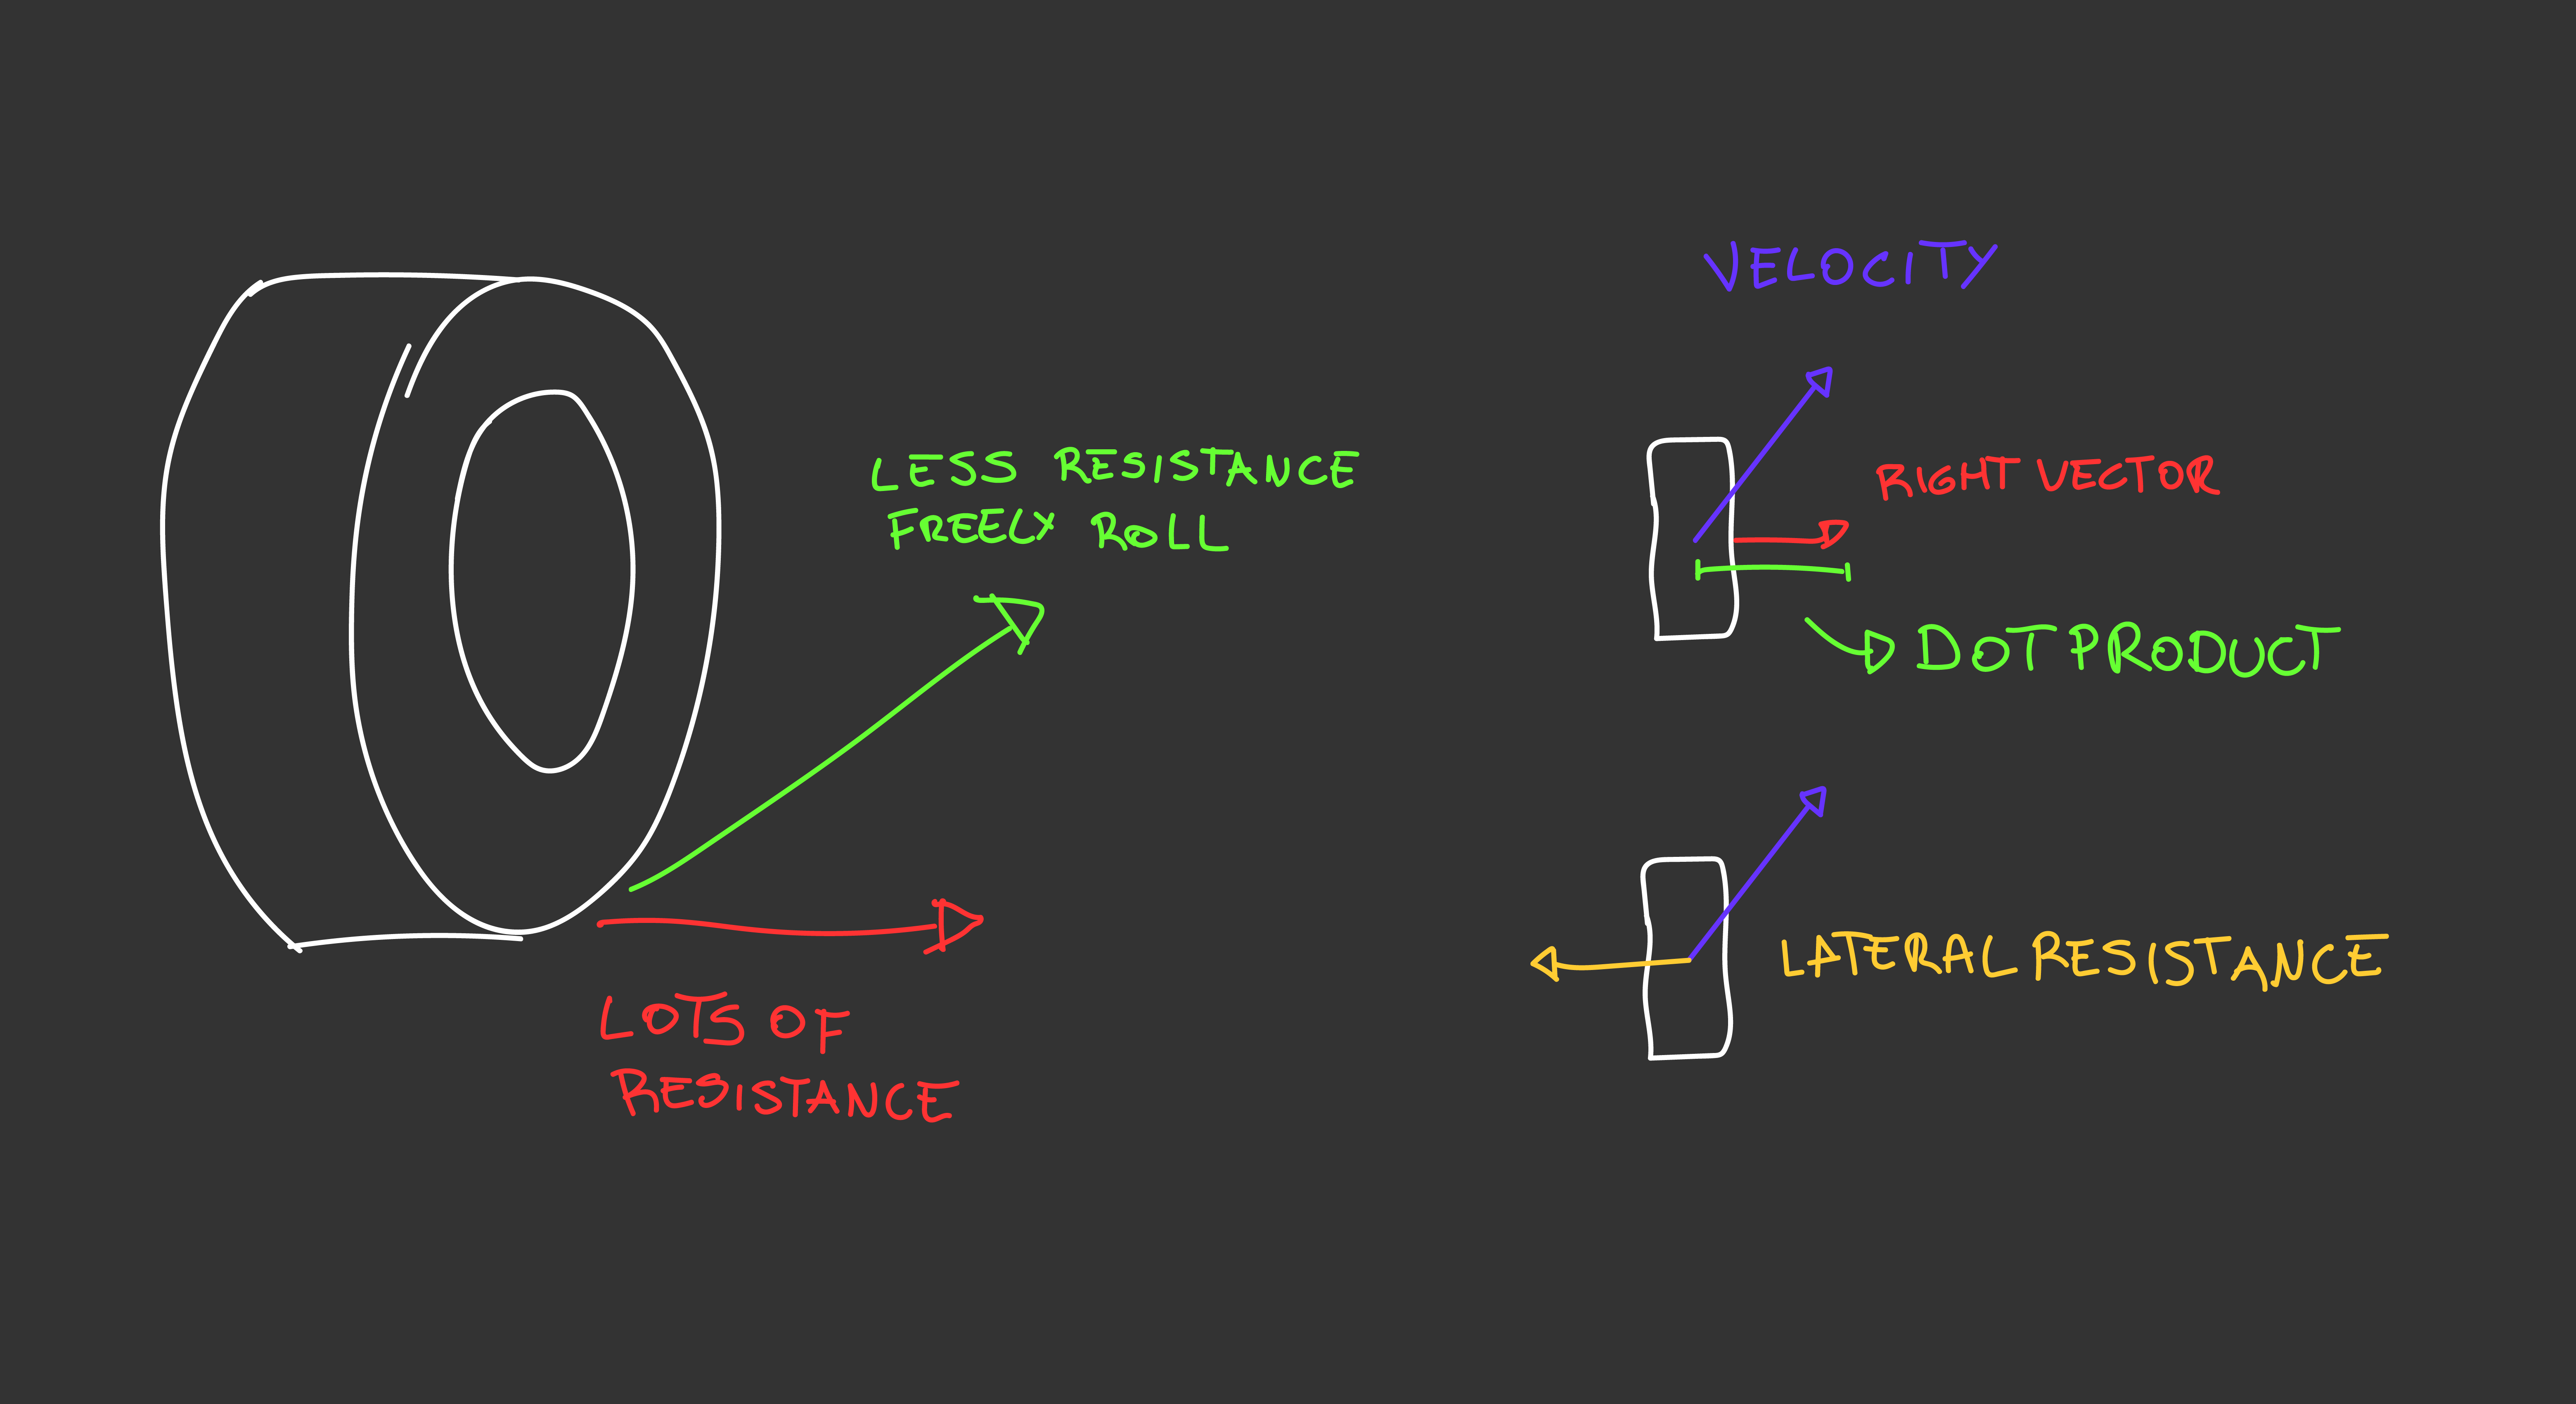
So lets think about wheel for a moment, it has a direction in which it can freely roll, we can think of it like the forward direction, and another direction in which it doesn't want to move at all, so it has a lot of resistance, we can think of it like the lateral direction. So what we are going to do is calculate how much velocity the car has in the lateral direction, and apply a contrary force to make that resistance.
So we need to calculate this lateral resistance for each wheel. we would need two primary things: a direction that points to the lateral of the wheel, and the car velocity, the first direction we can grab it by getting a Vector:Right relative to the CarBox and for the velocity we are going to get the velocity of the CarBox at the wheel location.
Now to know how much in the lateral direction the velocity is pointing, we are going to calculate a DotProduct between the two, this will return a float that will indicate how much in the right direction the velocity of the car is going. Now we should just add a force in the opposite direction of the RightVector and our wheels should resist lateral forces, but it will roll freely forward.
I recommend you to create a variable SteeringForce to multiply this LateralResistance force to have a better control of how much the vehicle should steer.
We have a car, the wheels are working fine, but how to steer it? for this we are going back a little to the force, instead of just use a RightVector, we want to calculate the direction of the front wheels with some angle to them.
For this I simply created a variable for a MaxAngle = 45, I will multiply this by the player input that could go from -1 to 1, so we are going to have values between -45 and 45 degrees, with the desired angle we are going to create a direction with that angle, with some trigonometry this should be really simple, just use the Cosine and Sine of the angle, but wait this direction is pointing forwards, and not the sides of the wheels, so what we are going to do is getting the perpendicular direction of this angled direction we calculated:
FVector wheelDirection = FVector(FMath::Cos(angleInRadians), FMath::Sin(angleInRadians), 0);
FVector perpendicularDirection = FVector(-wheelDirection.Y, wheelDirection.X, 0);
Now we just simply transform this direction to make it relative to the CarBox and voila, we now have calculated the side direction of a angled wheel, you need to implement some code to steer only the front wheels, but to be honest do whatever you want, steer with four wheels, could be interesting, or only with rear wheel, yes, why not?
This is how I implement it on Unreal:
for (FCarWheel& wheel : Springs)
{
    if (wheel.IsGrounded)
        continue;

    float angle;
    angle = wheel.IsSteering ? SteeringInput * MaxAngle : 0;
    float angleInRadians = FMath::DegreesToRadians(angle);

    FVector wheelWorldLocation = CarBox->GetComponentTransform().TransformPosition(wheel.LocalPosition);
    FVector carVelocity = CarBox->GetPhysicsLinearVelocityAtPoint(wheelWorldLocation);

    //Get the lateral direction of the Wheel
    FVector wheelDirection = FVector(FMath::Cos(angleInRadians), FMath::Sin(angleInRadians), 0);
    FVector perpendicularDirection = FVector(-wheelDirection.Y, wheelDirection.X, 0);
    perpendicularDirection = CarBox->GetComponentTransform().TransformVector(perpendicularDirection);

    //Calculate the final lateral resistance force
    float sideRatio = FVector::DotProduct(carVelocity, perpendicularDirection);
    FVector lateralResistance = perpendicularDirection * -sideRatio * SteeringForce;
    DrawDebugLine(GetWorld(), wheelWorldLocation, wheelWorldLocation + lateralResistance, FColor::Green, false, -1, 0U, 10);
    CarBox->AddForceAtLocation(lateralResistance, wheelWorldLocation);
}
So you might be testing this and found that the car is a little bit unstable as it is, and it easily rolls. Don't worry, we will be addressing these problems later on, now lets focus on the last force.
The hard stuff is almost over, in fact this force should be really easy to add, we want to add the force in the forward direction of the wheel, if the wheels that we are adding this forward force are not used to steer, we shouldn't worry too much, as the wheels will always facing forwards relative to the CarBox, but if the wheel can steer and also can accelerate, we should take it into account, but as we already calculated the direction of the wheel, I will just copy the code, and disregards the perpendicularDirection, as we are not going to need it.
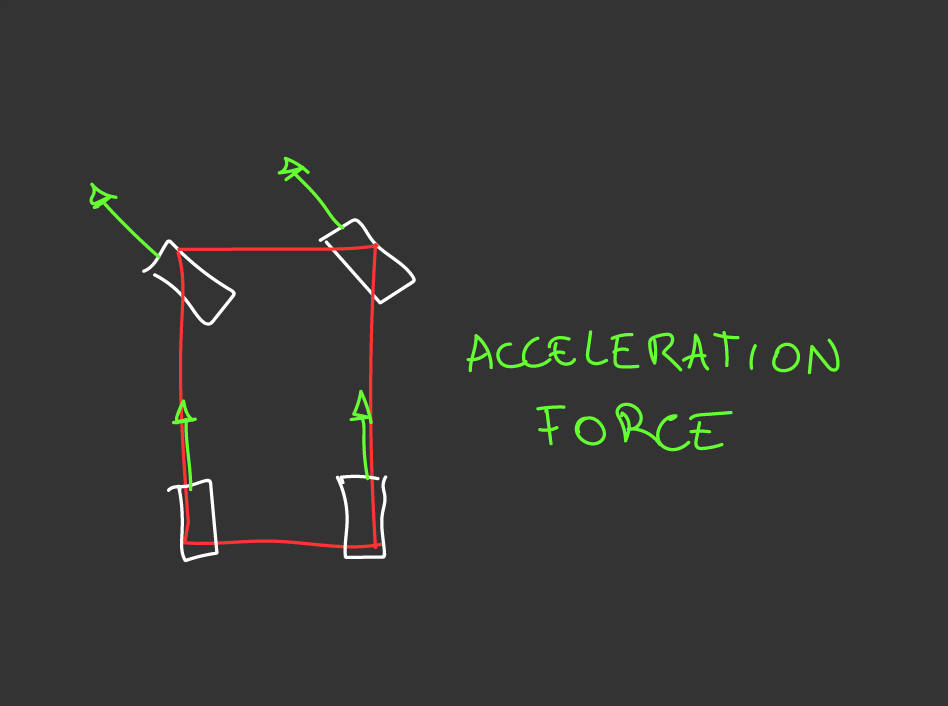
And yes I know, you are probably grabbing your head right now, and if not you should, coping the code and recalculate it all over again is not optimal, but I want to make it simple for the example, you can take a look at how I cached these calculations on the final code.
With the forward direction of the wheel we just multiply it by a new variable ForwardForce and the Acceleration Input (just like the Steering Input, should be values from -1 to 1).
for (FCarWheel& wheel : Springs)
{
    if (!wheel.IsGrounded || !wheel.IsEngine)
        continue;

    float angle;
    angle = wheel.IsSteering ? SteeringInput * MaxAngle : 0;
    float angleInRadians = FMath::DegreesToRadians(angle);
    FVector wheelWorldLocation = CarBox->GetComponentTransform().TransformPosition(wheel.LocalPosition);
    FVector wheelDirection = FVector(FMath::Cos(angleInRadians), FMath::Sin(angleInRadians), 0);
    FVector accelerationForce = CarBox->GetComponentTransform().TransformVector(wheelDirection * ForwardForce * AccelerationInput);
    DrawDebugLine(GetWorld(), wheelWorldLocation, wheelWorldLocation + accelerationForce, FColor::Red, false, -1, 0U, 10);
    CarBox->AddForceAtLocation(accelerationForce, wheelWorldLocation);
}
And you kind of have it right now, this vehicle should be able to move around, and steer like a real car, but it is probably really clunky, unstable and easy to roll, this is not going to work for a lot of games, but don't worry, there are a bunch of improvements we can make now we have a good base code.
First of all, remember when I said that when can simplify the Wheel as a simple position, well I lied, we want to know a little more information about the wheel than simply its local position, and in reality you will need to think about what you need for your game, as my wheel has only information and no functions I prefer to make an struct named FCarWheel, this struct stores this data: (don't worry I will explain each along the way)
| Vector LocalPosition | This will store the local position of the wheel |
| Bool IsGrounded | Indicate if the wheel is currently hitting the ground |
| Bool IsSteering | Indicate if this wheel is used for steering |
| Bool IsEngine | Indicate if this wheel is used for acceleration |
| Float Grip | Value between 0 to 1, indicates amount of grip for the wheel |
| Vector GroundNormal | This will store the current normal of the ground |
| Vector CurrentDirection | This will store the current direction of the wheel |
| Vector CurrentWorldPosition | This will store the current world position of the wheel |
| Vector ApplyForcesLocalPosition; | This will store the local position to use when applying forces |
| Vector ApplyForcesWorldPosition; | This will store the world positions to use when applying forces |
So lets start analyzing each force and how we can improve it
Since the suspension runs every frame for each wheel is a good place to cache our CurrentWorldPosition, we were already calculating it so we just need to store it and use that instead of calculating it again whenever we need it.
wheel.CurrentWorldPosition = CarBox->GetComponentTransform().TransformPosition(wheel.LocalPosition);
Another thing we want to add to our simulation to improve it is the ground normal, What is this? simply a direction pointing up relative to the ground, we have this information when the Ray hit the ground, so if this happens we want to store it, But why? the first use will be for correctly apply the SuspensionForce, instead of using an UpVector relative to the CarBox, we want to use this normal instead. This will improve how the car works on ramps.
wheel.GroundNormal = hitResult.Normal;
CarBox->AddForceAtLocation(wheel.GroundNormal * totalForce, wheel.CurrentWorldPosition);
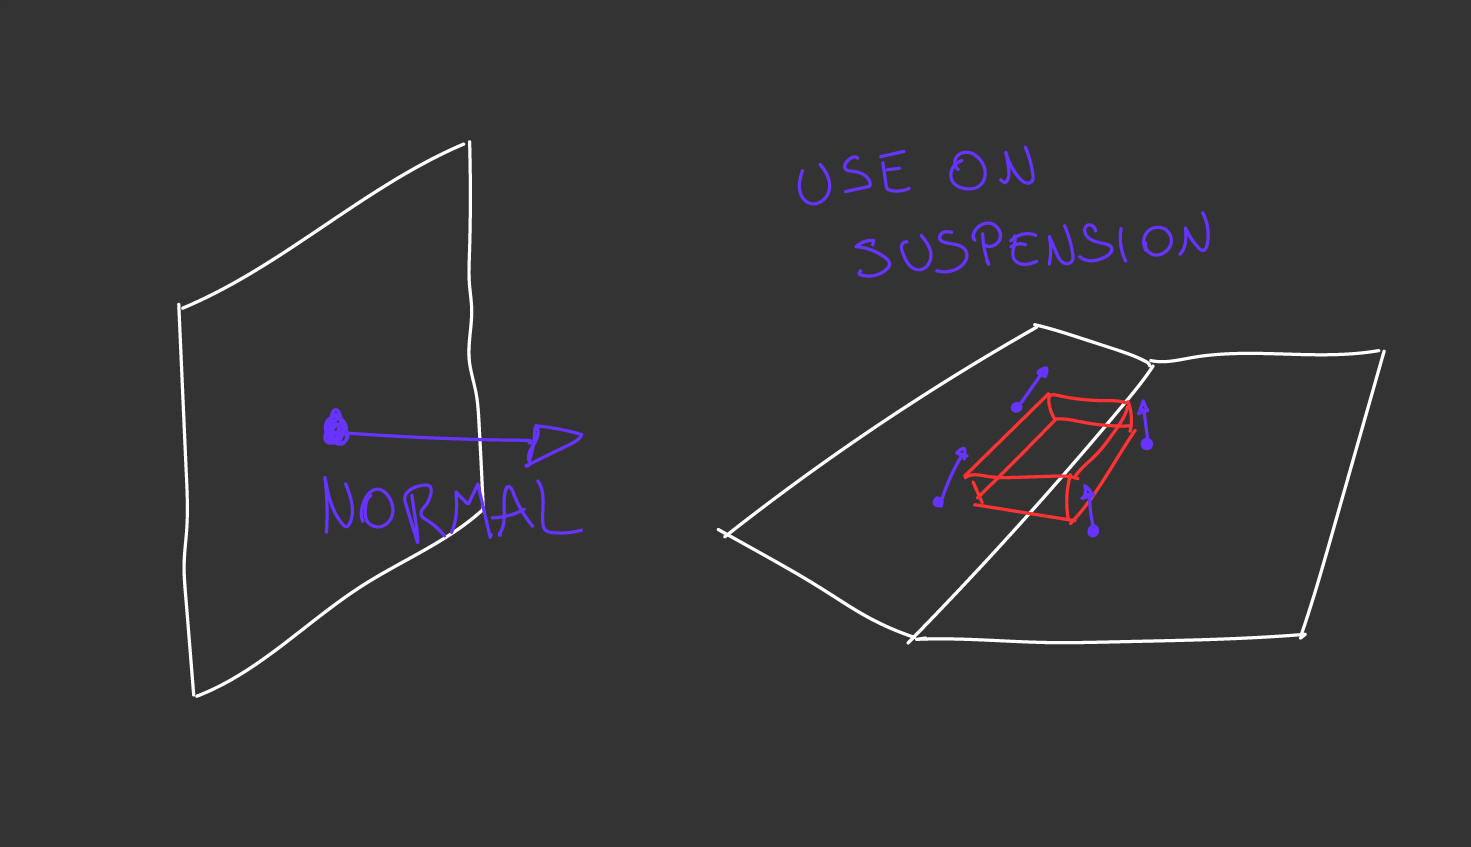
First we can cache the wheel direction, so we can later on use it for the acceleration:
wheel.CurrentDirection = FVector(FMath::Cos(angleInRadians), FMath::Sin(angleInRadians), 0);
But more important we should add the new variable Grip, this basically will tell how much of the lateral force will be applied to the wheel, in other words, if the wheel has low grip, the lateral resistance force applied on them will be lower, this will give you more tools to personalize the steering of the car, you can test what happen when the Grip of the rear wheels are lower than the front ones, and vice versa. Also you could implement different grip for different surfaces, you can have a road with 100% grip and maybe ice with 30% of grip. To add this simply multiply the grip by the LateralResistance Force
FVector lateralResistance = perpendicularDirection * -sideRatio * SteeringForce * wheel.Grip;
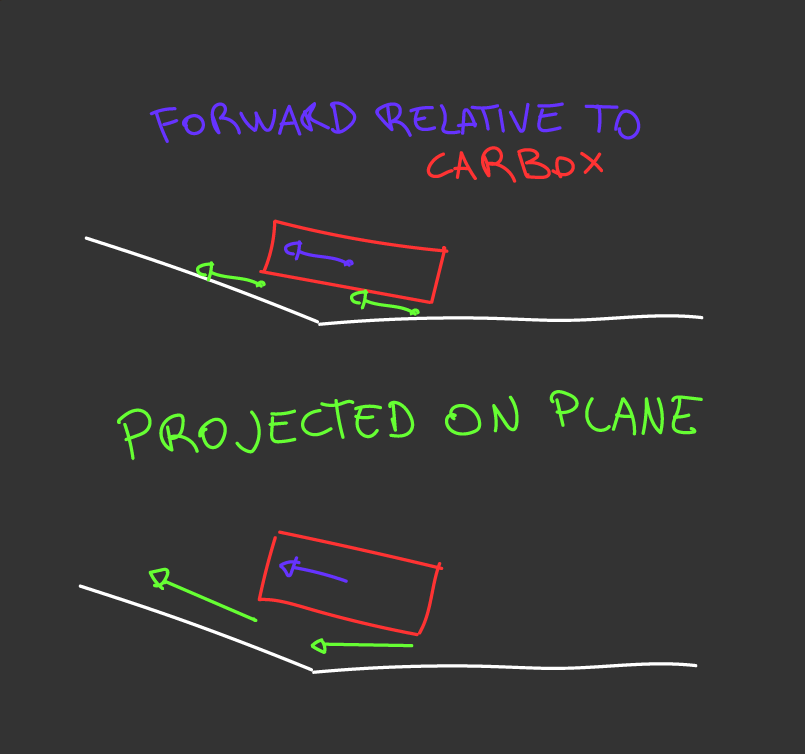
For the acceleration there is a small improvement we can make, now that we have the ground normal we can make a projection of our forward vector to the ground plane, this basically will result in a vector completely parallel to the ground, this will be more correct, as the wheel should roll parallel to the ground. To do this we simply get our already calculated acceleration force and projected on to the ground normal, and we are going to use our new projectedVector instead.
FVector accelerationForce = CarBox->GetComponentTransform().TransformVector(wheel.CurrentDirection * ForwardForce * AccelerationInput);
FVector projectedVector = FVector::VectorPlaneProject(accelerationForce, wheel.GroundNormal);
CarBox->AddForceAtLocation(projectedVector, wheel.CurrentWorldPosition);
The last improvement we want to make is about the Center Of Mass (CoM from now on), this property is really important to make the car more stable, for example if we want to make the car roll less to the sides, we can lower the CoM, and by simply physics this adjustment will make the car's floor remain more parallel to the ground.
But the CoM is really important also for the forces we are adding to the car, there will be different results if we apply the forces below or above relative to the Z axis of the CoM. For example you probably notice how when a real car brakes the upper part of your body wants to continue moving forward, and the opposite when the car accelerates, this is because the braking and acceleration forces are being applied below the CoM, and that makes the car tilts forwards or backwards, if we apply the forces above the CoM we will have the completely opposite behavior.
But be aware, applying the forces too far from the CoM and it will make the car more unstable, for example if the acceleration force is applied too low from the CoM, the front of car will be elevate from the ground and the car will try to flip itself.
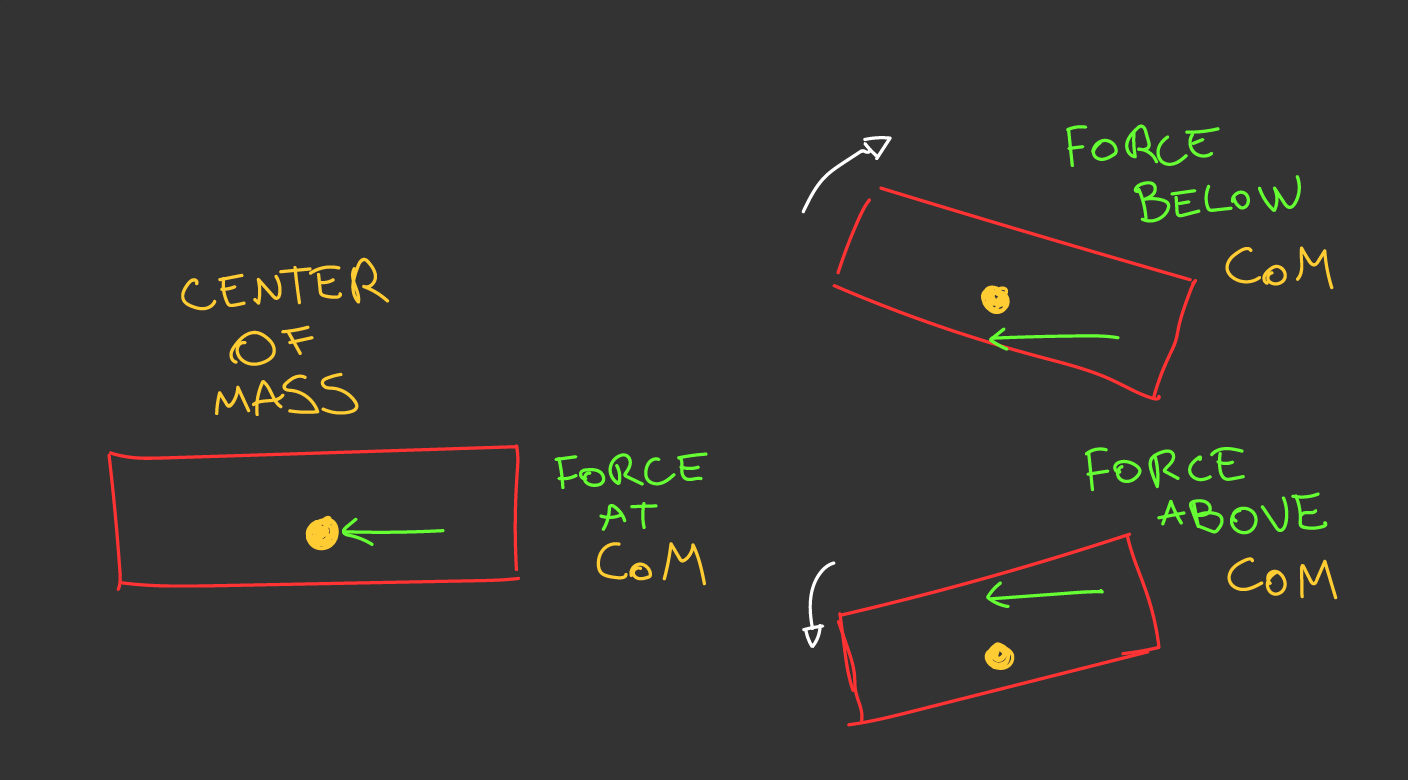
So basically what we want to do is to get the Z axis of the CoM, we dont need X and Y as these will still be the position of the wheel. Now lets make a variable called CoMVerticalOffset and this will be how lower relative to the Z axis we want to apply the forces. now when we are adding the acceleration and steering forces, we should use the result between CoM Z axis + CoMVerticalOffset
In code I simply calculated this when the Car spawns
FVector localCenterOfMass = CarBox->GetComponentTransform().InverseTransformPosition(CarBox->GetCenterOfMass());
for (FCarWheel& wheel : Springs)
{
    wheel.ApplyForcesLocalPosition = FVector(wheel.LocalPosition.X, wheel.LocalPosition.Y, localCenterOfMass.Z + CoMVerticalOffset);
}
And then in the suspension, when we calculated to CurrentWorldPosition we are going to also calculate the ApplyForcesWorldPosition and cache it for later.
wheel.ApplyForcesWorldPosition = CarBox->GetComponentTransform().TransformPosition(wheel.ApplyForcesLocalPosition);
Now when we apply our Acceleration and Steering forces we should use this new Location instead of the CurrentWorldPosition. Now you can test for yourself what happen when applying the forces directly, below or above relative to the CoM.
By now I really hope you were able to follow the guide step by step and have a functional car, there is still a lot to improve, if you check the code is still really simple, but i think is your job now to improve it into your own needs. Some things that need a little bit more of work is Acceleration and Grip, these are constant values now, but in the real world the acceleration forces changes over time, and the grip becomes lower the faster the wheels are rolling, you can make simple solutions for this or complex ones, it always depends of what you are looking for.
Nice guide but your car is simply a cube, how can we add a body mesh for the car? Easy, what you need to do is to add your car mesh as a child of the CarBox, this way the mesh will "follow" the CarBox. And you maybe wondering how to properly animate the wheels, you will need to set up your own animations to it, the wheel can roll, steer, and move vertically, you already have all this information to make it work:
FVector velocity = CarBox->GetComponentTransform().InverseTransformVector(CarBox->GetComponentVelocity());
float wheelCircunference = PI * wheel.Diameter* 0.01;
float wheelRPM = ((velocity.X * 0.01) / wheelDiameter) * 60;
With that you should be able to create good animations for the Car, but is your job to do it, as it will depends on your selected engine.
Last but not least important, I wanted to give you some resources that help me creating this physics system and this guide.
And if you want to continue submerging into the vehicle physics topic, I recommend you these two GDC talks, they are 1 hour long each but I fully recommend it.
I'm not an expert on this topic, and all the information I post in this guide I learned by myself just by researching, so I might be wrong in some things, if you spotted something that seems odd, comment on it and I will try to address it.
Also this guide was made to help others, so what is most important to me is that you have an easy time understanding it, if you feel that something was not completely clear, if you have any doubt about any step of the guide, or if you have any feedback about the guide, feel free to comment it, I'm completely open to it.
Now lets have some FUN making videogames!
Did you like this post? Tell us
Leave a comment
Log in with your itch.io account to leave a comment.