Have you ever wanted to add a dialogue system to your Unity game but have no idea where to begin? Well fear not! In this blog post I'll be sharing an awesome tutorial by Brackeys on how to do just that. By the end of this tutorial, you'll have a functional dialogue system that is simple yet robust, highly customizable to fit your individual needs.
Starting with an empty 3D project, let's build the UI first. To begin, create a canvas; I like to name mine UIManager, but feel free to name yours whatever makes the most sense. We will then create two children components of UIManager; an image called DialogueBox, as well as a TMP button called TestButton; DialogueBox will contain the visual elements of the dialogue system, including the dialogue itself as well as the name of the speaker. TestButton, for the purposes of this tutorial, will be how we initiate the dialogue.
Next, we will create 3 children components for the DialogueBox image; two TMP text objects called Name and Dialogue, as well as an additional TMP button called ContinueButton to advance the dialogue. From there, position the Name, Dialogue, and ContinueButton objects to wherever you please within the DialogueBox image. Pro tip: to make things easier to visualize, enter 2D mode using the button to the left of the inspector window, select the UIManager canvas, and press the F key to focus in on it. At the end of this step, here is what your hierarchy (and my UI as an example) should look like:
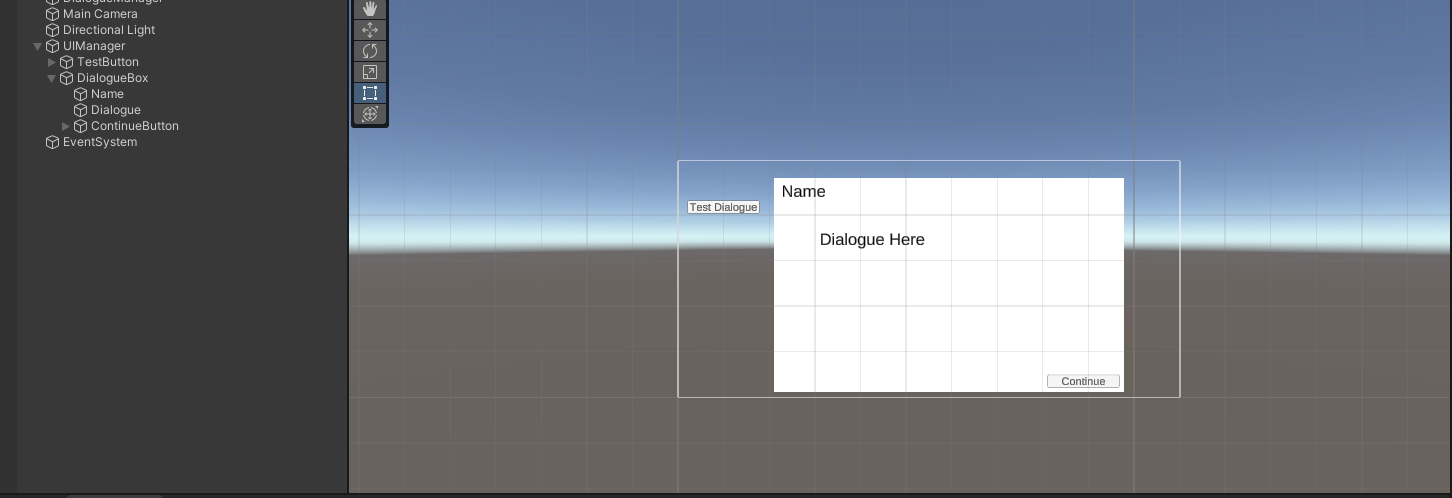
Like I said before, the layout of the Name, Dialogue, and ContinueButton components is up to personal preference, but this is how I decided to format mine. I also found it very helpful to use the anchor preset system to bind Name and ContinueButton to the top left and bottom right corners respectively- that way, should you decide to resize the DialogueBox, Name and ContinueButton will move along with it.
Once we have the UI set up how we want, it's time to move on to writing scripts so our dialogue system can do more than just look awesome. We will use a total of 3 scripts, so be sure to create a Scripts folder in the Assets window to keep things organized. To begin, we will create the first script titled DialogueManager; as implied by the name, this will be the brains of the system. Before we write it, however, we need a place to attach it. Create an empty GameObject also titled DialogueManager and attach the script to it.
Next, open the DialogueManager script, and we can immediately axe the Update method. In order to store the sentences we will later display in the DialogueBox, we will be utilizing the Queue data type. Your first thoughts might be to use a standard Array, but the FIFO (first in, first out) nature of Queues makes it a much more appropriate way of solving our problem. If you're a tad rusty with Queues, not to worry! Here's a quick little refresher. Name your Queue something intuitive, and be sure to declare it as a Queue of strings. Finally, initialize it in your Start method. At this point, your DialogueManager script should look like this:

Our next step is to create the script that will contain the details for the dialogue itself; this dialogue class will be passed to the DialogueManager whenever we decide to initiate a conversation, and as such will store all needed information related to said conversation. Return to Unity (after making sure to save DialogueManager) and create an additional script titled Dialogue. IMPORTANT: since this script will solely be used in communication with the DialogueManager, it does not need to inherit from MonoBehavior. The script is relatively short, so I will show it in its entirety and explain each line.
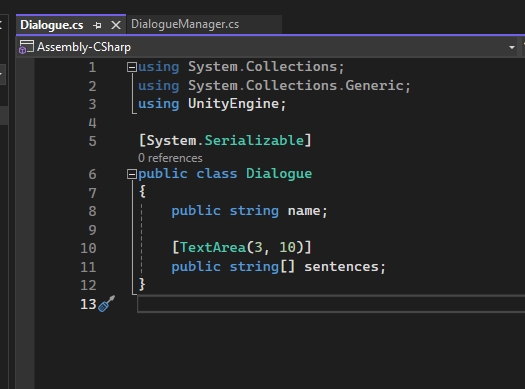
Firstly, designating the class as [System.Serializable] allows the subsequent fields to become visible and editable from within the inspector. The string variable "name" will be used to identify the person speaking during dialogue. "sentences" will store the strings that will be fed into the Queue within the DialogueManager, and TextArea will define the minimum and maximum lines of dialogue the text area will use. Once again, note that Dialogue does not inherit from MonoBehavior.
That's great! We have our manager set up, and configured our Dialogue to contain all the necessary information. Now, we need a way to activate our system, which is where our 3rd script comes into play. Create a final script called DialogueTrigger; once again, names here are entirely subjective. However, since this will be the script that initiates the dialogue, it should be named to reflect that purpose. For now, DialogueTrigger is going to live attached to the TestButton component, so be sure to attach it. We haven't touched that component in quite a while, so just as a reminder it's a child of the UIManager canvas!
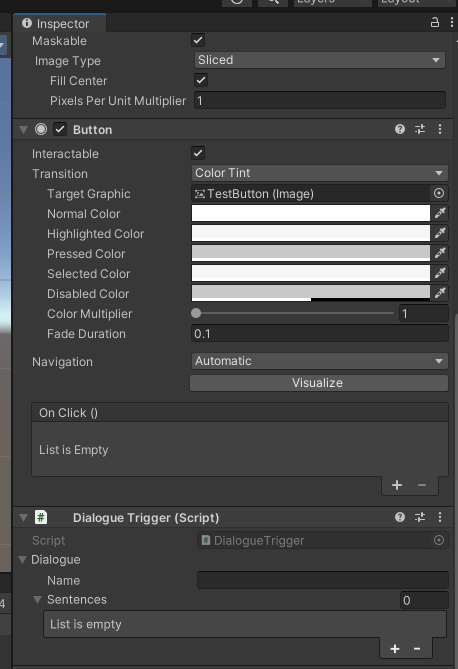
Now back to DialogueTrigger. Unlike Dialogue, DialogueTrigger will inherit from MonoBehavior so we can leave that part alone. Remove the Start and Update methods, and declare a public variable of the type Dialogue we just created, name it as you please, and BOOM! Returning to Unity, we can now select the TestButton component, click the Dialogue and Sentences dropdown, and we are free to start writing dialogue with a name and sentences as we wish! To check in, here is what you should see when viewing TestButton in the inspector:
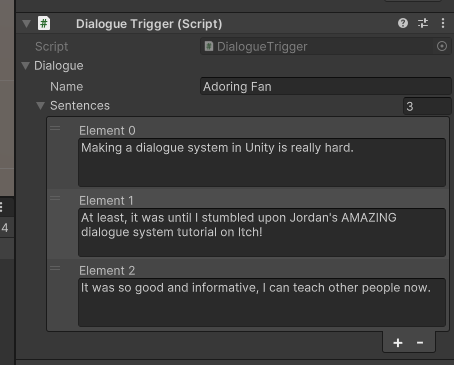
Now, let's populate this with something more interesting. Using either the + button or setting the number of sentences statically, let's set a name and write a little story. Here's mine:
In case you haven't heard it today, you're awesome! So far, we've made some great progress on our dialogue system, but right now our dialogue exists only within the inspector. We need a way now for DialogueTrigger to communicate with the manager, and ultimately get our dialogue on-screen.
To start, let's revisit our DialogueTrigger script. We're going to make a new public method in order to trigger the dialogue. I named mine, no surprise, TriggerDialogue, but you can name yours whatever you'd like so long as its purpose is clear. Our goal now is to locate our DialogueManager and then do something once we've found it. We can do so with the following on line 11:
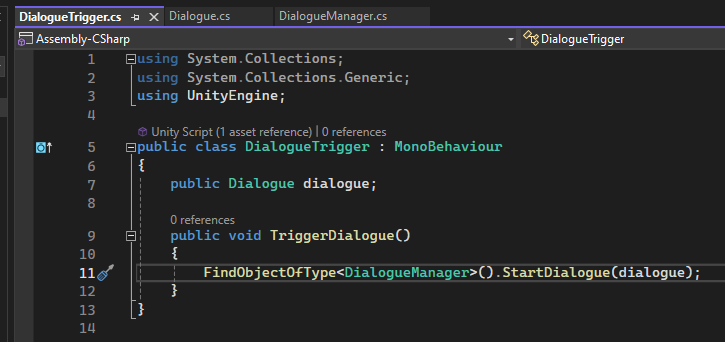
You may be wondering what StartDialogue is, and the reason why is because it's a method that doesn't exist yet! Let's head back to our DialogueManager script and code that method into existence.
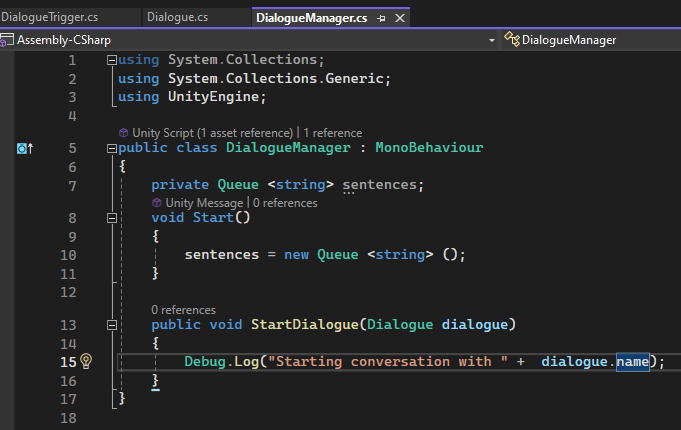
As you can see, we have made a new public method called StartDialogue, which takes in an argument "dialogue" of the type Dialogue (the class we made earlier!) I get there's a lot of "dialogue" going around, so if things start getting messy feel free to deviate from my naming conventions. For now, all we will do in StartDialogue is add a Debug.Log statement with the name of the person we're having a conversation with to confirm things are working properly.
Let's head back to Unity and test our new method. Navigate to the TestButton component. Add an on-click event, click the dropdown menu, and select DialogueTrigger -> TriggerDialogue. Next, drag in the TestButton object from the inspector onto the on-click event. Now when you view TestButton in the inspector, this is what you should see:

Now when we enter play mode and click the TestButton, StartDialogue should execute, printing: "Starting conversation with (whatever you entered in the Name field)" to the console tab within Unity. Drum roll...

Success! We now have a way to trigger our dialogue system. However, there is still more to be done. All we're doing right now is printing that statement we put in Debug.Log. What about that awesome Queue of sentences we worked so hard to create? Let's get that taken care of next.
Use the bathroom, drink some water, walk around and grab a snack. When you're ready, let's dive in and head back into the DialogueManager script. Our next task is to take the Queue of sentences we set in the inspector, and load it into the script. Once again, the additions to DialogueManager are not super extensive for this part, so I will post the updated code and walk through it.
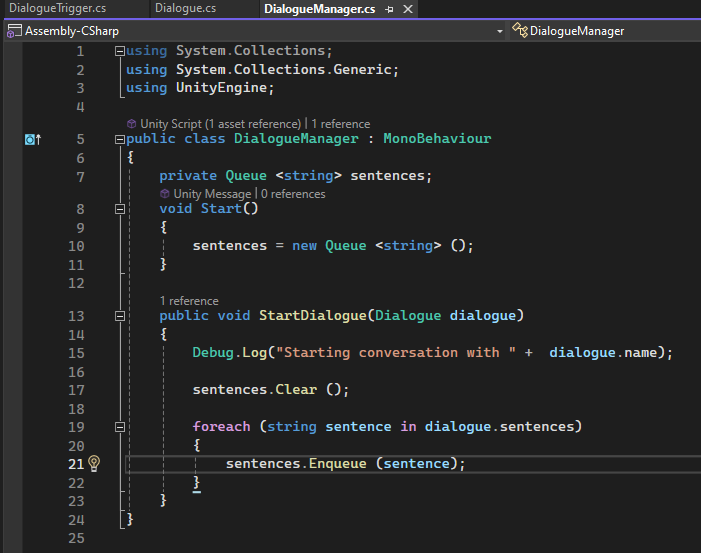
Starting on line 17, the first thing to do is clear the sentence Queue. We don't want any lines from the previous dialogue session to accidentally carry over into the next, so this little preventative measure handles that case. Lines 19-22 are how we load the Queue with our sentences. Remember back in the Dialogue class, how each instance has an array of strings? We're looping through that array, taking each one, and Enqueueing (Queue vocabulary for placing or inserting) each one into our sentence Queue. Not so bad, right? Next, we need to display them.
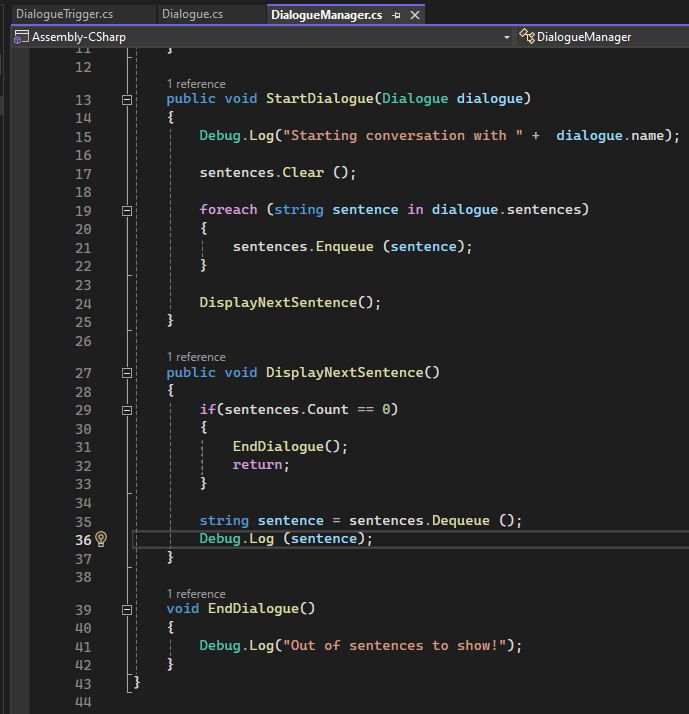
After we finish populating the Queue with all our sentences, we make a call to DisplayNextSentence on line 24. This method does two things: first, it checks to make sure there are even sentences to display. If not, it calls EndDialogue which informs us of such, and then returns from the method. If there are still sentences waiting to be displayed, it Dequeues (Queue vocabulary for removing) the next sentence and stores it in the sentence variable, as shown on line 35. Then, just like what we did earlier printing the name, let's test it and see if we can get the first line of our story to print to the console:

Perfect! We were able to grab the first sentence from our Queue and print it to the console. But what about the second sentence? Or the third, fourth, fifth, ...Nth? Now it's time to make our ContinueButton work. Luckily, it's a super easy process. First, let's find it in the inspector and add an on-click event. Remember DialogueManager? (The GameObject version!!!) Grab it, and attach it to the event. Next, click the dropdown and navigate to DialogueManager -> DisplayNextSentence. Now, by pressing Continue, we should be able to see our entire dialogue play out line by line in the console:

It works!!! But, we don't want to see our dialogue in the console. We want it in our super cool dialogue system UI! Once again, back to DialogueManager (the script this time!). Before we update the methods, we need to add the following two statements to the very top of the file (the preprocessor directives): using TMPro, and using UnityEngine.UI. Note- things will go very wrong if these are absent! Here are the remaining additions to the C# file. Firstly, add these two variables below the sentence Queue declaration:

These will be what we use to update the actual UI with our dialogue information. Next, we can go back inside StartDialogue and add the following:

and for our dialogue:
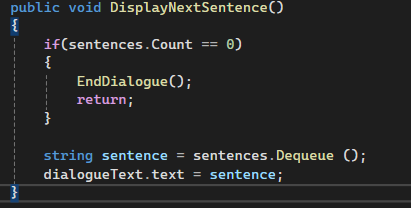
With these alterations, we're taking the name and dialogue text we set from within the inspector and setting them to nameText.text and dialogueText.text respectively. We can also omit the Debug.Log statement which originally was printing our sentences to the console.
To see these changes in action we just need to drag in the Name and Dialogue components into the DialogueManager GameObject back in Unity. Here is what the DialogueManager GameObject should look like in the inspector:
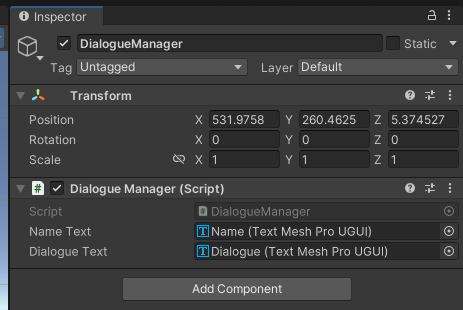
Now, all we need to do is enter play mode, begin our conversation with the TestButton, and we should be able to see our story finally appearing in our beautiful UI:
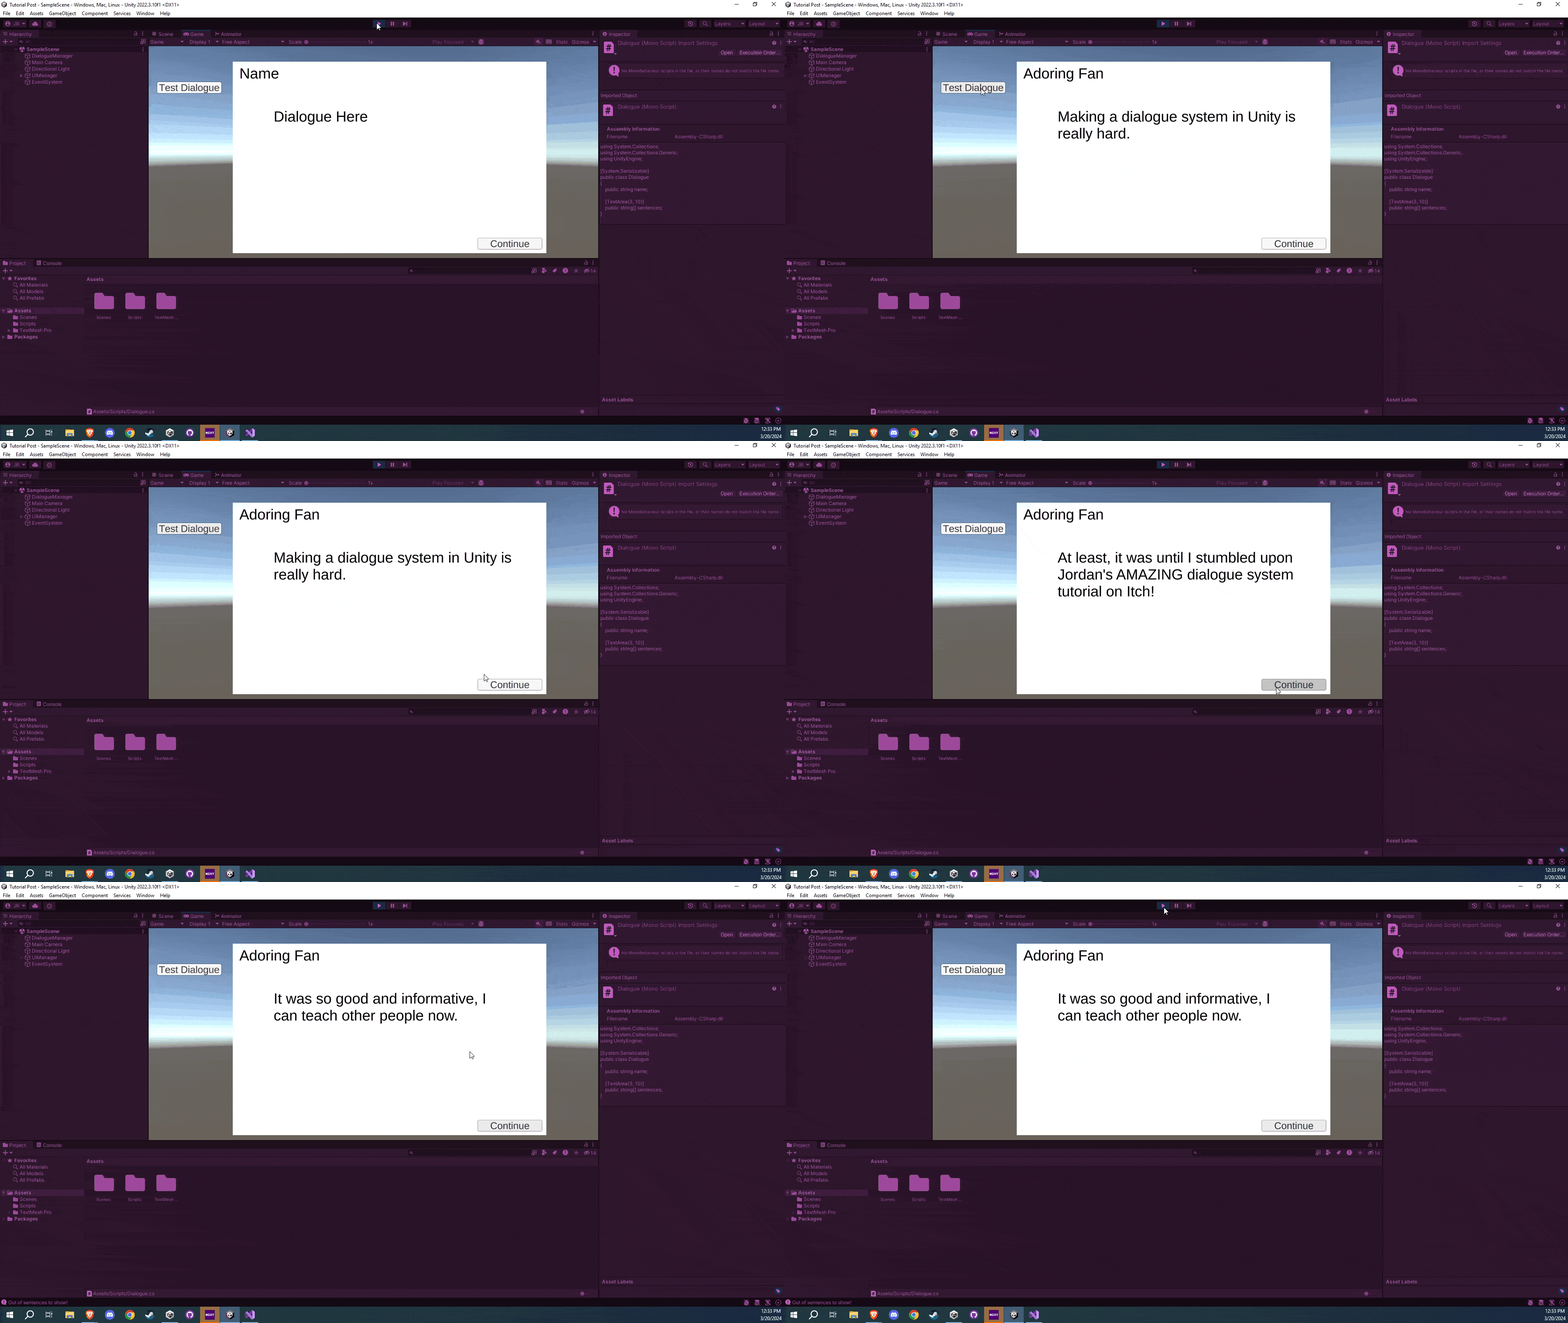
Sweet! We've gone from having our dialogue play in the console to fully porting it over to our UI display. But, I think we can make it look a little nicer.
Right now, when we run out of dialogue lines to display, all that happens is that we get a message printed to the console. Normally, when there are dialogue boxes in games, it's intuitive to believe they would disappear once the dialogue has been exhausted. With that in mind, let's add a simple animation to our DialogueBox to accomplish this. We'll need to take advantage of Unity's Animation system; if it isn't already there, it will be very helpful to have the Animation tab as a part of our Layout somewhere. You can find it by clicking Window -> Animation -> Animation. Personally, I like to have my Animation tab at the bottom left of my layout, in between the Project and Console tabs. Before we begin animating things, let's first make an Animation folder to store it.
Next, select the DialogueBox in the inspector. Tabbing over to Animation, you should see an option to create an animation clip:

Go ahead and click create; we are going to create a total of two animations, one for when the dialogue box is open, and another for when it is closed. Let's start with open.
Once you have created the animation file, hit the red record button at the bottom left corner of the screen. To insert a keyframe, copy DialogueBox's current Y position value. Hovering over "Pos Y" in the inspector will allow you to scrub left or right, lowering or raising the value respectively. Go a little in both directions, then paste back in the original Y position value you copied. You should see two things:
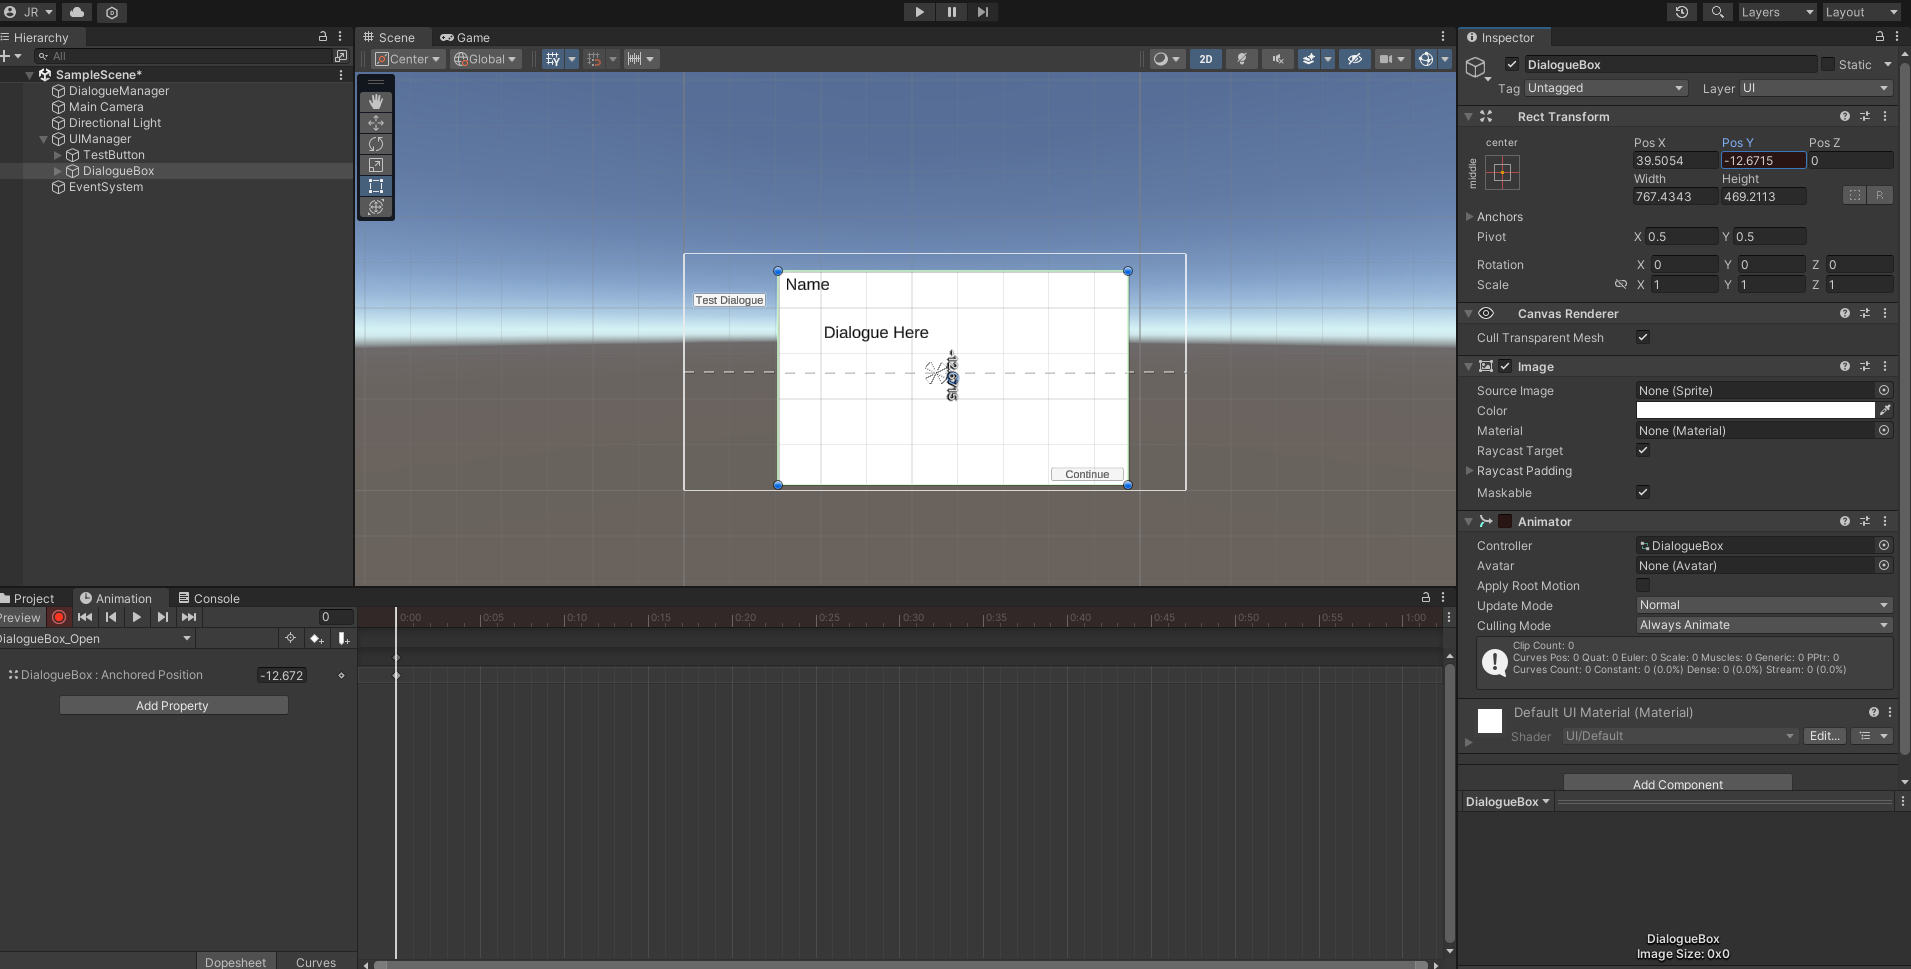
Firstly, note the white vertical line with the two dots. That shows that a keyframe has been successfully created. You may also notice that the Y position box is red; all this means is that the Y position has been altered during the the animation clip. We are now ready to make our closing animation. Click on the dropdown next to DialogueBox_Open, select Create New Clip, and make a second file called DialogueBox_Close (or equivalent). We want our dialogue box to move offscreen once the conversation is over, so after you hit the record button, select the DialogueBox in the inspector, and drag it offscreen however you'd like; I chose to drag mine downwards. Pro tip: if you click and start to drag then hold down the Shift key, it will lock the movement to only one axis! After you drag it away, hit the record button again to end the recording.
After creating the two clips, we need to adjust them so that they work the way we want; again, click Window -> Animation, and this time select Animator. Here is what you should see:
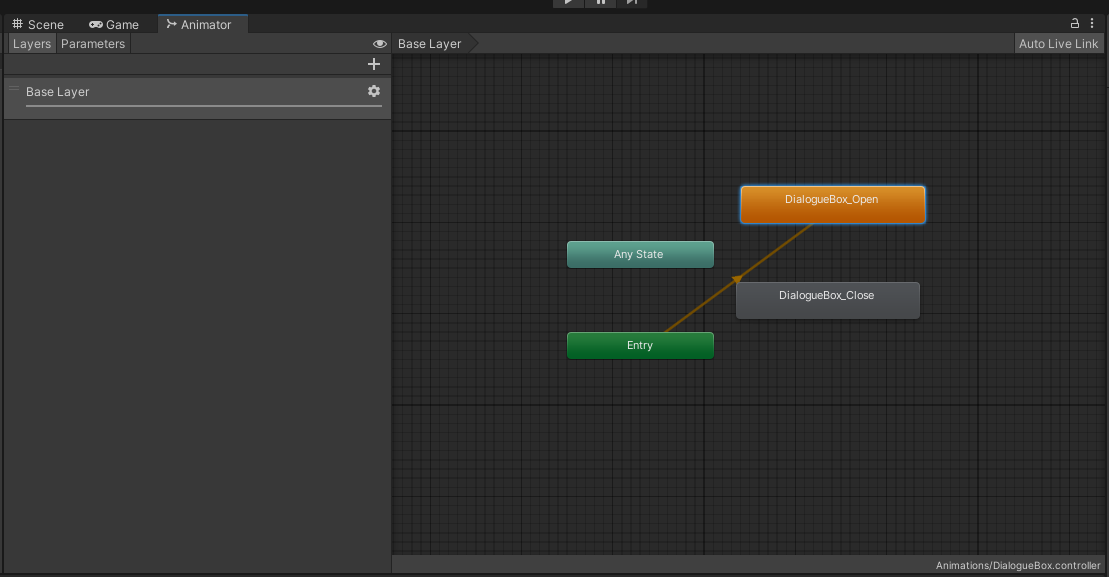
Here we can see the two states for our DialogueBox: DialogueBox_Close and DialogueBox_Open. We want to start off in the DialogueBox_Close state, so right click DialogueBox_Close and select "Set as Layer Default State". You should notice that Entry is now connected to DialogueBox_Close instead of DialogueBox_Open. We will use a Bool variable to control which state we are in. At the top left of the Animator window, select Parameters, click the + sign, select Bool, and name it isOpen (or whatever you'd like, just remember what you name it); this will tell us, expectedly, whether or not our dialogue box is currently open or closed. Since it is closed by default, make sure the box next to isOpen is not checked.
Next, we need to add transitions between DialogueBox_Close and DialogueBox_Open. Right click on DialogueBox_Close, select Make Transition, then click on DialogueBox_Open. Do this again but now from Open back to Close:
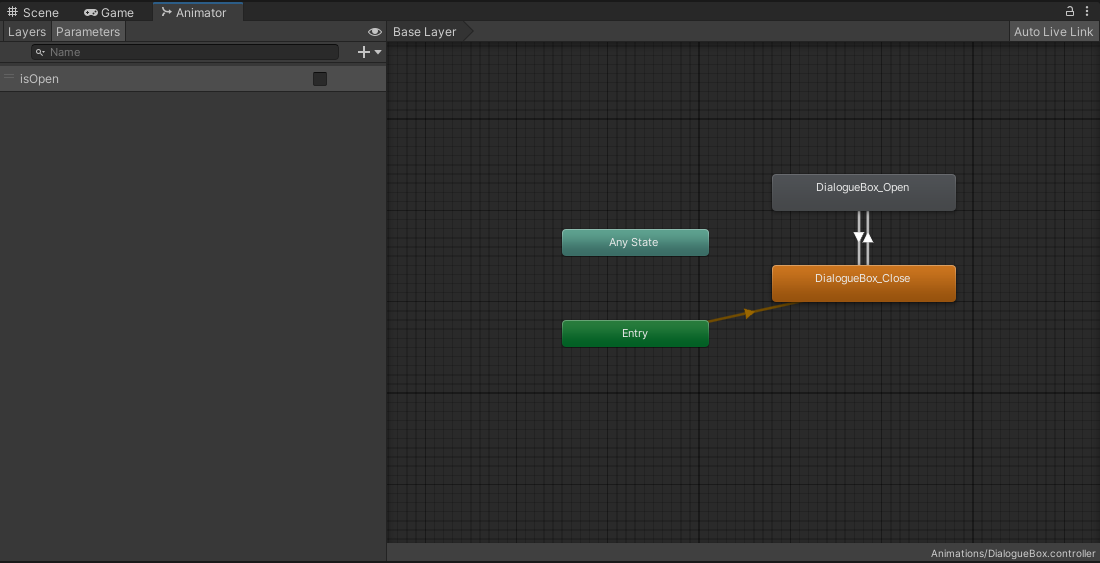
Next, we need to add conditions so that the transitions can actually take place. Click on the transition (the white arrow) from Close to Open, click the + sign on the Conditions list, and make sure isOpen is set to true. Then, do the opposite; select the transition from Open to Close, add a condition, and be sure that isOpen is false. Additionally, be sure to unselect "Has Exit Time" in both transitions, as this can lead to strange timing with the animations.
In order to control the animation, we need to create a reference for its component in our DialogueBox GameObject. Returning to our DialogueManager script, all this takes is a few additional lines of code. At the top of the script, create a new public Animator and call it animator. Then, in our StartDialogue method, we can use that animator variable to access our isOpen condition and set it to true, thus triggering the animation, via line 20:
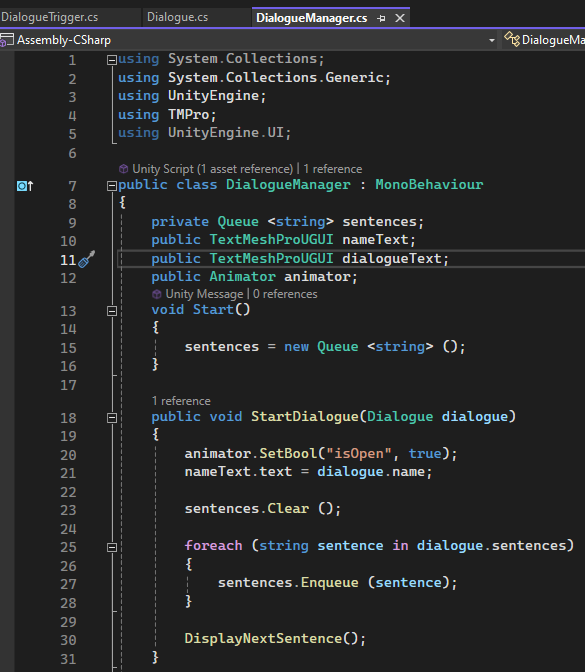
Be very careful here; on line 20, the first argument SetBool accepts is a string. It needs to match exactly to the name of the Bool we defined back in the Animator tab, otherwise it won't know where to look. I spent a lot of time debugging this process, and it turns out I named by condition "IsOpen", but within the script I was trying to access "isOpen". We can now also replace the Debug.Log statement in EndDialogue with the same code on line 20, except now we set it to false.
Next, let's return to Unity. Inspecting the DialogueManager GameObject, we can see there is a new public field in addition to the two for the Name and Dialogue; it is a new one for the animations we just created. Since the animations are attached to the DialogueBox, all we need to do is drag it onto the manager. When you start the scene. you should notice that the dialogue box is absent, and that initiating the dialogue with the TestButton will cause the DialogueBox to ease on screen. Once the dialogue has completed, it should ease off screen as well.
Let's add one last bit of polish to our dialogue system, and configure the dialogue to be written to the DialogueBox letter by letter. To accomplish this, we can take advantage of coroutines; back in DialogueManager (for the last time now, you're almost done!), add the following:
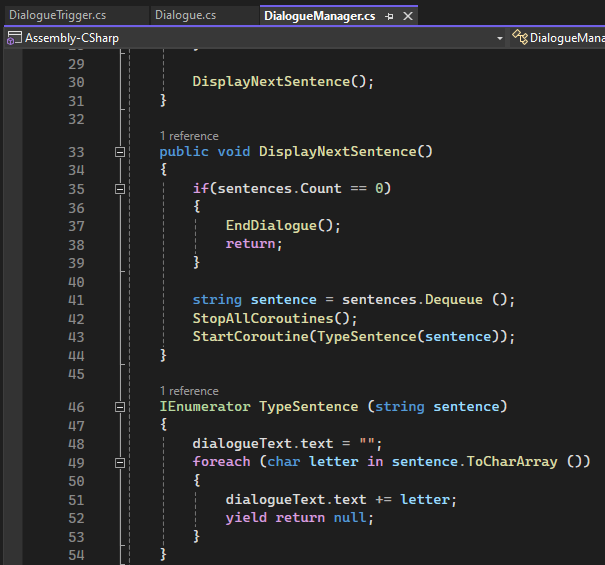
The first change occurs on line 42; StopAllCoroutines makes sure that we don't accidentally have two running at the same time, which in the context of an in-game dialogue, shouldn't be the case. On the next line, we make a call to our coroutine, passing in our Queue element "sentence" as an argument. Lines 46-54 are the actual coroutine itself: first, on line 48 we reset the text of dialogueText to an empty string to make sure there is no text leftover from a previous dialogue (similar to how we clear the sentence Queue in StartDialogue). Next, we convert each sentence into an array of characters, and using the char iterator "letter", loop through and append each character to our dialogueText one by one, waiting one frame in between. With this, in combination with the nice animations, our dialogue system is complete!
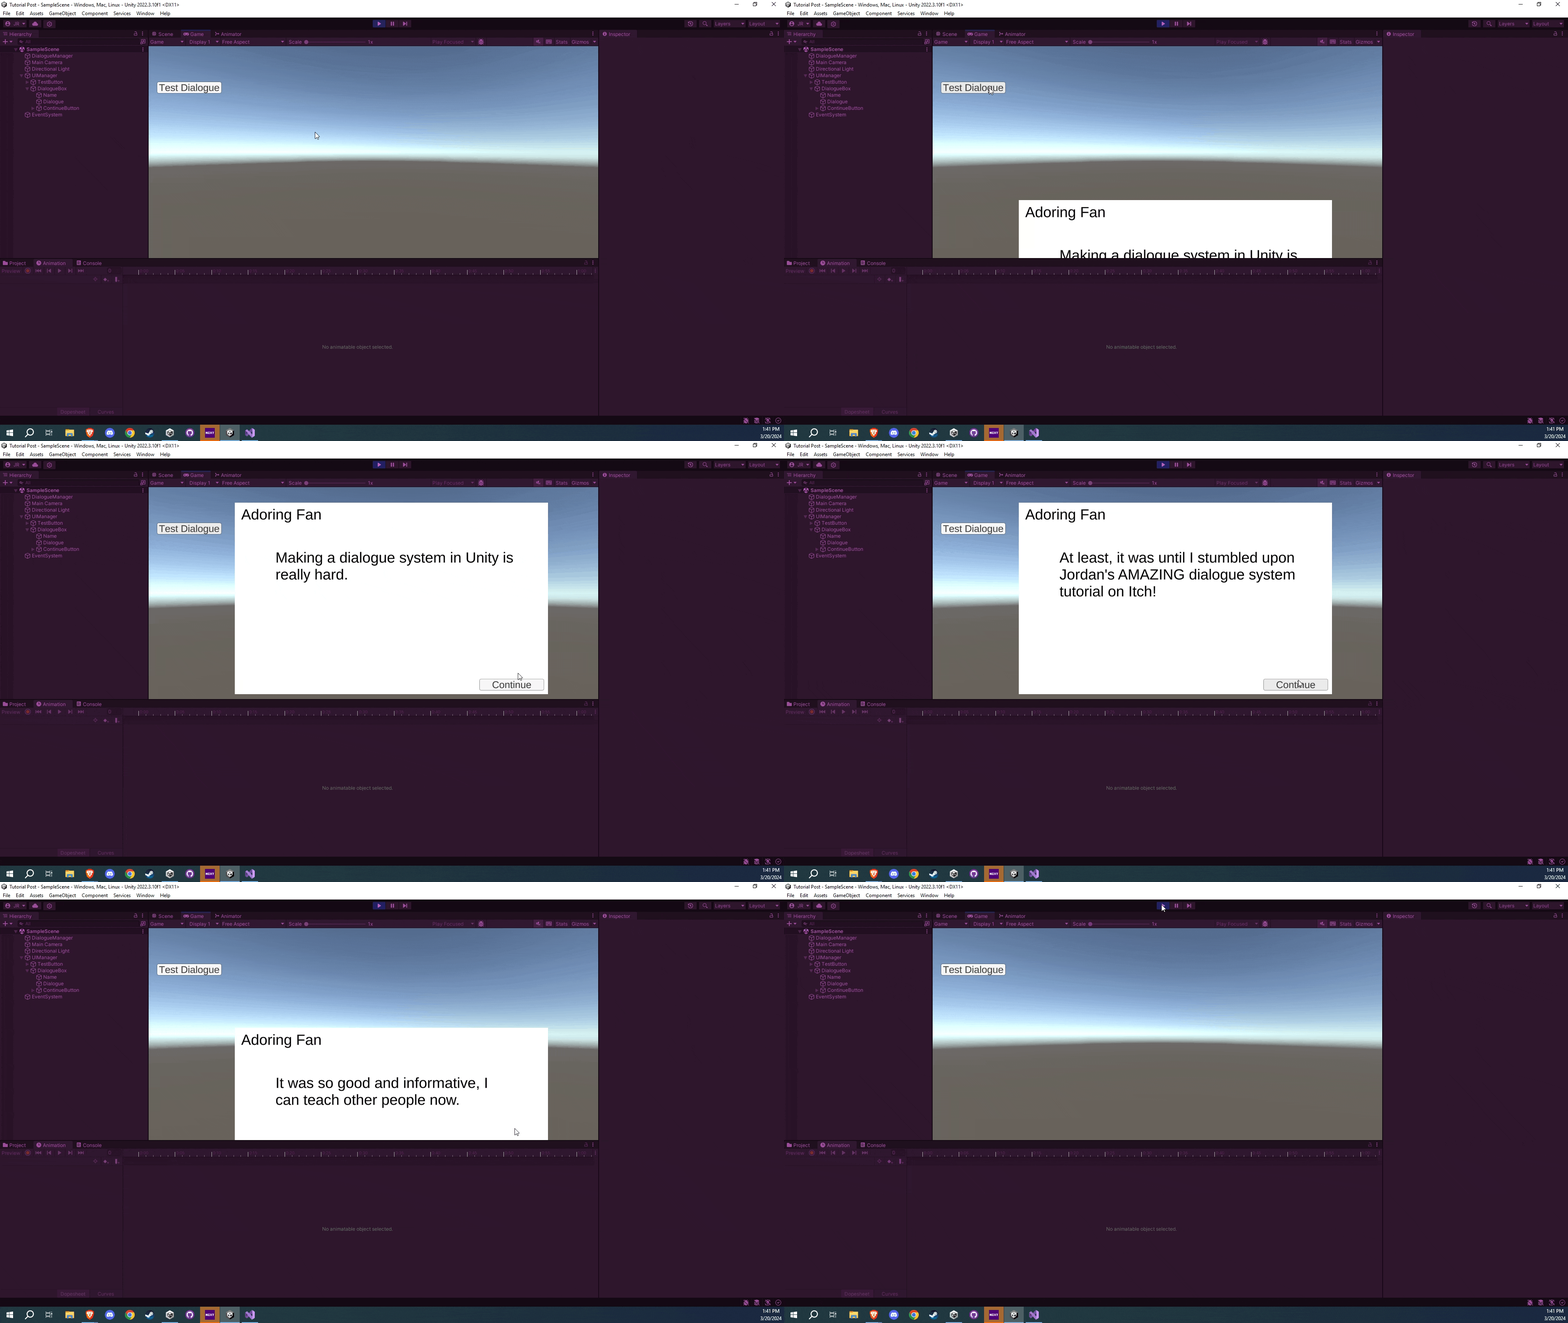
Throughout this tutorial, we learned how to make a simple yet highly customizable dialogue system within Unity. We started small, having conversations in the console tab, to being able to display our dialogue in a nicely formatted window, complete with animations and letter by letter printing. Thank you for taking the time to read through this tutorial, and I hope it serves you well!
Did you like this post? Tell us
Leave a comment
Log in with your itch.io account to leave a comment.
Some other thoughts: looking back, I noticed the text was being displayed VERY fast. I like to be able to read the dialogue at or around the same speed it's being displayed on screen, so I thought I should slow things down a bit.
In the coroutine within DialogueManager.cs, I defined a new float called waitTime and set it to .025f. Then, instead of yield return null, I made a call to Unity's built-in WaitForSeconds() as follows: yield return new WaitForSeconds(waitTime). I feel this change really helped to make things more natural, and if you decide it's too fast or too slow, it's very easy to customize.
Run into trouble along the way? No worries! If you need to un-stuck yourself, you can head on over to my GitHub where I have published the code here!