Here I will explain how I got simple player hosted sessions working in my game Combat Beans, then I`ll talk a bit about additional problems I encountered that you might find useful for your own projects in the future. I won`t go into much detail about basic things like creating the UI front end, buttons to host / find servers, etc. I want to focus on the core features and how to get them working, because just taking a quick look online and you`ll see how many problems people are having.
You REALLY need to test all this on 2 computers with 2 different steam accounts. I don’t recommend trying anything here if you only plan to test locally. It just doesn’t work properly and you`ll never really be able to debug it, because most of the functions don’t give specific error outputs, and most errors in the output log raise more questions than they answer.
If you don’t have 2 computers, ask a friend politely to help. If they don’t help, find new friends to help, and ditch the dead weight.
Firstly, you need to install the Advanced sessions plugin. It can be downloaded here.
https://vreue4.com/advanced-sessions-binaries
Download the correct plugin for whatever version of unreal engine you`re using. In this tutorial, I`m using 4.27. Once you have it, extract the contents and place it into the Plugins folder in your projects directory. If you don`t have a Plugins folder there, make one. The folder structure will be Project/Plugins/AdvancedSessions/ and inside there, you should have AdvancedSessions, AdvancedSteamSessions, ExampleBlueprints, LICENSE and README.md.
Once that`s done, open your project and go to plugins. Find “Advanced sessions” and “Advanced Steam Sessions”, and enable them both. Restart the editor.
Now, we need to correctly set up the DefaultEngine.ini config file. This was a pain for me, because up to now I only used dedicated servers in my game and the settings were very different. This file is found in the Config folder of your project directory. In the file, make sure these are the settings you`re using. At least, these worked fine for me.
[/Script/Engine.GameEngine]
+NetDriverDefinitions=(DefName="GameNetDriver",DriverClassName="OnlineSubsystemSteam.SteamNetDriver",DriverClassNameFallback="OnlineSubsystemUtils.IpNetDriver")
[OnlineSubsystem]
DefaultPlatformService=Steam
[OnlineSubsystemSteam]
bEnabled=true
bUseSteamNetworking=true
bUsesPresence=true
bInitServerOnClient=true
SteamDevAppId=480 (I used my own steam app id for these)
SteamAppId=480
Note: the SteamAppId and SteamDevAppId are only 480 for testing purposes. You will need to change that to your own game app ID when you package your build. And in fact I recommend you do that asap. The 480 AppID is public, and it being used by many people at the same time. This can fuck with your testing so I highly recommend you use your own AppID from the start, if possible.
Also, make sure you close your editor AND Visual Studio (or whatever IDE youre using, assuming you built ue from source) BEFORE changing and saving this file. Once its saved, then you can open the editor and your project.
The settings to get steam sessions working for me were in direct conflict with the settings for my dedicated server. If you`re packaging a dedicated server build as well, you can change the config settings to whatever you need to. The client and server can have different config settings (at least in this case) without their being a version mismatch.
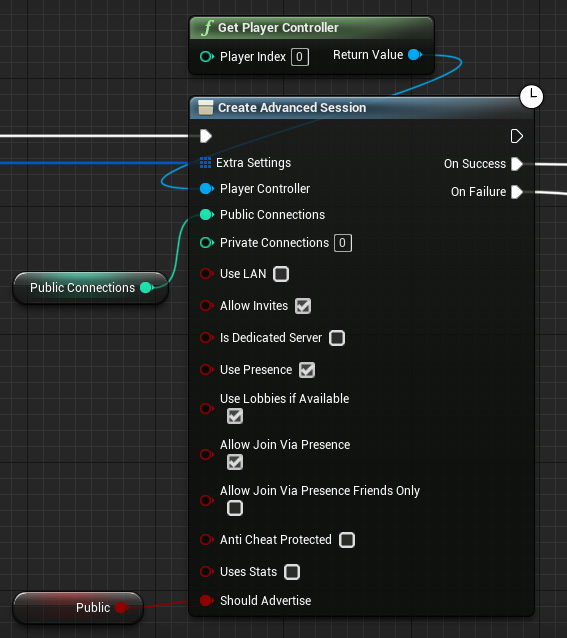
To create a session you use the function “create session advanced”. The settings I use in my game are as follows. Some of these are specific to your own game, such as public connections (max players).
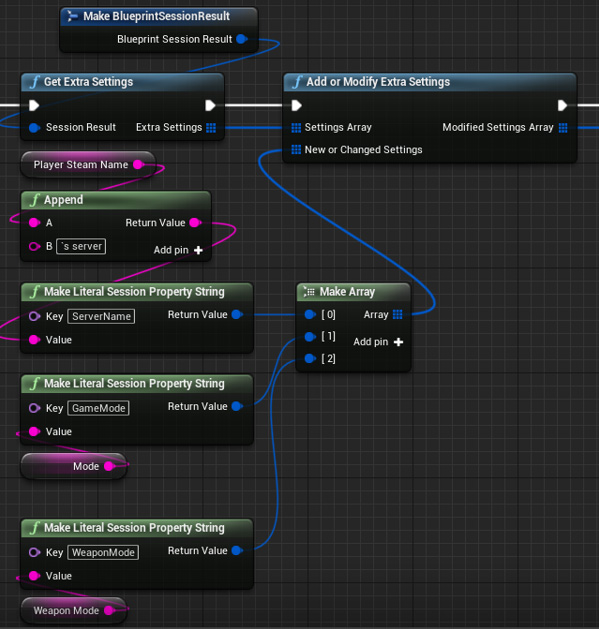
Lets say you want players to see the name of the server, or the game mode it is running, or what kind of weapons you can play with on that server. This is done with “Extra Settings”.
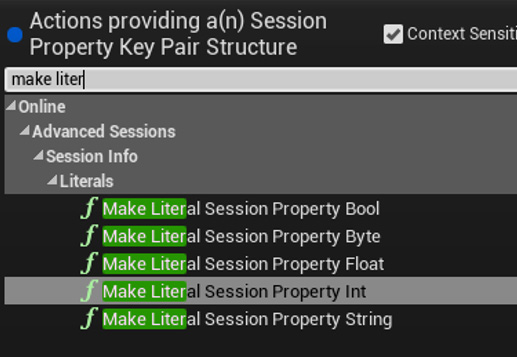
These are very handy key pair structures you can add to the session that can be interpreted by other clients. A key pair structure is basically a custom variable in the form a key and either a int, bool, string, byte or float.
These can be used however you want. For example, the server name made by players is a combination of their steam name appended with another string. I then use the function “Make Literal Session Property String” with the key “ServerName”, and pass that into the “make array”, which is then plugged into the new or changed settings. This is then passed to the Extra Settings input on the Create Advanced Session function.
Note: the key is CaSe sensitive. Make sure you`re spelling it correctly both on the create session logic and also the find session logic.
To add your own, right click and type “MakeBlueprintSessionResult” and create the node. Drag off of the session result and make “Get Extra Settings” node. Place an “Add or Modify Extra Settings” node and connect the Extra Settings into the Settings Array. From the New or Changed Settings input, drag off and use Make Array. Then Make Literal Session property [variable type]. Input the name of the key and whatever variable you want to include. Remember to connect the Modified Settings Array into the Create Advanced Sessions – Extra Settings input.
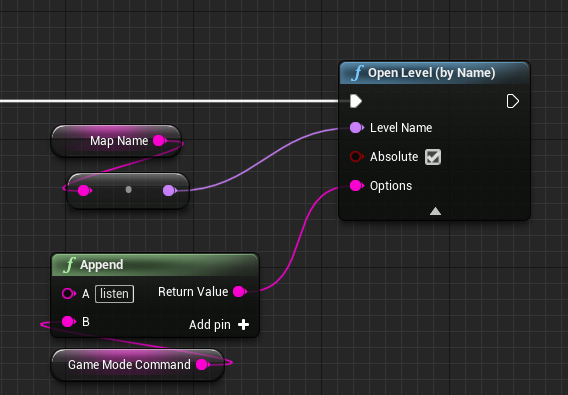
Out of the success branch of the Create Sessions Advanced node, you will likely want to open a level. You MUST add the “listen” command into the Options input of the Open Level (by name) node. Don’t put ?Listen or Listen or whatever crap you might see elsewhere. Just listen will work. Let`s say you want to also use a specific game mode override for that world. In that case, you can append command strings together like any other string, however, you need to separate commands with ?.
For example, here I am using the listen command with a custom game mode override, appended together.
listen?Game=/Game/BeanCombat/Core/GameModes/MPMode/FFAKingOfHill/BP_FFAKingOfHillGameMode.BP_FFAKingOfHillGameMode_C
Note: when referencing game modes, you must reference the class in addition to the actual blueprint. This is done in the following format [location of gamemode BP]/Name of GameMode.Name of GameMode_C
To find sessions you use the “Find Sessions Advanced” function. Always remember to input your player controller reference. The settings I use are as follows:

Some of these are pretty self explanatory. Max results can be whatever you want, I just left it at 0 (infinite) but if you have a specific ui and only want say 10 results max then use that. In my case, Im only letting people make client sessions, not dedicated servers.
Note: if youre using AppId 480, set it to something like 1000. If its too low, it may not return any results. But again, try not to use 480 if possible.
Note: even with LAN set to true, this still wont work in editor. You need to test with 2 computers and 2 steam accounts if you want to test it properly.
The function "Find Sessions Advanced" will return an array of Session Result Structures, and either a success if it found results, or failure. I run the Session Result Structures through a for each loop, and create a corresponding server slot widget.
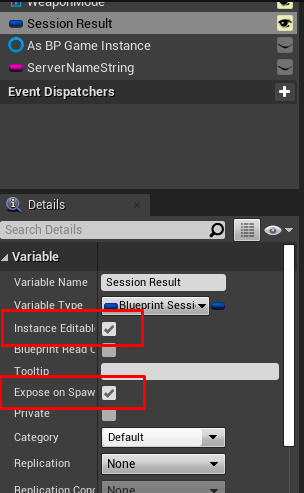
Inside that widget, add a variable “Blueprint Session Result Structure” and set it to Instance Editable and Expose on spawn. Compile, save, and go back and now you can input the result into the create widget function, and add that widget to a list or grid. It should look like this.

Inside that widget is where you will handle the “Joining Session” logic, as well as getting any extra settings set by the host.
The extra settings keypair structures can be extracted from the search result variable in the widget you made earlier. This is done pretty easily by dragging off of the session result and making the “Get Extra Settings” node. Then dragging the Extra Settings array and make the “Get Session Property String” (or whatever variable type it is you want to get) node. From the Setting Name input, drag off and type “Make Literal Name”. Input the KEY name of the setting you want. In this case, it`s the ServerName that was added as an extra setting when the host makes the session.
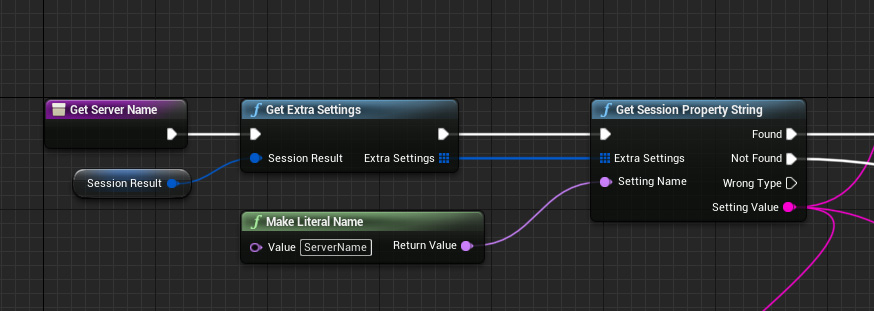
From there you can do whatever you want with the output. Display it as text somewhere, parse it or whatever.
These are some things you`ll find useful if you have a server browser of any kind. “GetCurrentPlayers”, “GetMaxPlayers” and “GetPingInMs” will return their respective integers. These nodes come from dragging off from the Session Result variable.

Now you have found a session and retrieved a Session Result variable, you can directly join.
This logic is actually the easiest thing to do. You only need the “Join Session” node, and to input the Session Result variable that you got from the Results for each loop earlier. Also don’t forget to add your player controller input.
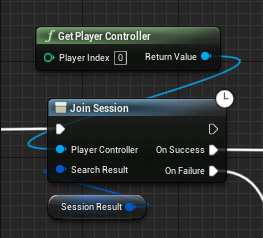
Though I have some logic for on success/failure, you don’t really need anything there. If the session result is valid and you`re able to join, you will automatically load into the map with the host. In my case, for success I set some variables in my game instance so I know im a client in a steam session server (not a dedicated server), and transition my game state to multiplayer. In case of failure, I just handle some UI feedback and button re-enabling.
Now you can create and join a session, you also must destroy the sessions when you`re finished. Basically, try not to think of a session as a server. A host can create a session, but also a client that joins the game has also created a session too. Only 1 session can be created on your game instance at any given time. These are not automatically destroyed, either. A problem I encountered was a player that was booted back to the main menu after the host closed their game couldn’t join a session again afterward, because the players session hadnt been destroyed on their local game instance.
A solution to this, is to include the function “Destroy session” in your logic on your main menu map, or main menu controller. This can be whatever you want. For example here in my project, on the Event BeginPlay in my main menu controller, I call the function there.This means whenever a player is returned to a default map (or any place of your choosing in case of network error) you will call this function.
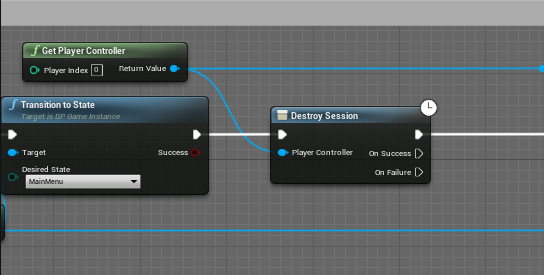
I don’t do anything special on the success or failure branches because its not required. But this means that if I abruptly am kicked back to the main menu from someone elses game, it will automatically destroy the session on my machine. You could also put this logic on a button somewhere, that you use to join someone else`s session. Another common place to put this would be on the exit game or equivalent button in your UI.
Note : these are latent functions, so they cannot be inside other functions.
If you have any questions drop them down below, or jump into the discord and ask me there.
Did you like this post? Tell us
Leave a comment
Log in with your itch.io account to leave a comment.