Week 3 of my journey didn’t have as clear a focus as the first two. Partly this is because I’m starting the get familiar with the engine, things noticeably get faster to implement. Having said that, the work was mostly centred around the UI. I tried to get a feel for the design principle of it: how to organize the nodes, how to implement layouts, how to wire up the behaviour… As always, I was sidetracked along the way with interesting topics, revelations on how to implement my already existing functionality better, add “low-hanging” mechanics quickly and the like.

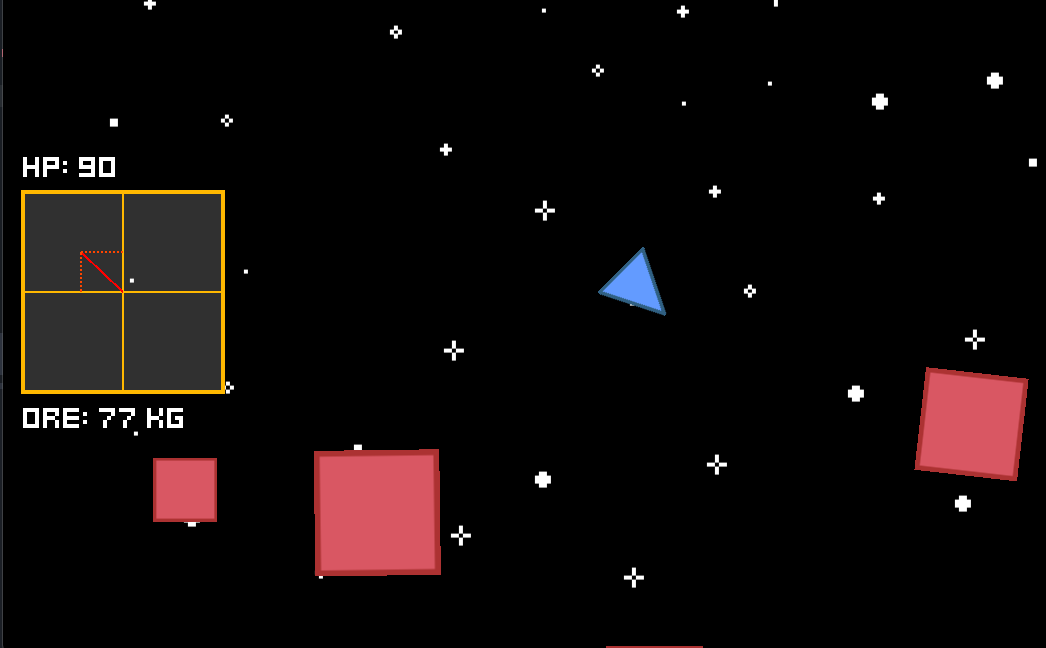
For obvious reasons, I wanted to learn how to create a user interface for games. Still going with the simple spaceship shoots asteroids game, I choose this as a learning project:
As many times already, I went to the godot documentation to get an idea how this will be put together. After some reading, I came away with the conclusion: I need signals and control nodes. The rest is just implementation detail (famous last words…). Also, here come the low-hanging feature part: my player has no health, and there is no score to display. Minor setback.
As I came to realize, I had no data to display in my non-existent GUI. The asteroids were already destructible, so I thought let the player collect some rocks and call it score. When the rocks are destroyed, the player receives their mass as if they collected it. To achieve this, I defined a signal in the asteroid object to emit when they are destroyed (it also communicates the mass of the destroyed asteroid). I wired it up to the player, which stores the sum of the collected ore. The wiring was not so simple, as the asteroid placed dynamically at runtime, so I had to connect these from code. Which led to some refactoring of the asteroid spawner code to also use signals. Signals everywhere. Nevertheless, my little spaceship now collects ore, and I have data to display as player score.
The matter of player health also led to refactoring. The asteroids already had health and could take damage. As any programmer worth their salt, I took that code, chucked it into a new component (HealthManager I call it), and made it reusable. I created a custom named class for it. Now, when it is added to a node as a child, it will handle the hit point maintenance. I also pumped it up a bit while I was at it: it can handle healing and changing the max health also. It emits signals when the health is changed or depleted. After all this work I chucked it under the player node, and realized that the only thing doing damage in my game is the bullet. *sigh*
Step 3, collision damage. To be able to test the player health, I made the asteroids do damage on collision. For now, it is only a constant value no matter what, but I plan on making it scale with the energy of the impact.
Now that I had the data I wanted to display, I started mucking about with the control nodes. I figured I would need labels to display text (as a side-note, I realized I would need a font, so I snatched one from the godot tutorial project). Placing the labels was straightforward, I attached scripts to them to handle the signals and update their values. I tried various placement for the UI elements, finally I settled on putting them in a HBoxContainer, aligned to the left side. It will do for now.
Now, onto the velocity displaying gizmo. The whole point of this exercise was to learn about the custom drawing feature of godot. My idea was to have a simple Descartes-axis setup, and draw a vector proportional to the velocity of a tracked body. For good measure, throw in dashed lines for the vector components along the axis. I can’t really add anything to the official tutorial on the custom drawing, it wasn’t too difficult to extend to my use-case. I also made it a tool script, so I could tweak it inside the editor.
To summarize, this week was a bit all over the place, but I’m definitely starting to get familiar with the editor.
Did you like this post? Tell us
Leave a comment
Log in with your itch.io account to leave a comment.