Introduction
I am certain this is the biggest update yet. This week, I finished the animation of the player and enemies. Not only that, but I also made two new levels to the game.
Player Animation
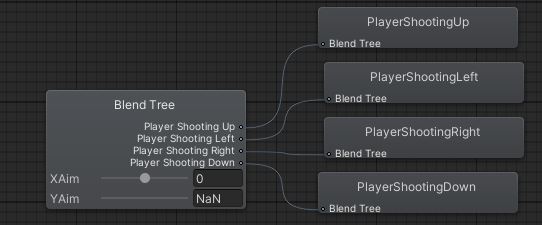
I had already made all the animation for the player when I first started making the game. However, only the default animation (when the player isn't shooting) was implemented. For the different animations for the different shooting directions, a Blend Tree was required.

In the animation controller, the shooting state has a 2D directional Blend Tree, which determines what animation to play. The animation is determined by two floats which represent the X and Y axis: XAim and YAim. For example, an XAim of 1 and a YAim of 0 plays the shooting right animation. In the player's shooting script, the axis values are determined by what key the player presses.

Both it and the animation code were heavily derived by the existing code and Blend Tree from the tutorials. It should be worth noting that the code was originally made for a top-down shooter, and the Blend Tree is for when the player is moving. In my game, the same animation is played regardless of what direction the player moves; this is an idle state. It only changes when the shooting boolean is true (and thus, the player is shooting). Also, the original Blend Tree had diagonal movement; Since there is no diagonal shooting in my game, I simplified it to four directions: North, East, South and West.
Enemy Animation
When implementing the enemies' animations, I simply duplicated the player's shooting controller, and changed it for the enemy. I also added much of the same code for determining what animation to play when the enemy shoots. However, this caused a bit of a problem, because at first the enemy only played the animation when aiming to the right. No other animation played for the other directions.
During a tutorial, I asked Ian for help, and while he wasn't able to find a complete solution, he pointed out to me that the reason why only the right-aiming animation works is because it's the last part of code in the script. After some trial and error, I managed to fix this problem, so that now the animations work for all the directions the enemy is shooting. I did this by setting the shooting boolean and the floats for every ray the enemy draws, and whether or not they hit something.
New levels
After adding the animations, I have found the time to add two new levels into my game, with increasing length and difficulty. To change the scenes (which are the levels), I used an object with a BoxCollider2D trigger, and a script that changes the scene when the player touches it. Right now, this script only changes the scene to level two. I would have to change the code for it to use a inputted variable, like a string, to change different to levels.
Right now, potholes are the only obstacles other than the enemies. I plan for them to be fatal to the player, and to replace most of the potholes currently in the game with fences or barriers. I also added new sign tiles that show how far the player is in the game.
Level three isn't complete yet, so the build that is currently on itch.io only has two levels: the one in most of my builds, and a new one.
Criticisms
Here's the following criticisms I received when I posted my current build:
They also suggested removing the road dots if I can't reduce the flickering, since they feel the dots don't go well with the camera. To fix the flickering, I would have to change the camera constraints to be closer to said camera. Right now, the bullet visibility seems to be the easiest to fix, since I can just modify the sprite itself. It would either have to be a greyish colour, so that it doesn't blend in the black or white bits of the road, or it would have to be gold, so that it doesn't blend in with the desert (this would be a less important issue, however).
Finally, one of the UTAS staff managing the unit has commented on my Alpha 4 build. They suggested that the build be uploaded to the same project, instead of a separate project for each build. They thought that "[The] Game looks like a cool idea, and shooting worked well!"* They noted that moving up and down was "buggy".*
*As quoted by utas_lindsay in the comments here: https://siderun.itch.io/road-rat-animation-test
Conclusion
Right now, my main focus is on completing the rest of the levels. I intend the game to have five or six in total. I would also like to fix the movement problems the playable character is having. I would probably require Ian's assistance in fixing them.
But for now, stay tuned next week, same dev-time, same dev-channel!
Did you like this post? Tell us
Leave a comment
Log in with your itch.io account to leave a comment.