As everyone slowly comes to the realization that private companies come and go, you may find that the only stability online is a place you host yourself. No billionaire will ever buy your website and throw a sink at it.
The next thought you may have is “But I can’t afford to host my own website.”
Squarespace is $16/mth or $23/mth if you want a shop option.
Shopify is $29/mth (and usually the templates available are store-first like you’re a -shirt brand or something instead of creative person with hopes and dreams and you sell things on the side to survive.)
The two above are the most popular options for human beings who make things and want a space of their own on the web. They’re fine solutions, the only issue I have with them is that they’re a private business and prices change, services go down or businesses get bought by billionaires who want to change things and now you’ve gotta hustle to move over to the next storefront site so you don’t disappear off the internet. It’s like being evicted from your rental. You don’t want a rental really, you wanna OWN your home on the web. Got $4/mth?
Here's how you can own your own website (with a store) for half the cost of Twitter Blue.
Here’s the recipe card up front. Read the post for details.
Total: $14/mth - $4/mth, do this right and it’ll be less than Twitter Blue.
If this is still too much and you do not really care to have a store, I suggest checking out this site, which helps you create a free website using Github by 🐦BigFnMikey! (It's a little techy, so good for folks who wanna learn some new skills!)
Alright, if you’re still here, then let’s dive in.
Incase you didn’t know. Everything you see online is stored somewhere. Exactly like files on your computer. Except there’s a million computers connected together that make up the internet. These little computers are called Servers. If you have the skills and time, you can set your own server, but if you have those skills you’re probably not reading this. So for the rest of us you need to find a Host.
There are a number of companies all over the globe that offer web hosting as a service (I’m from the US, so I apologize in advance if some of the advice here doesn’t work in your country. ) A google search will show you a ton of options local to you. These businesses do the hard nerdy work of setting up computers and connecting them to the web so you don’t have to. They charge a monthly or annual fee for you to use their stuff. It’s a pretty fair trade off if you ask me.
Like all businesses, some offer better prices and services than others. I personally use Hostinger because they have the best deals I can find and so far they’ve been very easy to work with. But look around, you may find a better host for a better price! At the time of this post, Hostinger has a Black Friday sale where you can get 4 YEARS of hosting for $2/mth ($96 up front.) If you can’t swing $96 up front, maybe you just want to trial them out, they have a 1 year plan for $36 up front. $3/mth is pretty cheap. Without holiday sales, you can usually get hosting for around $10/mth.
Here’s a link to the Hostinger site: https://www.hostinger.com/wordpress-hosting
Once you buy your hosting and go through setting up your account like any other website, you’ll be presented with an array of options that look something like this:

Don’t do anything yet. Through out this tutorial I'm going to be showing you screenshots from the services I use personally. Each host does things differently of course, and so they may use slightly different terminology and place actions you wanna take in different places. Don't let this frustrate you. For most things, you can usually find what you want on that host's 'help' section. (They want you to be able to use their services, usually they make it as easy as possible)
During the setup process, you may have been asked if you had a domain name. If the hosting gives you a free one or offers you to buy one (and you need one), it’s easier to get your domain from your host, since you won’t have to lift a finger to get it to work. But you may already have one or can get it cheaper somewhere else. What do you do? How do you connect it to your site?
Before you get too much stuff setup for your site you’re gonna want to figure out your domain name. The unfortunate answer is this is different for every hosting site and domain manager. (Sorry! This is the most confusing part, but it’ll be ok I promise!)
For the sake of this tutorial I’m going to show you what Google domains looks like, since that is what I personally use. (I have a bad habit of collecting domains, this makes it easy to manage them. I’m weird, idk what to say.)
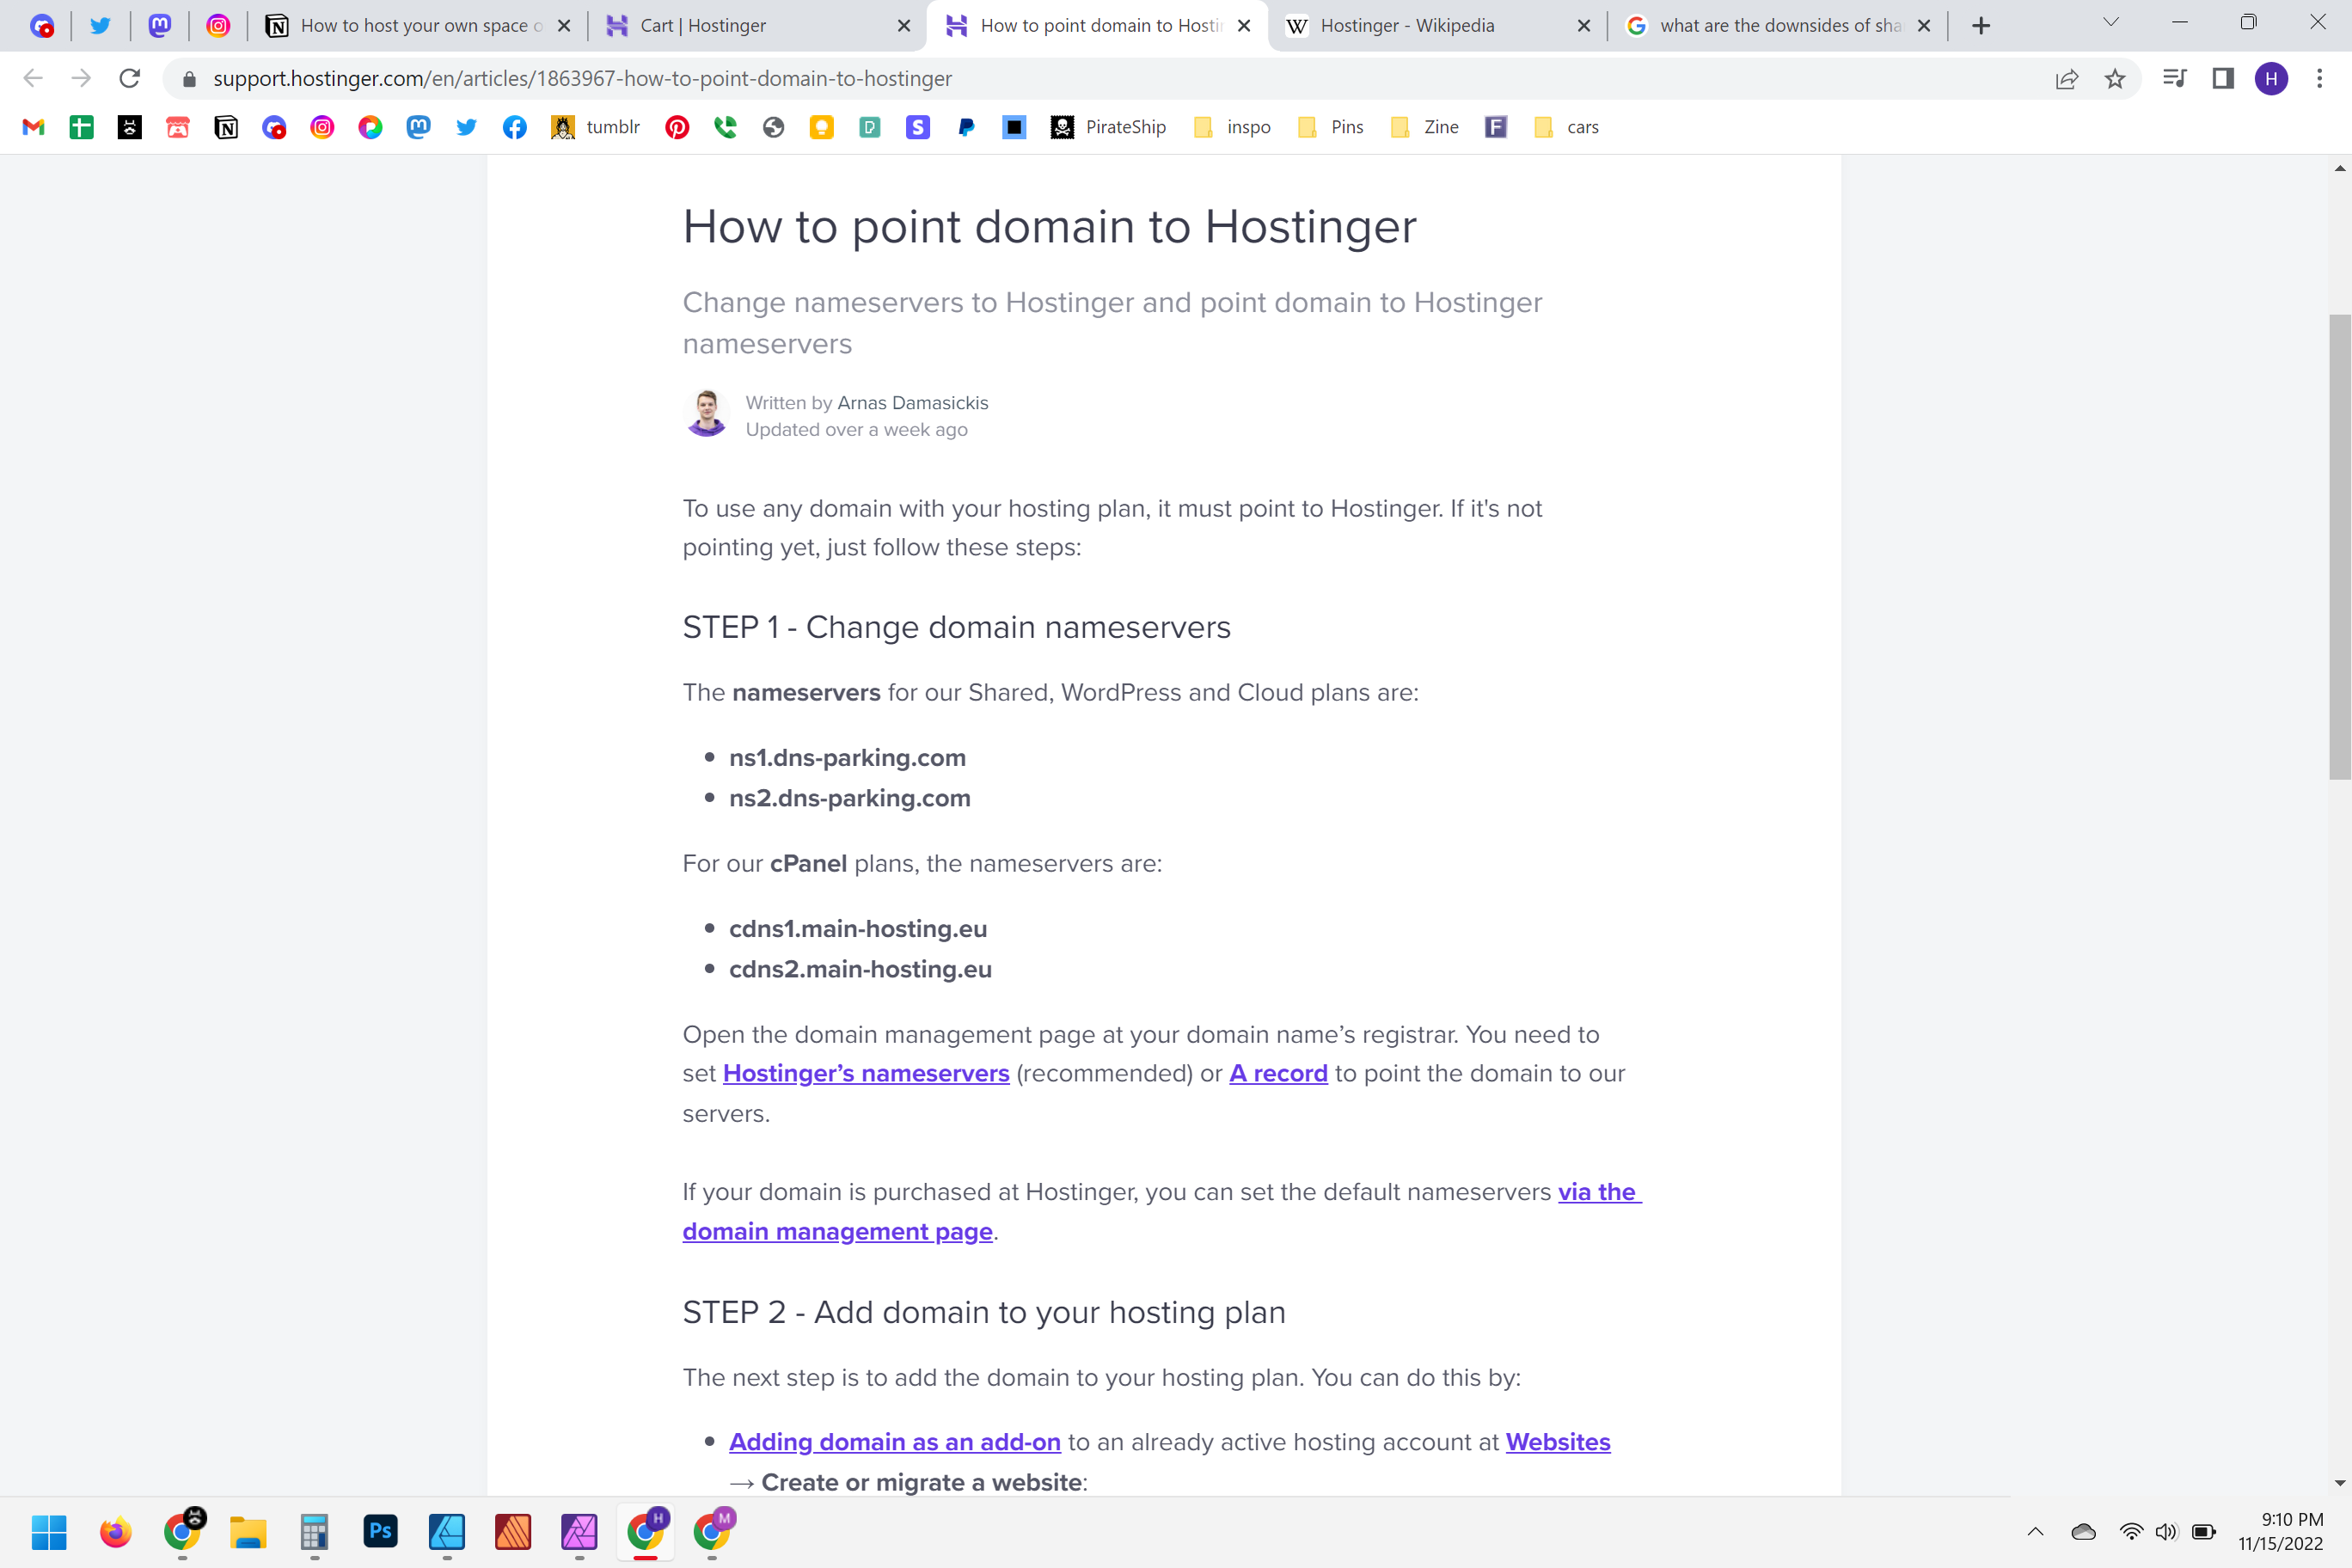
If you’re using a different web host, that’s ok. They will usually have a help section and just search for “how to point my domain to [insert hosting service name]” You will probably get taken to a page that looks something like this:
https://support.hostinger.com/en/articles/1863967-how-to-point-domain-to-hostinger
In another tab, find the site that manages your domain. Locate the settings that get you access to your DNS and/or Name Server settings. For Google Domains it looks something like this:
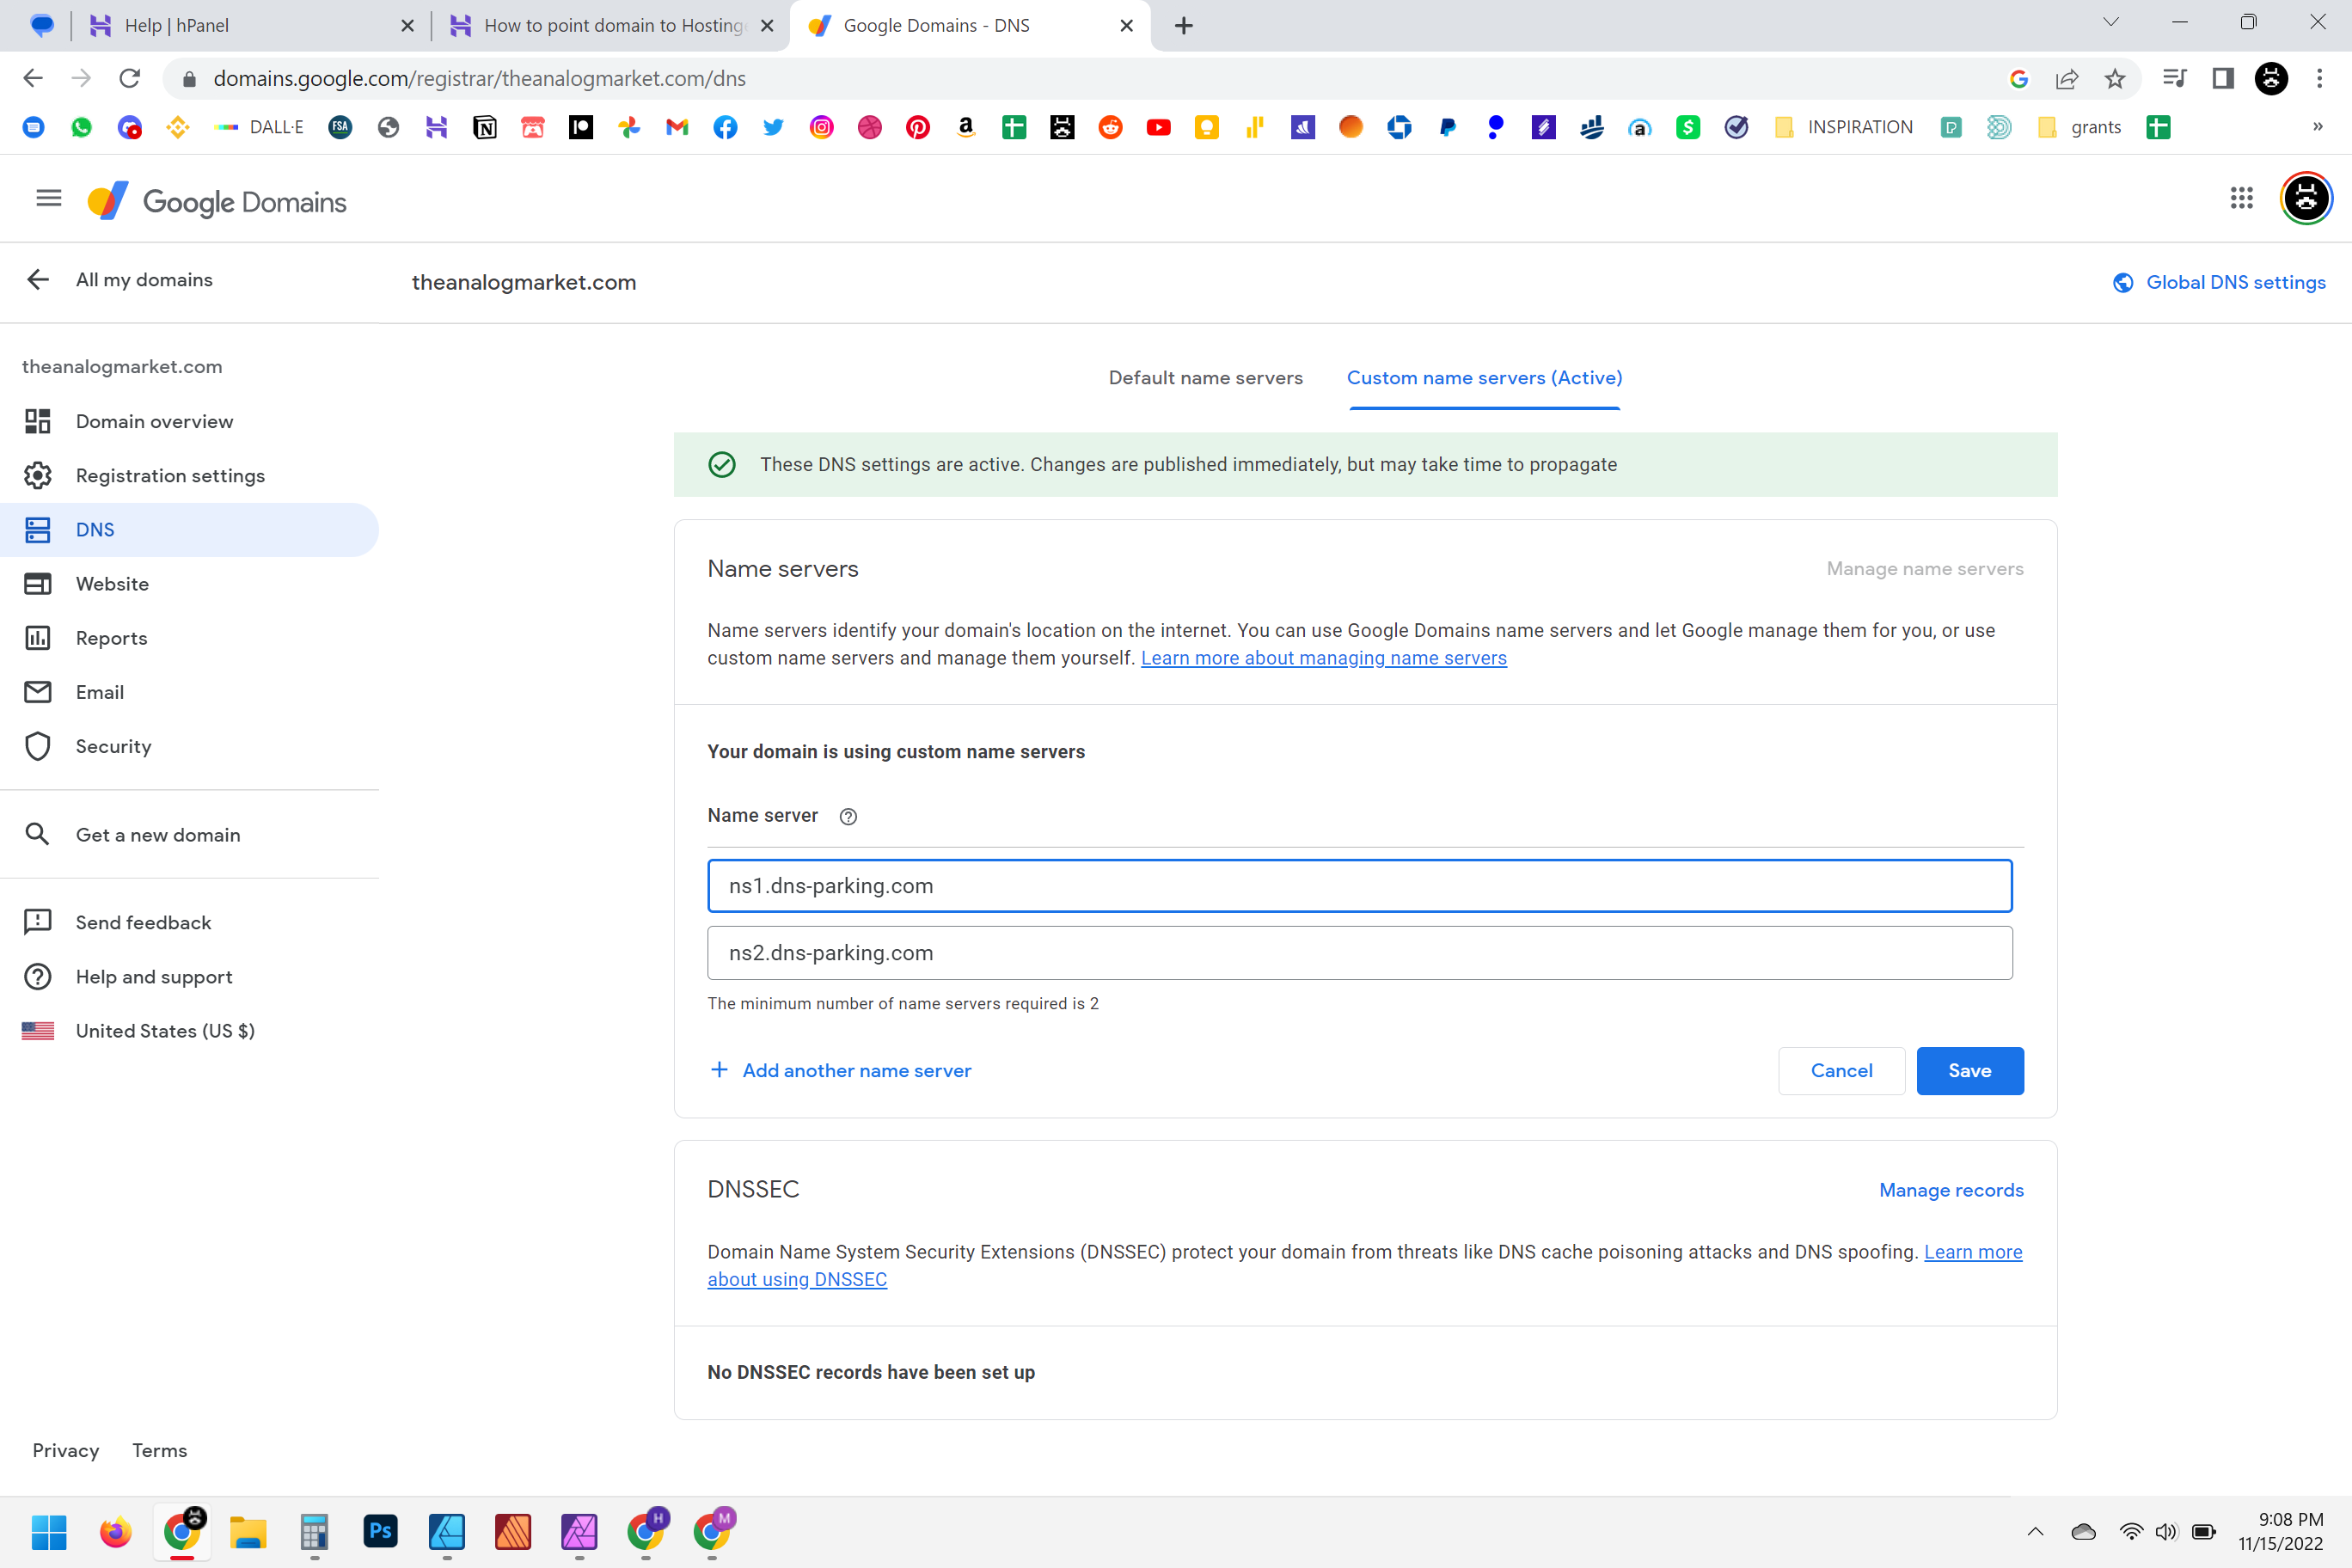
Then simply follow the instructions given by your hosting site. Every host will have a unique name server, so you will have to be specific. They usually give you 2, use both. Follow their instructions. Most web hosts want you using their services, they’ll do a good job helping you point the domain their way.
Type in what you need to type in, hit save and you’ll usually get a little notice or an email that says something like “changes you’ve made may take 48 hours to take effect.” and sometimes they do! and sometimes they take 10 seconds. So be patient.
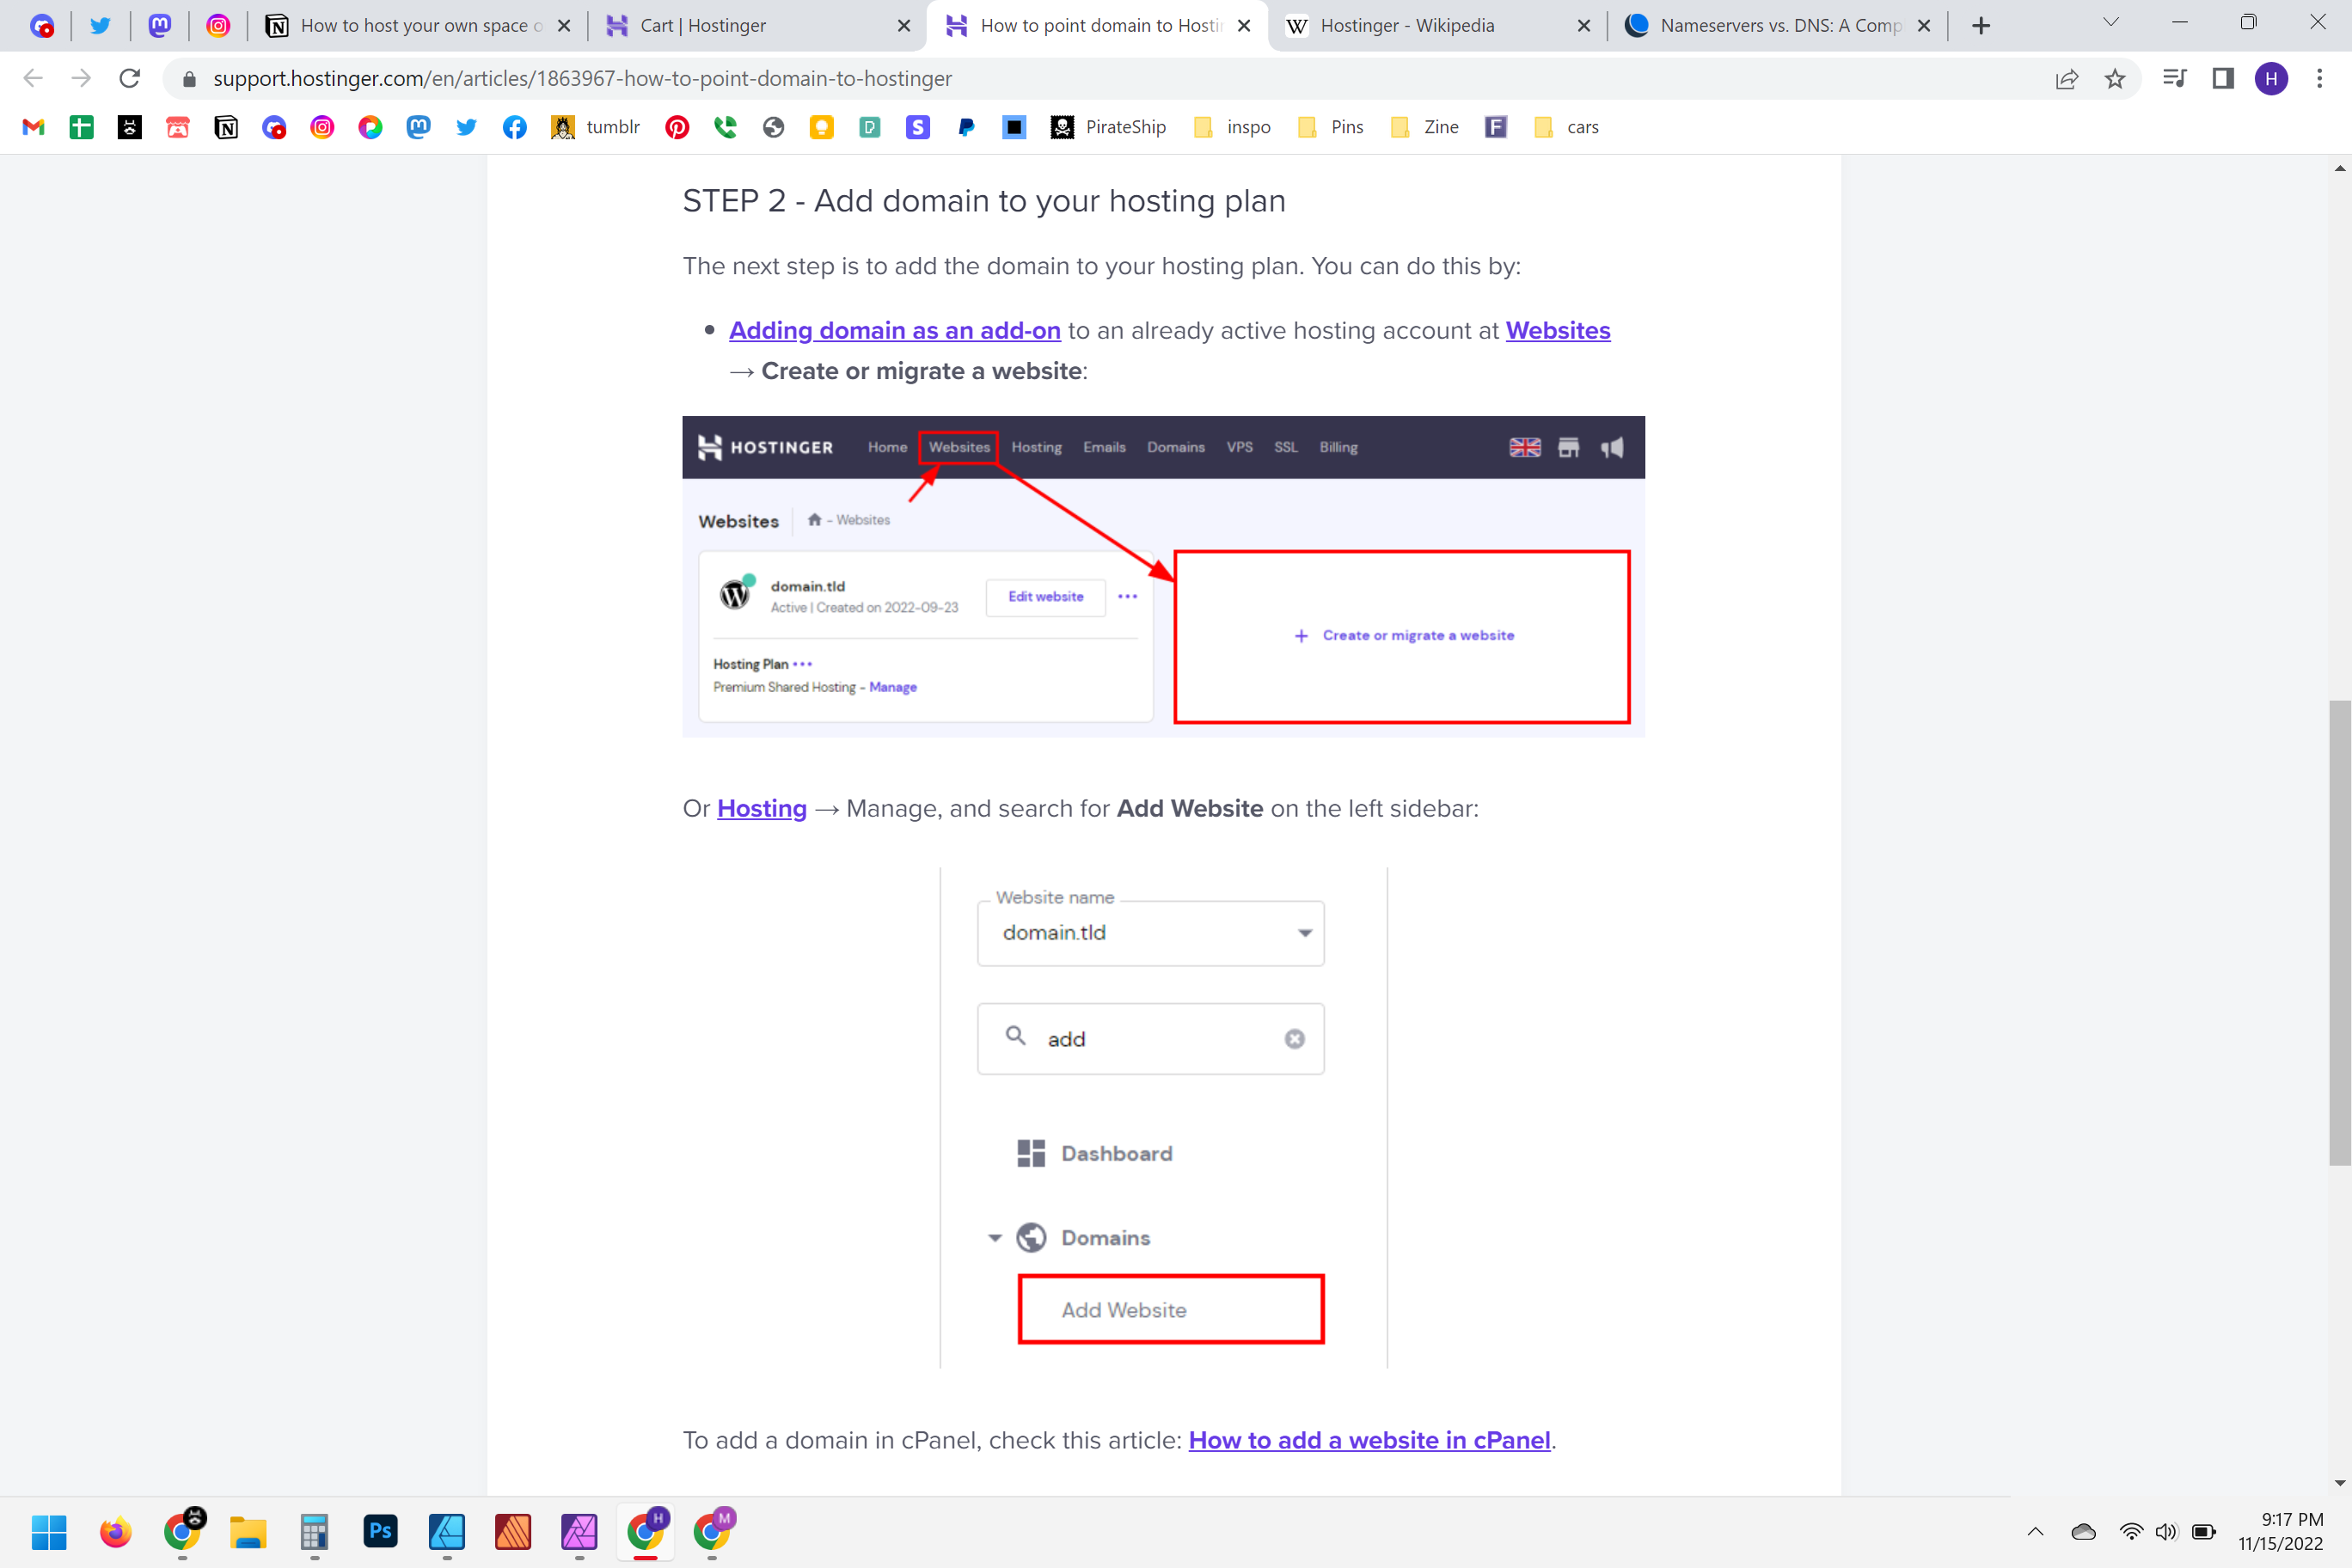
You don’t have to wait for this next step. Come back to your hosting site and tell it what domain to use.
There’s a lot of menus on some of these hosting sites. Don’t be afraid to go to their help section and search “how to use my own domain name” and there will usually be specific instructions to follow and links to press. For us over here with Hostinger you wanna head to your dashboard and click on websites at the top. Then follow the instructions. If asked, you wanna create a new website using Wordpress.
Ok, the hard part is done! On to step 3.
You may have heard of Wordpress before. It’s great. It’s just a backend skeleton for websites. You can add a bunch of things to it without having to know how to code. It’s owned by a company called Automattic. They own Tumblr. Yahoo bought Tumblr back in the day for $1 billion. The got gobbled up by Verizon, who sold Tumblr to Automattic for $3 million. Anyways, they’re famous cause they made Wordpress. And that’s what we’re installing!
Basically every web hosting service will have a one button install of Wordpress. Every web host puts that button somewhere different. Find that install button and press it. With Hostinger, you probably installed it by setting up your website in the last step.
Wait for it to install.
Then you’ll usually see a link that says something like “manage website” or “Manage Wordpress” something that indicates you’ll be taken to the Wordpress admin side of things. For Hostinger you’re looking for “edit website”. You wanna find the button that takes you to this page:
Before you register for a new account, check your emails. Sometimes hosts will automatically create your account and email your username and password, You can’t change your username, but you can change your password later. No one will ever see your username, so don’t worry about if they set one up for you and it’s dumb. Just write it down, let the browser save it, whatever works for you, just remember it and don’t give it out. This is the key to your house. Keep it safe.
If your host didn’t give you a username or anything, register for one. Easy.
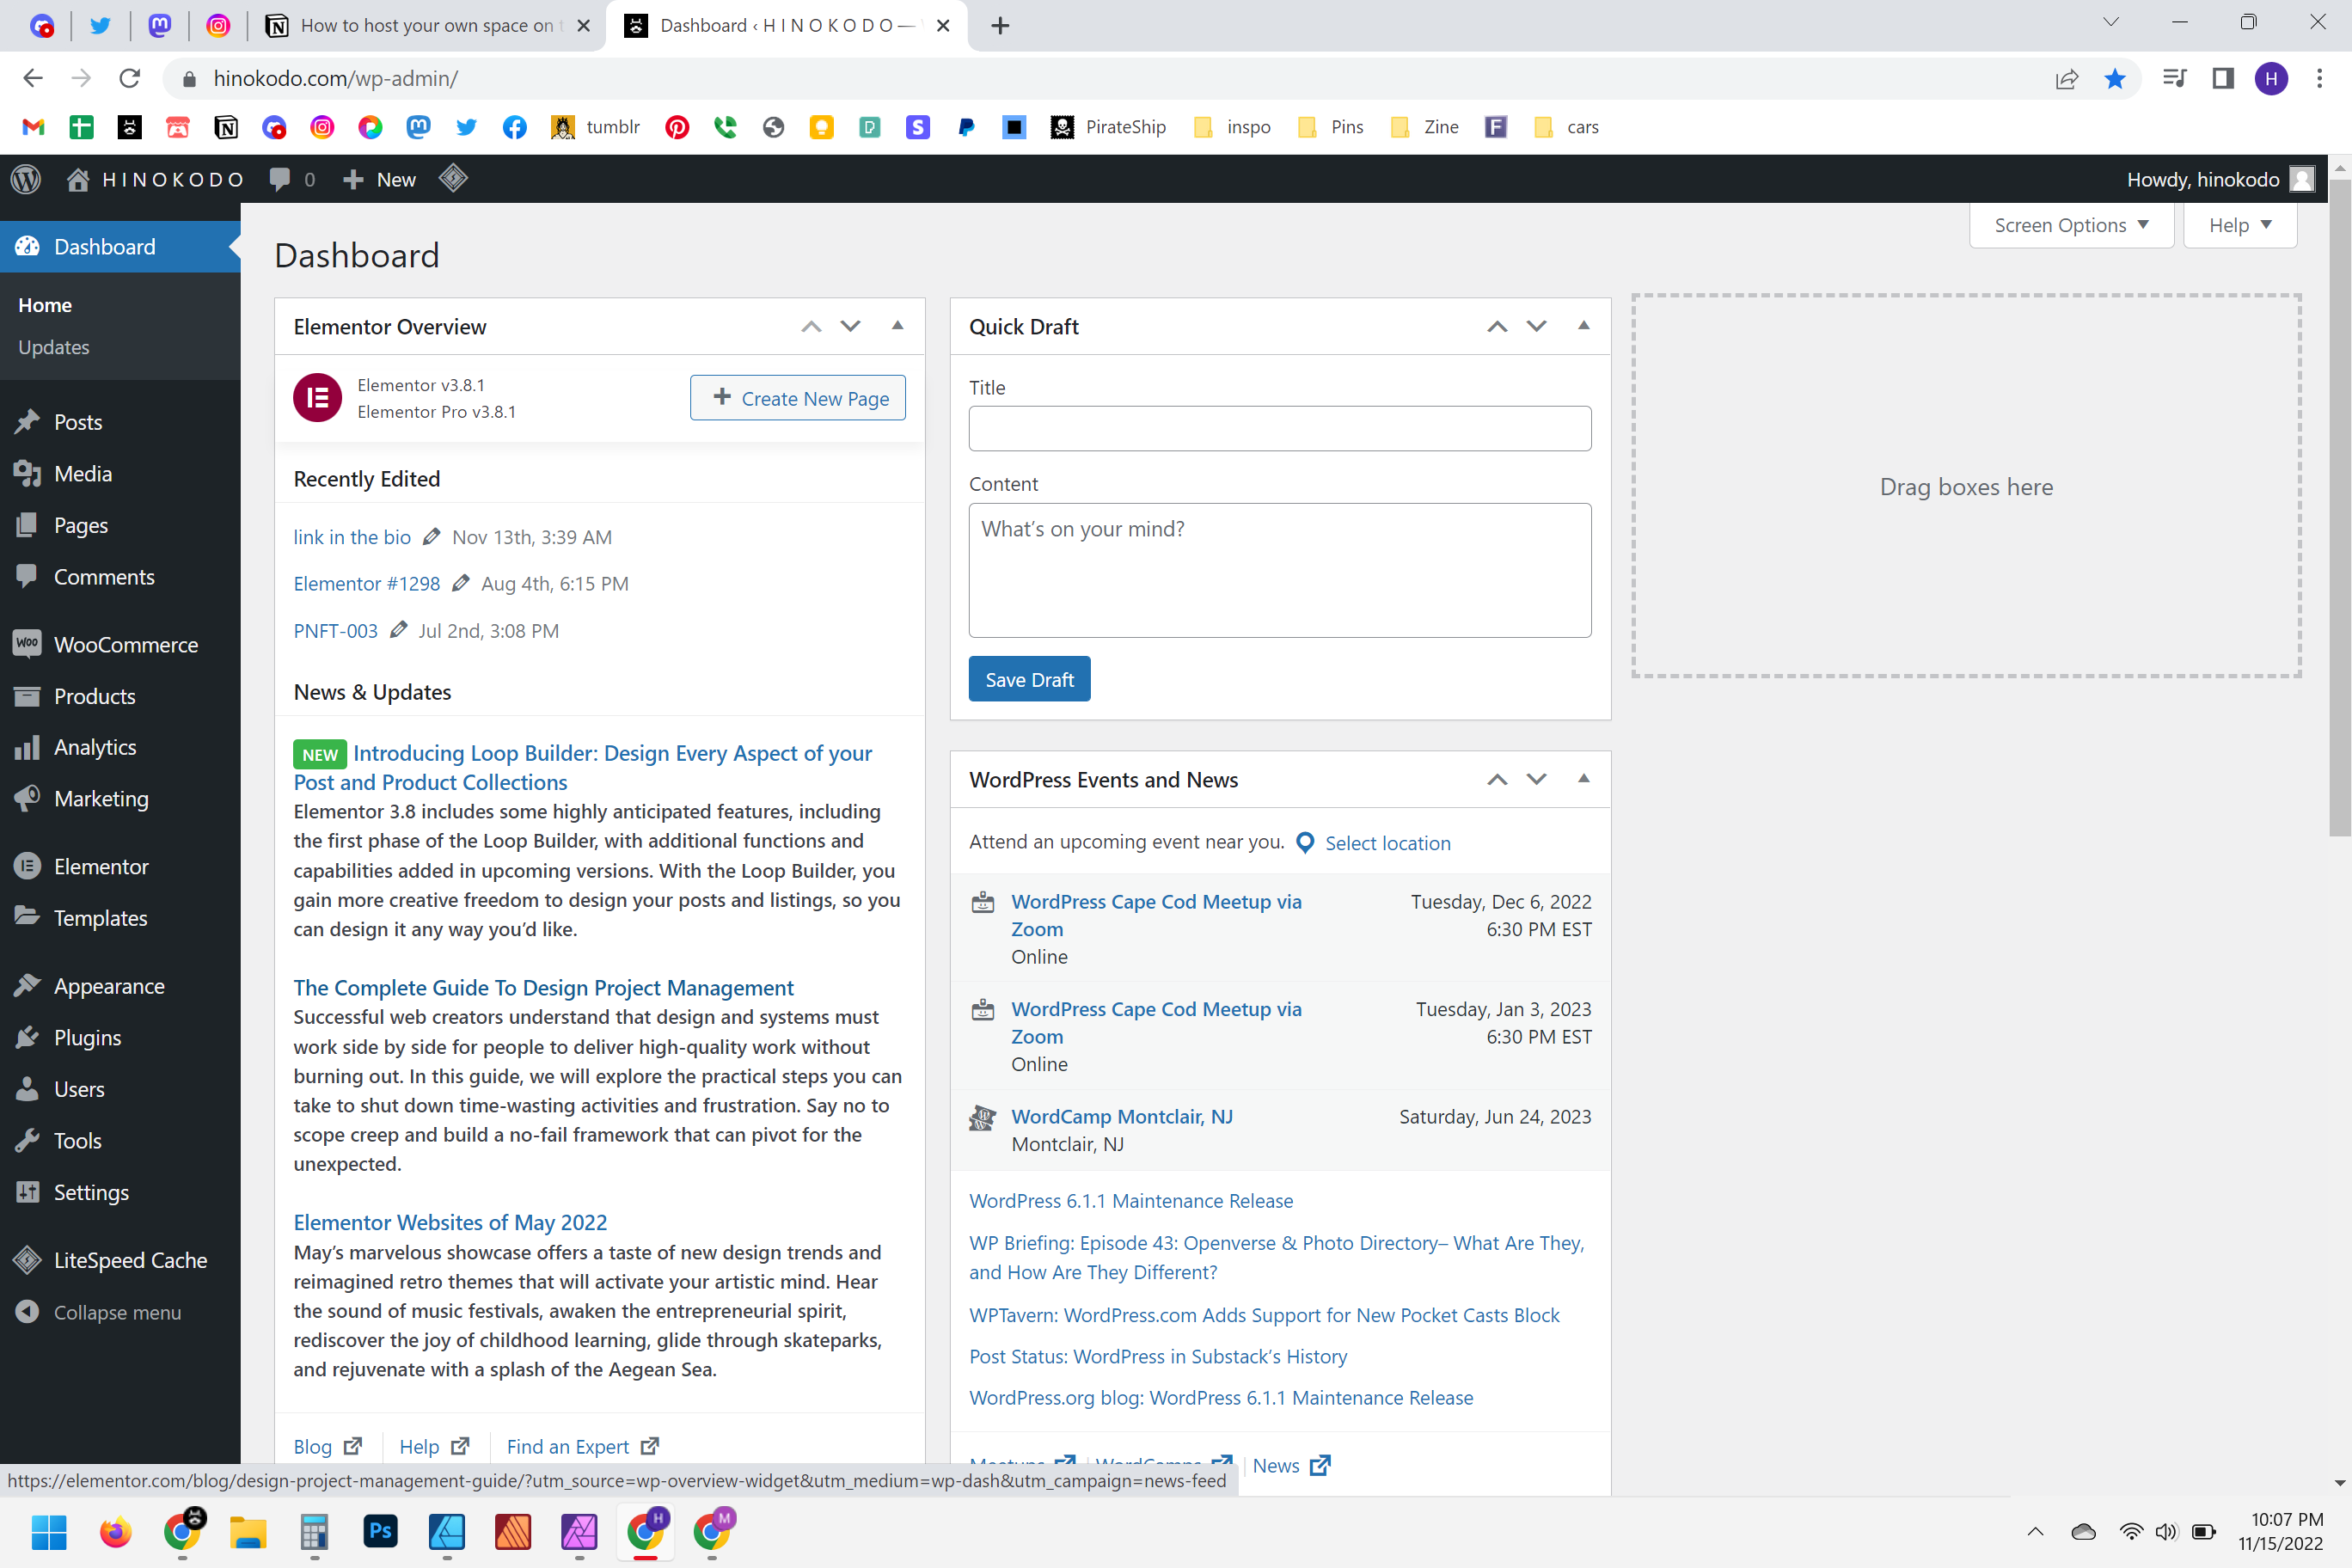
Once you login, you’ll see the Wordpress dashboard. It’s a little ugly, but why fix what isn’t broken I guess:
Ok, now that we have Wordpress installed, the next step is to install your theme.
Wordpress has been around long enough and is used so often, that there are entire marketplaces dedicated to making very affordable, if not free, themes. You are free to do whatever you want with your website. (For themes, just hover over “Appearance”, click on themes and search for what you want there. But if you like simple AND control you’re gonna want to install Elementor.)
In that menu on the side of your Wordpress dashboard, find the word ‘plugin’, hover over it and click ‘add new’.
We’re going to add a plugin called Elementor. It’s great because it lets you build your theme by dragging and dropping the things you want on your site and lets you customize a lot of stuff about those elements.
small note: You can save it for later, but you’re probably going to see a few other plugins asking for updates, suggestions, notices, and all kinds of things. Don’t worry about any of that right now. Most of it is trying to be helpful, but I find it to be kind of bloaty. You can uninstall most of it later.
Once Elementor is installed, you’re going to want to build your home page.
To do that you’re going to hover over “pages” in the menu on the left, and click on “add new”. It will take you to a page that looks like this:
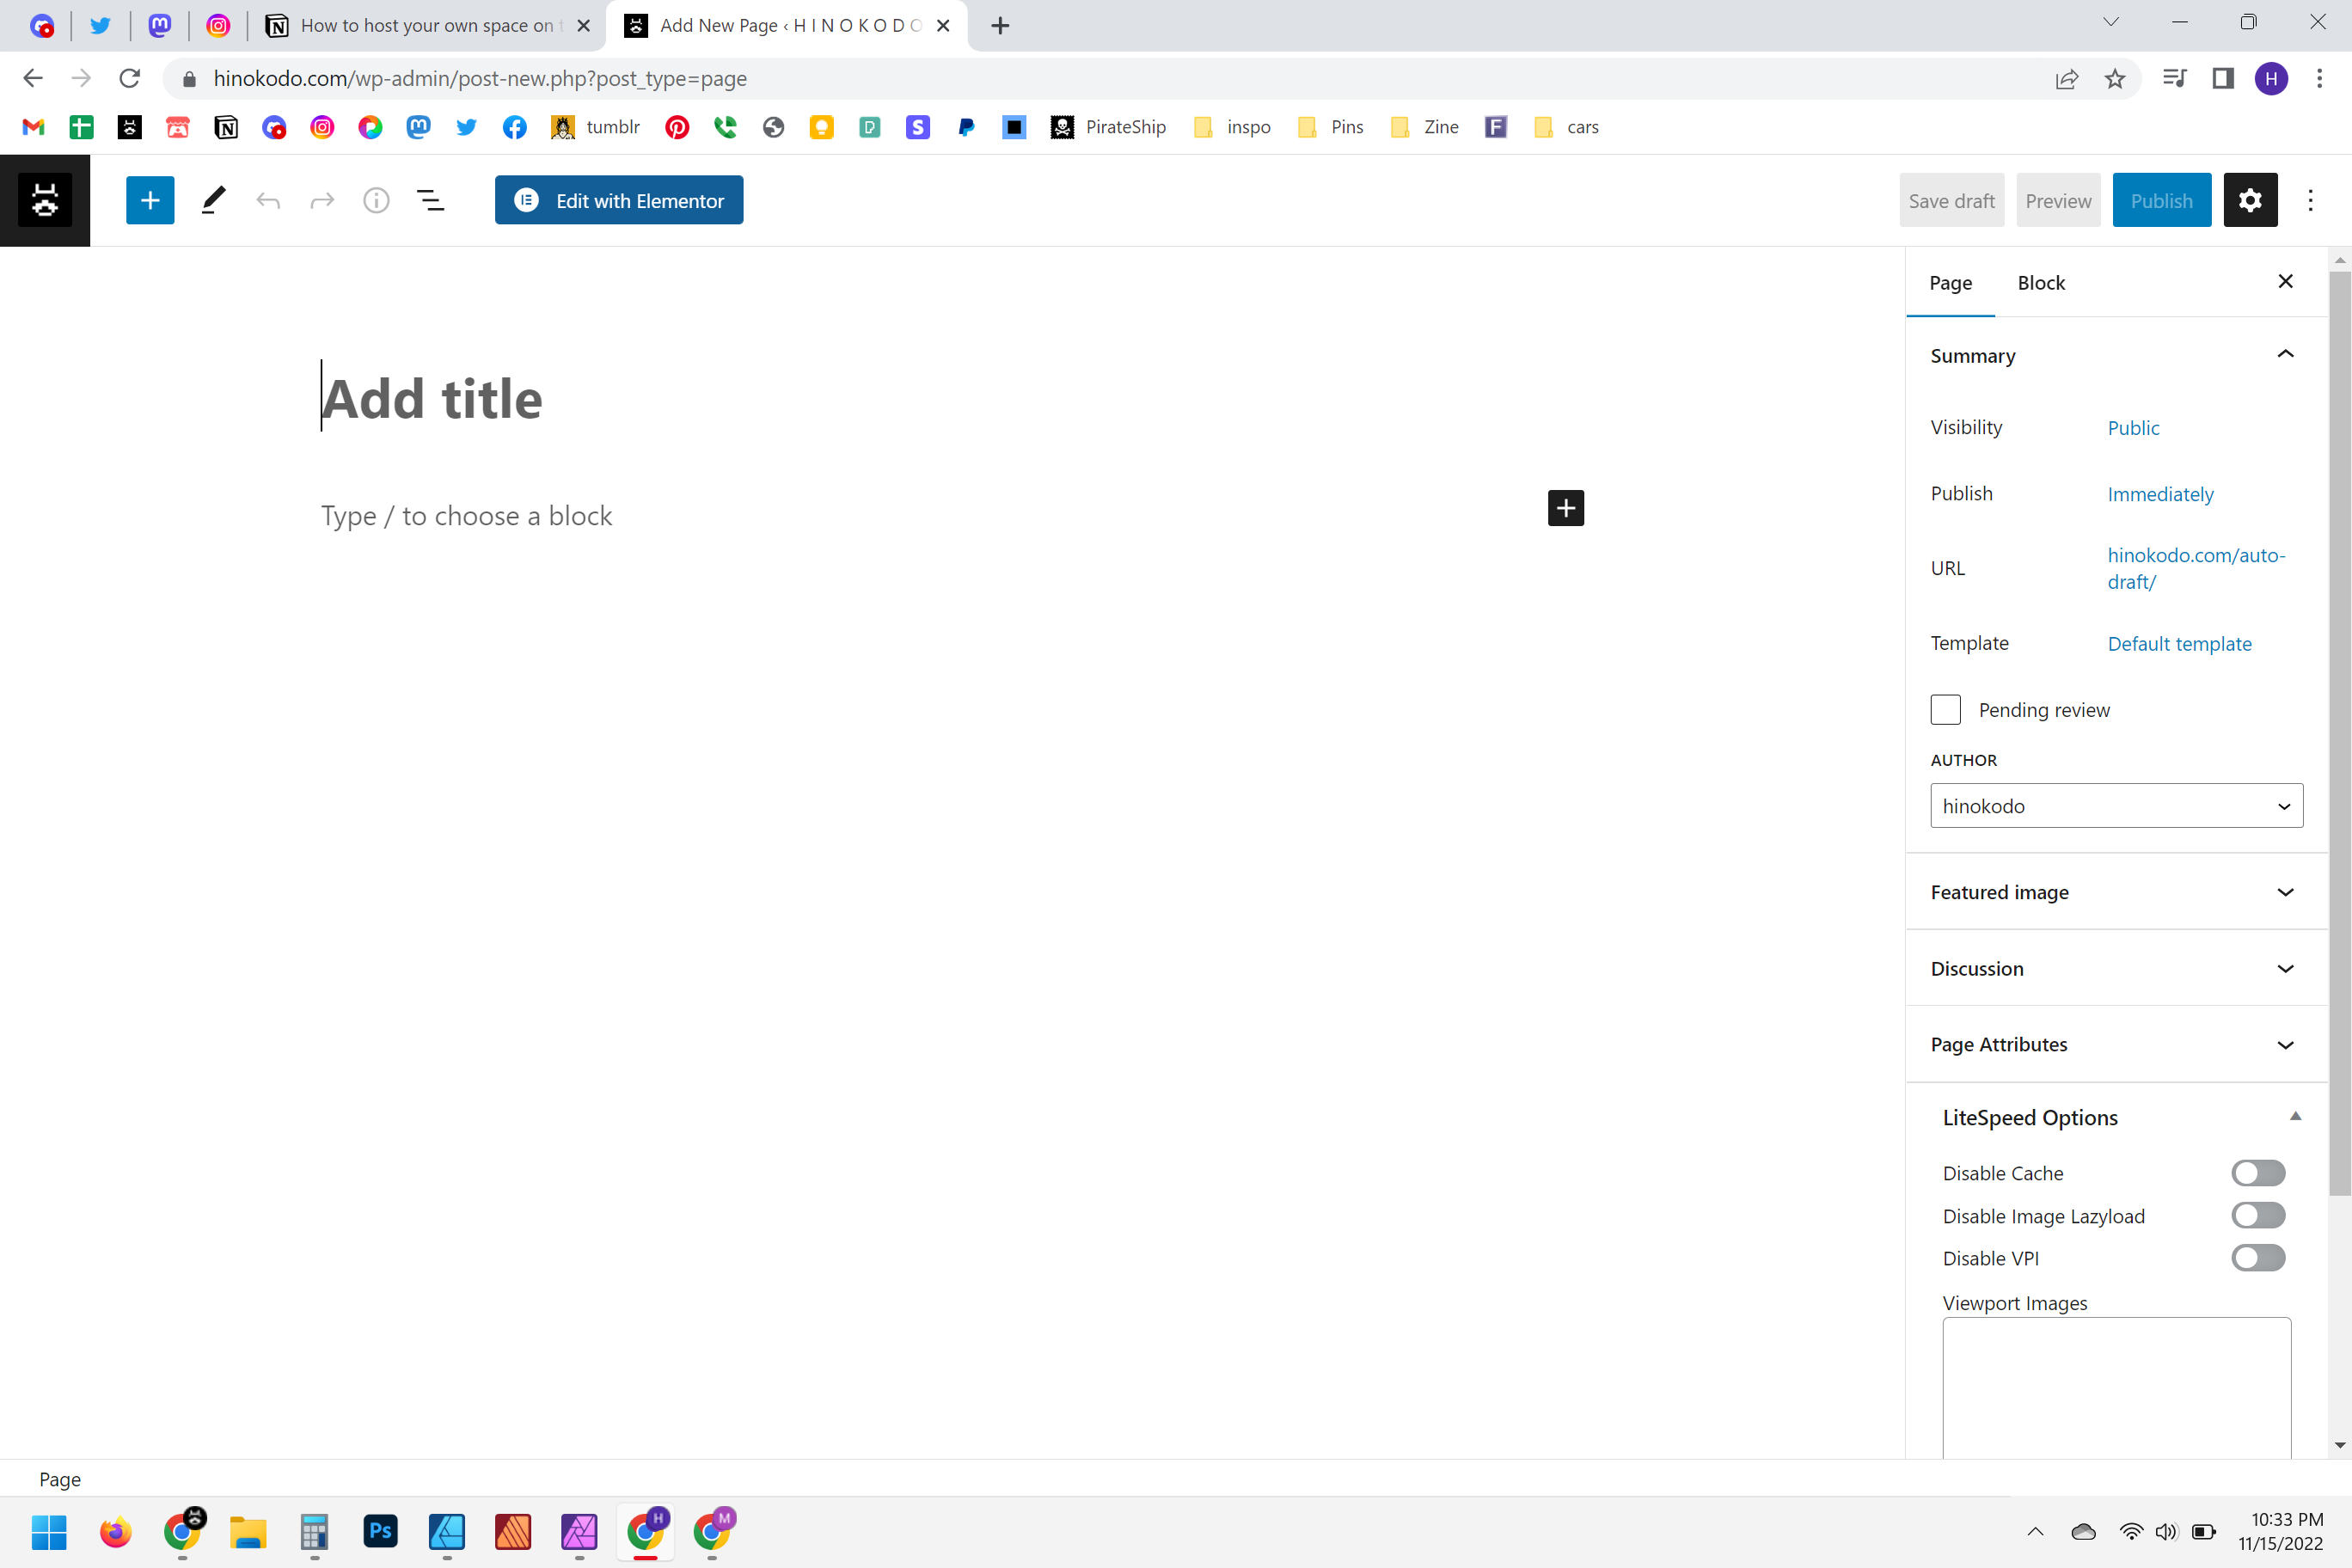
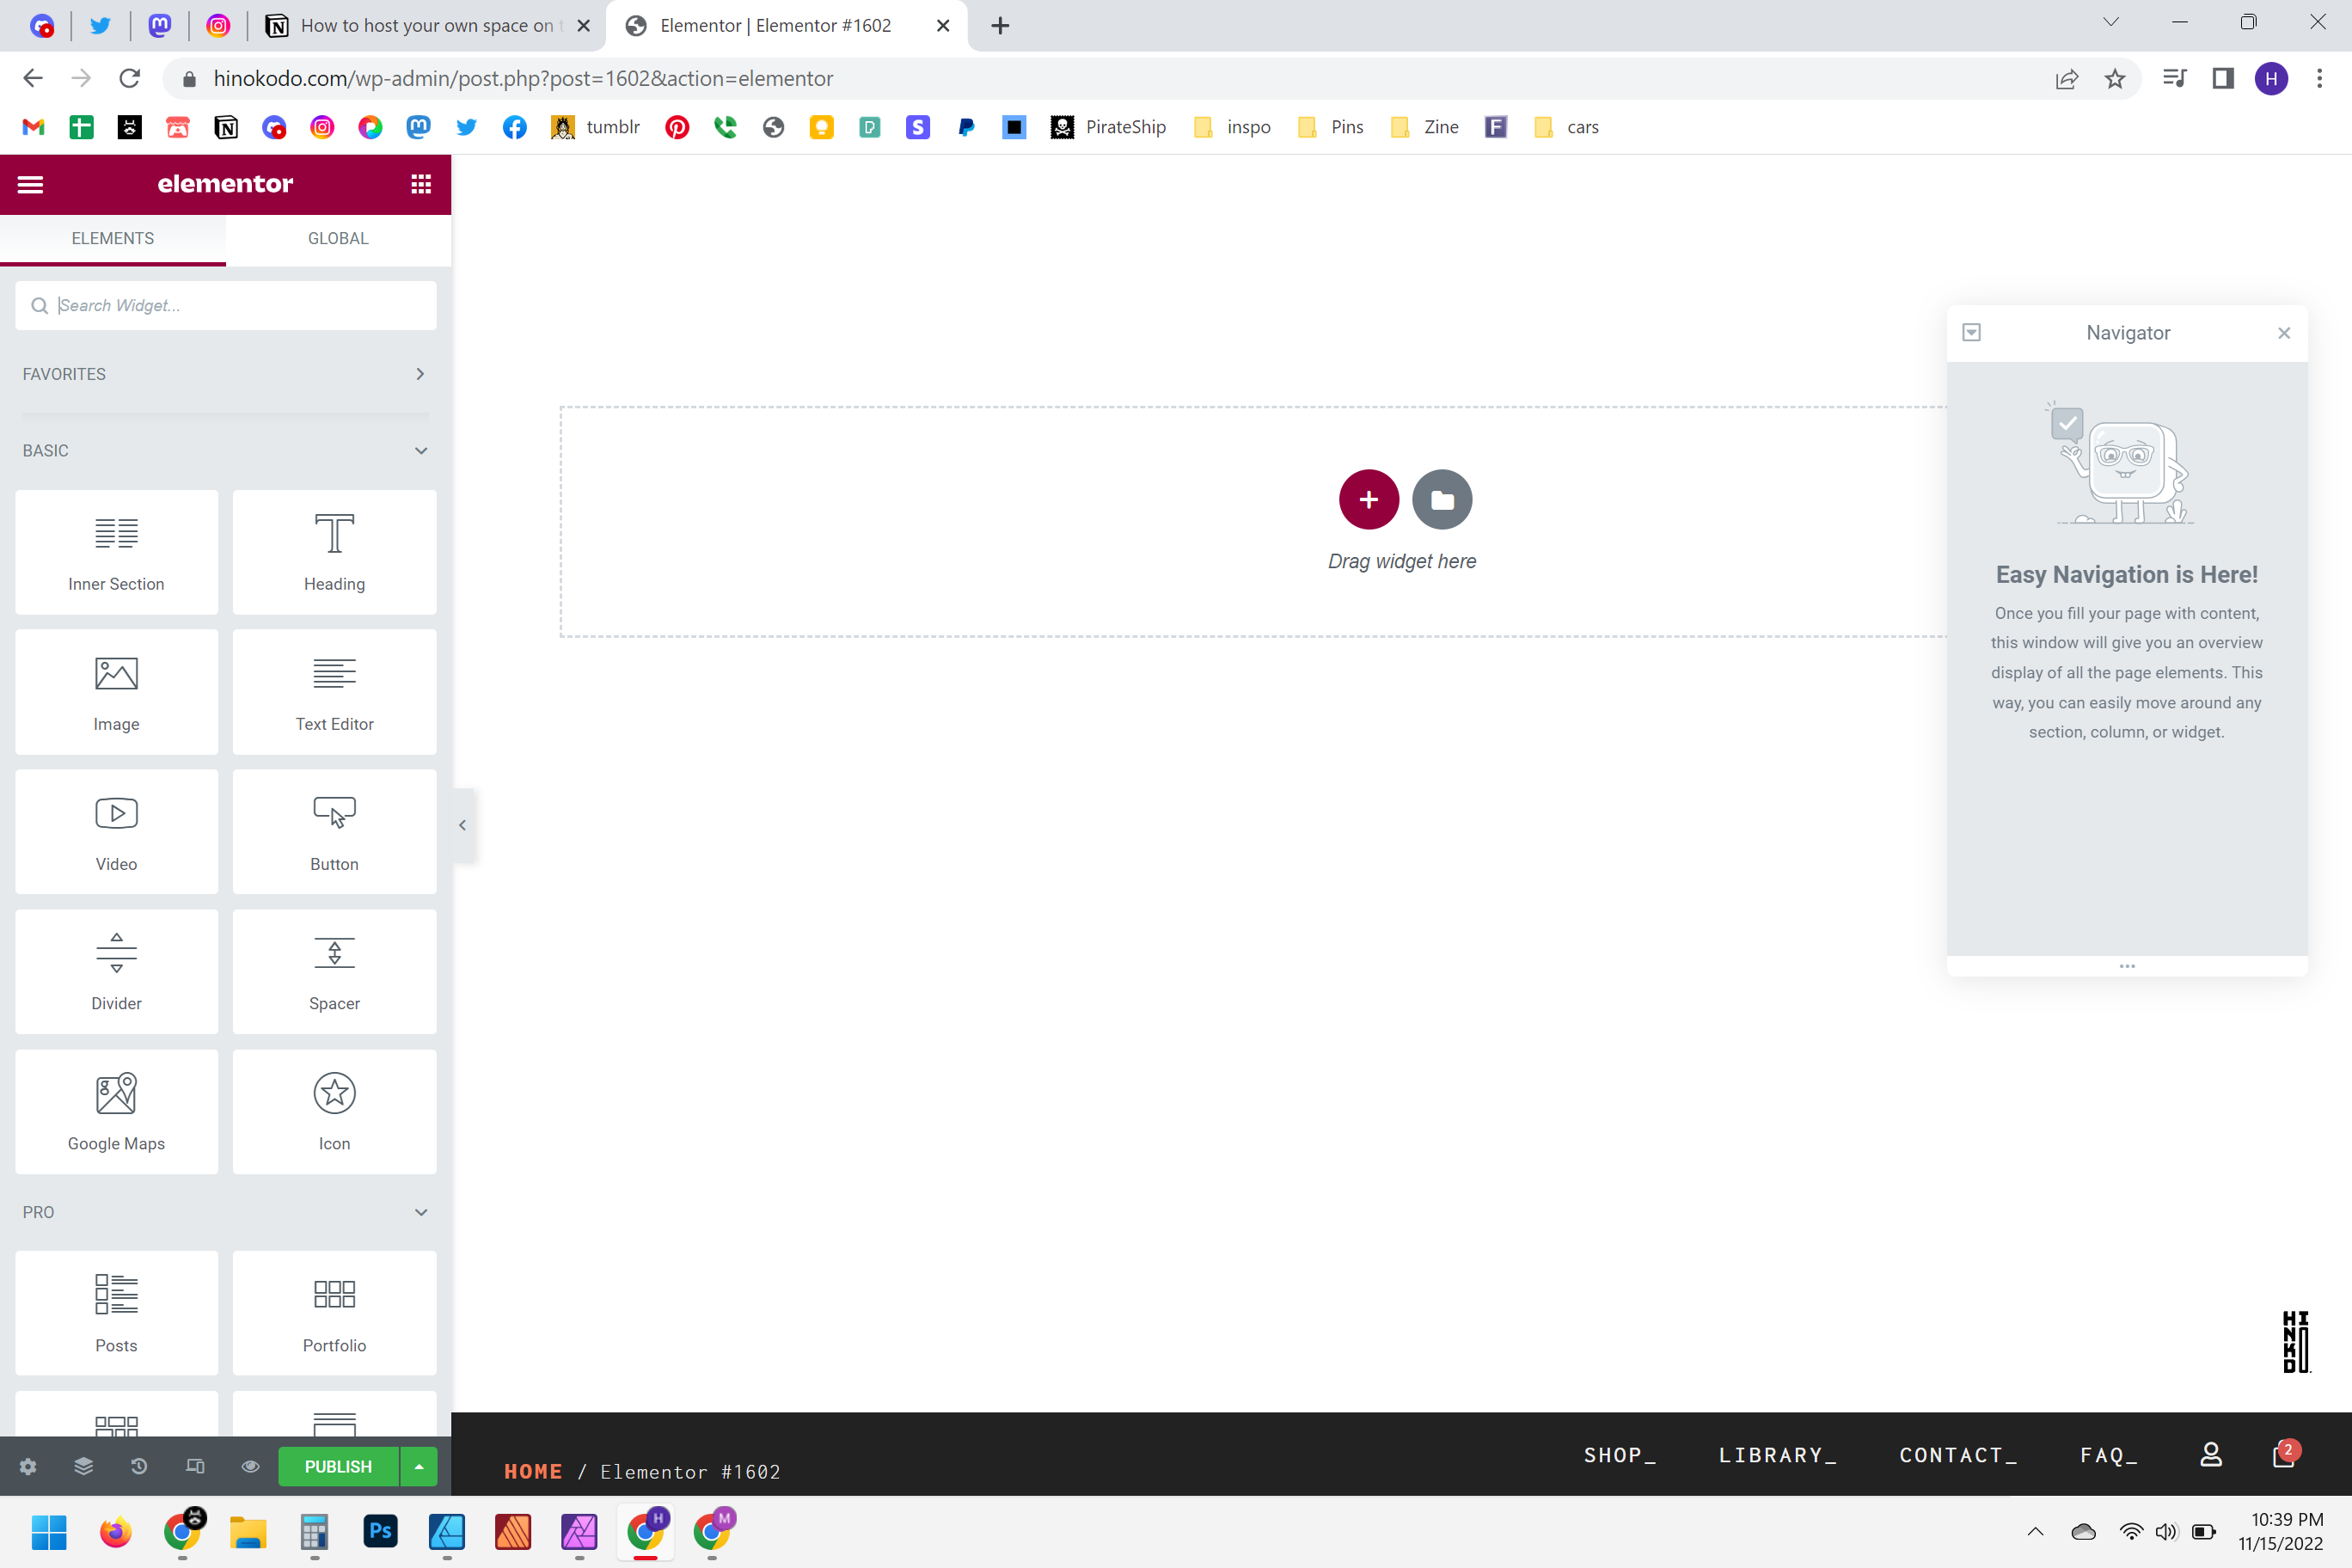
Title it whatever you want. (It’s going to be your new home page in this tutorial) Then click on the blue button at the top that says “Edit with Elementor”. That is going to take you to a page that looks like this:
Ok from here you’re kind of on your own. For practice, I recommend trying to recreate one of those link trees you see in everyone’s profiles on Twitter and Instagram. You know, the ones that kind of look like this:
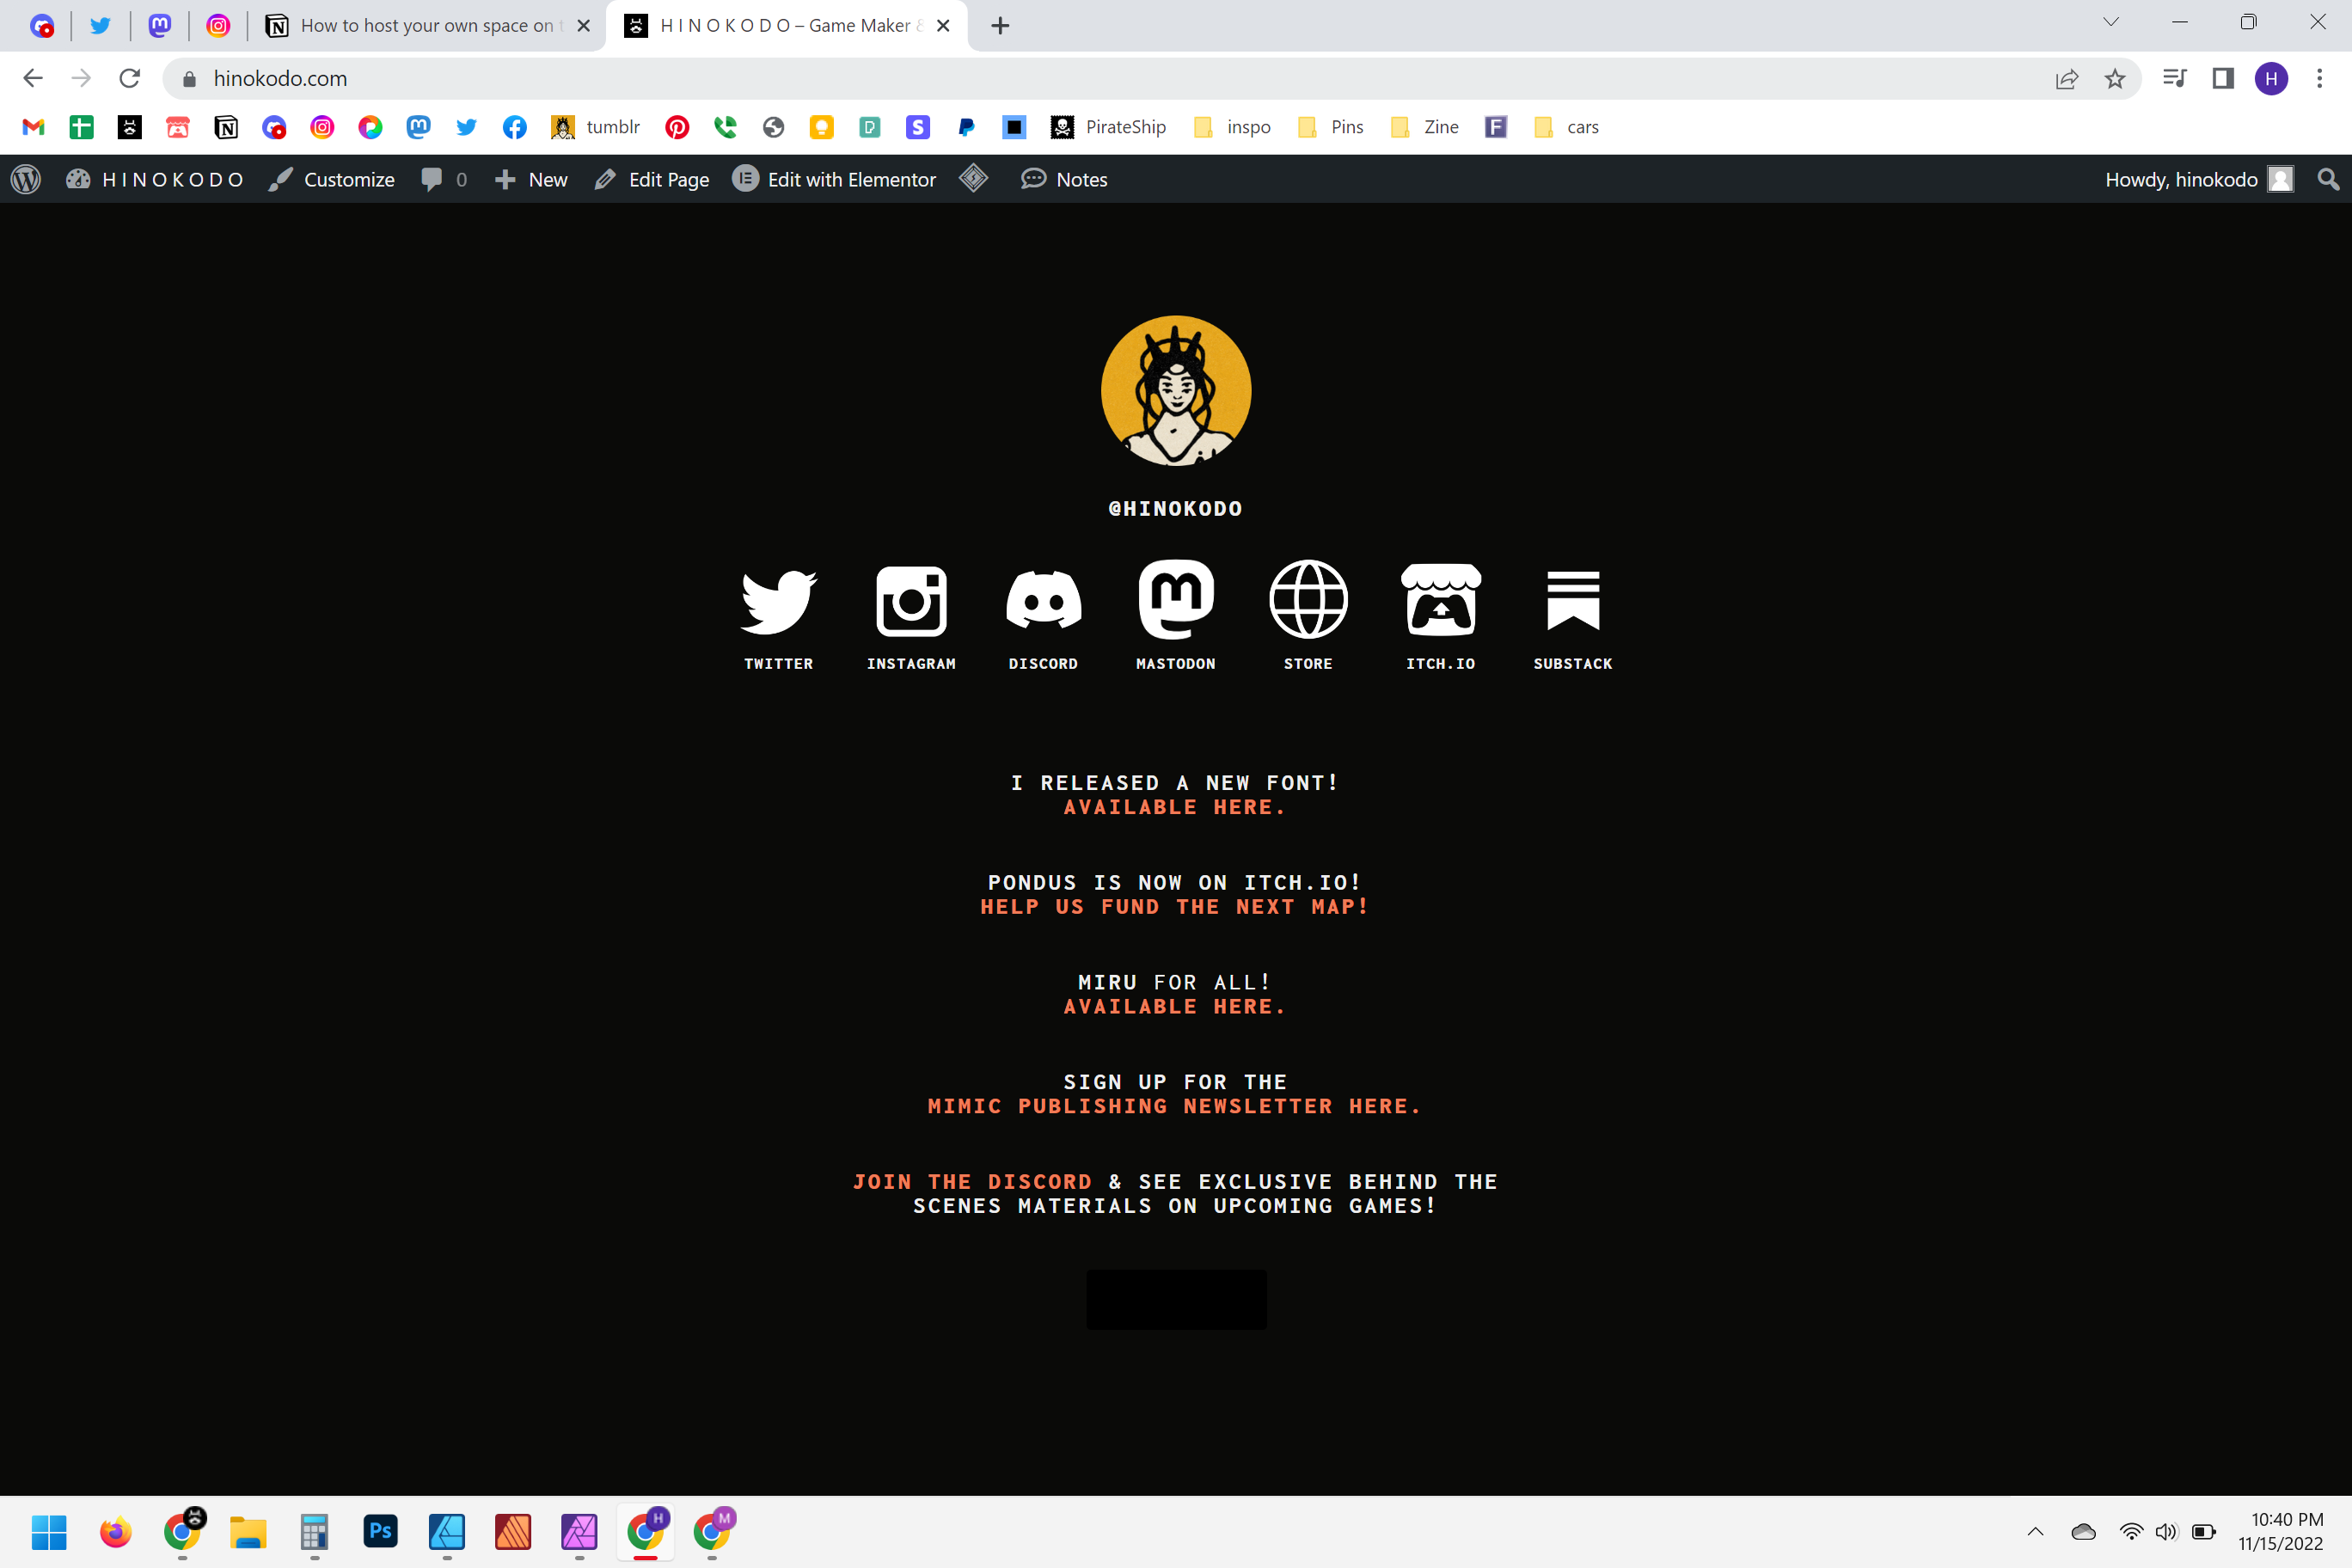
Everything on this example page was made using the top 4 Elementor block options. Actually only “image”, “text editor”, and “heading”. Every now and then I’ll throw in a “spacer” block to give the text some room to breathe. When designing a web page, start from top to bottom. At the bottom of the Elementor editor, (hover over the tiny icons) you’ll see one that says “responsive mode” I recommend clicking that and leaving it on while you build your site. It puts a banner at the top, that lets you click to see what your site will look like on desktop, tablet, and mobile. You want to look good on phones. It’s 2022 and majority of the web is viewed through a phone.
You have to make your site look good on a phone.
This part is like playing in a sandbox. You’re limited to your creativity, but practice makes perfect and I recommend practicing. Throw all the boxes on the site and see what each thing does. Play with their settings. Get weird! You can’t break anything. If you don’t like the way it looks, you can simply delete the boxes you put down. (Another helpful tip, is at the bottom next to the responsive mode button, there’s a button called “navigator”. It pops up a little layer manager and that lets you move blocks around and delete them easily, especially when you have a lot of things going on. )
If you want to see me rebuild this link tree style page, let me know in the comments. If enough of you peer pressure me, I’ll probably do it.
When you’re done designing, you’ll need to tell Wordpress you want to use it as your home page. You can do that by going back to your dashboard.
Then hover over “Appearance” and click on “customize”. From there just tap Homepage settings. Make sure your homepage will display “a static page” and then select the page you just edited with Elementor as your home page (if that’s the page you want). I like this as my homepage because I can just put my website link on any site without a string of text after it. I can use just www.hinokodo.com and that way it’s still short and I don’t have to pay or try to figure out how to use one of those short urls. People can read my website and remember it. No one remembers sht.dd/sadk
Ok the next steps are optional. If you feel comfortable around Wordpress and you want to have a shop, you’ll do these things and you can replace Squarespace and Shopify.
This is a very professional industry standard go-to for Wordpress. It’s a plugin, so add it like you did Elementor. (If you didn’t add Elementor and chose to find a theme, totally ok. If you use Woocommerce, you’ll need to find a theme that works with Woocommerce. It adds a few more pages to websites like a cart and stuff that normal themes don’t bother making pages for. )
Most of the setup for Woocommerce is done in the settings. (In your dashboard under Woocommerce) This part of the site setup is so personal and different for everyone. Fill it all in with your information.
You’re going to need to create a Paypal & a Stripe account. At this point you’re running a business and should prepare for that world. Try and keep personal expense separate from business. Track your purchases for tax season. You know the drill.
Only recommendation I have, is if you have a ‘business name’ or moniker you go under, you should try and snag the Gmail for it and use that for all your business dealings so everything is under one address. But you do you.
If you’re setting up a Woocommerce shop and stuff. You’re going to have to deal with the headache that is shipping packages. Woocommerce makes it pretty straight forward when you get orders (they have an app I recommend you download to track orders, looks better visually, I think.)
But if your plan is to use usps.com or ups.com or to the post office and pay for postage, you’re doing it wrong.
There’s a free popular website called pirateship.com , idk how it works, but they offer lower rates than what USPS does online or in their stores. (At least for the stuff I sell, I found USPS was always the cheapest shipping option, and so far very fast with tracking!)
The nice thing about Pirateship is you don’t have to manually type in all the addresses you may get with orders, you might mistype something! Instead you can just click the “import from Woocommerce” button they have when shipping labels. It’ll take all your most recent orders and you can get labels that way. It’s great.
Ok that wraps up this tutorial. Post your questions below and I’ll do my best tech support. I’d love to see all the websites you make from this. Like, show me your new place, let me take a look around.
Until next time.
Oh, buy my stuff! Check out my Itch.io page and my website: www.hinokodo.com (this whole site is made using the method above! All in Elementor and Woocommerce baby!)
Did you like this post? Tell us

Leave a comment
Log in with your itch.io account to leave a comment.