(Unity tutorial) OnValidate is my babe. How to use Unitys functions and gizmos to make your designlife easier. Same thing.
Disclaimer or whatever: This is not this cycles devlog, this is a tutorial about using some useful functionalities.
Use the OnValidate function to automate tedious actions and use Gizmos to make your editor more readable.
This is the situation. You have a gameobject that has a script on it, and a particle system. On the script is a variable, and when it changes you want to change the emission rate on the particle system. You could do this manually, if you are going to create one of these things. But when you know that you will place way more than one (up to 50 or 100), then doing it manually begins to sound like a real pain. And this was the way I used to do things! I would do all of this tedious work myself, without even thinking about making it more efficient. Then I did some research and suddenly I could create, and most importantly, iterate upon my levels waaaay faster.
Part 1: the example script
So for this tutoral I will use a script I made to create wind that moves a Rigidbody2D when it comes within a specific area.
Here is the code for it:
public class Wind : MonoBehaviour
{
    public Vector2 size; //how big is the windzone
    public LayerMask affectedLayers; //the layers that gets effected by the wind
    public float strenght; //how strong the wind is
    private void FixedUpdate()
    {
        //get the colliders in the chosen area
        Collider2D[] InArea = Physics2D.OverlapBoxAll(transform.position, size, transform.rotation.eulerAngles.z, affectedLayers);
        //loop through the colliders. If the collider has a rigidbody add a force in the direction of the wind.
        foreach(Collider2D col in InArea)
        {
            if (col.GetComponent<rigidbody2d>())
            {
                Rigidbody2D colRb = col.GetComponent<rigidbody2d>();
                Vector2 forceToAdd = Quaternion.Euler(0, 0, transform.rotation.eulerAngles.z) * Vector2.right * strenght; //don't look at this one. It is very ugly code to convert from degrees to a Vector2
                colRb.AddForce(forceToAdd);
            }
        }
    }
}
The code works, but it looks like this in the scene view:
It tells you jack shit about how big the effected area is, which direction the wind goes. It tells you NOTHING. So let's make it tell something.
Part 2: gizmos
Let's fix not knowing what is going on by placing out some Gizmos. (I will get to the OnValidate function, I promise you)
The first thing that should be shown is the area that the wind covers. So let's display a box around the area!
private void OnDrawGizmos()
    {
        Gizmos.DrawWireCube(transform.position, size);
    }
Problem solved, right? Not really. I want to rotate the gizmo, because the object can be rotated and that will change the direction of wind, and the rotation of the OverlapBox that gets all of the gameobjects to move.
So how do you rotate a gizmo? Simple answer, you can't. Less simple answer, there is a workaround:
private void OnDrawGizmos()
    {
        Gizmos.matrix = transform.localToWorldMatrix; //sets the world matrix to the matrix of this transform
        Gizmos.DrawWireCube(Vector2.zero, size); //change the position from the transforms center to 0, 0
    }
Question is; what does this actually do? To be completely honest, what I figured out was that it sets the middle of the world, from the gizmos perspective, to be transform. I hope that explains it, if you want to understand it better, I recommend you to use a programmers number one skill, to google.
So now it looks like this in the scene when the size is set to 10 by 10 (and you can rotate it now):
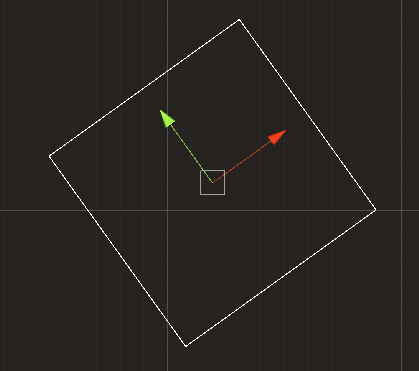
That's great and all, but we still have no clue where the wind is going. So let's make an arrow that points to the right (that's the direction that the wind blows).
Now how in the world do you create an arrow gizmo that:
- Moves along with the transform
- Is rotatable
- Doesn't look like shit
You can't rotate a gizmo icon, so I had to do something different. So up with a great solution. I can draw an arrow from a bunch of lines! So here is how I did it:
private void OnDrawGizmos()
    {
        //draw the box that visualizes the size of the windzone
        Gizmos.matrix = transform.localToWorldMatrix;
        Gizmos.DrawWireCube(Vector2.zero, size);
        //draw an arrow to indicate the direction of the wind
        //a vector array containing all of the points the line should go through
        Vector2[] positions = new Vector2[6]
        {
            new Vector2(-2, 0),
            new Vector2(1, 0),
            new Vector2(1, 1),
            new Vector2(2, 0),
            new Vector2(1, -1),
            new Vector2(1, 0)
        };
        //Loop through the points and draw a line from that point to the next one.
        //Don't do one for the last item though, because that would result in a indexoutsidearray error.
        for (int i = 0; i < positions.Length - 1; i++)
        {
            Gizmos.DrawLine(positions[i], positions[i + 1]);
        }
    }
Here is how it looks:
Beatiful! That's the gizmos that are useful for this example, so I'm stopping there.
Part 3: How to use OnValidate.
OnValidate is called when you change something about the script in the editor. So it is very useful for automating tedious things, like making a particlesystems shape change depending on the size of the wind. So let's do exactly that.
private void OnValidate()
    {
        ParticleSystem ps = GetComponent<particlesystem>(); //get the particle system on this gameobject
        ParticleSystem.ShapeModule editableShape = ps.shape; //set the shape module as its own variable because the variables in it can't be be acessed otherwise
        editableShape.position = new Vector2(-size.x / 2, 0); //set the shapes position to be at the left edge of the windzone
        editableShape.radius = size.y / 2; //since the emission shape is a line changing the radius will make it longer
    }
And here it is in action:
It has some issues:
- The amount of particles that are emitted stays the same, so when the are gets bigger the density of particles gets smaller
- The particles dies sometimes before, sometimes after the end of the zone, depending on the width of the zone
Fixing these are preeeetty easy:
private void OnValidate()
    {
        ParticleSystem ps = GetComponentInChildren<particlesystem>(); //get the particle system on this gameobject
        ParticleSystem.ShapeModule editableShape = ps.shape; //set the shape module as its own variable because the variables in it can't be be acessed otherwise
        ParticleSystem.MainModule editableMain = ps.main; //set the main module, same reason as the shape
        ParticleSystem.EmissionModule editableEmission = ps.emission; //same thing here
        editableShape.position = new Vector2(-size.x / 2, 0); //set the shapes position to be at the left edge of the windzone
        editableShape.radius = size.y / 2; //since the emission shape is a line changing the radius will make it longer
        editableEmission.rateOverTime = 4 * size.y; //set the rate over time(this is the normal emission rate) to be 4 * the height of the zone. Why 4? Because it looks good. You can turn the four into a variable for easier editing from the inspector
        editableMain.startSpeed = new ParticleSystem.MinMaxCurve(strenght * 0.8f, strenght * 1.2f); //Create a new minmax curve and then assign it to the startspeed
        editableMain.startLifetime = 1 / strenght * size.x; //the start lifetime should be 1 / strenght(the strenght is how quickly the particles will move) * size.x(the length that the particles should move)
    }
And how it finally looks in action:
And that's it! You have now learnt how to help yourself to make your life easier. I learned all of this when developing my game, so if you would check it out it would be very sweet of you!