Indie game storeFree gamesFun gamesHorror games
Game developmentAssetsComics
SalesBundles
Jobs
Tags

Bestiarium

A topic by Yanko Oliveira created Apr 03, 2016 Views: 1,174 Replies: 4
Viewing posts 1 to 5

Hey folks! This is my first post here. I'm currently working on a personal project (tentatively) called Bestiarium, which is still in early prototyping phases, so it means I don't know if it will be ever finished or not (it might simply turn out to not be fun in the end). My first step was this small toy that I published here on itch.

I'm reblogging this from my personal blog, which I hope is not a problem - I'm doing this because I'm trying to find a platform for these articles/tutorials where it actually helps other developers the most, hence why copying it here and not just posting an external link. I wasn't sure if I should post this in this area or on "General Development", but anyway, if you think this kind of stuff is interesting for me to keep a devlog on, let me know :)


image

After generating procedural chess pieces, the obvious step to take would be full blown creatures. There's this game idea I'm playing around with which, as every side project, I may or may not be doing - I'm an expert in Schrödinger's gamedev. This one even has a name, so it might go a longer way.

Bestiarium is deeply dependent on procedural character generation, so I prototyped a playable Demon Invocation Toy - try it out before reading! In this (quite big) post, I'll talk about some of the techniques I've experimented with. Sit tight and excuse the programmer art!

Part 1: Size matters

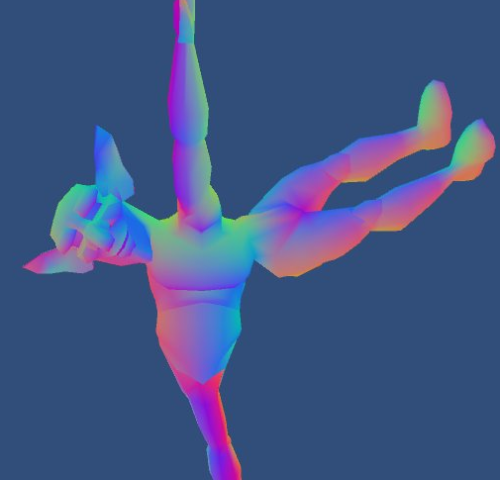
One thing I always played around with in my idle times when I worked on the web version of Ballistic was resizing bones and doing hyper-deformed versions of the characters (and I'm glad apparently I'm not the only one that has fun with that kind of thing). Changing proportions can completely transform a character by changing its silhouette, so the first thing I tried out was simply getting some old models and rescaling a bunch of bones randomly to see what came out of it.

One thing you have to remember is that usually your bones will be in a hierarchy, so if you resize the parent in runtime, you will also scale the children accordingly. This means you will have to do the opposite operation in the children, to make sure they stay the same size as before. So you end up with something like

private float ScaleLimb(List<Transform> bones, float scale) { 
   for (int i = 0; i < bones.Count; i++) { 
      bones[i].localScale = new Vector3(scale, scale, scale);  
      foreach (Transform t in bones[i]) { 
         t.localScale = Vector3.one * 1 / scale; 
      } 
   } 
   return scale; 
} 

image

But that leads to another problem: you're making legs shorter and longer, so some of your characters will either have their feet up in the air, or under the ground level. This is a thing that I could struggle with in two ways:

  1. Actually research a proper way of repositioning the character's feet via IK and adjust the body height based on that.
  2. Kludge.

I don't know if you're aware, but gambiarras are not only a part of Brazilian culture, but dang fun to talk about if they actually work. So I had an idea for a quick fix that would let me go on with prototyping stuff. This was the result:

image

Unity has a function for SkinnedMeshRenderers called BakeMesh, that dumps the current state of your mesh into a new one. I was already using that for other things, so while I went through the baked mesh's vertices, I cached the one with the bottom-most Y coordinate, and then offset the root transform with that amount. Dirty, but done in 10 minutes and worked well enough, so it allowed me to move on. Nowadays I'm not using the bake function for anything else anymore, so I could probably switch it to something like a raycast from the foot bone. Sounds way less fun, right?

Part 2: variations on a theme

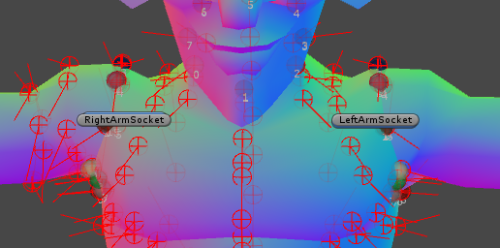
I started looking into modular characters, but I ended up with a problem: modularity creates seams, so it looks great on clothed characters (e.g.: it's easy to hide a seam for hands in shirt sleeves, for the torso in the pants etc). In Bestiarium, however, I want naked, organic creatures, so the borders between parts have to look seamless.

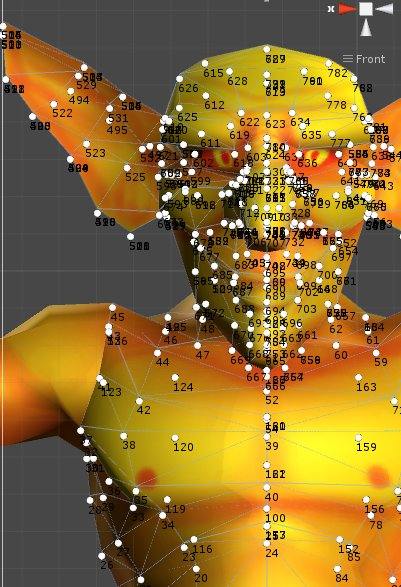
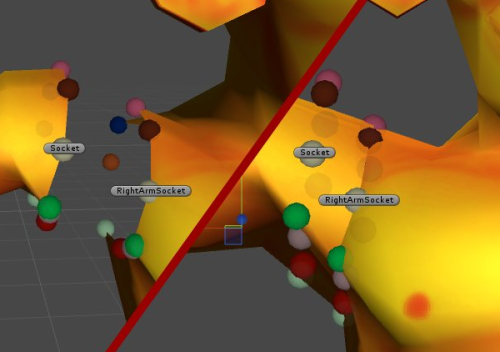
This is probably the problem I poured most of my time into, and yet, I couldn't find a good solution, so I timed out on that. The basics are easy: make sure you have "sockets" between the body parts that are the same size so you can merge the vertices together. But merging vertices together is way more complicated than it seems when you also have to take care of UV coordinates, vertex blend weights, smoothing groups etc. Usually, I ended up either screwing up the model, the extra vertices that create the smoothing groups or the UV coordinates; I even tried color coding the vertices before exporting to know which I should merge, but no cigar. I'm pretty sure I missed something very obvious, so I'll go back to that later on - therefore, if you have any pointers regarding that, please comment!

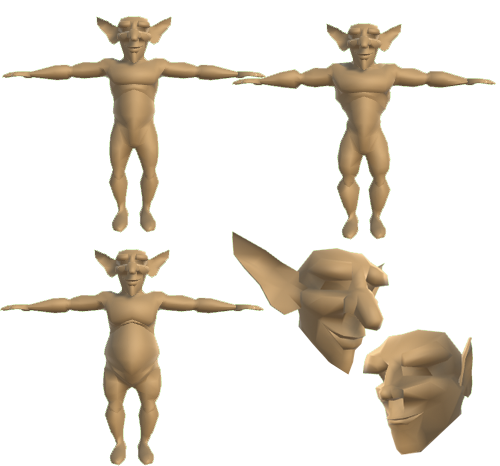
However, since I wanted to move on, I continued with the next experiment: blend shapes. For that, I decided it was time to build a new model from scratch. I admit that the best thing would be trying out something that wasn't a biped (since I've been testing with bipeds all this time), but that would require a custom rig, and not having IK wouldn't be an option anymore, so I kept it simple.

The shapes were also designed to alter the silhouette, so they needed to be as different from the base as possible. From the base model, I made a different set of ears, a head with features that were less exaggerated, a muscular body and a fat one.

image

Part 3: there is more than one way to skin an imp

In the kingdom of textures, a good cost/benefit variation will usually come from colors. Biggest problem is, if you simply tint, you will probably lose a lot of color information - because usually tinting is done via multiplication, your whites will become 100% the tinted color, so you lose the non-metallic highlights.

Ok, so, let's focus on those two things: multiplications and percentages. As I've said before, all the cool stuff that computers do are a just a bunch of numbers in black boxes. There's a lot of ways to represent a color:RGB, HSL, HSV… but in all of them, you can always extract a 0 to 1 value, which is basically a percentage from "none" to "full value" in a color channel. Whatever that represents in the end, it's still a [0,1] that you can play around with.

There's a tool that you can use to texture stuff which is gradient mapping. Basically what you do is provide a gradient and sample it based on a value from 0 to 1. You can do a lot of cool stuff with it, including… texturing your characters!

Granted, that's pretty easy to do in Photoshop, but how to do that in runtime? Shaders to the rescue! There's another thing that goes from 0 to 1, and that's UV coordinates. This means we can directly translate a color channel value to the UV coordinate of a ramp texture, sampling the pixel in the secondary (ramp) texture based on the value of the main (diffuse) one. If you're not familiar with the concept, go see this awesome explanation from @simonschreibt in his article analyzing a Fallout 4 explosion effect.

In your shader, you'll have something like

float greyscale = tex2D(_MainTex, IN.uv_MainTex).r; 
float3 colored = tex2D(_Gradient, float2(greyscale, 0.5)).rgb; 

Which roughly means "let's read the red channel of the main diffuse texture into a float using the UV coordinates from the input, then let's use that value to create a 'fake' UV coordinate to read out the ramp texture and get our final color".

image

Neat! We have a color tint and we don't necessarily lose our white highlight areas. But… that still looks kind of bland. That's because we have a monochromatic palette, and no colors that complement it. This is the point where I really started missing the old school graphics, where you could have 50 ninjas in Mortal Kombat by simply switching their palettes. So this is where I got kind of experimental: how could we have palettes in our 3d texture?

It would be easy if I just wanted to have 1 extra color: creating a mask texture and tinting the pixels using that mask would suffice. But what if we wanted to have several different colors? So far we have 1 diffuse texture and 1 for the ramp - would we then have to add 1 extra texture for each mask?

What I did in the end was having a multi-mask within one single channel: each area would have a different shade of gray, and that would also be used to read from a ramp texture. Since there's filtering going on, we can't really have all different 256 values, because the graphics card will blend neighboring pixels, but we could have more than 1. I tested with 3 and it looked decent, although it did contain some leaking, so I have to look a bit more into it.

image

So we're down to 1 diffuse, 1 mask and 2 ramps (4 against 6 if we had 3 different masks), right? Wrong. Remember: we're talking a single channel, so this means we can actually write both the diffuse AND the masks into 1 RGBA texture, simply using 1 channel for each. And that even leaves us 1 extra channel to play with, if we want to keep Alpha for transparency! This means if we wanted to only have 2 masked parts, we could even ditch the second ramp texture, the same if we had no transparency and wanted 3 masks.


image

Ok, we have a shader that we can cram stuff into, so all we must do is make sure we have enough ramps to create variety. This means either having a bunch of pre-made ramp textures or…

Part 4: gotta bake 'em all!

Unity has a very nice Gradient class, which is also serializable. This leaves us the option of actually generating our gradients in runtime as well, also randomizing them. Then we simply have to bake a ramp texture from the Gradient, which is quite simple:

private Texture2D GetTextureFromGradient(Gradient gradient) { 
   Texture2D tex = new Texture2D((int)FinalTexSize.x, (int)FinalTexSize.y);
   tex.filterMode = FilterMode.Bilinear; 
   Color32[] rampColors = new Color32[(int)FinalTexSize.x];  
   
   float increment = 1 / FinalTexSize.x;   
   for (int i = 0; i < FinalTexSize.x; i++) {
      rampColors[i] = gradient.Evaluate(increment * i); 
   }   
  
   tex.SetPixels32(rampColors); 
   tex.Apply(); 
   return tex; 
} 

Here's where I had to make a decision of where to go next: researching procedural palettes, or simply getting a bunch of samples from somewhere. For the purpose of this prototype, I just needed good palettes to test my shader, so I wondered where I could find tons of character palettes.

Even though I'm a SEGA kid, there's no discussion about Nintendo being great at character color palettes. Luckily, right about the time I was doing the prototype, someone at work sent a link to pokeslack.xyz, where you can get Slack themes from Pokémon. Even better: the page actually created the palettes on the fly based on the ~600 Pokémon PNGs it used as source.

I wrote a Python script that downloaded a bunch of PNGs from that site and ported the palette creation code to C#, then made a little Unity Editor to extract the palettes and make them into gradients I could use to create ramp textures. Ta-da! Hundreds of palettes for me to randomize from!

The result to all of this is the Invocation prototype, so make sure you check it out and tell me what you think!

image

Prologue

If you read all the way here, I hope some part of this wall of text and the links within it were interesting or of are of any use to you! In case you have any questions and/or suggestions (especially regarding properly welding vertices at runtime without ruining everything in the mesh), hit me up in the comments section or on twitter @yankooliveira!

I'll keep doing experiments with Bestiarium for now, let me know if you want to keep hearing about it. Who knows, maybe this is a creature I'm supposed to invoke.

Very interesting read. Looking forward to see more follow ups on this topic :)

I think the obvious value of such work would be generated enemies that don't look the same.

Oh and now that I think about that, it reminds me of Jade Cocoon. Jade cocoon was an RPG game were you could capture creatures and fight with them (pokemons you said?). The interesting part was, you could merge creatures into one to join their abilities into a new offspring. But the abilities were not the only thing inherited. Indeed, creature shared morphological characteristics of their parents. Maybe you should take a look at the game ;)

I'll probably do a post regarding my plans for the design of the game, but I'm guessing it's going to be more like Stardew Valley than your typical ARPG haha :D
But yes, this idea came as a spin off of generating enemies for another game idea of mine.

It all started out with a design for something I could play with my wife, which would be something like Kiling Floor meets Diablo (in a tiny arena, not a sprawling hell universe). Since even with the small scope it was still pretty big for my free time, I decided to split it into 2 smaller prototypes: one for the procedural characters, the other for the arcadey 3rd person shooter - if both worked well, I'd have the tech for the original idea. However, the procgen prototype evolved into something more interesting (granted, so far only in theory), so I'll have to see how it goes from now.
In any case, I'll take a look at Jade Cocoon, it's always good to have some inspiration!
Thanks for reading :)

Before my last blog post, I had some ideas floating around on how to solve my problem with being limited by morph targets. After studying how Impossible Creatures approached its "modular" creatures, I was pretty sure I was on the right track. Exploring that direction gave me pretty good results, but also paved way to a way bigger problem, that I still haven't solved. Anyway, let's start from the beginning.

When I first started the Invocation Prototype, I wanted to have different character parts being randomized for a lot of variation. That is super simple and standard for characters that actually have good geometry to hide the seams (e.g.: clothes), but my creatures needed to be bare naked. I started by trying to merge vertices together automatically, but that had poor results, and I always ended up breaking something (either the hard edges that I wanted, or the UVs).

Now, here's what happened to me, and I guess this is a very common thing amongst technical folks exploring solutions. Going back to square one usually involves answering the question "what exactly do I want to achieve?"- and sometimes you're so deep into one idea that your answer gets biased by that.

On my first approach, I answered that with "I want to weld vertices that are close enough to each other together".

Let's go back to the very basics. then. All meshes are comprised of triangles, and those triangles are defined by vertices. Triangles are one sided, so you need a normal to define which direction a triangle is facing.

However, in a game engine like Unity, the normals aren't stored per triangle, but per vertex. This allows you to interpolate between the triangle's vertex normals to create the effect of smooth shading. If you have a mesh that is to be rendered smoothly, but you want hard edges, you need to add extra vertices to that edge, so that you can define neighboring triangles that visually share an edge, but seemingly face different directions because the way the gradients end up being calculated. This is obviously terrible to understand in text, so just watch the video below:

So taking a step back: what exactly did I want to achieve?

"I want to combine meshes with no visual seams."

That doesn't really mean that I want to combine vertices, or reduce their amount, which was my original attempt. That only means that I have to make sure that the triangles line up (i.e. the "edge" vertices are in the exact same position), and also that the normals make the shading smooth between these neighboring triangles. But how to do that automatically?

Here's the thing: computers are really good making very specific, repetitive tasks, which we suck at. However, we're really good at detecting abstract patterns, which is something that is really hard for them to do because we really suck in describing in a logical and explicit manner how exactly we detect those patterns - basically because we just don't know exactly how that works (and my bet is that we'll probably find out the definitive answer for that while trying to teach computers to do the same).

After studying the workflow used for Impossible Creatures, I realized that maybe it was better cost/benefit to focus my attempt into creating a good workflow for helping the computer in the part that it sucks with. This is especially true because whatever algorithm I'd end up using would require to do things runtime, so I'd have to optimize a lot even to prove the concept. So taking the question one step forward:

"I want to make an open edge from a 'guest' object 'lock' onto an open edge from a 'host' object in a way that there are no visible seams. Also, this has to happen in run time."

So here was the idea: I'd tag the vertices in both edges, and the vertices from one object would be transported to the equivalent position in the other one, then the normals would be copied from the host object to the one that was latching into it.

I started out by experimenting with adding handles to every vertex in the object so I could identify and manipulate them, but it was quickly clear that approach wouldn't scale well.

I don't really need to tag vertices, I need to tag what I think vertices are. So let me help you help me, Mr. Computer: here's a Vertex Tag. A Vertex Tag is a sphere that fetches all vertices that might exist within its radius. With that, I can, outside of runtime, cache all the vertex indices that I visually classify as "a vertex in the edge", even if those are actually multiple vertices - i.e. a translation between what I'm talking about when I think of a vertex and what Unity thinks a vertex is.

Snippet

public void GetVertices() { VertexIndexes = new List<int>(); Vector3[] vertices = GetTargetMesh().vertices; Transform trans = GetTargetTransform(); for (int i = 0; i < vertices.Length; i++) { Vector3 worldPos = trans.TransformPoint(vertices[i]); if (Vector3.Distance(worldPos, transform.position) < Radius) { VertexIndexes.Add(i); } } }

GetTargetMesh() and GetTargetTransform() are just handler methods because this might work with either MeshFilters or SkinnedMeshRenderers. As you can see, this is not optimized at all, but that's not an issue because we're not supposed to do that in runtime.

Now we need something to control a group of tags: a Socket. A Socket is comprised of several vertex tags, and it defines where things should "connect" in space. That way, we use the sockets to position the objects themselves (in a way that they properly align), and then can control all the tags to be "joined" to the proper vertices. Right now it's working on top of the tagged vertices only (so the further apart the objects are, the more deformation it causes), but it would even be possible to think about something like using verlet integration to smoothly "drag" the neighboring vertices along - which for now really seems like overkill.

One big advantage of this Socket system is that it can be improved to try and adjust itself to different amount of vertex tags in the base mesh and the attached mesh: if there are more vertex tags on the host object, you might force the host object itself to change, or you can make all the extra vertex tags of the guest object to go to the same tag in the host object. Obviously, the best thing is trying to keep the amount either equal in both sides, or very close to that. Also because, I mean, poor guy.

To make things decoupled, there's this helper class that actually has the "joining" logic: re-positioning the parts, triggering the socket to connect itself to a "host" socket. One thing to keep in mind is that if you mirror an object by setting its scale to -1 in one of the directions, you'll have to adjust your normals too:

Snippet

public void MirrorNormals() { Mesh mesh = Mesh.Instantiate(GetTargetMesh()); mesh.name = GetTargetMesh().name; Vector3[] normals = mesh.normals; for (int i = 0; i < normals.Length; i++) { normals[i].x *= -1; } mesh.normals = normals; SetTargetMesh(mesh); }

There is some debug code in which I can see the direction normals are pointing, and the position of vertices, but my biggest friend has been a shader that paints the model based on the vertex normals (I'm using one from the wiki).

So there, now I can tag vertices, save that information to a prefab and simply get them to connect at runtime, with little overhead because everything is pre-tagged. Although the workflow isn't perfect, some small things can improve it a lot, like snapping tags to vertex positions, improving the way that sockets join vertex tags etc.

I'm so glad the biggest problem was solved, now I can simply start animating the characters.

That maybe have different bone structures for each limb.

Which have to be merged in runtime.

Hm.

I guess it's time to start asking myself the "what exactly do I want to achieve?" question again - although with a problem like animation, it's more like "what am I even doing?".