Indie game storeFree gamesFun gamesHorror games
Game developmentAssetsComics
SalesBundles
Jobs
Tags

Sipho

Design a creature and eat your way to the top of the food chain. · By Sipho, Dominas, DanTM, NinjaKyat

Boss strategies!

A topic by Trogsothoth created Aug 30, 2018 Views: 2,116 Replies: 8
Viewing posts 1 to 11

OK, so I figured it might be prudent to help players advance by sharing boss strategies! Feel free to add you own startegies that have proven helpful or effective in defeating enemies.

BE AWARE THAT THIS THREAD, BY NATURE, CONTAINS SPOILERS!!! 

So don't look if you want a "pure", unspoiled experience.
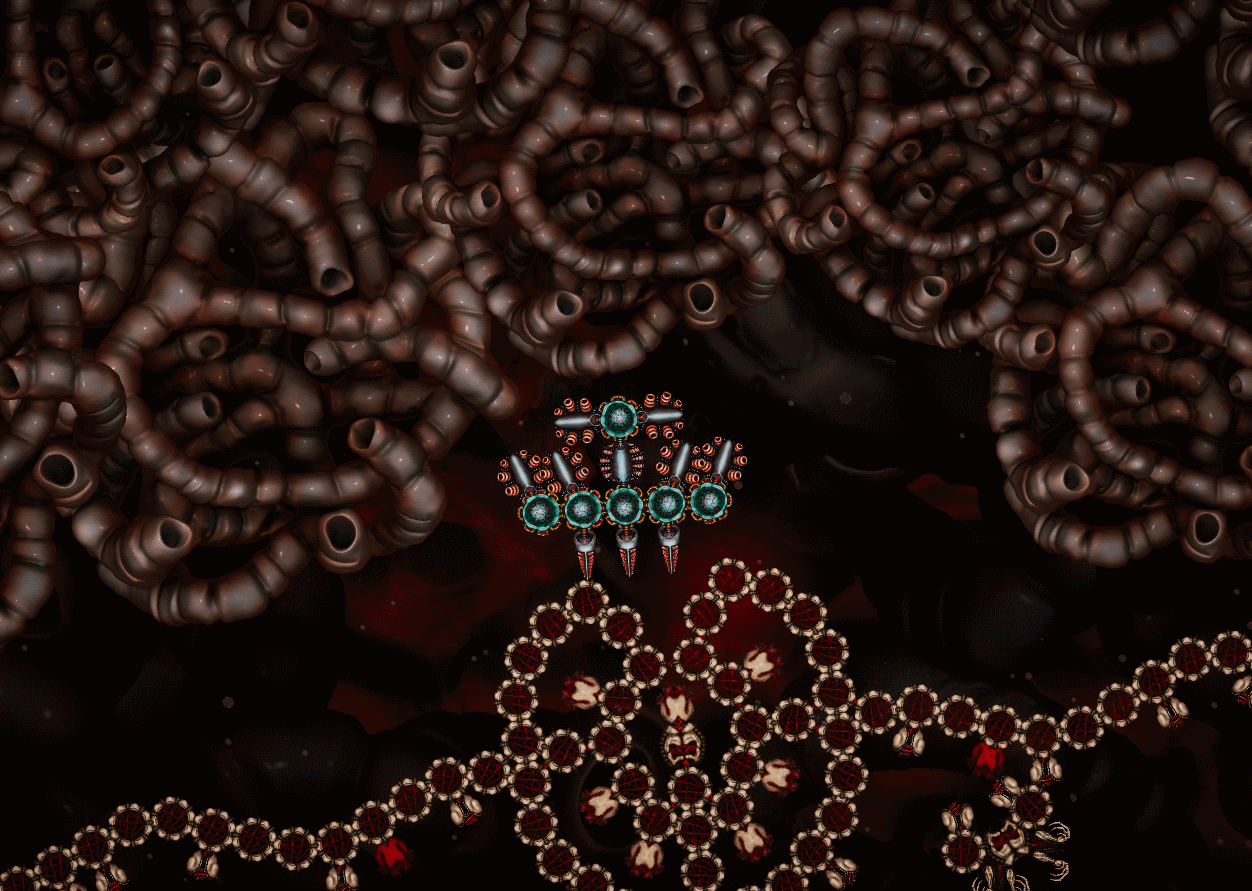


Boss #1

Saenus Beefuarus Boss

Codename: Azure Scissors

Azure scissors is an aggressive but easy(-ish) boss who capitalizes on the Saenus Beefuarus species combat zooid, thankfully not doubling up on his species' mouth parts abilities to stick victims in a loop of being blown into pincers. it's ONLY weapons are those nasty pincers. assuming you are starting with Advena, The mouth part is your best friend with it's poison vomit attack. Get Azure Scissors to charge you by entering his line of sight and back-peddle down through the corridor you spawned in as you continuously belch poison, switching with dash if he manages to start closing and putting you in pinching range. position your mouths to launch poison in a V arc, in order to knock out Azure's scissors quickly. Once he's been (literally) disarmed, you need only fight the force of his mouth pusher zooids to get in close and poison his main part to kill him, or swap out one of your mouths for a spike if you want to give him a good shanking, although you will need that second mouth, and a third, for the next boss!

(1 edit)

Boss #2

Buginis

Codename: Queen of Corrosion

(image courtesy of TH3_3RR0R)

The Queen of corrosion is deserving of her name and a bit tougher than the previous boss. Towards her front, her mouths produce poison mines, and at her posterior she has a deadly battery of flak throwers that can really punish you if you're not on your toes. when you first spawn in she sits in her spawn area, spinning and creating a deadly mine field to prevent a reckless charge with Advena's spike, so if your using the alien invader, you'll need to resort to the poison spewer. It's worth noting that poison using species are not immune to other species' poison attacks. The Corrosion Queen has the same flaw as Azure Scissors: get within sight of her main body (that blurry bit) and she'll immediatly flip around to present her flak guns and charge, firing on all cylinders. the strategy here is virtually the same as the last boss: back-peddle and spit poison at her to wear her down. like Azure Scissors she'll back off after taking a certain amount of punishment. her area is a little less straight forward however, so mind your control scheme and mouse to keep from backing yourself against a rock. I did this a couple of times and it was an immediate death sentence. once you take out the flak throwers she'll pursue you head on with her mine launching mouths, which move a bit differently. If she manages to land some damage on you her stage has algae clumps at the top past the current and down low past some spiky rocks, which could regenerate any lost parts in a pinch. however, the stage after The Queen of Corrosion is the last area i know of before you stop seeing Buginis, so while you may not want to, consider dying to the queen a couple times to gain buginis DNA, as the species' Flak throwers and toxic mines are a MUST in the upcoming fights against a species i haven't even managed to unlock yet at the time of writing, which make up the next boss: Leech Lord.

This species, which i have endearingly dubbed "the leech" until I can discover it's species name, makes up the next boss, Leech Lord, who currently has me pretty much stumped on how to advance. The part forward of the main body is it's mouth, and has a stun attack that can debilitate weapons and parts for a few seconds, effectively rending you neutral. the parts connected immediately right and left of the main body are it's connectors (obviously) which have a regeneration function, which the two times i had them were a godsend, allowing me to rest up and heal before trying to gain nutrients, allowing me to use nutrients exclusively for buying parts. the parts farthest left and right are it's movers, which only move in the directions their "hands" point. And finally it's combat parts, the forward pointing spiked tongues projecting forward from the connecters. These hellish french ticklers latch onto enemies (I.E. you) and slowly damage their target while staying firmly locked onto their target, and possibly (i'm not 100% sure on this though) healing the leech. The boss version of these guys is completely unlike the other two, he's fixed in place, but spawns minions who won't attack him or each other, instead working together to pin you and grind you into sad mush. i fought against hime 8 times in a row before i had to step away from my computer and do something relaxing before i returned to attempt subsequent (and as yet unsuccessful) attacks on this hellish nightmare. When asked, the devs stated that the game is set to a hard mode, and that this boss is an experiment. I imagine somebody has beat this abomination, and in fact it's why i've started this thread, in hopes somebody will come along and help me and all of us continue forward in an expedient way.

I know the way to beat the "leech lord", if you are talking about the one that surrounds and traps you. you want to take out its minions with snipers and slowly cut off its arms. The more you cut off the arms the less minions it can summon until it cant summon minions any more. Then just go straight for the head with snipers to remove the leeches and slowly dig into the boss untill his head is vulnerable, then just rush the core. Hope you find this helpful!

(+2)

I have come to add more to this guide. Of course, more spoilers, especially for those who have difficulty making it past the "???" species boss.


Before that, though, let's touch upon the third boss once more.

I have beaten it on multiple occasions already, however, the difficulty of the boss is so ridiculous, to the point where the tactic used by yours truly to beat that monster of a boss is essentially an exploit.

What you must always keep in mind for the third boss is to never take it head-on. Even if you kill it, if it manages to spawn a minion, they can and will stunlock you, as the minions are programmed to simply ram into you eternally while attacking. The minions are very good at pushing you around for something their size.

The tactic I use is essentially a pseudo-out of bounds exploit. Pseudo, as it doesn't really go out of bounds, but it allows one to be outside the boss' "enclosed area". By making use of the fact that the boss spawns only after the player siphonophore moves to a certain distance and triggers the boss spawn, one can navigate to an area outside the boss itself, since the boss' structure takes time to form when it spawns. Here's how to do it:

1. Make sure your siphonophore is armed enough to deal with the boss quickly, which also helps to deal with any minions that remain after the boss' death. I personally use the "Wall of Death" configuration, but as long as you have a siphonophore design that works for you, it'll do.

2. Swim to the extreme left/right side of the arena, then swim upwards. Make sure your siphonophore is in a position where the boss' zooids won't spawn on top of you.

3. After the boss spawn is triggered, try to squeeze your way to the boss' core, and eat away! Be sure to do this as fast as possible, so as to minimize the number of minion spawns. If your siphonophore is unable to squeeze your way to the core area, you can eat some of the boss' "wall" to make your way there.

4. Celebrate victory, and prep for whatever's ahead.


/!\ Warning: Spoilers for those who've yet to beat the third boss ahead! /!\


And now, for the true final boss of this build of the game.

The Advena Boss.

Codename: The Crown of Thorns


Seen here is an approximate recreation of the boss done by yours truly, approximate, due to the impossible placement of some of the movement zooids on the actual thing (they face diagonally, despite there being two cardinally-placed zooids in the way, which would prevent diagonal placement).

What makes this particular boss dangerous is the arena that it is fought in. Every single wall of the arena is made up of stationary balls of spikes, essentially being the first boss' arena on steroids.  It does not help that the Advena species' Spike zooid is able to instakill zooids given enough force, and the boss' few-but-still-present poison-spewing eater zooids only serve to make the spikesmhave an easier time chewing up your siphonphore.

There are 2 ways to beat this boss.

1. The direct way: A risky-sounding tactic that works most of the time.

Make your siphonophore small and maneuverable, and dart around the boss until you end up on one of its rear "pylons", then eat away. Just beware of the single spikes; a small siphonophore can easily get its core instakilled, even by a lone spike.


2. The cheesy way: A tactic that always works, which makes use of the boss' AI, as well as some creativity. 

You must at least have one eater zooid that produces poison (i.e. Advena or Buginis eater zooids). The boss will always try to get at you near the entrance of the arena, sometimes turning to use the spikes on its "pylons" to reach you. Whenever it does the turn, simply move forward slightly from within the safe player spawn area, spray poison, then retreat. Over time, the boss will die. There are multiple ways to make this easier, however. For one, pairing the Saenus  Beeforus' Eater Zooid (the one that can push) with either Advena or Buginis eater zooid will extend your range if you know how to use them together, allowing you to essentially camp from within the safe zone. Furthermore, the boss' AI actively tries to dodge poison mines, which means that creating a mass of poison mines and advancing forward will lead to the boss' AI seizing up, leaving it terribly vulnerable.

Once defeated, you will gain access to the area where all my gigantic creations are birthed: Free Roam mode.

(+1)

For the Queen of Corrosion boss fight, if you only have melee weapons on you, rushing at her can be suicidal; instead you can use your spikes to hold and push the harmful floating spiky debris. Find these spiky balls and push them towards the boss spawn; as the boss chases you it will damage itself on these. Make sure not to touch spiky balls with unprotected parts of yours, only with the points of your spikes.


As for the infamous Leech Lord or Cage Boss as I call it, here is the strategy I came up with: as I enter the room and boss spawn animation starts, I rush upwards, hide behind the boss as it spawns and eat away at his unprotected brains. Easiest boss ever once you know the trick.


(3 edits)

my tactic is:

When the third boss, the Leech Lord or OMEGA FLOWEY as i call it, spawns,

BACK THE FUCK OUT OF THERE!

and then you won't be trapped in his hell and can wail on him from outside.


Sometimes ramming into the Queen of Corrosion if your creature is melee would be Suicide.

Other times it's deemed as An Easy Kill.


I finished off OMEGA FLOWEY by guessing where his core is gonna be, running inside before he spawns,

and SPAMMING THE TRIGGER.


When im got Mines in the finale boss, i create structure zooids in a cup-style shape., and mine launchers that point inside the cup. i gather up mines and then advance forth, disabling the boss and leaving him open for a fatal attack. you must act quick though as the mines are on a timer

Deleted 5 years ago
Developer

Hey,

I would like to ask you to write your thoughts down in a single message rather than posting several at a time. That way we will keep the community page nice and clean. If you do forget writing something - you can edit your previous messages.

Thank you!

New Version: Crown of thorns got overtaken by a freak of science, codenamed Frakir.

My strategy against this one is to kill the mini-bosses first at the corners of the arena.

That way, when Frakir screeches at you, backup will never arrive...