Indie game storeFree gamesFun gamesHorror games
Game developmentAssetsComics
SalesBundles
Jobs
Tags

Yal's SoulsVania Engine

Metroidvania / Soulslike project for GameMaker:Studio · By Yal

Quick Start Guide / Frequently Asked Questions Sticky

A topic by Yal created Nov 26, 2019 Views: 1,347 Replies: 50
Viewing posts 1 to 5
Developer (3 edits)

This is a little primer on how to use the engine, since it's probably a bit daunting to just dive in. Feel free to ask questions and I'll add them in to this FAQ.

How do I add in new items?

Check Scripts --> Data Mangling --> Item Database. There are plenty of example items showing off how the format works.

How do I make new levels?

On the title screen, first hit F1 to open the world map editor, then place the new levels (using appropriate area, size, etc). Then save the world map, back out to the title screen, and open the level editor with F2. Hit F2 again to select the level to load, and type in the number of the new levels you added to the world map. Level connectivity and some other metadata is stored in the world map data, and used later in the level editor.

When shipping a game, don't forget to take the output worldmap/level files (from the game's sandbox folder) and update the Include Files with the latest versions!

What can these editors do?

Press F1 to list all accepted commands, or check Objects --> Interface and Control --> Editors.

How do I use the World Map editor?

The world map is divided into "areas", which affect the default biome of the levels. The area system is counter-intuitive, but meant to make separating the game world into areas easier. Use 1/2 to cycle between areas: levels you place will use the selected area. When the player enters a new area, there's an announcement showing the area's name, and the areas have separate colors on the world map editor view so it's easier to tell them apart.

(Areas are defined in Scripts --> Data Mangling --> Worldmap --> wmap_init_areas.)

Note that since level IDs must be unique and never change, deleting a level will not free up its ID in any way. Be careful not to create/delete too many levels to avoid leaking memory (even without the level files, there's world map metadata for each level ID up until the final defined ID). It's not a super huge concern, but it's good to be aware of it.

Once you've placed some levels, you can edit them in the Level Editor. You can edit levels not defined in the world map, but some metadata is unavailable (biome, size, etc).  The intended workflow is to always chart out an area in the world map editor first, then fill them in using the level editor.

How do I use the Level Editor?

Oh boy, I have no idea where to even begin explaining this gargantuan beast. First off, allot levels on the world map editor to create metadata like which map region they're part of before you start making new levels. It's not strictly necessary, but it fills in level size and some other metadata automatically.

Don't forget that you can press F1 to list all possible commands, and use the mouse wheel to zoom in/out.

The level editor has separate modes for tiles and objects. The tileset is based off of the biome, and you can only have one active tileset at once. Changing the biome will change the tileset and update all existing tiles to use the new tileset. The biome will default to the area's default biome, but nothing stops you from changing it (the cave areas in the undead city is an example of this in the demo). Press Space to toggle between object and tile modes.

Objects can be combined freely. They're stored in "object palettes" for convenience, grouping similar objects together. Press P to change object palette. The default palette is "util", which has doors, checkpoints and such... you need to add side doors to connect to adjacent rooms, so don't forget to do that.

To create tiles quickly, press T to enter "auto terrain mode". Draw a line and press either Enter or Insert to turn anything below/above that line into floor/ceiling. Slopes are added automatically, and the wall tiles are randomly selected to make for a less monotonous experience. (This doesn't work super well with all tilesets). You can also use Shift + T to enter "terrain chunk mode", which is like Auto Terrain Mode but lets you create chunks more freely (not just the entire level's wall / floor). It's a bit tricker to get used to, since it creates a reference point when you enter it that decides what's "below" or "above", but it's really powerful if you can master it.

Don't forget to save your level with F5 often! There's no undo feature.

What do I do with the skeletal animation files?

Copy the skeletal animation data to the clipboard with the hotkey, go to Scripts --> Effects --> Visual --> Skeleton Animation --> skelani_init_all_keyframes, and paste the data at the bottom. Change the "insert name here" line at the top to a new constant / enum / macro.

How do I add in phat loot in a level?

Press P to change the object palette, type in "item", and select the "loot orb" item from the list and place it in the level. Next hover over the loot orb and press E to edit its arguments, and you can type in an item name. The game looks this name up in the item database while loading the level, and will interpret a trailing " +2" as an upgrade level and " x3" as a quantity automatically. (Note that upgrade level only applies to weapons/armor and quantity only applies to consumables).

The reason the editor stores item names instead of item IDs is because there's no good way to access the constants, and manually parsing integer item IDs is just a mess. So this felt like the least painful solution at the time.

Also note that the game automatically manages flags for placed items (loot orbs, stat upgrades, etc) as long as they're children of the appropriate object.

How do I add in other things?

Check Scripts --> Editors --> Room --> init_objpalettes for a list of all available object palettes (and this is where you add new objects as well).

What's this "biome" thing?

A definition of the level's tileset, background layers, music, effect-controller object. Biomes are defined in Scripts --> Data Mangling --> Level --> level_init_biomes. The biome isn't displayed to the player in any way, so you can make as many as you want (e.g. for different tilesets using the same background, if you need a special tileset for a certain character's room or somesuch).

I wanna release the game now, how do I disable the editors?

Set the macro DEBUG_MODE to false. It's very close to the top of the macro list.

The "enter name" dialog box is kinda ugly...

I figured get_string_async() was the portable, recommended way to get a string in Game Maker these days. I kinda regret it.

Can I make metroidvanias that AREN'T Dark Souls 3 ripoffs in this engine?

Yeah - check out Scripts --> config_quickclone_features for a series of quick configuration parameters. You can disable the stamina system, make enemies drop health/ammo randomly, and similar tweaks.

How does the flags system work?

Flags are stored in an array: one bank per level, 30 subflags per bank. (Basically, 32 bits, rounded down a bit since GM is a bit weird when you set the sign bit manually). This means a flag is referred to with two numbers: its bank, and its subflag.

For treasure flags, the bank is always equal to the level number... level0 has treasure flags 0:0 to 0:30.

For story flags, the bank is just a random number. It might help organizing the game if you use the bank to group similar things together (like an NPC's questline).

How do I make NPCs and other things conditionally appear / be gone?

There's objects in the "event" object palette that destroys any overlapping objects if a story flag is set / not set.

How does the NPC system work?

There's two types of NPCs: script NPCs and oneliner NPCs. Script NPCs execute a script when interacted with, which typically initiates a cutscene and queues up messages, shop interactions, and such. Oneliner NPCs are exactly the same, but they have a set script that reads 1 line of dialogue. Oneliner NPCs are useful to reduce the number of redundant scripts in your project, letting you create tons of NPCs without making a custom cutscene script for each.

NPCs can be given a dialogue portrait sprite option, this isn't used in the demo since I felt it detracted from the experience.

NPCs can take either a sprite name or a script name as their "in-game sprite" argument. When used, the script should be Skelani Setup script (which initializes the skeleton animation system and loads sprites to all relevant body parts). Bordomir, Andrea, and the crestfallen knight use this approach, all other NPCs use sprites.

How does the Skeletal Animation system work?

Basically there's a list of angles, which are stored in the keyframe data. In an animation, angles between two keyframes are interpolated to find the current angles. All body parts' positions are computed from the angles, the skeleton's origin point (the bottom center), limb sizes, and the way the limbs are connected to each other.

You can find the skeleton animation system in Scripts --> Effects --> Visual --> Skeletal Animation.

The system is mostly hardcoded to use humanoid skeletons.

Why is the GMS2 source file version 2?

I found a serious issue with the collision checking (one of the compatibility scripts slowed it down noticeably in large levels) after uploading the first version, and fixed it.

My question isn't answered in this FAQ...

Ask it in a comment and I'll try to answer it!

Hello! I had a question- would it be possible to remove the character customization element so that there is a singular character player? And on that note, can I remove the skeletal system to use default sprites instead?

Developer (1 edit)

The player's customized graphics are set up in player_setup_skelani_parts. (Lines 33-92 reads equipment, the part before that sets up the body customizations). If you want a static player appearance, you could change this script to just set everything to a hardcoded list of body parts instead of reading the player equiment data.

To remove the skeletal system for the player entirely, you just need to remove the skelani_draw_skeleton call in the Draw event and replace it with a standard sprite drawing function (e.g. draw_self), and then replace all skelani_set_animation calls in the various player state machine scripts with functions to change the sprite instead. (When you're done, you might also want to consider removing the skelani_init call in the Create event to save on resources)

Sorry if this is something you answered alright and I misunderstood, but by static player appearance, does that mean I can entirely bypass the character creation at the beginning entirely?

Developer

Oh, right, you probably want to remove that as well.

You'd want to edit mev_title_newgame to load the first map rather than send you to the character creation menu. Most of the "finalize creation" code is in mev_title_ccust_confirm_actually, with most of the character customization effect code in mev_title_ccust_update. You'd want to move the applicable bits of these over to the mev_title_newgame script (e.g. apply the stats you want the player to have, set up starting inventory, do a heal to the new max stats), then copy over the bits related to the room transition and remove the old transition (e.g., load starting coordinates, go to rm_ingame instead of the character editor).

Thank you very much for answering my questions. I'm sold, and I just purchased the engine now actually.

Now directly contrasting my previous questions, which script contains the data used for customizing the Character Customization to add or modify the options? Also, what is or where can I find the formula for damage calculation? Everything in the editor is very neatly organized, I'm just a bit lost, sorry.

Developer

Character customization data is defined in minit_title_charactercustomization (Script --> Menu System --> Menu Initialization). It uses the class data from init_player_classes (Scripts --> Data Mangling --> Player Stats), and the starting gift data is set up in the Create event of object obj_charactercustomization_setup. (The class data is used in some other places, like listing your class on the Status screen, but the starting gift data isn't, that's why the gifts are handled a bit less ceremoniously)

Damage is computed in rpg_compute_damage (Scripts --> Data Mangling --> RPG elements). It's a basic sum of ATK - DEF for all elements, the stats are set up by rpg_combat_statblock_init, and given actual values with rpg_setup_attack_stats for hitboxes. contact damage, etc., and rpg_setup_defense_stats for enemies.

Thank you very much. What is the purpose of each stat, however? As someone unfamiliar with the Dark Souls games in depth, are they identical in functionality? When I search for the stat names they seem to be used in various places, but some are a bit ambiguous such as Luck and Faith.

Developer
  • Strength, Dexterity, Intelligence and Faith increase the power of heavy weapons, light weapons, sorceries and healing spells, respectively.
  • Vigor, Attunement and Endurance influences maximal HP, MP and stamina.
  • Vitality influences maximal equip load.
  • Luck influences item drop rate.

There's some secondary uses as well (magical stats and luck influence elemental resistances, physical stats influence physical defenses, attunement gives you more spell slots) but those are the main uses.

(1 edit)

just saw this engine. I have been working on a game for a while on and off. The idea is a mix of darksouls/castlevania 2, with some more rpg elements in it. Would it be easy to adjust this engine for that? Are there any size limits on the Rooms? what about object collisions for stuff like areas you can only unluck with bombs and so on? how easy is it to build on?

also does this in the eula "

 Games can be played but not resold, reposted or such. Assets can be
used to create games, books, movies and such, but cannot be distributed in
editable form. If one team member has a license to use Yal Stuff, the entire
team can use it.

"

that if i build upon it, and dont maintain any of youre gfx, that i cant sell the game afterwards?

Developer
  • It probably would be easy to adjust the engine for this since it's basically Symphony of the Night mixed with Dark Souls.
  • There's no size limits for rooms. There's instance deactivation in play so only a small region uses CPU at any given time, but load times and the internal drawing loop for the tile layer will of course be longer the larger rooms you're using.
  • You can add any object to "object palettes" which are used in the editor, so you can add anything you want to the editor. There's an example destructible object in the engine, actually! (But you can destroy it with any attacks, it doesn't need any upgrades)
  • I use the same EULA for both games and asset packs. (That's for my convenience, it's easier to just keep one legal document up-to-date). This is an asset pack, not a game, so only the asset pack clause applies:
    • you can make anything you want with the asset pack except sharing it as an asset pack (you must make a game, a video or something like that where the end user can't edit it, so you can't sell the GMX/YYZ file as-is, export the sounds/sprites and sell those, etc)
    • you can use any graphical/sound/code assets that are included in the asset pack in your final game (unless there's a notice in the project that you can't use a certain thing)
    • you can sell games made using the asset pack
    Hopefully this clears things up!

Thanks for the answers, it clears up it up a ton. Last few questions. Particle effects are they sprites? so i cold just sprite animations as particles easy? or? also the animation system, how easy is it? and can i just use the sprite animations or is that a huge task to be able to?

Developer

There's a mix of shape and sprite particle effects (it's using Game Maker's built-in particle system) so there's example code for both.

The animation system uses a 2D skeletal animation system, the editor should be available in the demo. It works by you defining keyframes (this is what the animation editor exports), then you can set up an animation as a list of keyframes. Once an animation is in place, it's one line of code to use it, and as many objects as you want can use the same animation.

Normal sprite animation also works, some enemies like the Harpy and the bosses use standard sprites. The player is hardcoded to use the skeletal animation system right now, but you could remove all skelani_ function calls in the state machine and replace them with their standard sprite equivalents.

(1 edit) (+1)

thanks again for the answers. I will buy it in the next few days, just need to figure out a few things! i saw the animation system in the demo, just thought it was incomplete as i could not figure out how to make key frames, and how to generate animations between them.

Developer

All of the keyframe handling is done in GML scripts, there's no specific animation preview tool. There's two export options in the animation editor: saving as a file, and copying to clipboard. Saving as a file saves it in a format that can be loaded later, the usual ol' editor stuff. Copying to clipboard creates a preformatted snippet of GML code you can just paste into a script directly, though, and that's what you'll be using to define a keyframe. (It just needs one manual change, providing the animation index - that's needed so the animation data can reference the keyframe somehow later)

(1 edit)

Thanks. I just bought it.

A few last questions then im ready to jump into it.

1: tiles.. how is the layout? should i just create tiles with the exsame layout, or could i remove some of the items on the right? What if i dont want to use slopes?

2: so how would you begin a new project with this. just import this, and delete all the data/rooms/tiles.. and start from there?

3: any autotile function? it seem

4: in the world editor, it crashes if i right click outside a room?

Developer (1 edit)

Thanks for the patronage! ^__^

To answer your questions:


1: There's an example tileset called tileset_template which is a bit more readable than the normal tilesets, it's probably the best reference when making new tilesets.

Tiles are arranged in columns where only the tile's x coordinate matters, except that slopes are arranged in alternating rows of alternating floor/ceiling tiles with different collision checking, and autotiling using tiles from the rows you've currently selected in the tileset. The layout goes like this:

  • 1-block uphill (1 tile)
  • 1-block downhill (1 tile)
  • 2-block uphill (2 tiles)
  • 2-block downhill (2 tiles)
  • Solid blocks (5 tiles)
  • Decorative tiles without collision (5 tiles)

The exact coordinates for each type of tile are defined in the macros script, lines 100-105. They are checked in reverse order when collision checking (pixel_vacant script is the only place that handles collision checks, but the editor also uses the tile types), so setting all slope types to 0 and then also the solid type to 0 should remove collision checking from slopes entirely. (You might wanna remove them from pixel_vacant as well to save on processing power)


2: To start a completely new project, import the source file, then go to "included files" and delete the world map and level files:

When editing the world map and levels, files will be created in the game's AppData folder (the sandbox location where save files normally are created - this can be changed in the game's platform Preferences). This is convenient during development, but don't forget to add them as included files when you plan to make a release.


3: There are two autotile functions.

  • Press T to enter "Auto Floor/Ceiling" mode. Click to place points (you must do this from left to right). Press Enter to create a floor under the points, or Insert to create a ceiling above it. In both cases, all the space between the points you created and the edge of the room is filled with random tiles from the currently selected row of tiles, creating slopes to match the points as accurately as possible.
  • Press Shift+T to enter "Terrain Chunk" mode. This is similar to the "Auto Floor/Ceiling" mode, but instead of going to the edges of the room, it creates tiles around a center point (which is stored when you press Shift+T). You can create points both above and below the center point, and when you press Enter, the area delimited by these lines get filled with tiles.

The idea is that you draw a handful of lines and then the functions fill them up with random tiles, so you can design a level in just a few quick strokes (and the randomness looks more natural than human-placed tiles).


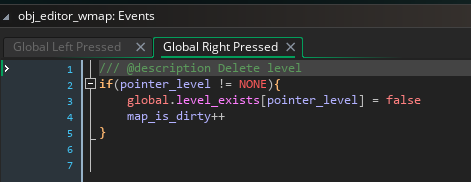
4: This is a bug, thanks for finding it! I'll try to upload a new version with this fixed as soon as feasible. In an existing project, you can fix it by changing the obj_editor_wmap Global Right Mouse event like this:


(1 edit)

Thanks again for the good explanations. A few last things i think :D

1: is it possible to use more than one texture set in the same room? (i think not its ok just want to be sure)

2: how do i set where the player starts? i dont seem to be able to find any player spawn object in the object list?

3: can i have more than one entry to the same room. Like in room A there is 2 exits both lead to room B, just in 2 diffrent locations? and how do i tie rooms togerther? i can see i need to place the door stuff from array(obj_door_sideways,obj_door_vertical,obj_door_background,NONE,  obj_door_bg_1way_front,obj_door_bg_1way_back,obj_lockeddoor_door,NONE,  obj_checkpoint_inactive))

4: How to remove or add classes? is it enought to edit "init_player_class" and "init_player_classes" ?

This is really awesome work though!

Developer

1: It's not possible. My idea was that it should be easy to reuse the same room layouts with a different tileset, so rooms are hardcoded to only use one tileset. (This is also why the tileset layout is forced to be the same for every tileset for collision checking purposes) I guess it might've been a mistake.


2: In the script config_quickclone_features, at the bottom. You provide the starting level, and the pixel X / Y coordinates.


3: The player will snap to whatever door is the closest to the edge of the screen you entered from, measured from the center of the map grid cell you moved to, so it's possible to have more than one sideways door from one room to another, but it's a bit finicky if they're placed too close to each other - as a rule of thumb you can only have one door per map cell of each type [=background, left, right, up, down].

(Map cells are indicated in the room editor, so hopefully this shouldn't be too hard to deal with.)

The world map data is used to connect levels - when you go through a door, the player is moved to whatever level is on the adjacent cell on the map. So rooms that are next to each other in the world map editor will be connected... but only if you place a door in them in the level editor. It's a bit disorienting at first, but the nice part is that the doors connect completely automatically.


4: Editing init_player_classes to add more lines of data should be everything you need, the character creation menu reads from this data when it is constructed. If you add/remove classes (instead of just changing the default classes) you also need to update the macro PLAYERCLASS_MAX to match the new value, since that is how many entries the menu reads. There's a handful of other places where the player class data is used (status and file select menu displays the name of the character's class) but these should also "just work" since they read from the same data array.

What's the best way to adjust the size of the character sprites to make each part smaller?

Developer

The skelani_length array contains the lengths of each body part (there's also skelani_shoulderwide and skelani_hipwide that adjusts how far away from the spine the arms/legs are anchored).


For just a one-off character you could make a custom NPC Skelani Setup script that changes these values, if you want to change a lot of characters you might want to duplicate skelani_init_limb_lengths_humanoid and use that when setting up the smaller characters (or, edit it directly if you want every human to be smaller)

Would you be available for commission to make some smaller modifications to the engine? If so please let me know, thank you.

Developer

Sadly no, I'm shorter on time than money these days and doing commissions would not improve the balance in the direction I want. But if you just want some simple questions answered, ask them here and I'll answer them (I try to check my Itchio notifications at least once per day).

(4 edits)

Beautiful engine. Easy purchase, even if just to study! Just a few of questions; would I be able to scale up the sprites themselves without any major headaches? Specifically for things like limbs? If not, what would I be looking to change code-wise? In addition to that, would altering the in game resolution create any major issues? This seems to cater more towards pixel styled games (where I would rather use hand-drawn, larger resolution sprites, etc.) You also mentioned the little detail about the the "enter name" dialog box. Considering only the windows export, is there any simple way to adjust this with handmade graphics? I have never actually used the GMS built in dialog feature, so I know nothing about it lol. 

OH! last question! Being that this uses skeletons, is there any simple way to make the player's arms/weapons aim towards the mouse cursor? I'm unfortunately at work at the moment so I can't delve into the code to see how it works just yet, but knowing the answer to this one would give me a little motivation boost until I can get home and start digging into it!

Developer

Thanks for the patronage and interest in the engine! ^__^

That's quite a lot of questions! I'll try to answer them all in order:

  • To scale sprites up, the most important thing is increasing the limb lengths (these things are unrelated to the sprite sizes to allow for things like pauldrons that cover more than the entire body part). Check out skelani_init_limb_lengths_humanoid; you'd either edit this directly (if you want everything to scale up) or make a new script (if you only want some things, e.g. giant ogres, to scale up). A search for the script's name should reveal all places it's used.
  • If you just edit VIEW_W and VIEW_H (in the "macros" script) to match the new resolution, everything should just magically work. (Some UI elements might need resizing since they look too small or too big, depending on the new resolution, but they should adapt just fine without additional work).
  • The easiest way to have an in-engine name-entering dialog is to just have a GGUI menu for it, which is a grid with all the letters in it. All events are the same script, which just adds the corresponding letter to the global name string, except for the "DONE", "ERASE" and "CANCEL" events of course. (Obviously you'd want a loop that creates all the entries instead of manually defining every letter separately)
  • To make the player's weapon aim towards the mouse cursor, you can just manually override the skelani_drawangle of the weapon's limb after you've updated the animation, using the direction to the mouse cursor. (You might want to also update the corresponding arm's angles). The player_skelani_override_guns script should give you an idea for how to do this, it's basically exactly what you want except it's not mouse-controlled.
(+1)

Thank you very much for the response! It's seriously appreciated! I'm super excited to start getting into it as soon as I have the time! :) 

Is there anyway to remap the key bindings to a mouse button? Even in the conrols_setup_default_keyboard script, it seems that there is no way to change any of those inputs to a mouse button press constant.

Developer

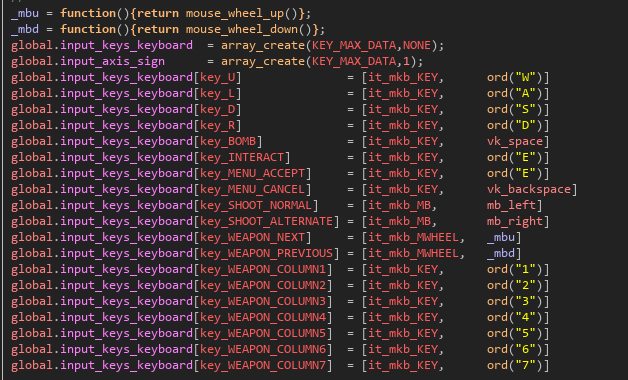
Nothing built-in, sadly. The approach I'd recommend (which is from a more recent project) would probably be turning keys into device/ID pairs like this...


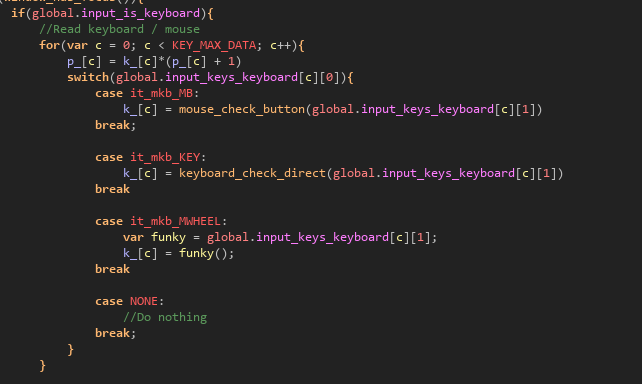
..and then in input_get, have a switch statement that reads the appropriate device based on the first member, using the second as an ID:


(Note that the code above uses a bunch of GMS2-isms and will not work in the GMS1 version of the engine)

so I found a good solution to the mouse thing, but now I've run into a pretty significant problem with scaling the sprites up. So I've tried to use larger sprites for the player, and I've got it all aligned correctly with the skelani_init_limb_lengths_humanoid, however it definitely needs new animations. The problem is, the skeleton editor it still using the original limb lengths and I can't seem to figure out how to change them to the new lengths. I would have figured the editor would have used the same script, but that doesn't seem to be the case, unless I'm missing something?

Developer (1 edit)

I had a look and it turns out the editor has the lengths hardcoded in its Create event (hit Ctrl+T and start typing "obj_editor_skeletonanimation" and it'll take you to it), it also uses a set completely different variables instead of normal skelani ones... but you could solve both of those issues at once by, at the end of its Create Event, first calling skelani_init, then your updated skelani_init_limb_lengths_humanoid, and finally a loop that just sets all the sklen variables to values of their skelani_length counterparts.

Deleted 2 years ago
(+1)

Thank you very much! I think I've got it all figured out so far, so hopefully I won't have to bug you anymore lol

(1 edit)

Alright, I've got what I believe should be my last one lol. Got any tips for scaling up the actual game resolution? At glance, it seems pretty hardcoded to really only get along with 640x360, which is unfortunately just far too small for my scaled up sprites. Would you happen to know of any ways I can scale up to ~1280x720 without breaking anything?

Developer (1 edit)

I'm pretty sure updating the VIEW_W / VIEW_H macros should make everything else "just work" since they're used everywhere, though GUI elements that adapt to the size might get too big and sparse and elements that don't might get small and hard to read... so you probably need some adjustments for visual style (but the CODE bit should work without changes at least, unless I messed something up). Most of the frame-based menus have coordinates in percent of the frame for all elements, so just changing the size of the frame everything's stored in should automagically resize the elements.

Maps might be broken since the map grid size is based on the number of screens the room occupies (which changes if you scale up the game to have a bigger screen), but I assume you're going to remake all levels from scratch so hopefully this isn't going to be an issue.

(1 edit)

the problem with simply changing the values of those macros, is the game becomes extremely pixilated (only gui elements scale appropriately), and various things that rely on the view, such as obj_darknesscontrol do not scale up with the resolution; they stay the same size. So it ends it creating this little box of color overlay that only covers a portion of the screen.

Developer

Oh yeah, you might need to change the viewport settings for every room as well... I forgot they're set in GM's room editor and not by code. (There's just 7 rooms so it's not super involved). Both the "port on screen" and "view in room" values should have width/height matching your new resolution. obj_darknesscontrol uses the view size and not the VIEW_W/VIEW_H macros so this should fix that as well (the same applies to obj_control's view and deactivation code).

Okay interesting, I initially tried doing this only to the rm_ingame room, which didn't work, however doing it to every room seems to solve the problem! Thanks an absolute ton!

So I really hate to keep bothering you, but I've got another one. I can't seem to figure out how to add more animations. Say for example I want to add an extra keyframe to the sword attack animation; I create a new macro for that keyframe, add that keyframe to the skelani_init_all_keyframes script, and then add the macro for that keyframe to the array for the skani_ATTACK_SWORD in the skelani_init_all_animations script. This doesn't seem to do anything however, as the attack animation continues to only show the two original frames.

Developer

The attack animation in psm_melee uses skelani_set_animation to explicitly set the animation frame instead of playing it automatically, this is why you don't see the new frame at the end play out. Since all the default attack animations have 2 frames, the hardcoded 0 and 1 will work, but one thing you could do if you want more intricate animations is to use global.skelani_animation_length[argument0] instead of 1 when setting the animation, and for the line that goes

skelani_set_animation(atkanimation,(statecntr-atkwarmup)/atkduration)

you'd instead use

skelani_set_animation(atkanimation,global.skelani_animation_length[argument0]*(statecntr-atkwarmup)/atkduration)

(which means you interpolate between all the frames instead of just the first two)

Since indexing starts at 0 you might need to use (global.skelani_animation_length[argument0]-1) instead of just global.skelani_animation_length[argument0] to prevent the animation from looping back to the first keyframe at the end, I don't remember if the length is inclusive or not.